Page 1029 of 1456
2. WAGON
B5M0189B
(37) D pillar cover attaching hole 12´
8 mm (0.47´0.31 in) dia.
(38) Shoulder mole attaching hole 8
mm (0.31 in) dia.
(49) Front pillar (LWR) gauge hole 10
mm (0.39 in) dia. (On both
Sedan and Wagon)
(50) Front pillar (UPR) gauge hole 16
mm (0.63 in) dia. (On both
Sedan and Wagon)(57) Retainer attaching square hole
at C pillar (UPR) 7´7 mm (0.28
´0.28 in)
(60) Trim attaching hole at rear skirt
(UPR) 15 mm (0.59 in) dia.
(61) Rear bumper side attaching hole
6 mm (0.24 in) dia.
(62) Rear seat belt bolt hole 13 mm
(0.51 in) dia.
(63) Rear rail locator concave part(64) Buffer attaching hole (UPR) M6
(70) Rear quarter end (LWR) gauge
hole 20 mm (0.79 in) dia.
(71) Rear combination light mounting
hole 7 mm (0.28 in) dia.
6
5-1[S2B2]SPECIFICATIONS AND SERVICE DATA
2. Body Datum Points
Page 1142 of 1456
1. Front Seat
B5M0454A
(1) Headrest free bushing
(2) Headrest lock bushing
(3) Headrest ASSY
(4) Front backrest frame ASSY
(5) Protector
(6) Cover (Bolt) (outer)
(7) Cover (Bolt) (inner)
(8) Inner belt ASSY
(9) Inner slide rail ASSY(10) Connect wire
(11) Outer slide rail ASSY
(12) Front cushion frame ASSY
(13) Cushion ASSY
(14) Reclining lever
(15) Hinge spring cover
(16) Reclining hinge ASSY
(17) Backrest ASSY
(18) Hinge cover(19) Tilt lever cover
(20) Tilt lever ASSY
Tightening torque: N´m (kg-m, ft-lb)
T1:
23±5 (2.3±0.5, 16.6±3.6)
T2:29±7 (3.0±0.7, 21.7±5.1)
T3:52±10 (5.3±1.0, 38±7)
2
5-3[C100]COMPONENT PARTS
1. Front Seat
Page 1145 of 1456
3. Front Seat Belt
B5M0455A
(1) Adjuster anchor ASSY
(2) Through anchor cover
(3) Webbing guide
(4) Inner belt ASSY(5) Outer belt ASSYTightening torque: N´m (kg-m, ft-lb)
T1:
13±3 (1.3±0.3, 9.4±2.2)
T2:35±13 (3.6±1.3, 26±9)
5
[C300]5-3COMPONENT PARTS
3. Front Seat Belt
Page 1146 of 1456
4. Rear Seat Belt
B5M0035D
(1) Outer seat belt (LH)
(2) Center seat belt
(3) Outer seat belt (RH)(4) Inner seat belt
(5) Lap anchor cover (LH)
(6) Lap anchor cover (RH)Tightening torque: N´m (kg-m, ft-lb)
T:
35±13 (3.6±1.3, 26±9)
6
5-3[C400]COMPONENT PARTS
4. Rear Seat Belt
Page 1151 of 1456
2. WAGON
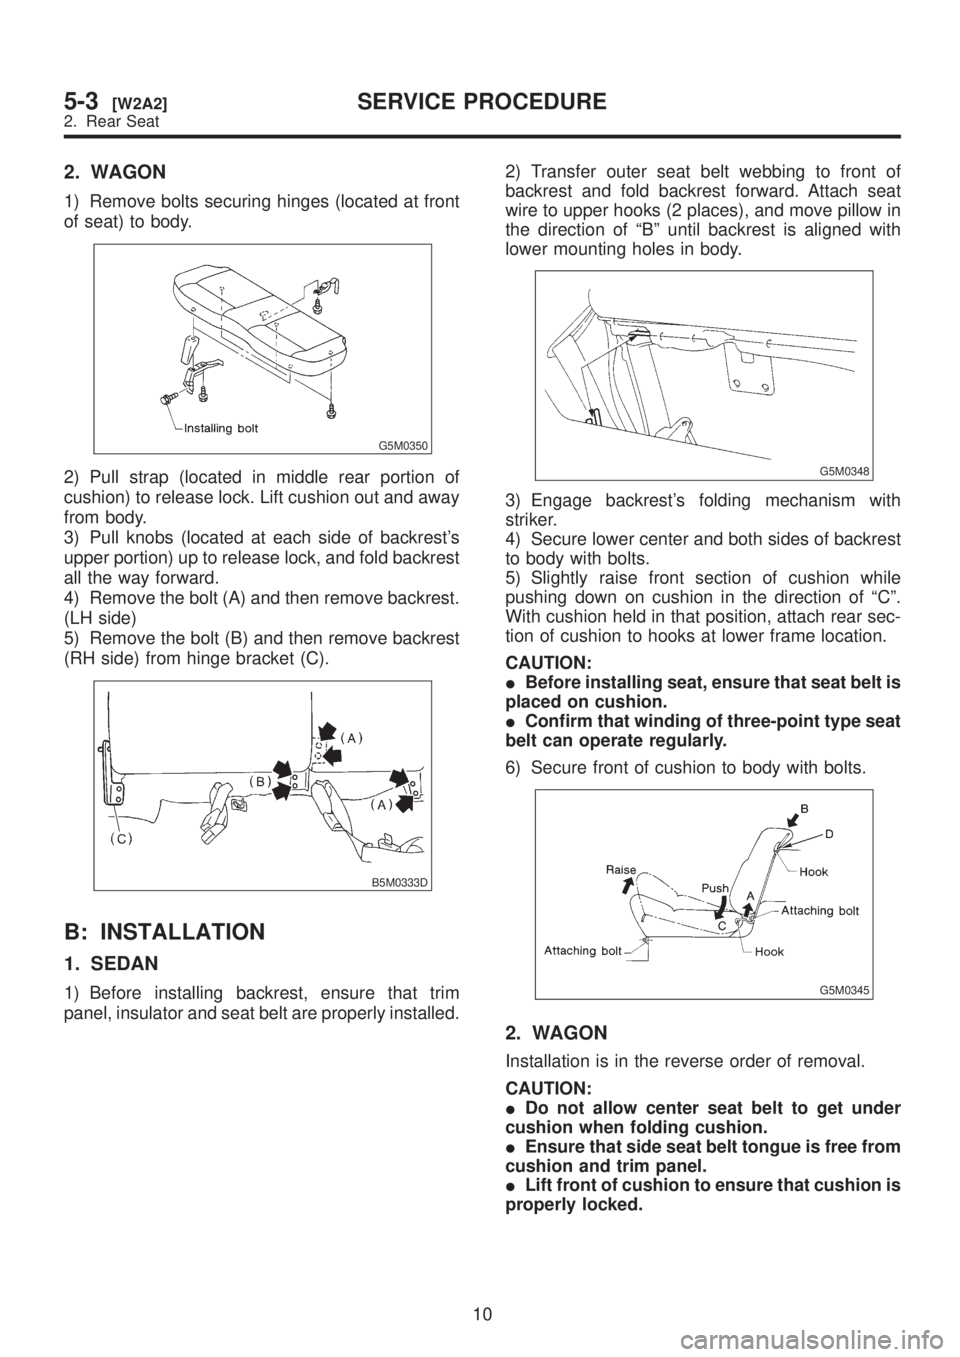
1) Remove bolts securing hinges (located at front
of seat) to body.
G5M0350
2) Pull strap (located in middle rear portion of
cushion) to release lock. Lift cushion out and away
from body.
3) Pull knobs (located at each side of backrest's
upper portion) up to release lock, and fold backrest
all the way forward.
4) Remove the bolt (A) and then remove backrest.
(LH side)
5) Remove the bolt (B) and then remove backrest
(RH side) from hinge bracket (C).
B5M0333D
B: INSTALLATION
1. SEDAN
1) Before installing backrest, ensure that trim
panel, insulator and seat belt are properly installed.2) Transfer outer seat belt webbing to front of
backrest and fold backrest forward. Attach seat
wire to upper hooks (2 places), and move pillow in
the direction of ªBº until backrest is aligned with
lower mounting holes in body.
G5M0348
3) Engage backrest's folding mechanism with
striker.
4) Secure lower center and both sides of backrest
to body with bolts.
5) Slightly raise front section of cushion while
pushing down on cushion in the direction of ªCº.
With cushion held in that position, attach rear sec-
tion of cushion to hooks at lower frame location.
CAUTION:
IBefore installing seat, ensure that seat belt is
placed on cushion.
IConfirm that winding of three-point type seat
belt can operate regularly.
6) Secure front of cushion to body with bolts.
G5M0345
2. WAGON
Installation is in the reverse order of removal.
CAUTION:
IDo not allow center seat belt to get under
cushion when folding cushion.
IEnsure that side seat belt tongue is free from
cushion and trim panel.
ILift front of cushion to ensure that cushion is
properly locked.
10
5-3[W2A2]SERVICE PROCEDURE
2. Rear Seat
Page 1152 of 1456
3. Front Seat Belt
A: REMOVAL AND INSTALLATION
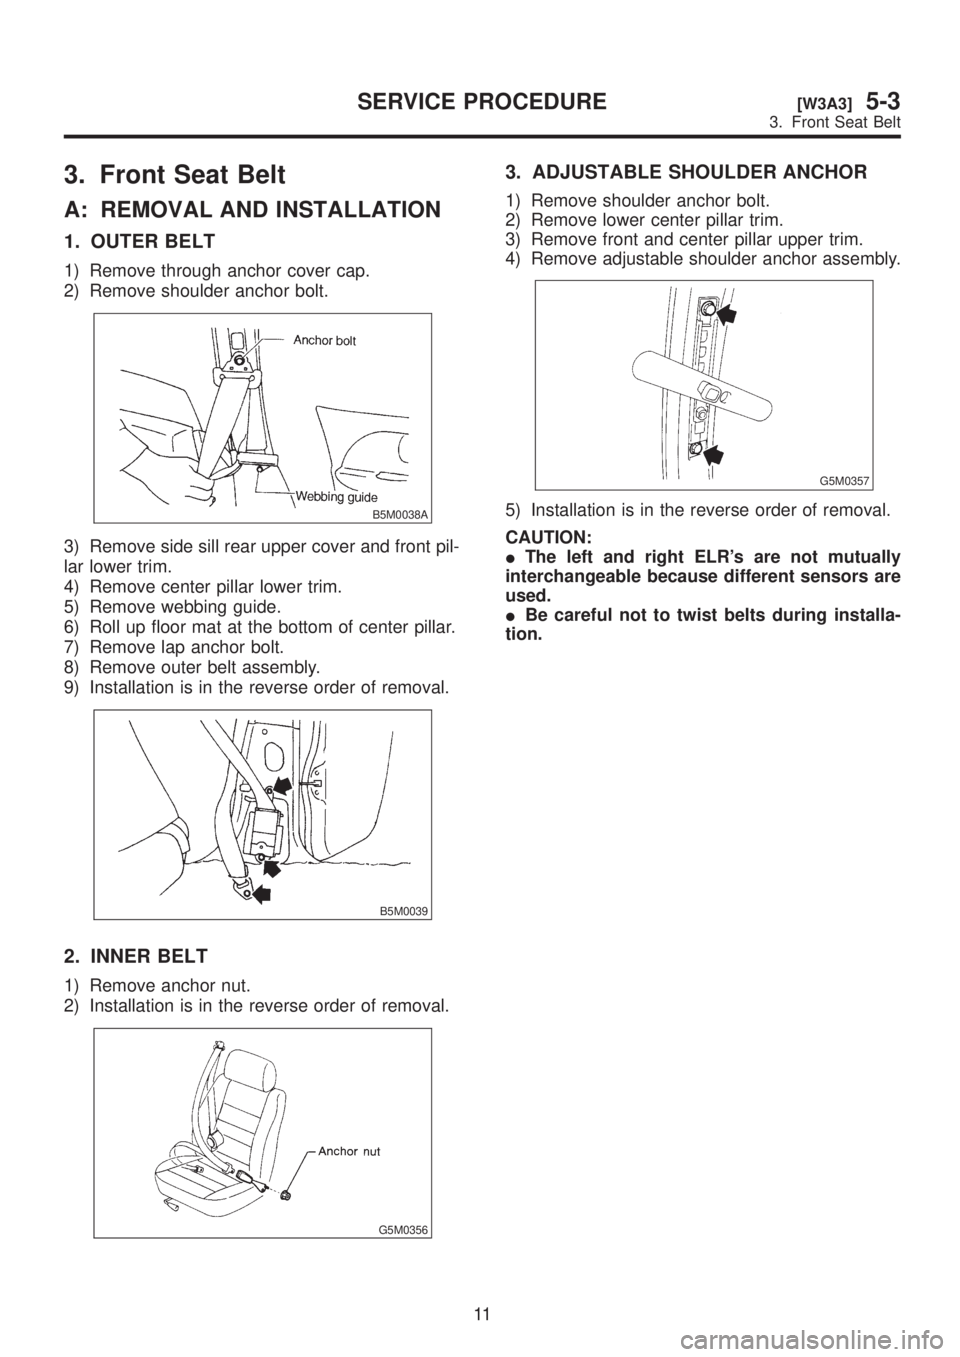
1. OUTER BELT
1) Remove through anchor cover cap.
2) Remove shoulder anchor bolt.
B5M0038A
3) Remove side sill rear upper cover and front pil-
lar lower trim.
4) Remove center pillar lower trim.
5) Remove webbing guide.
6) Roll up floor mat at the bottom of center pillar.
7) Remove lap anchor bolt.
8) Remove outer belt assembly.
9) Installation is in the reverse order of removal.
B5M0039
2. INNER BELT
1) Remove anchor nut.
2) Installation is in the reverse order of removal.
G5M0356
3. ADJUSTABLE SHOULDER ANCHOR
1) Remove shoulder anchor bolt.
2) Remove lower center pillar trim.
3) Remove front and center pillar upper trim.
4) Remove adjustable shoulder anchor assembly.
G5M0357
5) Installation is in the reverse order of removal.
CAUTION:
IThe left and right ELR's are not mutually
interchangeable because different sensors are
used.
IBe careful not to twist belts during installa-
tion.
11
[W3A3]5-3SERVICE PROCEDURE
3. Front Seat Belt
Page 1153 of 1456
4. Rear Seat Belt
A: REMOVAL AND INSTALLATION
1. SEDAN
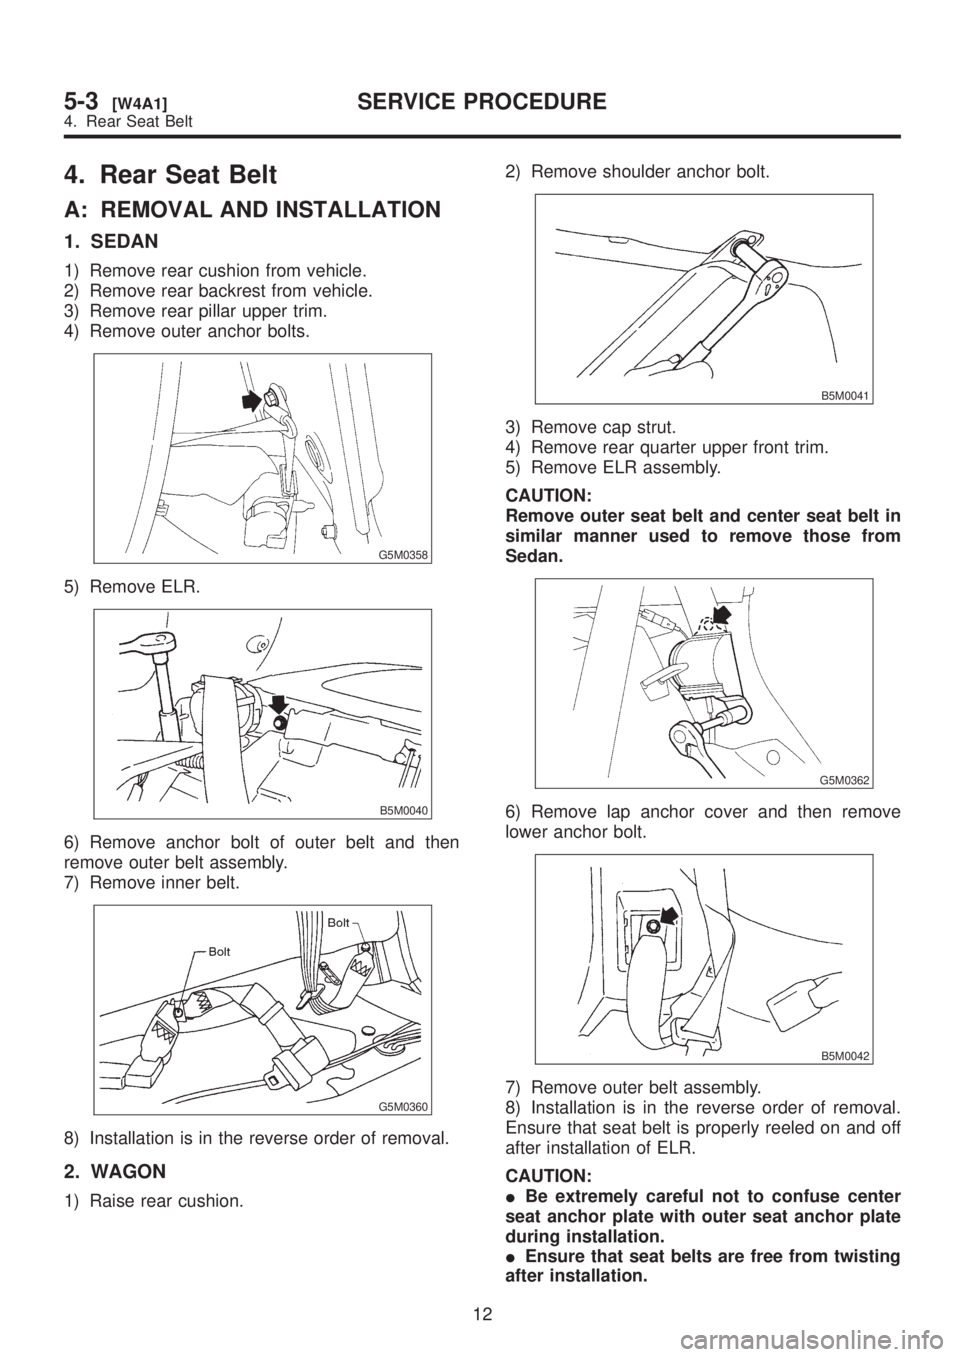
1) Remove rear cushion from vehicle.
2) Remove rear backrest from vehicle.
3) Remove rear pillar upper trim.
4) Remove outer anchor bolts.
G5M0358
5) Remove ELR.
B5M0040
6) Remove anchor bolt of outer belt and then
remove outer belt assembly.
7) Remove inner belt.
G5M0360
8) Installation is in the reverse order of removal.
2. WAGON
1) Raise rear cushion.2) Remove shoulder anchor bolt.
B5M0041
3) Remove cap strut.
4) Remove rear quarter upper front trim.
5) Remove ELR assembly.
CAUTION:
Remove outer seat belt and center seat belt in
similar manner used to remove those from
Sedan.
G5M0362
6) Remove lap anchor cover and then remove
lower anchor bolt.
B5M0042
7) Remove outer belt assembly.
8) Installation is in the reverse order of removal.
Ensure that seat belt is properly reeled on and off
after installation of ELR.
CAUTION:
IBe extremely careful not to confuse center
seat anchor plate with outer seat anchor plate
during installation.
IEnsure that seat belts are free from twisting
after installation.
12
5-3[W4A1]SERVICE PROCEDURE
4. Rear Seat Belt
Page 1154 of 1456
IEnsure that tongues, buckles and belts are
properly placed on seat.5. Inner Trim Panel
A: REMOVAL AND INSTALLATION
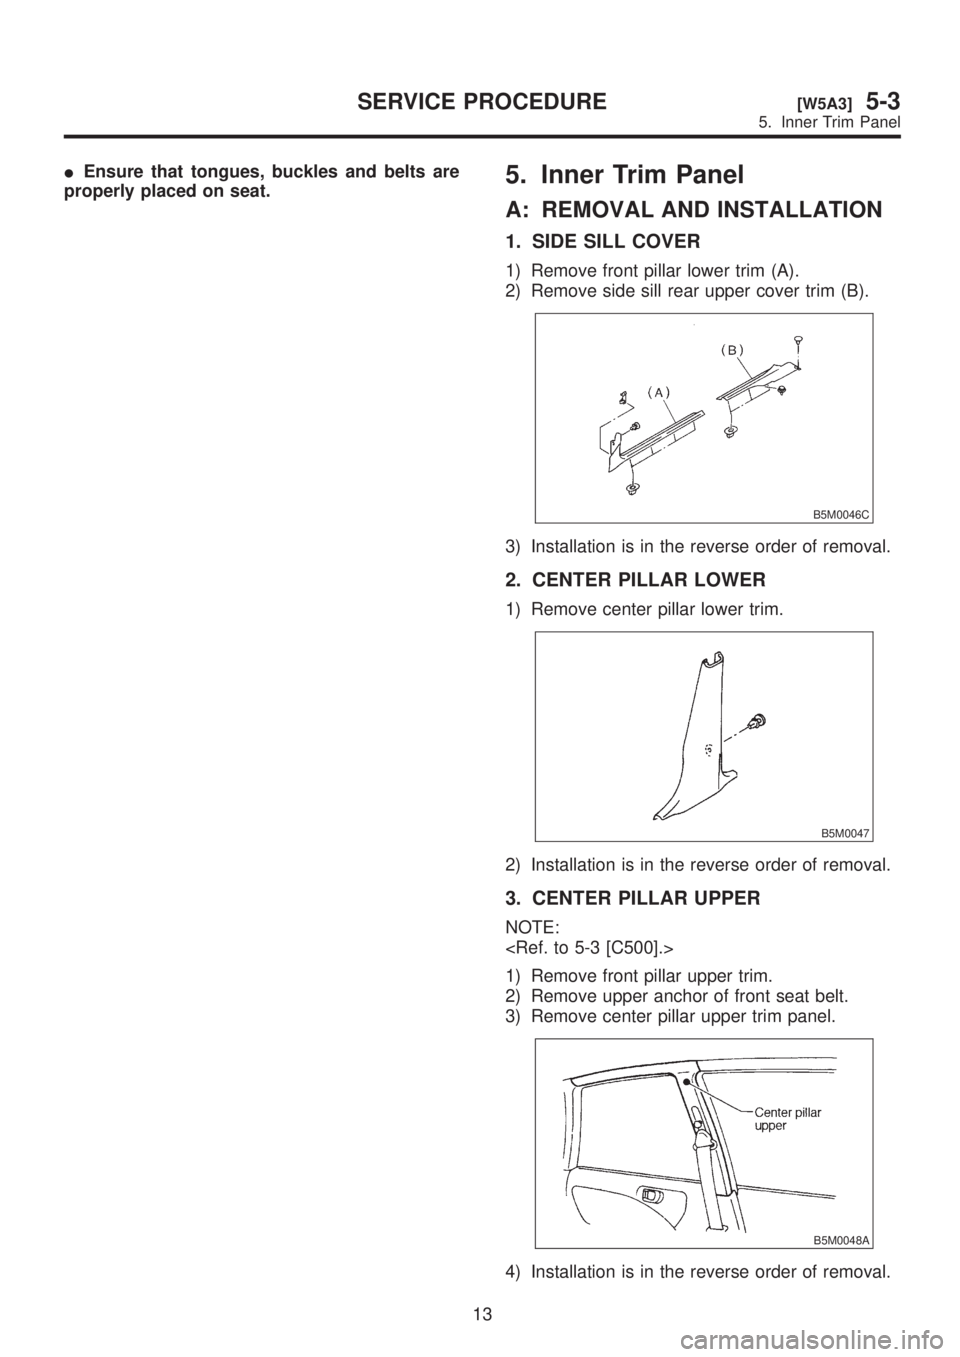
1. SIDE SILL COVER
1) Remove front pillar lower trim (A).
2) Remove side sill rear upper cover trim (B).
B5M0046C
3) Installation is in the reverse order of removal.
2. CENTER PILLAR LOWER
1) Remove center pillar lower trim.
B5M0047
2) Installation is in the reverse order of removal.
3. CENTER PILLAR UPPER
NOTE:
1) Remove front pillar upper trim.
2) Remove upper anchor of front seat belt.
3) Remove center pillar upper trim panel.
B5M0048A
4) Installation is in the reverse order of removal.
13
[W5A3]5-3SERVICE PROCEDURE
5. Inner Trim Panel