1993 DODGE TRUCK door lock
[x] Cancel search: door lockPage 1404 of 1502
•
BODY COMPONENTS
23
- 21
DOORS
INDEX
page
Complete
Door
..........................
22
Door
Adjustment
. 21
Door Inside Handle
. 26
Door
Latch
27
Door
Latch
Striker
25
Door Outside Handle
26
Door
Trim
Panel/Waterdam
21
SERVICE INFORMATION
The front door service procedures include:
• Complete door removal/installation
f
Component removal/installation • Component replacement • Adjustments Care should
be
taken
to
prevent undercoating
material from contacting
the
door internal com ponents.
A
major cause
of
door component fail
ure
is
contamination
by
rust prevention
material.
BLIND
RIVET REMOVAL The rivets used
to
attach
the
various door compo
nents should
be
removed according
to the
following
information:
• Remove
the
center
of the
rivet with
a
drift punch • Drill
out the
rivet with
a 6 mm
(1/4-in) diameter
drill
bit.
When installed,
the
components should
be
attached
to
the
door with
1/4-20
x 1/2
bolts
and
nuts. Tighten
the nuts
to 10 N«m (90 in. lbs.)
torque.
HINGE
REPLACEMENT
REMOVAL (1)
Use a wax
pencil
to
mark
the
outline
of the
hinge-halves
on the
door
and the
cowl
for
installation alignment reference.
(2) Support
the
door with
a
padded floor jack.
(3) Remove
the
hinge screws. Remove
the
hinge
from
the
door
and the
cowl.
INSTALLATION (1) Clean
the
hinge.
(2) Color coat
the
hinge
to
match
the
body color.
(3) Lubricate
the
hinge with engine
oil.
(4) Position
the
hinge
on the
door. Install
the
hinge screws finger-tight.
(5) Align
the
hinge with
the
installation reference
outlines.
(6)
Tighten
the
hinge screws
to 41
N»m
(30 ft. lbs.)
torque.
page
Hinge Replacement
, 21
Key
Lock
Cylinder
........................
25
Power Door Lock Motor
26
Service
Information
21
Vent Window
and
Channel
23
Window
Glass
and
Door
Weatherstrip
Seals
.... 27
Window Glass/Channels/Regulators
...........
23
(7) Remove
the
floor jack from
the
door.
(8)
If
necessary, adjust
the
door. Refer
to the ad
justment procedure(s).
DOOR
ADJUSTMENT
The door position
is
adjusted
at the
hinge locations
at either
the
cowl
or the
door,
as
applicable. Slightly
enlarged bolt holes
are
located
in the
cowl
for
fore/aft and up/down adjustments. Slightly enlarged bolt
holes
are
located
in the
door
for
in/out adjustments. It
is
important
to
adjust
a
door properly.
If not
the door weatherstrip seal could
be
damaged.
A
simple test
of
weatherstrip seal contact
can be
done
with
a
strip
of
newspaper. Place
the
paper adjacent
to
the
door pillar. Close
the
door. Pull
the
paper out
ward.
A
slight drag should
be
detected.
If the
paper is difficult
to
remove,
the
door should
be
re-adjusted.
Prior
to
door adjustment,
the
door latch must
be re
moved. This will allow
the
door
to
close freely
and be
properly aligned without interference.
(1) Support
the
door with
a
padded floor jack.
(2) Loosen
the
hinge bolts. Move
the
door
to the
correct position. (3) Tighten
the
hinge bolts
to 41 N«m (30 ft. lbs.)
torque. (4) Remove
the
floor jack from
the
door.
DOOR
TRIM
PANEL/WATERDAM
REMOVAL
(1)
If
equipped, remove
the:
• Power switch housing
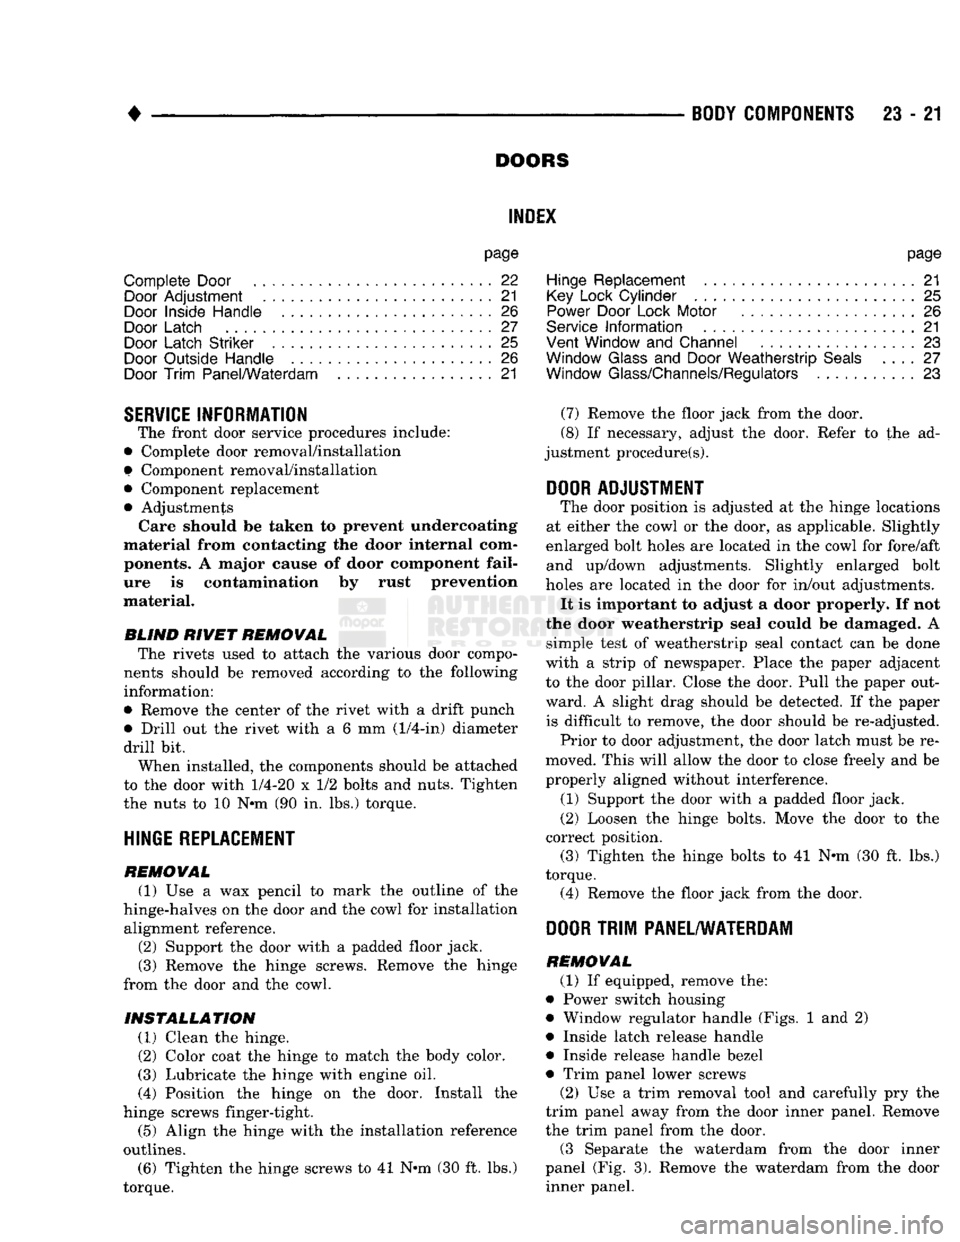
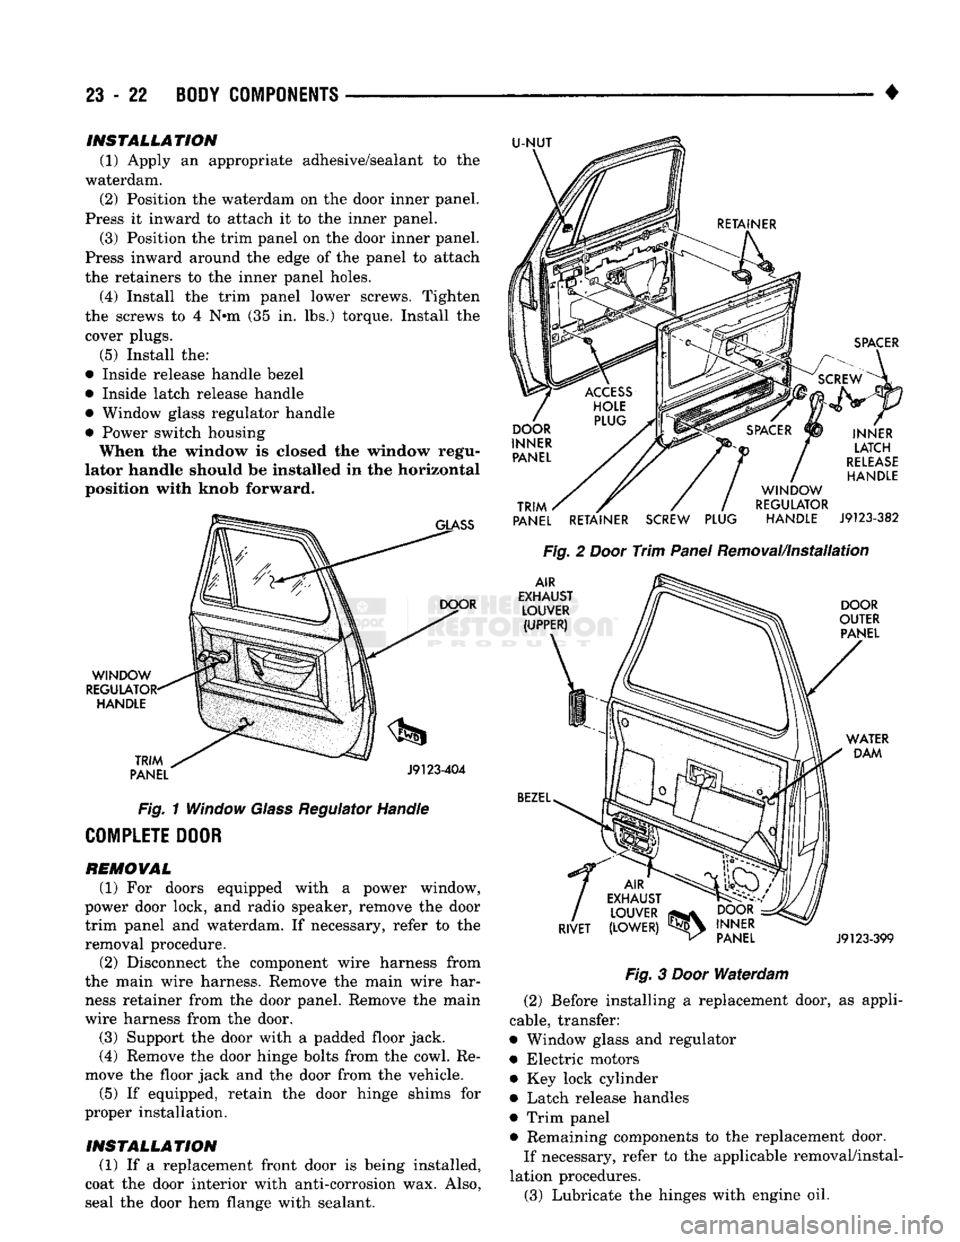
• Window regulator handle (Figs.
1 and 2)
• Inside latch release handle • Inside release handle bezel
• Trim panel lower screws (2)
Use a
trim removal tool
and
carefully
pry the
trim panel away from
the
door inner panel. Remove
the trim panel from
the
door.
(3 Separate
the
waterdam from
the
door inner
panel
(Fig. 3).
Remove
the
waterdam from
the
door inner panel.
Page 1405 of 1502
23
- 22
BODY COMPONENTS
•
INSTALLATION
(1) Apply an appropriate adhesive/sealant to the
waterdam. (2) Position the waterdam on the door inner panel.
Press it inward to attach it to the inner panel. (3) Position the trim panel on the door inner panel.
Press inward around the edge of the panel to attach
the retainers to the inner panel holes. (4) Install the trim panel lower screws. Tighten
the screws to 4 N»m (35 in. lbs.) torque. Install the cover plugs.
(5) Install the:
• Inside release handle bezel
• Inside latch release handle
• Window glass regulator handle
• Power switch housing When the window is closed the window regu
lator handle should be installed in the horizontal position with knob forward.
GLASS
U-NUT
WINDOW
REGULATOR' HANDLE
TRIM
PANEL DOOR
J9123-404
Fig.
1 Window
Glass
Regulator Handle
COMPLETE DOOR
REMOVAL
(1) For doors equipped with a power window,
power door lock, and radio speaker, remove the door trim panel and waterdam. If necessary, refer to the
removal procedure.
(2) Disconnect the component wire harness from
the main wire harness. Remove the main wire har ness retainer from the door panel. Remove the main
wire harness from the door.
(3) Support the door with a padded floor jack.
(4) Remove the door hinge bolts from the cowl. Re
move the floor jack and the door from the vehicle.
(5) If equipped, retain the door hinge shims for
proper installation.
INSTALLATION
(1) If a replacement front door is being installed,
coat the door interior with anti-corrosion wax. Also,
seal the door hem flange with sealant.
SPACER
INNER LATCH
RELEASE
HANDLE
TRIM
PANEL RETAINER SCREW PLUG WINDOW
REGULATOR HANDLE
J9123-382
Fig.
2
Door
Trim
Panel
Removal/Installation
AIR
EXHAUST LOUVER (UPPER) DOOR
OUTER PANEL
BEZEL
WATER
DAM
f
AIR
EXHAUST LOUVER
_
RIVET (LOWER)
^
DOOR
INNER PANEL
J9123-399
Fig.
3
Door
Waterdam
(2) Before installing a replacement door, as appli
cable, transfer:
• Window glass and regulator
• Electric motors • Key lock cylinder
• Latch release handles
• Trim panel • Remaining components to the replacement door. If necessary, refer to the applicable removal/instal
lation procedures. (3) Lubricate the hinges with engine oil.
Page 1408 of 1502
•
BODY
COMPONENTS
23 - 2i
(3)
Raise the glass. Slide it rearward and engage
the channel with the regulator arm roller.
(4) Install the vent window.
(5) Test the window glass and regulator operation.
Correct as necessary.
(6)
Install the door waterdam and the trim panel.
Fig.
7
Power
Window
Glass
Regulator
KEY
LOCK CYLINDER
REMOVAL
(1) Raise the window glass to the closed position. (2) Remove the door trim panel and the waterdam.
(3) Disconnect the lock cylinder latch rod at the
door latch. (4) Remove the key lock cylinder retainer clip. Re
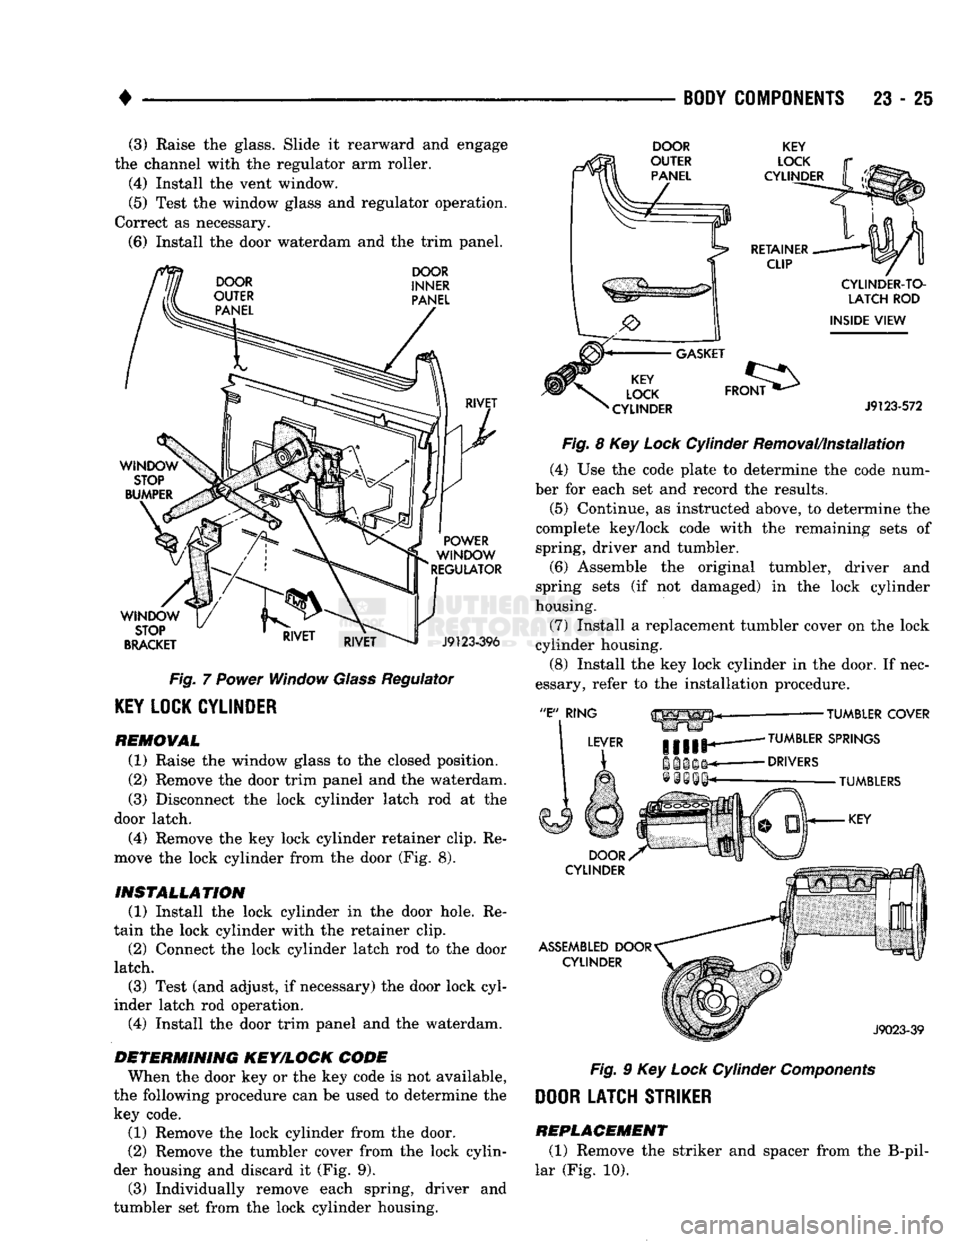
move the lock cylinder from the door (Fig. 8).
INSTALLATION
(1) Install the lock cylinder in the door hole. Re
tain the lock cylinder with the retainer clip. (2) Connect the lock cylinder latch rod to the door
latch.
(3) Test (and adjust, if necessary) the door lock cyl
inder latch rod operation.
(4) Install the door trim panel and the waterdam.
DETERMINING KEY/LOCK CODE
When the door key or the key code is not available,
the following procedure can be used to determine the
key code. (1) Remove the lock cylinder from the door.
(2) Remove the tumbler cover from the lock cylin
der housing and discard it (Fig. 9). (3) Individually remove each spring, driver and
tumbler set from the lock cylinder housing.
DOOR
KEY
Fig.
8 Key
Lock
Cylinder Removal/Installation (4) Use the code plate to determine the code num
ber for each set and record the results. (5) Continue, as instructed above, to determine the
complete key/lock code with the remaining sets of
spring, driver and tumbler.
(6)
Assemble the original tumbler, driver and
spring sets (if not damaged) in the lock cylinder
housing.
(7) Install a replacement tumbler cover on the lock
cylinder housing.
(8) Install the key lock cylinder in the door. If nec
essary, refer to the installation procedure.
Fig.
9 Key
Lock
Cylinder
Components
DOOR LATCH STRIKER REPLACEMENT
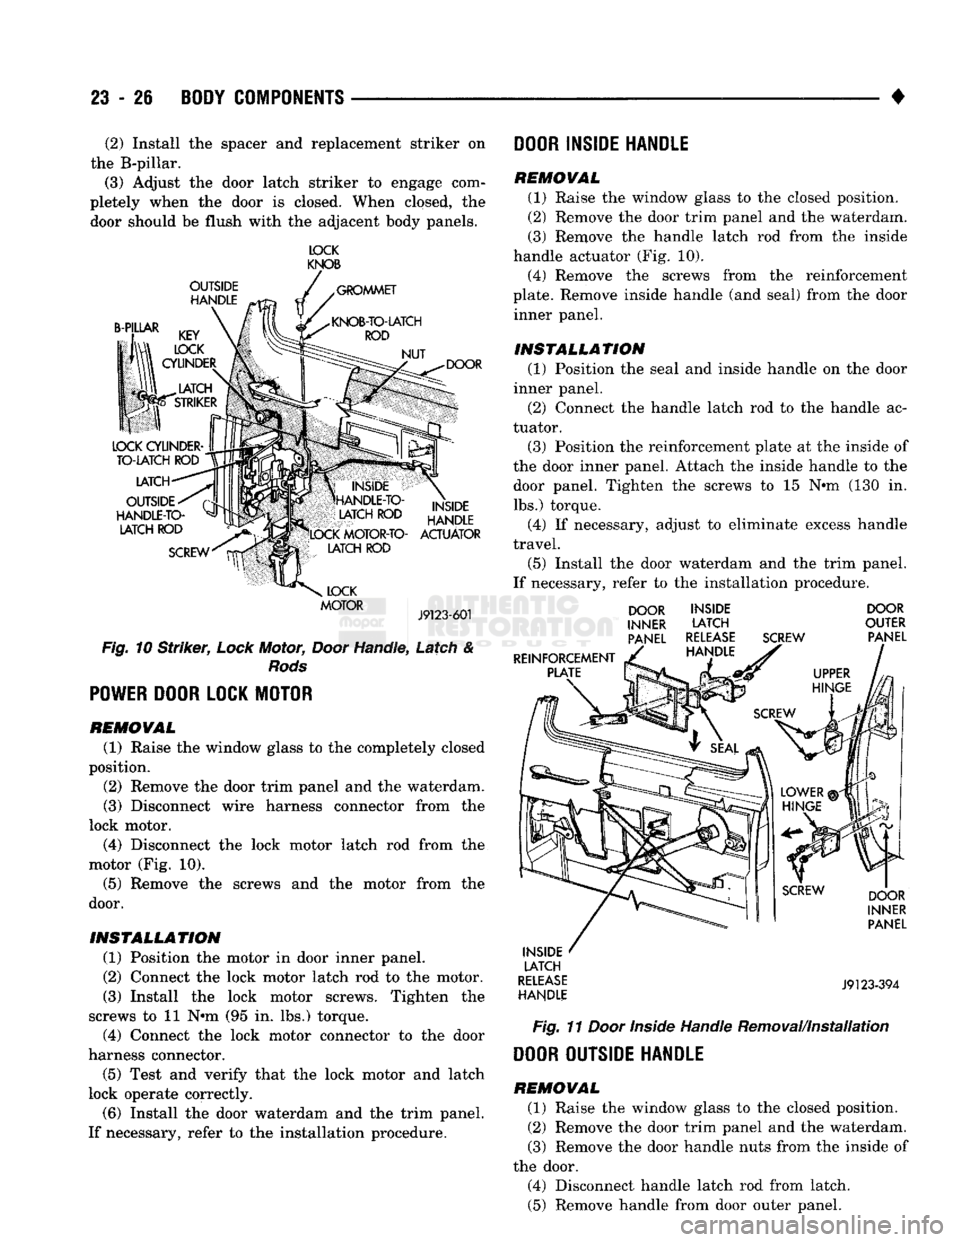
(1) Remove the striker and spacer from the B-pil-
lar (Fig. 10).
Page 1409 of 1502
23
- 26
BODY COMPONENTS
• (2) Install the spacer and replacement striker on
the B-pillar.
(3) Adjust the door latch striker to engage com
pletely when the door is closed. When closed, the
door should be flush with the adjacent body panels. IOCK
KNOB
OUTSIDE HANDLE GROMMET
B-PILLAR DOOR
LATCH
OUTSIDE
HANDLE-TO- LATCH ROD
SCREW INSIDE
HANDLE
LOCK MOTOR-TO- ACTUATOR LATCH ROD
LOCK
MOTOR
J9123-601
Fig.
10
Striker,
Lock
Motor,
Door
Handle, Latch &
Rods
POWER
DOOR LOCK MOTOR
REMOVAL
(1) Raise the window glass to the completely closed
position.
(2) Remove the door trim panel and the waterdam.
(3) Disconnect wire harness connector from the
lock motor.
(4) Disconnect the lock motor latch rod from the
motor (Fig. 10).
(5) Remove the screws and the motor from the
door.
INSTALLATION
(1) Position the motor in door inner panel.
(2) Connect the lock motor latch rod to the motor.
(3) Install the lock motor screws. Tighten the
screws to 11 N#m (95 in. lbs.) torque. (4) Connect the lock motor connector to the door
harness connector.
(5) Test and verify that the lock motor and latch
lock operate correctly.
(6) Install the door waterdam and the trim panel.
If necessary, refer to the installation procedure. DOOR INSIDE HANDLE
REMOVAL
(1) Raise the window glass to the closed position.
(2) Remove the door trim panel and the waterdam.
(3) Remove the handle latch rod from the inside
handle actuator (Fig. 10).
(4) Remove the screws from the reinforcement
plate. Remove inside handle (and seal) from the door inner panel.
INSTALLATION
(1) Position the seal and inside handle on the door
inner panel.
(2) Connect the handle latch rod to the handle ac
tuator. (3) Position the reinforcement plate at the inside of
the door inner panel. Attach the inside handle to the door panel. Tighten the screws to 15 N#m (130 in.
lbs.) torque.
(4) If necessary, adjust to eliminate excess handle
travel.
(5) Install the door waterdam and the trim panel.
If necessary, refer to the installation procedure. DOOR
INNER PANEL
REINFORCEMENT PLATE INSIDE
LATCH
RELEASE HANDLE SCREW DOOR
OUTER PANEL
INSIDE LATCH
RELEASE HANDLE DOOR
INNER PANEL
J9123-394
Fig.
11
Door
Inside
Handle Removal/Installation DOOR OUTSIDE HANDLE
REMOVAL
(1) Raise the window glass to the closed position.
(2) Remove the door trim panel and the waterdam. (3) Remove the door handle nuts from the inside of
the door. (4) Disconnect handle latch rod from latch.
(5) Remove handle from door outer panel.
Page 1410 of 1502
•
BODY
COMPONENTS
23 - 27
INSTALLATION
(1)
Apply silicone spray lubricant to the handle in
ternal moving parts.
(2) Install the handle on the door outer panel.
(3) Tighten the handle nuts to 7 N*m (65 in. lbs.)
torque. (4) Connect the handle latch rod to the latch.
(5) Test and verify the handle operates correctly.
(6)
Install the door waterdam and the trim panel.
OUTSIDE HANDLE LATCH
ROD
RELEASE
ADJUSTMENT
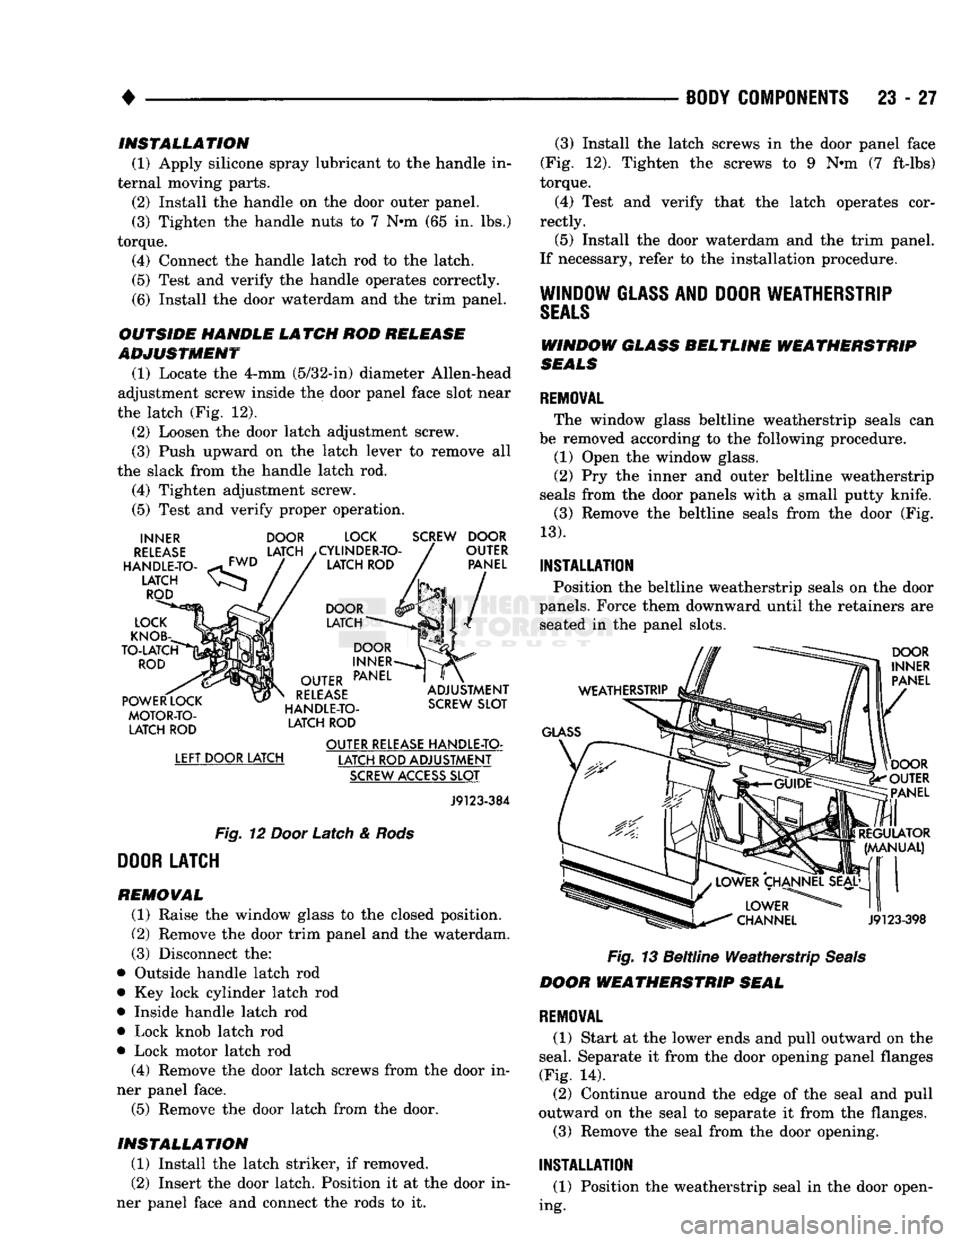
(1) Locate the 4-mm (5/32-in) diameter Allen-head
adjustment screw inside the door panel face slot near
the latch (Fig. 12).
(2) Loosen the door latch adjustment screw.
(3) Push upward on the latch lever to remove all
the slack from the handle latch rod.
(4) Tighten adjustment screw.
(5) Test and verify proper operation.
INNER
RELEASE
HANDLE-TO
LATCH
ROD
LOCK
KNOB
TO-LATCH
ROD
POWER
LOCK
MOTOR-TO-LATCH
ROD
DOOR
LATCH
LOCK
/CYLINDER-TO LATCH
ROD
SCREW
DOOR
OUTER
PANEL
DOOR
LATCH
DOOR
INNER
OUTER
PANEL
RELEASE
HANDLE-TO LATCH
ROD
ADJUSTMENT
SCREW
SLOT
LEFT
DOOR LATCH OUTER
RELEASE
HANDLE-TO-
LATCH ROD ADJUSTMENT
SCREW
ACCESS
SLOT
J9123-384
Fig.
12
Door
Latch &
Rods
DOOR
LATCH
REMOVAL
(1) Raise the window glass to the closed position.
(2) Remove the door trim panel and the waterdam.
(3) Disconnect the:
• Outside handle latch rod
• Key lock cylinder latch rod
• Inside handle latch rod
• Lock knob latch rod
• Lock motor latch rod (4) Remove the door latch screws from the door in
ner panel face.
(5) Remove the door latch from the door.
INSTALLATION
(1) Install the latch striker, if removed.
(2) Insert the door latch. Position it at the door in
ner panel face and connect the rods to it. (3) Install the latch screws in the door panel face
(Fig. 12). Tighten the screws to 9 Nnn (7 ft-lbs)
torque.
(4) Test and verify that the latch operates cor
rectly. (5) Install the door waterdam and the trim panel.
If necessary, refer to the installation procedure.
WINDOW
GLASS
AND
DOOR
WEATHERSTRIP
SEALS
WINDOW
GLASS
BELTLINE WEATHERSTRIP
SEALS
REMOVAL
The window glass beltline weatherstrip seals can
be removed according to the following procedure. (1) Open the window glass.
(2) Pry the inner and outer beltline weatherstrip
seals from the door panels with a small putty knife.
(3) Remove the beltline seals from the door (Fig.
13).
INSTALLATION
Position the beltline weatherstrip seals on the door
panels. Force them downward until the retainers are seated in the panel slots.
WEATHERSTRIP
GLASS
DOOR
INNER
PANEL
DOOR
OUTER
PANEL
REGULATOR
(MANUAL)
J9123-398
Fig. 13 Beltline Weatherstrip Seals
DOOR
WEATHERSTRIP
SEAL
REMOVAL
(1) Start at the lower ends and pull outward on the
seal. Separate it from the door opening panel flanges
(Fig. 14). (2) Continue around the edge of the seal and pull
outward on the seal to separate it from the flanges.
(3) Remove the seal from the door opening.
INSTALLATION
(1) Position the weatherstrip seal in the door open
ing.
Page 1419 of 1502
23
- 36
BODY COMPONENTS
SCREW
INSTRUMENT
CLUSTER (REAR)
SHIFT
INDICATOR
STEERING COLUMN
J9123-539
Fig.
3 A/T Shift Position Indicator
INSTALLATION
(1) Position the shift position (PRNDL) indicator
on the instrument cluster.
(2) Install the indicator screws in the rear of the
instrument cluster. Tighten the screws to 2 N»m (17
in. lbs.) torque.
(3) Connect the indicator wire to the steering col
umn.
ASH
RECEIVER
TRAY
AND
HOUSING
REMOVAL
(1) Disconnect the wire harness connector from the
cigarette lighter. Remove the ash receiver tray from
the housing. (2) Remove the housing screws from the instru
ment panel. (3) Disconnect the wire harness connector from the
lamp.
Remove the housing from the instrument
panel.
INSTALLATION
(1) Position the ash receiver tray housing at the
instrument panel. Connect the wire harness connec
tor to the lamp.
(2) Install the housing screws in the instrument
panel. Tighten the screws to 2 N«m (17 in. lbs.)
torque. (3) Position the ash receiver tray in the housing.
Connect the wire harness connector to the cigarette
lighter.
GLOVE
BOX
REMOVAL
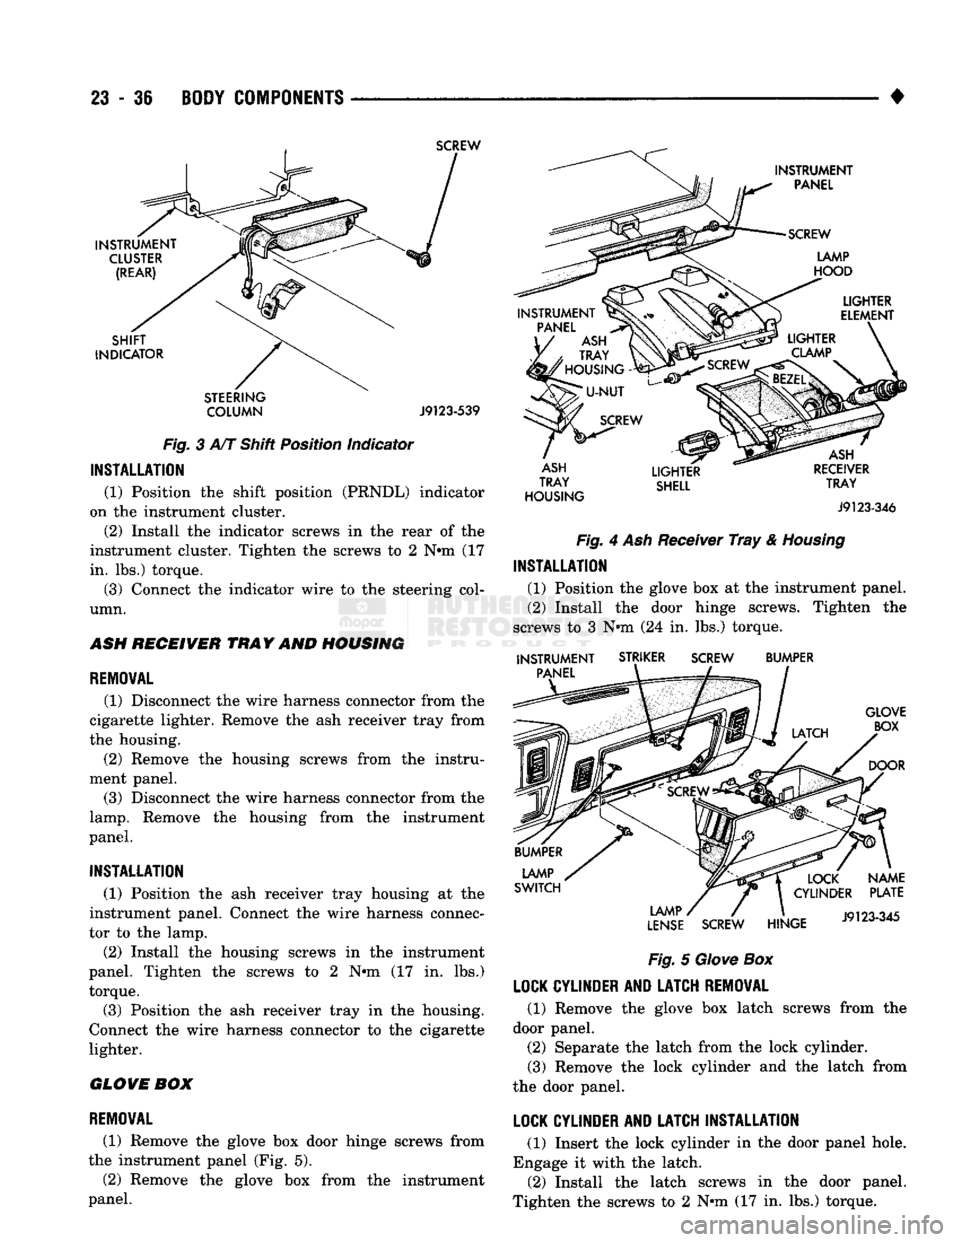
(1) Remove the glove box door hinge screws from
the instrument panel (Fig. 5).
(2) Remove the glove box from the instrument
panel.
INSTRUMENT
PANEL
SCREW
LAMP
HOOD
PANEL
ASH
TRAY
'
HOUSING
-
LIGHTER
ELEMENT
SCREW
LIGHTER
CLAMP
ASH
TRAY
HOUSING
LIGHTER
SHELL
ASH
RECEIVER
TRAY
J9123-346
Fig.
4 Ash Receiver
Tray
&
Housing
INSTALLATION
(1) Position the glove box at the instrument panel.
(2) Install the door hinge screws. Tighten the
screws to 3 N»m (24 in. lbs.) torque.
INSTRUMENT
PANEL
STRIKER
SCREW
BUMPER
GLOVE BOX
DOOR
LAMP
SWITCH
LAMP
LENSE
SCREW
HINGE
NAME
PLATE
J9123-345
Fig.
5
Glove
Box
LOCK
CYLINDER
AND
LATCH
REMOVAL
(1) Remove the glove box latch screws from the
door panel. (2) Separate the latch from the lock cylinder.
(3) Remove the lock cylinder and the latch from
the door panel.
LOCK
CYLINDER
AND
LATCH
INSTALLATION
(1) Insert the lock cylinder in the door panel hole.
Engage it with the latch. (2) Install the latch screws in the door panel.
Tighten the screws to 2 N»m (17 in. lbs.) torque.
Page 1420 of 1502
BODY
COMPONENTS
23 - 37
DOOR
LATCH STRIKER ADJUSTMENT
(1) Insert a small pry bar in the latch striker slot.
(2) Pry on the striker as necessary to obtain cor
rect adjustment.
INSTRUMENT PANEL
(UP)
REMOVAL
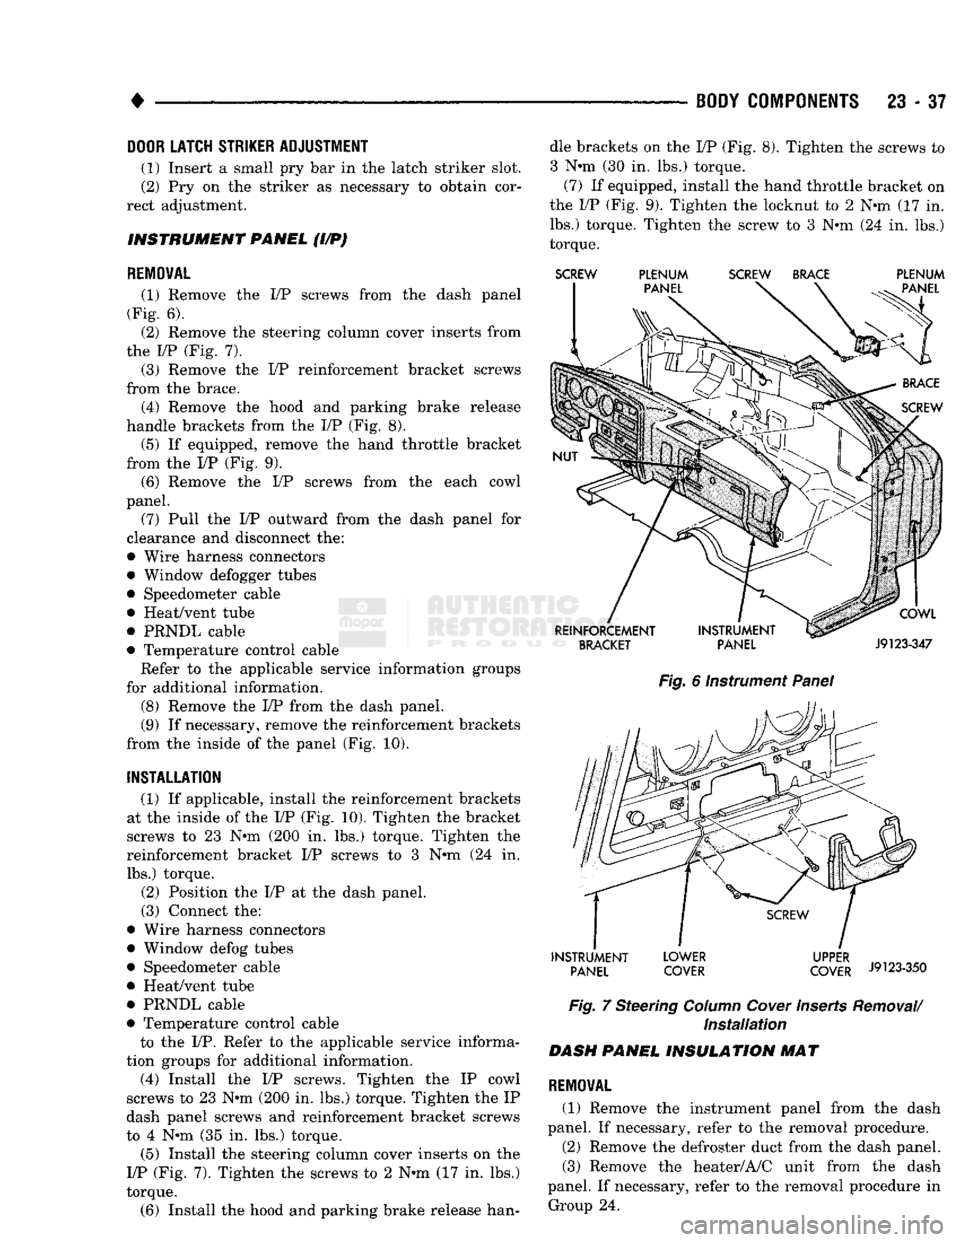
(1) Remove the I/P screws from the dash panel
(Fig. 6). (2) Remove the steering column cover inserts from
the I/P (Fig. 7). (3) Remove the I/P reinforcement bracket screws
from the brace. (4) Remove the hood and parking brake release
handle brackets from the I/P (Fig. 8).
(5) If equipped, remove the hand throttle bracket
from the I/P (Fig. 9).
(6) Remove the I/P screws from the each cowl
panel.
(7) Pull the I/P outward from the dash panel for
clearance and disconnect the:
• Wire harness connectors
• Window defogger tubes
• Speedometer cable
• Heat/vent tube
• PRNDL cable
• Temperature control cable Refer to the applicable service information groups
for additional information.
(8) Remove the I/P from the dash panel.
(9) If necessary, remove the reinforcement brackets
from the inside of the panel (Fig. 10).
INSTALLATION
(1) If applicable, install the reinforcement brackets
at the inside of the I/P (Fig. 10). Tighten the bracket
screws to 23 N#m (200 in. lbs.) torque. Tighten the
reinforcement bracket I/P screws to 3 N*m (24 in. lbs.) torque.
(2) Position the I/P at the dash panel. (3) Connect the:
• Wire harness connectors
• Window defog tubes
• Speedometer cable
• Heat/vent tube
• PRNDL cable
• Temperature control cable
to the I/P. Refer to the applicable service informa
tion groups for additional information. (4) Install the I/P screws. Tighten the IP cowl
screws to 23 N-m (200 in. lbs.) torque. Tighten the IP
dash panel screws and reinforcement bracket screws
to 4 N»m (35 in. lbs.) torque.
(5) Install the steering column cover inserts on the
17P (Fig. 7). Tighten the screws to 2 N*m (17 in. lbs.)
torque.
(6) Install the hood and parking brake release han dle brackets on the I/P (Fig. 8). Tighten the screws to
3 N*m (30 in. lbs.) torque. (7) If equipped, install the hand throttle bracket on
the I/P (Fig. 9). Tighten the locknut to 2 N*m (17 in. lbs.) torque. Tighten the screw to 3 N*m (24 in. lbs.)
torque.
SCREW
PLENUM SCREW BRACE PLENUM
Fig.
6 Instrument
Panel
INSTRUMENT LOWER UPPER
irt
PANEL COVER COVER
J9123-350
Fig.
7 Steering
Column
Cover
Inserts
Removal/
Installation
DASH
PANEL INSULATION
MAT
REMOVAL
(1) Remove the instrument panel from the dash
panel. If necessary, refer to the removal procedure. (2) Remove the defroster duct from the dash panel. (3) Remove the heater/A/C unit from the dash
panel. If necessary, refer to the removal procedure in Group 24.
Page 1438 of 1502
•
• —• •
HEATING
AND AIR
CONDITIONING
24 - 1 CONTENTS
page
CLIMATE CONTROL SYSTEM
............. 21
REFRIGERANT SYSTEM SERWICE
COMPRESSOR
SERWICE
(SD-709)
......... 21
PROCEDURES
.............
DIAGNOSTIC PROCEDURES
3
TORQUE SPECIFICATIONS
GENERAL INFORMATION
1
page
. 17
. 31
GENERAL INFORMATION
HEATER SYSTEM
All models use a Blend-Air type heater. Outside air
enters the heater through the cowl opening and
passes through a plenum chamber to the heater core. Air intake openings must be kept free of snow, ice and other obstructions for the heater system to pick
up sufficient outside air. A temperature control door
in the heater housing directs incoming air through
the heater core and/or the heater core bypass. The amount of blend (heated and non-heated air) is deter
mined by the setting of the temperature lever on the
instrument panel. Direction of the blended air is con
trolled by the HEAT-DEFROST lever on the instru ment panel. The blower switch and resistor block controls the
speed of the blower motor. This in turn controls the
velocity of the air flow from the heater outlets. The resistor block consists of 2 helical wound wire
resistors connected to terminals which are mechani cally attached to a glass-filled phenolic board. This
assembly is bolted to the plenum. The blower switch controls the blower motor speed
by selectively connecting the resistors in series to the
blower motor.
A self-adjusting clip, on each of 2 control cables has
been incorporated to simplify cable adjustment. This clip snaps onto the control cable core wire and will slide along the wire under a specific load to provide
an automatic cable adjustment.
AIR
CONDITIONING
SYSTEM
Air intake openings must be kept free of snow, ice
and other obstructions for the air conditioning sys
tem to pick up sufficient outside air.
COMPONENTS
• COMPRESSOR-The seven piston SD-709 com
pressor is used on all vehicles. This compressor com
presses the low pressure refrigerant vapor into a high pressure, high temperature vapor. • CLUTCH PULLEY AND COIL-These are
mounted on the compressor, providing a convenient
way to drive it and disengage it in accordance to the cooling needs.
• CONDENSER-The condenser is located in front
of the radiator. Its function is to cool the hot, high
pressure refrigerant gas causing it to condense into
high pressure liquid refrigerant.
• FILTER-DRIER—The filter-drier is used to remove
any traces of moisture from the refrigerant system.
This component incorporates the sight glass and the
high pressure relief valve.
• SIGHT GLASS-The sight glass is provided as a
diagnostic tool to observe refrigerant flow and indi cate refrigerant level. It is located at the top of the
filter drier.
• HIGH -PRESSURE RELIEF VALVE-This is a safety device designed to open automatically if the
system pressure reaches a predetermined level. This
will prevent system component damage. • EXPANSION (H) VALVE-The expansion (H)
valve is used to meter refrigerant into the evaporator
in accordance with cooling requirements. • EVAPORATOR COIL-The evaporator coil is lo
cated in the A/C unit. Its function is to cool and de-
humidify the air before it enters the vehicle. • FREEZE CONTROL-The main function of freeze
control is to prevent water on the evaporator coil face
from freezing which restricts the airflow. An elec
tronic temperature cycling switch is located on the
refrigerant plumbing (suction line) near the H-Valve.
The switch turns the compressor ON-OFF depending
on the temperature in the suction line. The switch is a sealed, specially calibrated unit. If found defective,
the switch must be replaced. • REFRIGERANT LINES-These lines are needed
to carry the refrigerant between the various system components.
• CONDENSATE DRAIN TUBE-Condensation
which accumulates on the bottom of the evaporator
HEATING
AND AIR
CONDITIONING