Page 836 of 2103

CLUTCH On-vehicle Service
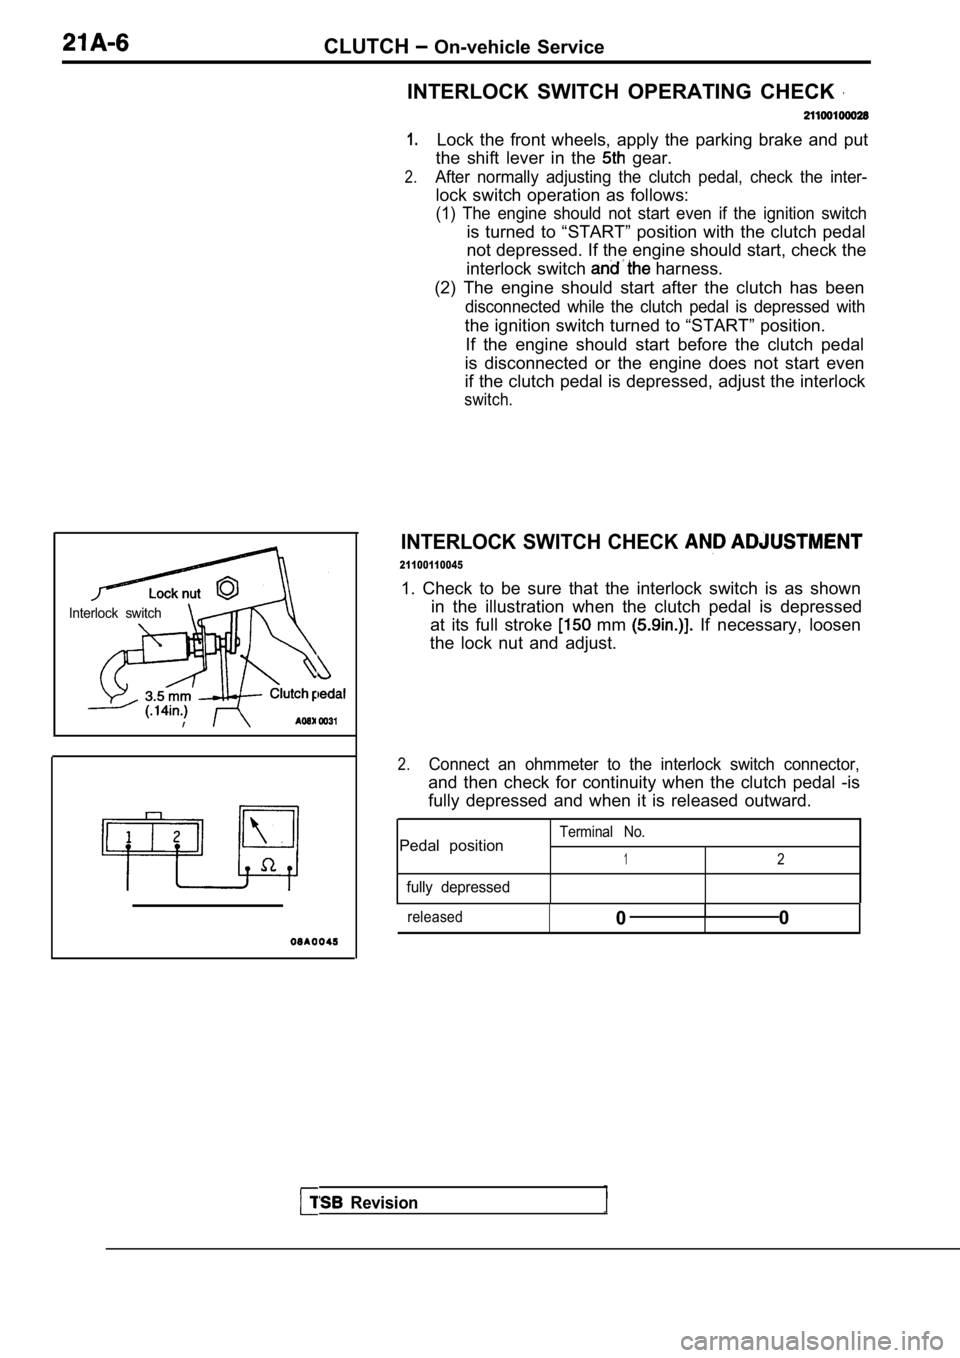
Interlock switch
Revision
INTERLOCK SWITCH OPERATING CHECK
1.
2.
Lock the front wheels, apply the parking brake and put
the shift lever in the
gear.
After normally adjusting the clutch pedal, check th e inter-
lock switch operation as follows:
(1) The engine should not start even if the ignition switch
is turned to “START” position with the clutch pedal
not depressed. If the engine should start, check th e
interlock switch
harness.
(2) The engine should start after the clutch has be en
disconnected while the clutch pedal is depressed with
the ignition switch turned to “START” position.
If the engine should start before the clutch pedal
is disconnected or the engine does not start even
if the clutch pedal is depressed, adjust the interl ock
switch.
INTERLOCK SWITCH CHECK
21100110045
1. Check to be sure that the interlock switch is as shown
in the illustration when the clutch pedal is depres sed
at its full stroke
mm If necessary, loosen
the lock nut and adjust.
2.Connect an ohmmeter to the interlock switch connect or,
and then check for continuity when the clutch pedal -is
fully depressed and when it is released outward.
Terminal No.Pedal position12
fully depressed
released0I0
Page 837 of 2103
CLUTCH On-vehicle Service
Engine (Non-turbo)>
Engine (Turbo) and
BLEEDING
Whenever the clutch tube, the clutch clutch
master cylinder have or the clutch pedal
is spongy, bleed the system.
Specified brake fluid: DOT 3 or 4
Caution
Use only the specified brake fluid. Do not mix with
fluid.
TSB Revision
Page 842 of 2103
CLUTCH Clutch Control
side
REMOVAL SERVICE POINT
CLUTCH HOSE REMOVAL
Holding the nut at the clutch hose side, loosen the flare nut
on the clutch pipe.
INSTALLATION SERVICE POINT
CLUTCH HOSE/CLUTCH PIPE INSTALLATION
1. Temporarily tighten the clutch pipe flare nut by hand,
and then tighten it to the specified
being careful
that the clutch hose does not become twisted.
2. After tightening the clutch pipe flare nut, chec k to be
sure there is no leakage of the clutch fluid.
Revision
INSPECTION
lCheck the pedal shaft bushing for wear.
lCheck the pedal arm for bend or torsion.
lCheck the turnover spring for deterioration.
lCheck the master cylinder or clutch hose for fluid leakage.
lCheck the clutch hose or pipe for cracks or cloggin g.
Page 843 of 2103
CLUTCHClutch Master Cylinder. . .
CLUTCH MASTER CYLINDER
DISASSEMBLY AND REASSEMBLY
Piston repair kitBrake fluid DOT 3 or
DOT 4Grease:Rubber
(Non-turbo)
Engine (Turbo)>
Disassembly steps
1. Piston stopper ring rod assembly
Piston assembly
5. Return spring
6.Reservoir hose
121 mm (4.8 in.)
7.Reservoir cap8. Reservoir tank
9. Reservoir band
10. Nipple11. Clutch master cylinder body
INSTALLATION SERVICE POINT
PUSH ROD ASSEMBLY INSTALLATION
NOTE
Set the length of the push rod assembly to the shown
dimension to make the adjustment of the clutch peda l easier.
0 8 2 0 0 0 4
INSPECTION
lCheck the inside cylinder body for rust or scars.
lCheck the piston cup for wear or deformation.
lCheck the piston rust or scars.
lCheck the clutch pipe connection for clogging.
TSB Revision
Page 845 of 2103
OVERHAUL
CONTENTS
CLUTCH. . . . . . . . . . . . . . . . . . . . . . . . . . . . ...*...4SPECIFICATIONS2. . . . . . . . . . . . .
CLUTCH RELEASE CYLINDER
Engine (Turbo) and Engine> . . .
3
Lubricants . . . . . . . . . . . . . . . . . . . .
. . . . . . . . . . . . .
Service Specifications
Engine (Turbo) and Engine> . . . . . 2
Torque Specifications . . . . . . . , . . . . . . . . . . . . . . .2
Page 846 of 2103
21CLUTCH OVERHAUL Specifications
SPECIFICATIONS21200030047
SERVICE SPECIFICATION Engine (Turbo) and Engine>
0.3
Diaphragm spring end height difference
TORQUE SPECIFICATIONS
Engine (Turbo) and Engine>
Clutch cover bolt
Release cylinder mounting bolt
Release cylinder union bolt
Release cylinder bleeder plug
Release fork fulcrum
Clutch chamber bracket mountingbolt
Clutch line tube flare nut
N mft.
19 14
19
14
23
17
118.0
36 24
1914
1511
Engine (Non-turbo)>
Drive plate to clutch flywheel bolt
Revision
Page 848 of 2103
21CLUTCH OVERHAUL Clutch
CLUTCH
REMOVAL AND INSTALLATION Engine
Removal steps
1. Oil tube
2. Clutch release cylinder 5. Clutch release lever
3. Clutch flywheel
6. Clutch control equip stud
7. Boot
4. Clutch release bearing
NOTE
The modular clutch assembly flywheel assembly) used in this vehicle consists o f a single,
dry-type clutch disc and a diaphragm style clutch c over. The clutch unit is serviced as an assembly.
No disassembly is possible.
Revision
Page 850 of 2103
21CLUTCH OVERHAUL Clutch
Clip
REMOVAL SERVICE POINT
RELEASE FORK REMOVAL
Slide release fork in direction of arrow and disengage fulcrum
from clip to remove release fork. Be careful not to cause
damage to clip by pushing release fork in the direc tion other
than that of arrow and removing it with force.
INSTALLATION SERVICE POINTS
GREASE APPLICATION TO RELEASE
Specified grease:
MITSUBISHI genuine grease Part No. 01010
equivalent
1 or
- -
Revision
.
GREASE APPLICATIONCLUTCH RELEASE
BEARING
Specified grease:
genuine grease Part No. 0101011 or