Page 1850 of 2103
BODY Windshield and Window Glass
QUARTER WINDOW GLASS AND REGULATOR ASSEMBLY
REMOVAL AND INSTALLATION
IPost-installation OperationQuarter Window Glass Adjustment (Refer to I
122820
Power window switch removalsteps
1. Door trims (Refer to GROUP 42 Door.)2. Power window switch
Quarter window glass removalsteps
l Quarter trim, lower
(Refer to GROUP Trims.) Quarter belt moulding (Refer to GROUP
3. Quarter trim bracket
4. Quarter belt line inner weatherstrip
and quarter window front weather-
strip
5. Waterproof film
window glass assembly
Quarter window glass
9. Guide assembly
Regulator assembly removal steps
6. Quarter window glass assembly l Rear speaker bracket A
(Refer to GROUP 54 Speaker.)10. Regulator assembly
TSB Revision
Page 1870 of 2103

BODY Door
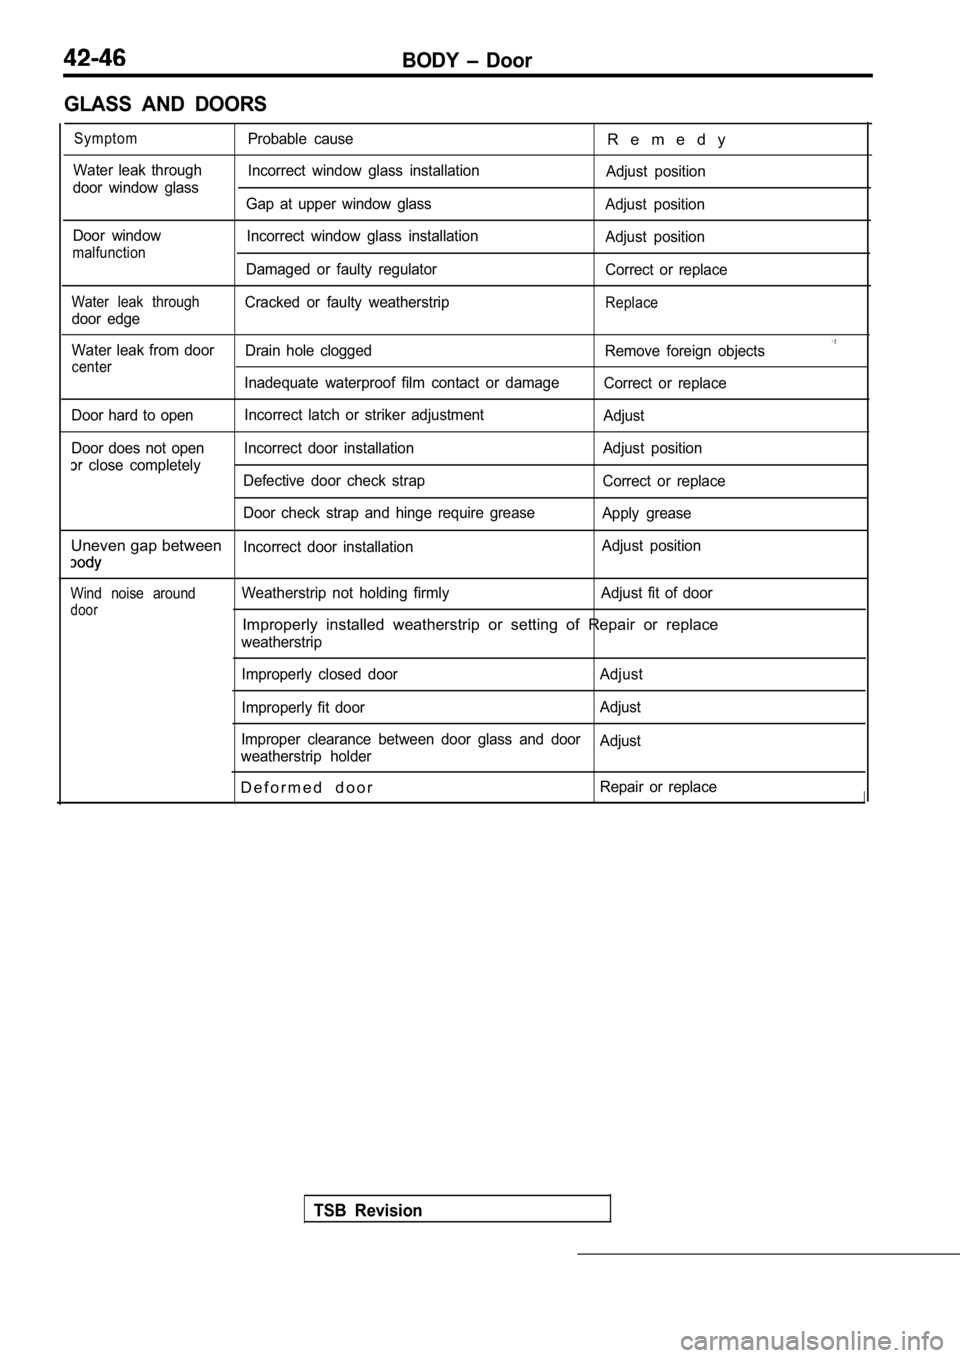
GLASS AND DOORS
SymptomProbable causeR e m e d y
Water leak through Incorrect window glass installation
Adjust position
door window glass Gap at upper window glass Adjust position
Door window Incorrect window glass installation
Adjust position
malfunction
Damaged or faulty regulator Correct or replace
Water leak throughCracked or faulty weatherstripReplace
door edge
Water leak from doorDrain hole clogged
Remove foreign objects
centerInadequate waterproof film contact or damageCorrect or replace
Door hard to open Incorrect latch or striker adjustment
Adjust
Door does not open Incorrect door installation Adjust position
close completely
Defective door check strap Correct or replace
Door check strap and hinge require grease Apply grease
Uneven gap betweenIncorrect door installationAdjust position
Wind noise around
door
Weatherstrip not holding firmly Adjust fit of door
Improperly installed weatherstrip or setting of Rep
air or replace
weatherstrip
Improperly closed door Adjust
Improperly fit door Adjust
Improper clearance between door glass and door Adjust
weatherstrip holder
D e f o r m e d d o o rRepair or replaceI
TSB Revision
Page 1872 of 2103

42-48BODY Door
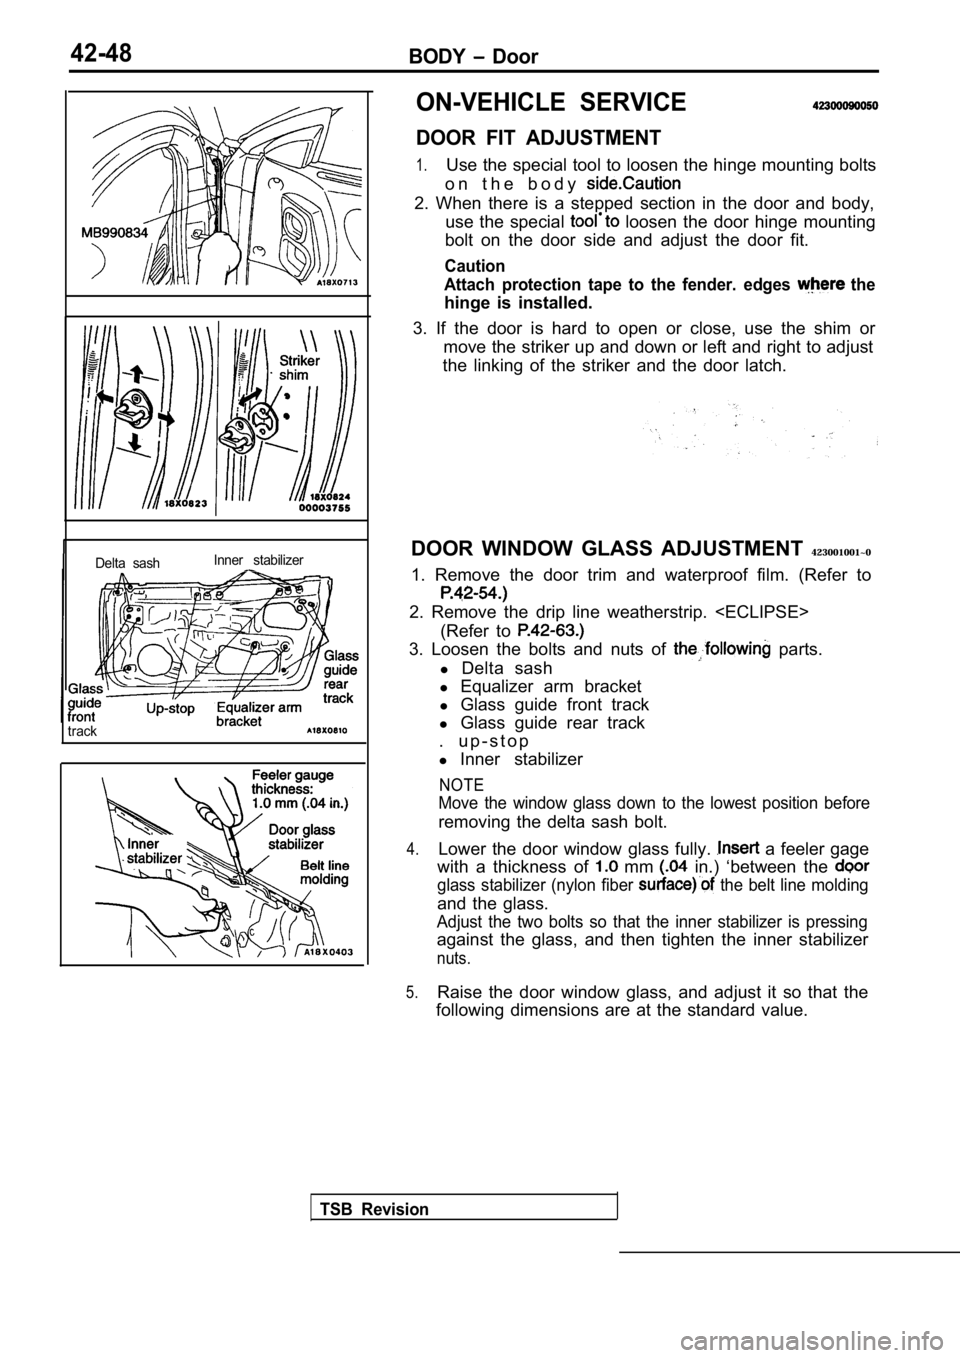
Delta sashInner stabilizer
track
ON-VEHICLE SERVICE
DOOR FIT ADJUSTMENT
1.Use the special tool to loosen the hinge mounting b
olts
o n t h e b o d y
2. When there is a stepped section in the door and body,
use the special
loosen the door hinge mounting
bolt on the door side and adjust the door fit.
Caution
Attach protection tape to the fender. edges
the
hinge is installed.
3. If the door is hard to open or close, use the sh im or
move the striker up and down or left and right to a djust
the linking of the striker and the door latch.
DOOR WINDOW GLASS ADJUSTMENT 423001001~0
1. Remove the door trim and waterproof film. (Refer to
2. Remove the drip line weatherstrip.
(Refer to
3. Loosen the bolts and nuts of parts.
l Delta sash
l Equalizer arm bracket
l Glass guide front track
l Glass guide rear track
. u p - s t o p
l Inner stabilizer
NOTE
Move the window glass down to the lowest position b efore
removing the delta sash bolt.
4.Lower the door window glass fully. a feeler gage
with a thickness of
mm in.) ‘between the
glass stabilizer (nylon fiber the belt line molding
and the glass.
Adjust the two bolts so that the inner stabilizer i s pressing
against the glass, and then tighten the inner stabi lizer
nuts.
5.Raise the door window glass, and adjust it so that the
following dimensions are at the standard value.
TSB Revision
Page 1878 of 2103
BODY Door
DOOR TRIM AND WATERPROOF FILM
REMOVAL AND INSTALLATION.
NOTE Indicates the clip positionsTSB Revision
Removal steps
1.Clip 2. Regulator handle
3.Escutcheon4. Pull handle box
5.6 .Cover Door trim
7. Pull handle bracket
8. Door inside handle
9. Door speaker assembly
10. Speaker cover
Waterproof film
Page 1880 of 2103
BODY Door
DOOR GLASS AND REGULATOR
REMOVAL AND INSTALLATION
.
Door Trim and Film Removal
Belt Line Molding Removal (Refer to
10
Post-installation OperationlDoor Window Glass Adjustment (Refer to lBelt Line Molding Installation (Refer lDoor Trim and Waterproof Film Installation(Refer to
TSB Revision8
0 0 0 0 3 6 7 6
Power window switch removalsteps
1. Pull handle box
2. Power window switch
Door glass and regulator removal
steps
3. up-stop
4. Inner stabilizer
5. Delta sash
6. Door window glass
7. Window regulator assembly
8. Power window motor (Vehicles with
power window)9. Glass guide rear track
10. Glass guide front track
Page 1909 of 2103
B O D Y,
SUNROOF
REMOVAL AND INSTALLATION
Post-installation OperationlSunroof Fit Adjustment (Refer to lWater Test (Refer to
44 44
66
27 35
Sunroof glass seal removal steps
1. Sunroof glass 2. Sunroof glass sealSunroof sunshade removal steps
1. Sunroof glass3. Rear sunroof sunshade
4. Front sunroof sunshade 5. Sunshade slide block
motor steps
6. (Refer to Headlining.)
7. Bracket
10. Sunroof motor
Sunroof
6. Headlining (Refer to GROUP Headlining.)
guide assembly removal
steps
1. Sunroof glass 3. Rear sunroof sunshade” 4. Front sunroof sunshade 11. Sunroof cables connection
12. Sunroof assembly
7. Bracket8. Sunroof switch
Sunroof control unitSunroof assembly
6. Headlining (Refer Headlining.)
7. Bracket. .
6. Headlining (Refer to GROUP Headlining.) 9. Sunroof control unit 13. Drain hose ‘14. Sunroof assembly
TSB Revision