1988 PONTIAC FIERO wiring
[x] Cancel search: wiringPage 1056 of 1825
AUTOMA"PI&: TRANSMISSION 780-R4-5
5. Case extension bolts (37)
and case extension (36)
6. Extension seal ring (35)
7. Output
shaft sleeve (690) and output shaft o-ring
seal (691)
- Not all models use an output shaft sleeve
and seal
a Remove or Disconnect (Figures 75)
Models with Mechanical Speedometer
1. Speedometer drive gear
(689) and clip (688)
- push tab of retaining clip and tap
speedometer gear off the output shaft.
- use care not to damage the speedo gear
Valve Body and Wiring Harness
Remove or Disconnect (Figures 76, 77)
1. Screws (74), oil
pan (73), and gasket (72).
2. Oil filter
(71) and filter seal (70).
- Filter seal may be stuck in the case
3. Outside
electrical connector (33) and o-ring seal
(34).
4. Electrical connections from switches.
- refer to wiring diagrams in the Hydraulic
Diagnosis Section for specific model
applications
5. Solenoid bolts
(51) and solenoid assembly (50)
with o-ring seal (49) and wiring harness.
6. Accumulator cover bolts (63) and 1-2
accumulator cover and pin assembly (62).
7. 1-2 accumulator piston (61) and seal (60).
8. Spring (59).
Remove or Disconnect (Figures 78,99,88 and 81)
1. Bolt (75) and manual detent spring assembly
(709).
2. Electrical wire clips (66) and tube clamps (97).
3. Auxiliary valve tube (96).
4. Wiring harness retaining washer (A) and the
filter retainer clips
(87).
5. Bolts (69) and T.V. lever and bracket assembly
(65)
6. T.V. link (64)
Remove or Disconnect (Figures 78,88,8'1 and 82)
1. Remaining valve body bolts (69)
2. Manual valve link (705)
3. Control valve assembly (67)
4. Bolts
(374-376), auxiliary valve body (377), and
check
ball (55)
5. Spacer plate (56) and spacer plate gaskets (88 and
89)
6. Check balls (55 and 91) spring (54), piston (52),
sea1 (53) and pin
- Three checkballs are located under the
valve body, one in the auxiliary valve body
and four are located in the case. The large
copper flash colored ball is
# 10 check ball
(9 1)
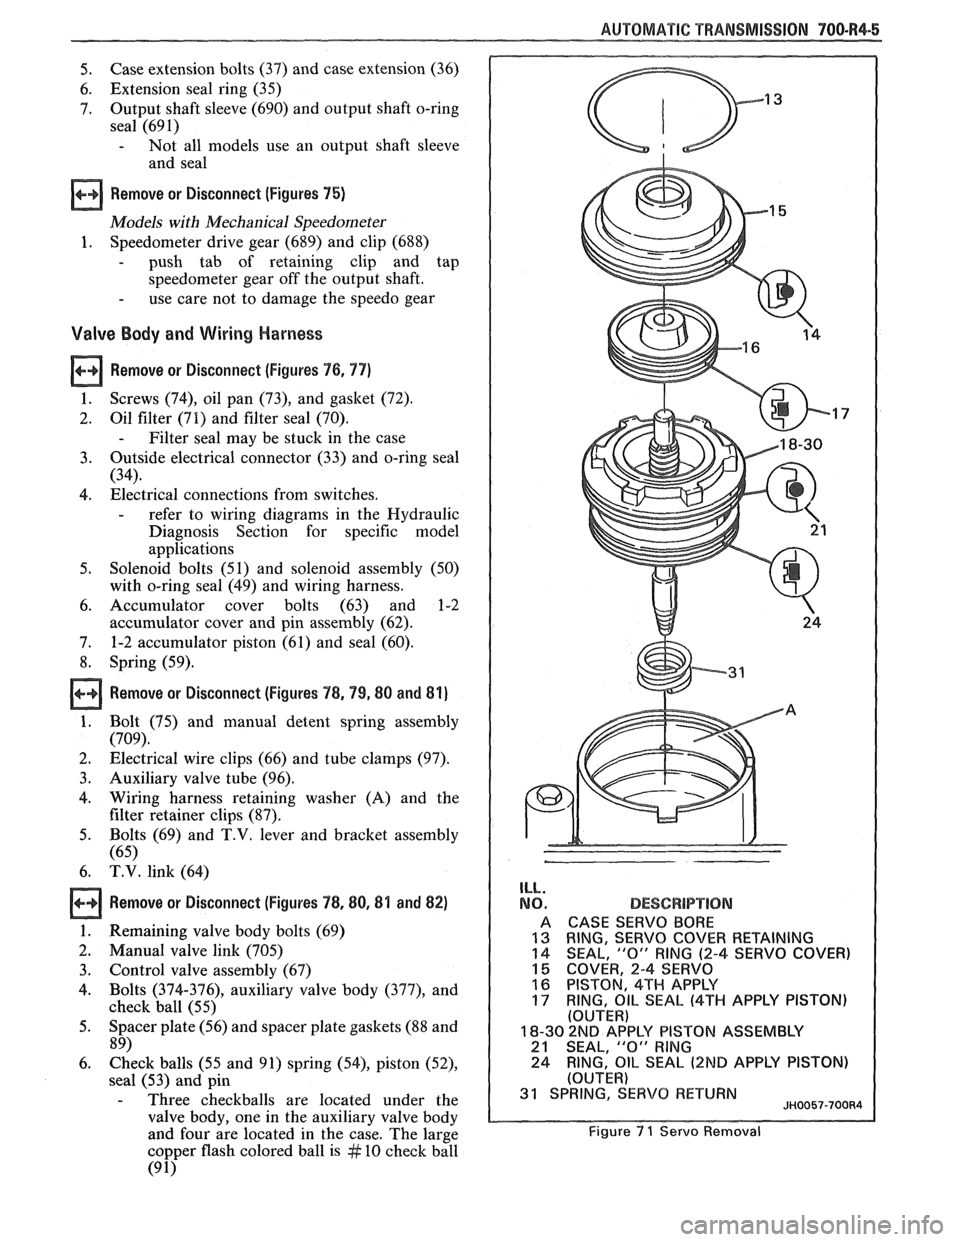
ILL.
NO.
A
13 14
15 16
17
DESCBPlPT!ON
CASE SERVO BORE
RING,
SERVO COVER RETAINING
SEAL, "0" RING (2-4 SERVO COVER)
COVER, 2-4 SERVO
PISTON, 4TH APPLY
RING,
OIL SEAL (4TH APPLY PISTON) (OUTER)
18-30 2ND AP'PLY PISTON ASSEMBLY 21 SEAL, "0" RlNG
24 RING, OIL SEAL (2ND APPLY
PISTON)
(OUTER) 31 SPRING, SERVO RETURN JH0057-700R4
Figure 7 1 Servo Removal
Page 1100 of 1825
AUTOMATIC TRANSMISSION 700-R4-49
--
NO. DESCRIPTION I 301 VALVE, T.V. MODULATOR DOWNSHIFT
302 SPRING, T.V. MODULATOR DOWNSHIFT
VALVE
303 VALVE, T.V. MODULATOR UPSHIFT
304 SPRING, T.V. MODULATOR UPSHIFT VALVE
305 SLEEVE, CONVERTER CLUTCH THROTTLE
306 SPRING, CONVERTER CLUTCH THROTTLE
307 VALVE, CONVERTER CLUTCH THROTTLE
308 VALVE, CONVERTER CLUTCH SHlFT
309 SLEEVE, 3-4 THROTTLE VALVE
3 10 SPRING, 3-4 THROTTLE VALVE
31 1 VALVE, 3-4 THROTTLE
312 VALVE, 3-4 SHlFT
31 3 SLEEVE, 2-3 THROTTLE VALVE
314 SPRING, 2-3 THROTTLE VALVE
31
5 VALVE, 2-3 THROTTLE
31 6 VALVE, 2-3 SHlFT
31 7 SLEEVE, 1-2 THROTTLE VALVE
31
8 SPRING, 1-2 THROTTLE VALVE
31 9 VALVE, 1-2 THROTTLE
322 VALVE, 1-2 SHlFT
323 SLEEVE, THROTTLE VALVE PLUNGER
324 PLUNGER, THROTTLE VALVE
325 SPRING, THROTTLE VALVE
326 VALVE, THROTTLE
328 VALVE, 3-4 RELAY
329 VALVE, 4-3 SEQUENCE
330 SPRING, 4-3 SEQUENCE VALVE
331 SPRING, T.V.
LIMIT VALVE
332 VALVE, T.V.
LIMIT
333 VALVE, 1-2 ACCUMULATOR
334 SLEEVE, 1-2 ACCUMULATOR VALVE
335 SPRING, 1-2 ACCUMULATOR VALVE
336 VALVE,
LlNE BlAS
337 SPRING, LlNE BlAS VALVE
338 SPRING, 3-2 CONTROL
339 VALVE, 3-2 CONTROL
340 VALVE, MANUAL
341 PIN, COILED SPRING
342 PIN, COILED SPRING
343 RETAINER, SPRING (SLEEVE)
344 PLUG, VALVE BORE
345 PLUG, CUP
(-33 DIA.)
346 SWITCH ASM., PRESSURE (3RD CLUTCH)
347 SWITCH ASM., PRESSURE (4-3 PULSE)
348 SWITCH ASM., PRESSURE
(4TH CLUTCH)
349 SWITCH ASM., PRESSURE
(T.C.C.
SIGNAL)
350 BODY, CONTROL VALVE
351 PLUG, T.V. LIMIT
352 PLUG, VALVE BORE (12.5
- O.D.)
354 PLUG, CONVERTER CLUTCH SHlFT VALVE
BORE
(ECM CONTROLLED VEHICLES)
355 PLUG, CONVERTER CLUTCH T.V. BUSHING
BORE
(ECM CONTROLLED VEHICLES)
Figure 179 Control Valve Assembly-Legend
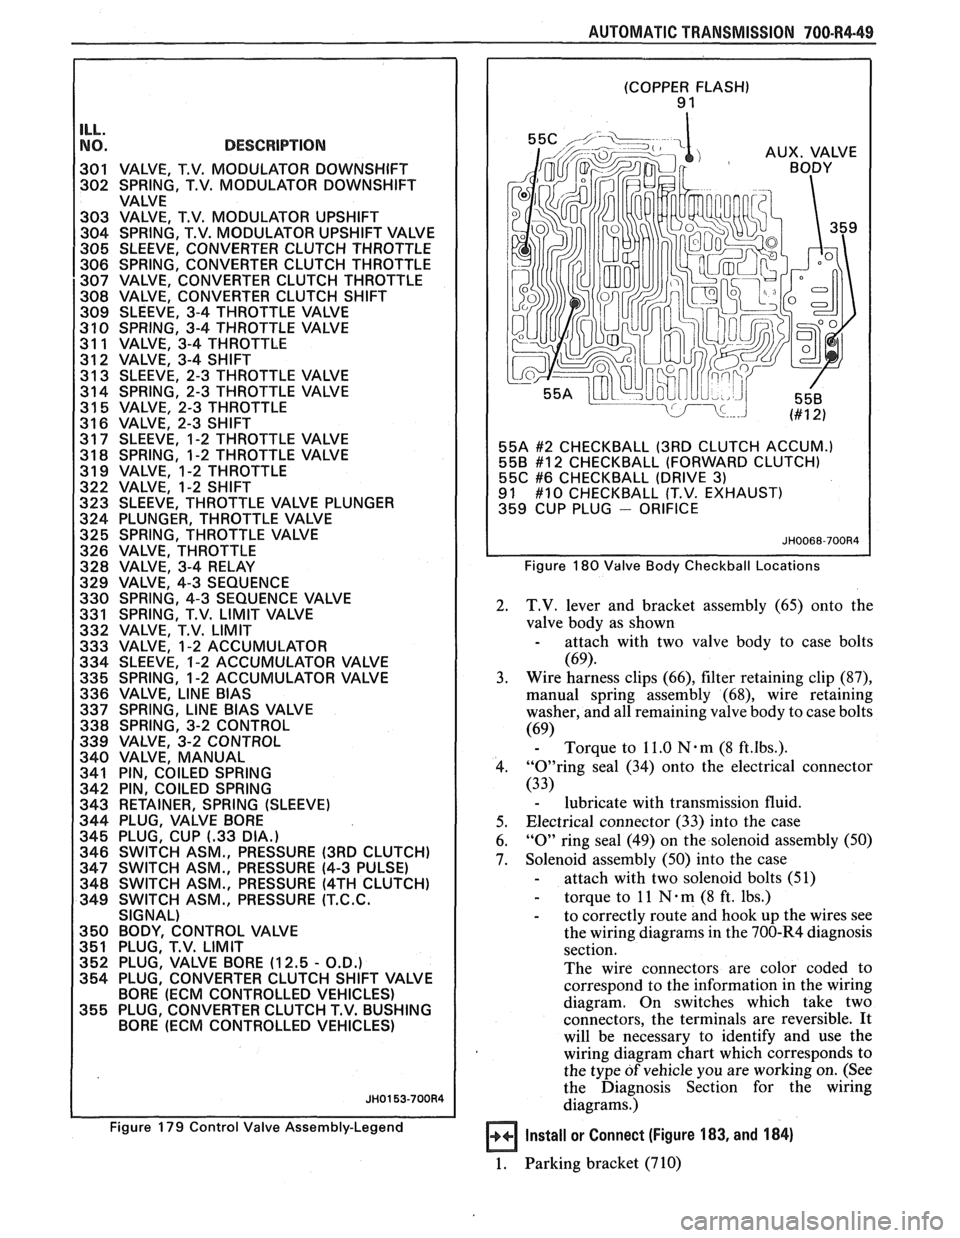
(COPPER FLASH) 9 1
55A
#2 CHECKBALL (3RD CLUTCH ACCUM.)
558 #12 CHECKBALL (FORWARD CLUTCH)
55C #6 CHECKBALL (DRIVE 3) 91 #10 CHECKBALL (T.V. EXHAUST)
359 CUP PLUG - ORIFICE
Figure 180 Valve Body Checkball Locations
2. T.V. lever and bracket assembly (65) onto the
valve body as shown
- attach with two valve body to case bolts
(69).
3. Wire harness
clips (66), filter retaining clip (87),
manual spring assembly (68), wire retaining
washer, and all remaining valve body to case bolts
(69) - Torque to 11.0 Nam (8 ft.lbs.).
4. "0"ring seal (34) onto the electrical connector
(33)
- lubricate with transmission fluid.
5. Electrical connector
(33) into the case
6.
"0" ring seal (49) on the solenoid assembly (50)
7. Solenoid assembly (50) into the case
- attach with two solenoid bolts (51)
- torque to 11 N . m (8 ft. lbs.)
- to correctly route and hook up the wires see
the wiring diagrams in the 700-R4 diagnosis
section.
The wire connectors are color coded to
correspond to the information in the wiring
diagram. On switches which take two
connectors, the terminals are reversible.
It
will be necessary to identify and use the
wiring diagram chart which corresponds to
the type
of vehicle you are working on. (See
the Diagnosis Section for the wiring
diagrams.)
Install or Connect (Figure 183, and 184)
1. Parking bracket (710)
Page 1122 of 1825
AUTOMATIC TMNSMISSION ON-VEHICLE SERVICE 7A1-3
e Propeller shaft oil seal worn or damaged
o Governor cover
e Line pressure pipe plug loose
@ Porous casting
3. Leak at converter end:
Converter seal damaged
- Seal lip cut. (Check converter hub for
damage.)
- Bushing moved forward and damaged
- Garter spring missing from seal
o Converter leak in weld area. (Refer to
Torque Converter.)
Porous casting (Case or pump)
4. Fluid comes out vent pipe or fill tube:
Over-filled
Water or coolant in fluid. Fluid will appear
milky.
e Case porous
e Incorrect fluid level indicator
e Plugged vent
e Drain back holes plugged
Mispositioned oil pump to case gasket (if
equipped)
Case Porosity Repair
1. Clean the leak area with solvent and air dry.
CAUTION: Epoxy adhesive may cause
skin irritations and eye damage. Read
and follow all information on the
container label as provided by the
manufacturer.
2. Mix a sufficient amount of epoxy adhesive,
# 1052533, or equivalent, following the
manufacturer's recommendations.
3. While the transmission case is hot, apply epoxy
adhesive with a clean, dry soldering acid brush.
4. Allow the epoxy adhesive to cure for three hours
before starting the engine.
5. Repeat fluid leak diagnosis procedures.
TORQUE CONVERTER CLUTCH ELECTRICAL
CONTROLS
The Torque Converter Clutch (TCC) system uses
controls that are internal as well as external to the
transmission. For internal control components of the
TCC system, refer to the I-Iydraulic Diagnosis Section
for for wiring diagrams and switch locations.
The external control components of the TCC
system include:
1. Brake Release Switch - To avoid stalling the
engine when braking, the converter clutch is
released any time the brakes are applied.
2. Electronic Control ModuOe - Receives input
signals and grounds TCC solenoid to apply clutch
when proper operating conditions are met.
3. Throttle Position Sensor - Sends throttle
position information to Electronic Control
Module.
4. Vacuum Sensor - Sends engine vacuum (load)
information to Electronic Control Module.
5. Vehicie Speed Sensor - Sends vehicle speed
information to Electronic Control Module.
6. Coolant Temperature Sensor - Sends engine
coolant temperature information to Electronic
Control Module.
TORQUE CONVERTER CLUTCH DIAGNOSIS
To properly diagnose the Torque Converter
Clutch (TCC) system perform all electrical testing first
and then the hydraulic testing. Refer to the appropriate
Driveability and Emissions Section (6E) for additional
Torque Converter Clutch Information
ON-VEHICLE SERVICE
SI-IIFT CONTROL CABLE
Remove or Disconnect (Fig. 1)
1. Negative battery cable.
2. Raise car, see Section OA.
3. Cable attachments at transmission.
4. Lower car.
5. Console, see Section
8C.
6. Cable at control lever and base.
7. Cable from floor.
install or Connect
1. Cable to floor.
2. Cable at base and control lever.
3. Console, see Section 8C.
4. Place control lever in "NEUTRAL"
5. Raise car.
6. Cable attachments at transmission.
7. Adjust cable.
8. Lower car.
9. Negative battery cable.
Adjust (Fig. 1)
1. Place control lever in "N" (Neutral).
2. Raise car, see Section 0.4.
3. Loosen cable
attachment at shift lever.
4. Rotate shift lever "clockwise" to park detent and
then back to neutral.
5. Tighten cable attachment.
15
N-m (11 lbs. ft.)
Important
Levg must be held out of "PARK" when
torquing nut.
6. Lower car.
7. Check cable adjustment by rotating control lever
thru the detents.
Remove or Disconnect (Fig. 2)
1. Negative battery cable.
2. Console, see Section 8C.
3. Cable at control lever and base.
Page 1170 of 1825
These schematics break the entire electrical
system down into individual circuits. You are
not distracted by wiring which is not part of
the circuit you're working on.
It is important to realize that no attempt is
made on the schematic to represent compo-
nents and wiring as they physically appear on
the car. For example, a 4-foot length of wire is
treated no differently in a schematic from one
which is only a few inches long. The number of
cavities for each connector is listed in the Com-
ponent Location List. Similarly, switches and
other components are shown as simply as pos-
sible, with regard to function only.
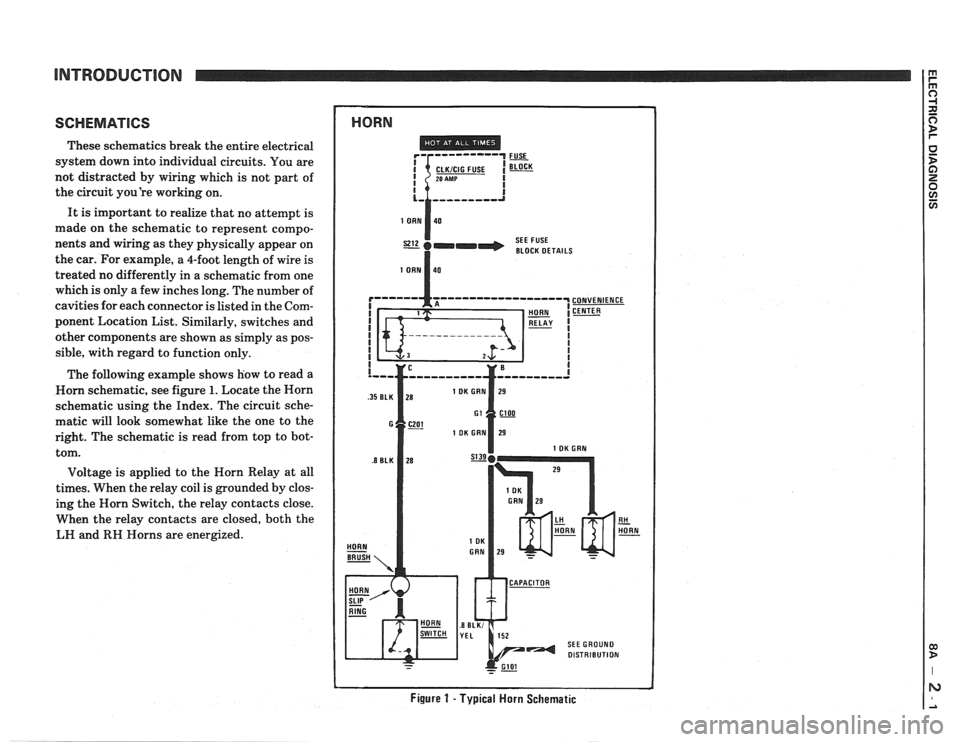
The following example shows how to read a
Worn schematic, see figure
1. Locate the Horn
schematic using the Index. The circuit sche-
matic will look somewhat like the one to the
right. The schematic is read from top to bot-
tom.
Voltage is applied to the Horn Relay at all
times. When the relay coil is grounded by clos-
ing the Horn Switch, the relay contacts close.
When the relay contacts are closed, both the
LH and
RH Horns are energized.
1 HORN
SEE FUSE
I BLOCK DETAILS
Figure 1 - Typical Horn Schematic
Page 1174 of 1825
INTRODUCTION
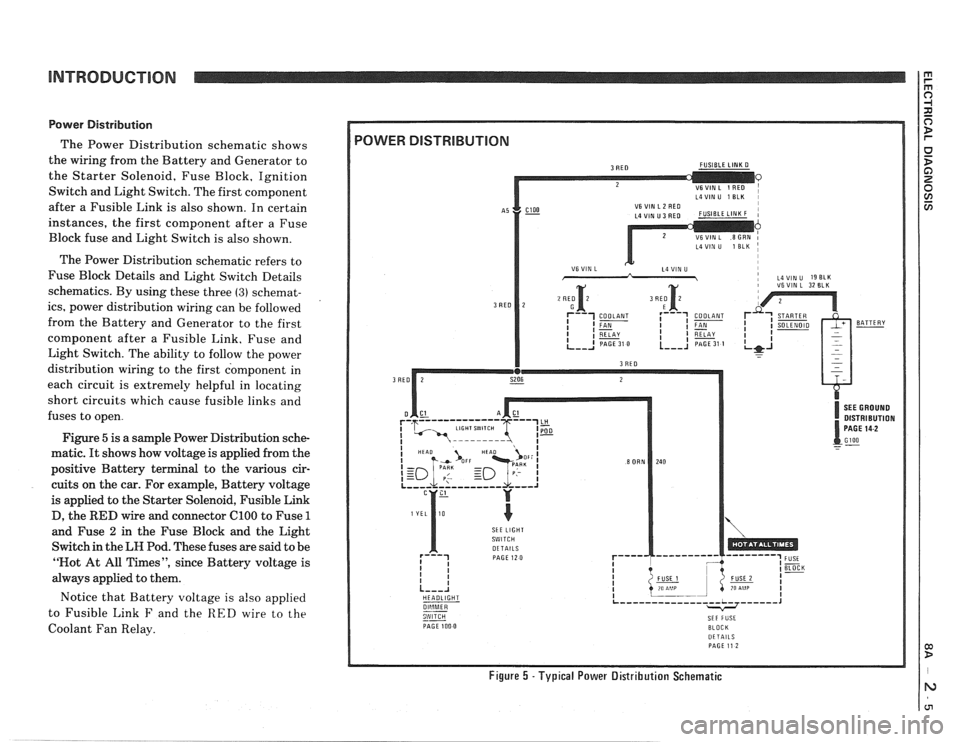
Power Distribution
The Power Distribution schematic shows
the wiring from the Battery and Generator to
the Starter Solenoid, Fuse Block, Ignition
Switch and Light Switch. The first component
after a Fusible Link is also shown. In certain
instances, the first component after a Fuse
Block fuse and Light Switch is also shown.
The Power Distribution schematic refers to
Fuse Block Details and Light Switch Details
schematics. By using these three
(3) schemat-
ics, power distribution wiring can be followed
from the Battery and Generator to the first
component after a Fusible Link. Fuse and
Light Switch. The ability to follow the power
distribution wiring to the first component in
each circuit is extremely helpful in locating
short circuits which cause fusible links and
fuses to open.
Figure
5 is a sample Power Distribution sche-
matic.
It shows how voltage is applied from the
positive Battery terminal to the various cir-
cuits on the car. For example, Battery voltage
is applied to the Starter Solenoid, Fusible Link
D, the
RED wire and connector ClOO to Fuse 1
and Fuse 2 in the Fuse Block and the Light
Switch in the
LH Pod. These fuses are said to be
"Not At All Times", since Battery voltage is
always applied to them.
Notice that Battery voltage is
also applied
to Fusible Link
F and the RED wire to the
Coolant Fan Relay.
L4VIN U 1 ELK I
i VSVIN L 32 BLK
DISTRIBUTION
SkE LIGHT
HEADLIGHT
--
PAGE 100 0 BLOCK DETAILS PAGE 11 2
Figure 5 -Typical Power Distribution Schematic
Page 1175 of 1825
INTRODUCTION
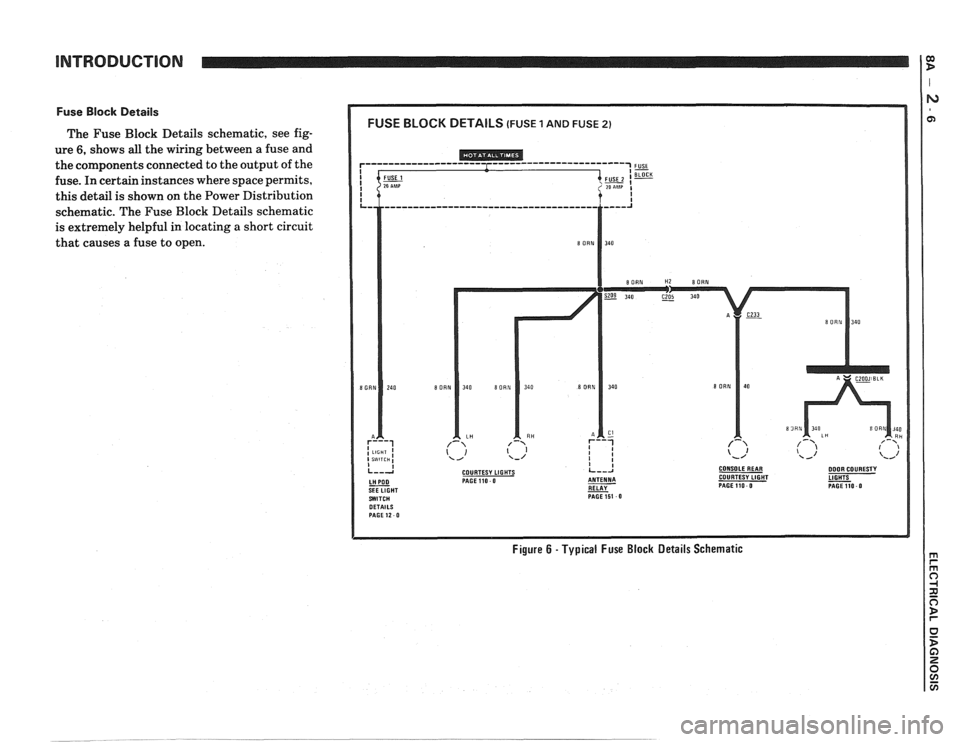
Fuse Block Details
The Fuse Block Details schematic, see fig-
ure
6, shows all the wiring between a fuse and
the components connected to the output of the
fuse. In certain instances where space permits,
this detail is shown on the Power Distribution
schematic. The Fuse Block Details schematic
is extremely helpful in locating
a short circuit
that causes a fuse to open.
COURTESY LIGHTS CONSOLEREAR DOOR COURESTY PAGE110 0 COURTESY LIGHT
RELAY - PAGEllO 0 PAGE151 0
Figure 6 - Typical Fuse Block Details Schematic
Page 1176 of 1825
INTRODUCTION
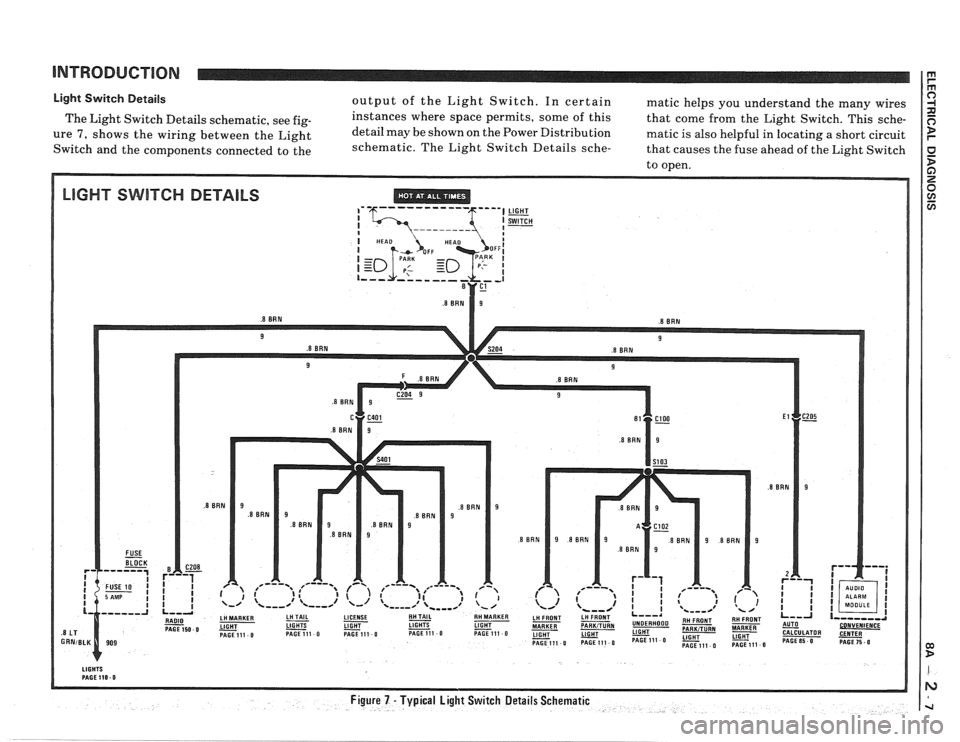
Light Switch Details output of the Light Switch. In certain matic helps you understand the many wires
The Light Switch Details schematic, see
fig- instances where space permits, some of this
that come from the Light Switch. This sche-
ure 7, shows the wiring between the Light detail
may be shown on the Power Distribution matic is also helpful in locating a short circuit
Switch and the components connected to the schematic.
The Light Switch Details
sche- that causes the fuse ahead of the Light Switch
to open.
LIGHT SWITCH DETAILS ,' '6--- ----- --- 5""l LIGHT
Page 1181 of 1825
TROUBLESHOOTING PROCEDURES
The following four-step troubleshooting pro-
cedure is recommended:
Step 1: Check the problem.
Perform a System Check to be sure you
understand what's wrong. Don't waste time
fixing part of the problem! Do not begin dis-
assembly or testing until you have narrowed
down the possible causes.
Step 2: Read the Electrical Schematic.
Study the schematic. Read the Circuit Oper-
ation text if you do not understand how the
circuit
should work. Check circuits that share
wiring with the problem circuit. The names of
circuits that share the same fuse, ground,
switch, etc., are included on each electrical
schematic. (Shared circuits are also shown on
Power Distribution, Ground Distribution,
Fuse Block Details, and Light Switch pages.)
Try to operate the shared circuits. If the
shared circuits work, then the shared wiring is
OK. The cause must be within the wiring used
only by the problem circuit. If several circuits
fail at the same time, chances are the power
(fuse) or ground circuit is faulty.
Step 3: Find the Cause and Repair.
* Narrow down the possible causes.
@ Use the Troubleshooting Hints.
@ Make the necessary measurements as
given in the System Diagnosis.
Step 4: Test the Repair
Repeat the System Check to be sure you
have fixed the whole problem.
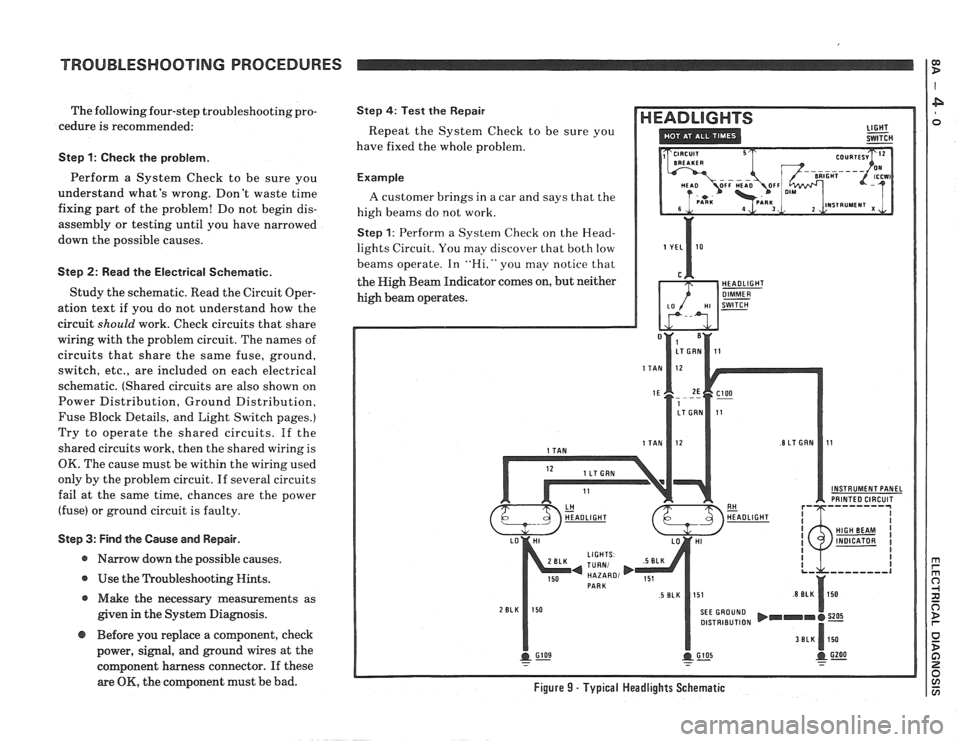
Example
A customer brings in a car and says that the
high beams do not work.
Step 1: Perform a System Check on the Head-
lights Circuit. You may discover that both low
beams operate. In
"Hi," you may notice that
the High Beam Indicator comes on, but neither
high beam operates.
INSTRUMENT PANEL PRINTED CIRCUIT
DISTRIBUTION
@ Before you replace a component, check
power, signal, and ground wires at the
component harness connector. If these
are
OK, the component must be bad. Figure 9 - Typical Headlights Schematic