1973 DATSUN B110 oil level
[x] Cancel search: oil levelPage 310 of 513

EMISSION
CONTROL
AND
TUNE
UP
reading
cylinders
through
spark
plug
hole
Repeat
compression
check
on
these
cylinders
1
If
compression
improves
considerably
piston
rings
are
defective
2
If
compression
does
not
improve
valves
are
sticking
or
seating
improperly
3
If
two
adjacent
cylinders
indicate
low
compression
and
injecting
oil
on
pistons
does
not
increase
compres
sion
the
cause
may
be
a
cylinder
head
gasket
leak
between
the
cylinders
Engine
oil
and
coolant
in
cylinder
could
result
from
this
problem
Compression
pressure
12
S
to
14
S
kg
cm2
178
to
206
psi
at
3S0
rpm
Checking
exhaust
manifold
heat
control
valve
Check
heat
control
valve
for
proper
operation
If
it
does
not
operate
properly
trouble
is
due
to
excess
carbon
on
shaft
or
damaged
shaft
Clean
if
necessary
The
bimetal
should
be
also
checked
for
proper
function
IGNITION
AND
FUEL
SYSTEM
Checking
battery
Check
electrolyte
level
in
each
battery
celL
L
Unscrew
each
filler
cap
and
inspect
fluid
leveL
If
fluid
level
is
low
add
distilled
water
to
bring
level
up
to
app
roximately
10
to
20
mm
0
3937
to
0
7874
in
above
plates
Do
not
overfilL
2
Measure
specific
gravity
of
battery
electrolyte
ET002
Fig
ET
B
Checking
the
specific
gravity
of
battery
electrolyte
Permissible
Full
charge
value
value
at
200C
68OF
Frigid
climates
Over
1
22
1
28
Tropical
climates
Over
1
18
1
23
Other
climates
Over
L
20
1
26
Clean
the
top
of
battery
and
terminals
with
a
solu
lion
of
baking
soda
and
water
Rinse
off
and
dry
with
compressed
air
The
top
of
battery
must
be
clean
to
prevent
current
leakage
between
terminals
and
from
positive
terminal
to
hold
down
clamp
In
addition
to
current
leakage
prolonged
accumulation
of
acid
and
dirt
on
the
top
of
battery
may
cause
blistering
of
the
material
covering
connector
straps
and
corrosion
of
straps
After
tightening
terminals
coat
them
with
petro
laturn
vaseline
to
protect
them
from
corrosion
Checking
and
adjusting
ignition
timing
I
Check
spark
plugs
and
distributor
breaker
points
for
condition
2
Thoroughly
wipe
off
dirt
and
dust
from
timing
marks
on
crank
pulley
and
front
cover
3
Warm
up
engine
sufficiently
ET
5
Page 331 of 513

ENGINE
Spark
plugs
Cap
mm
in
0
8
to
0
9
0
03110
0
035
Idle
CO
ldie
speed
Manual
transmission
rpm
rpm
1
5
to
5
800
1
5
to
5
650
in
D
position
Automatic
transmission
Dash
pot
Setting
engine
speed
rpm
1
900
to
2
000
Throttle
opener
at
sea
level
Setting
vacuwn
pressure
Manual
transmission
Automatic
transmission
Setting
engine
speed
no
load
Servo
diaphragm
full
stroke
rpm
mm
in
500
to
540
19
7
to
21
3
480
to
520
18
9
to
20
5
1
650
to
1
850
5
0
1969
mmHg
in
Hg
mmHg
in
Hg
Theono
switch
Temperature
rises
from
low
to
high
oC
0
F
above
5
41
Flow
guide
valve
Opera
ting
pressure
mmHg
in
Hg
10
0
4
TROUBLE
DIAGNOSES
AND
CORRECTIONS
Troubles
Possible
causes
Remedies
CANNOT
CRANK
ENGINE
OR
SLOW
CRANKING
Improper
grade
oiL
Replace
with
proper
grade
oiL
Discharged
battery
Charge
battery
Defective
battery
Replace
Loosen
fan
belt
Adjust
Trouble
in
charge
system
Inspect
charge
system
Wiring
connection
trouble
in
starting
circuit
Correct
Defective
starter
switch
Repair
or
replace
Defective
starter
motor
Repair
or
replace
ET
26
I
Page 333 of 513
ENGINE
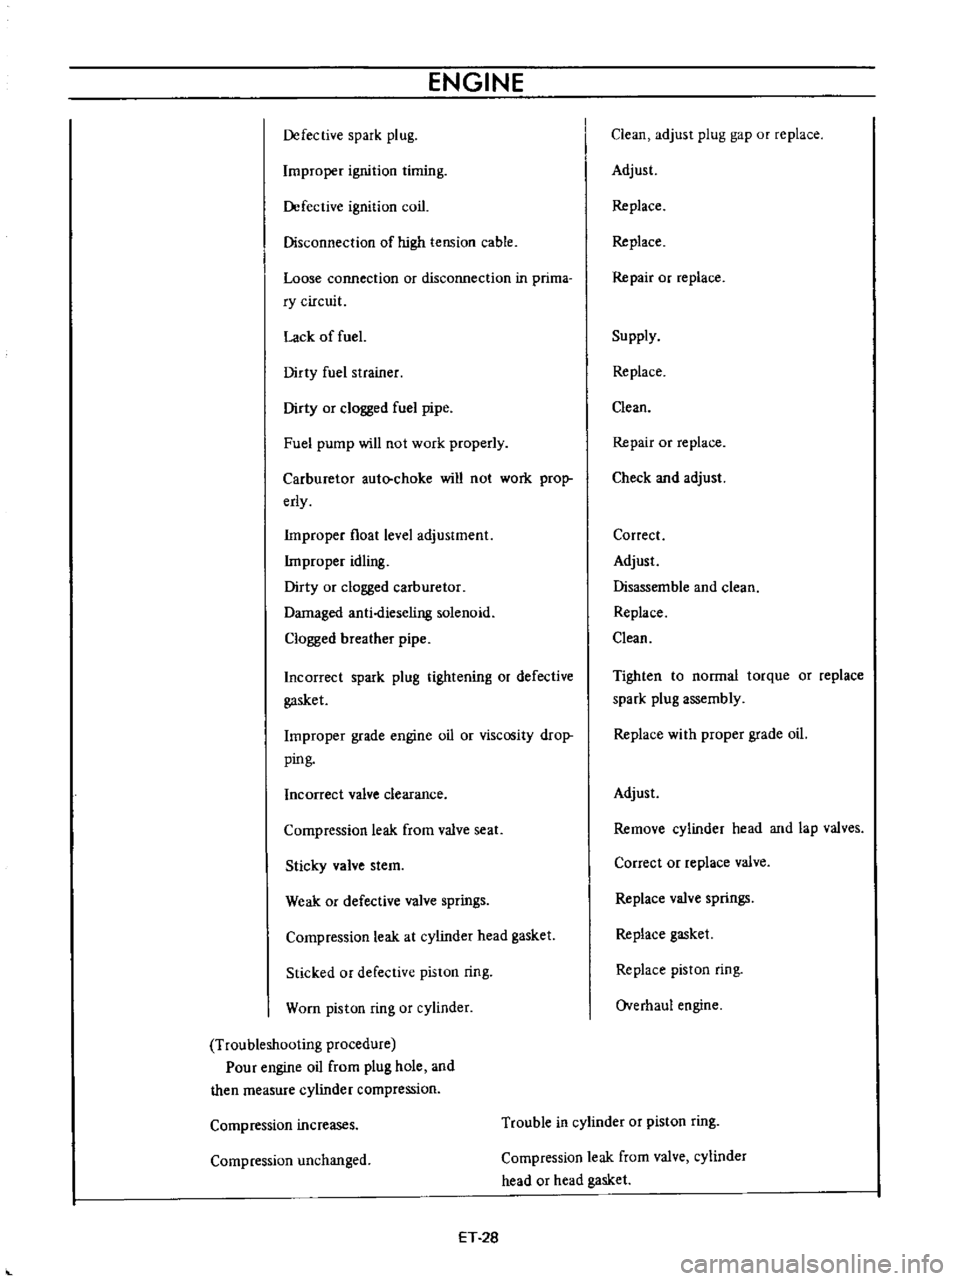
Defective
spark
plug
Improper
ignition
timing
Defective
ignition
coil
Disconnection
of
high
tension
cable
Loose
connection
or
disconnection
in
prima
ry
circuit
Lack
of
fuel
Dirty
fuel
strainer
Dirty
or
clogged
fuel
pipe
Fuel
pump
will
not
work
properly
Carburetor
auto
choke
will
not
work
prop
erly
Improper
float
level
adjustment
Improper
idling
Dirty
or
clogged
carburetor
Damaged
anti
dieseling
solenoid
Clogged
breather
pipe
Incorrect
spark
plug
tightening
or
defective
gasket
Improper
grade
engine
oil
or
viscosity
drop
ping
Incorrect
valve
clearance
Compression
leak
from
valve
seat
Sticky
valve
stem
Weak
or
defective
valve
springs
Compression
leak
at
cylinder
head
gasket
Sticked
or
defective
piston
ring
Worn
piston
ring
or
cylinder
Troubleshooting
procedure
Pour
engine
oil
from
plug
hole
and
then
measure
cylinder
compression
Clean
adjust
plug
gap
or
replace
Adjust
Replace
Replace
Repair
or
replace
Supply
Replace
Clean
Repair
or
replace
Check
and
adjust
Correct
Adjust
Disassemble
and
clean
Replace
Clean
Tighten
to
normal
torque
or
replace
spark
plug
assembly
Replace
with
proper
grade
oil
Adjust
Remove
cylinder
head
and
lap
valves
Correct
or
replace
valve
Replace
valve
springs
Replace
gasket
Replace
piston
ring
Overhaul
engine
Compression
increases
Trouble
in
cylinder
or
piston
ring
Compression
unchanged
Compression
leak
from
valve
cylinder
head
or
head
gasket
ET
28
Page 334 of 513

IMPROPER
ENGINE
IDLING
Fuel
system
in
trouble
Low
compression
Others
Ignition
system
in
trouble
Engine
idle
too
fa
t
ENGINE
POWER
NOT
UP
TO
NORMAL
4
w
compression
Ignition
system
in
trouble
Fuel
system
in
trouble
EMISSION
CONTROL
AND
TUNE
UP
Clogged
or
damaged
carburetor
jets
Incorrect
carburetor
adjustment
idle
speed
idle
mixture
Clogged
air
cleaner
Defective
gaskets
of
manifolds
or
carburetor
insulator
Improper
float
level
adjustment
Incorrect
valve
clearance
Extremely
low
revolution
Incorrect
basic
ignition
timing
Incorrect
automatic
teinperature
control
air
cleaner
Defect
or
malfunction
of
ignition
system
spark
plug
high
tension
cable
breaker
point
ignition
coil
etc
Trouble
in
throttle
link
and
cable
Incorrect
throttle
opener
adjustment
Trouble
in
PCV
valve
Trouble
in
automatic
choke
Defect
or
malfunction
of
ignition
system
spark
plug
high
tension
cable
breaker
point
ignition
coil
etc
Incorrect
ignition
timing
Defective
spark
plugs
Defective
distributor
points
Malfunction
of
choke
system
Clogged
fuel
pipe
ET
29
Clean
or
replace
Adjust
idle
speed
mixture
Replace
element
Replace
gasket
Adjust
Previously
mentioned
Adjust
Adjust
idie
rpm
Adjust
ignition
timing
Adjust
automatic
temperature
control
air
cleaner
Adjust
or
replace
ignition
system
Check
throttle
link
and
cable
Adjust
throttle
opener
Replace
PCV
valve
Adjust
automatic
choke
Adjust
or
replace
ignition
system
Previously
mentioned
Adjust
Clean
adjust
or
replace
plugs
Dress
or
replace
points
Check
con
denser
Adjust
Clean
Page 337 of 513
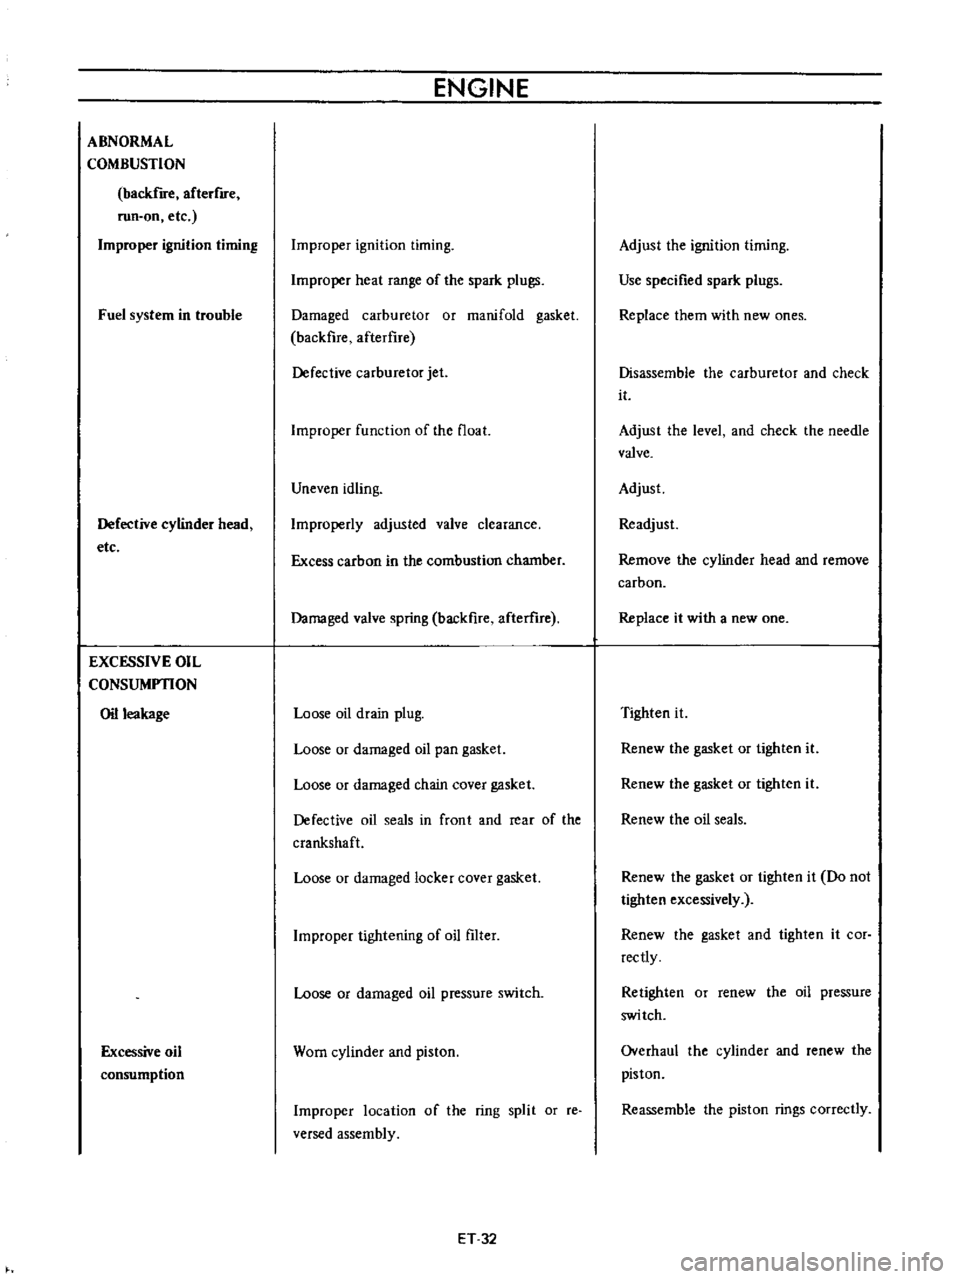
ABNORMAL
COMBUSTION
backfire
afterflfe
run
on
etc
Improper
ignition
timing
Fuel
system
in
trouble
Defective
cylinder
head
etc
EXCESSIVE
OIL
CONSUMPTION
Oil
leakage
Excessive
oil
consumption
ENGINE
Improper
ignition
timing
Improper
heat
range
of
the
spark
plugs
Damaged
carburetor
or
manifold
gasket
backfire
afterflre
Defective
carburetor
jet
Improper
function
of
the
float
Uneven
idling
Improperly
adjusted
valve
clearance
Excess
carbon
in
the
combustion
chamber
Damaged
valve
spring
backfire
afterure
Loose
oil
drain
plug
Loose
or
damaged
oil
pan
gasket
Loose
or
damaged
chain
cover
gasket
Defective
oil
seals
in
front
and
rear
of
the
crankshaft
Loose
or
damaged
locker
cover
gasket
Improper
tightening
of
oil
filter
Loose
or
damaged
oil
pressure
switch
Worn
cylinder
and
piston
Improper
location
of
the
ring
split
or
reo
versed
assembly
ET
32
Adjust
the
ignition
timing
Use
specified
spark
plugs
Replace
them
with
new
ones
Disassemble
the
carburetor
and
check
it
Adjust
the
level
and
check
the
needle
valve
Adjust
Readjust
Remove
the
cylinder
head
and
remove
carbon
Replace
it
with
a
new
one
Tighten
it
Renew
the
gasket
or
tighten
it
Renew
the
gasket
or
tighten
it
Renew
the
oil
seals
Renew
the
gasket
or
tighten
it
Do
not
tighten
excessively
Renew
the
gasket
and
tighten
it
cor
rectly
Retighten
or
renew
the
oil
pressure
switch
Overhaul
the
cylinder
and
renew
the
piston
Reassemble
the
piston
rings
correctly
Page 379 of 513
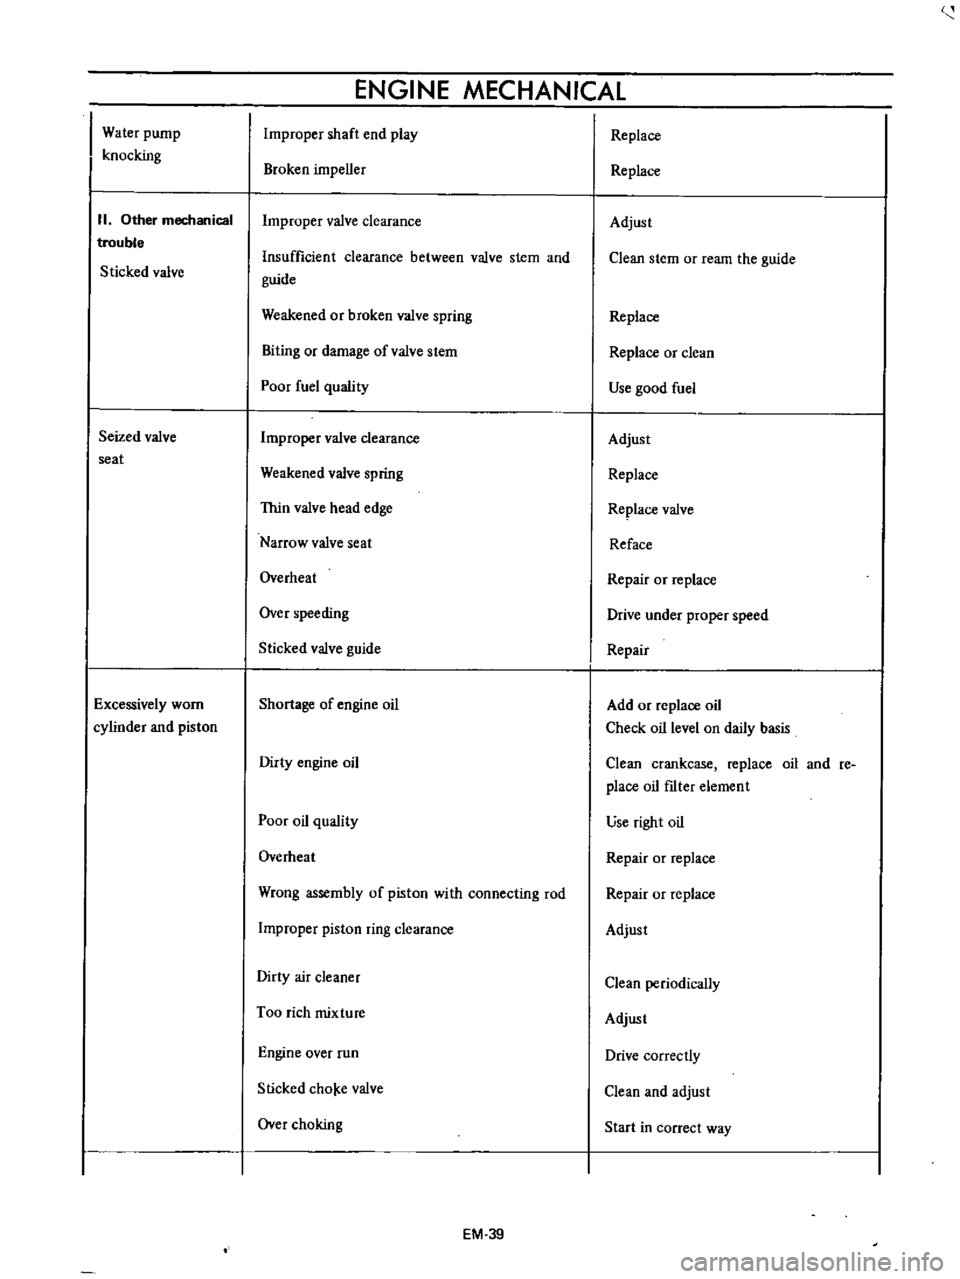
Water
pump
knocking
II
Other
mechanical
trouble
Sticked
valve
Seized
valve
seat
Excessively
worn
cylinder
and
piston
ENGINE
MECHANICAL
Improper
shaft
end
play
Broken
impeller
Improper
valve
clearance
Insufficient
clearance
between
valve
stem
and
guide
Weakened
or
broken
valve
spring
Biting
or
damage
ofvalve
stem
Poor
fuel
quality
Improper
valve
clearance
Weakened
valve
spring
Thin
valve
head
edge
Narrow
valve
seat
Overheat
Over
speeding
Sticked
valve
guide
Shortage
of
engine
oil
Dirty
engine
oil
Poor
oil
quality
Overheat
Wrong
assembly
of
piston
with
connecting
rod
Improper
piston
ring
clearance
Dirty
air
cleaner
Too
rich
mixture
Engine
over
run
Slicked
cho
e
valve
Over
choking
EM
39
Replace
Replace
Adjust
Clean
stem
or
ream
the
guide
Replace
Replace
or
clean
Use
good
fuel
Adjust
Replace
Replace
valve
Reface
Repair
or
replace
Drive
under
proper
speed
Repair
Add
or
replace
oil
Check
oil
level
on
daily
basis
Clean
crankcase
replace
oil
and
re
place
oil
fIlter
element
use
right
oil
Repair
or
replace
Repair
or
replace
Adjust
Clean
periodically
Adjust
Drive
correctly
Clean
and
adjust
Start
in
correct
way
Page 380 of 513
r
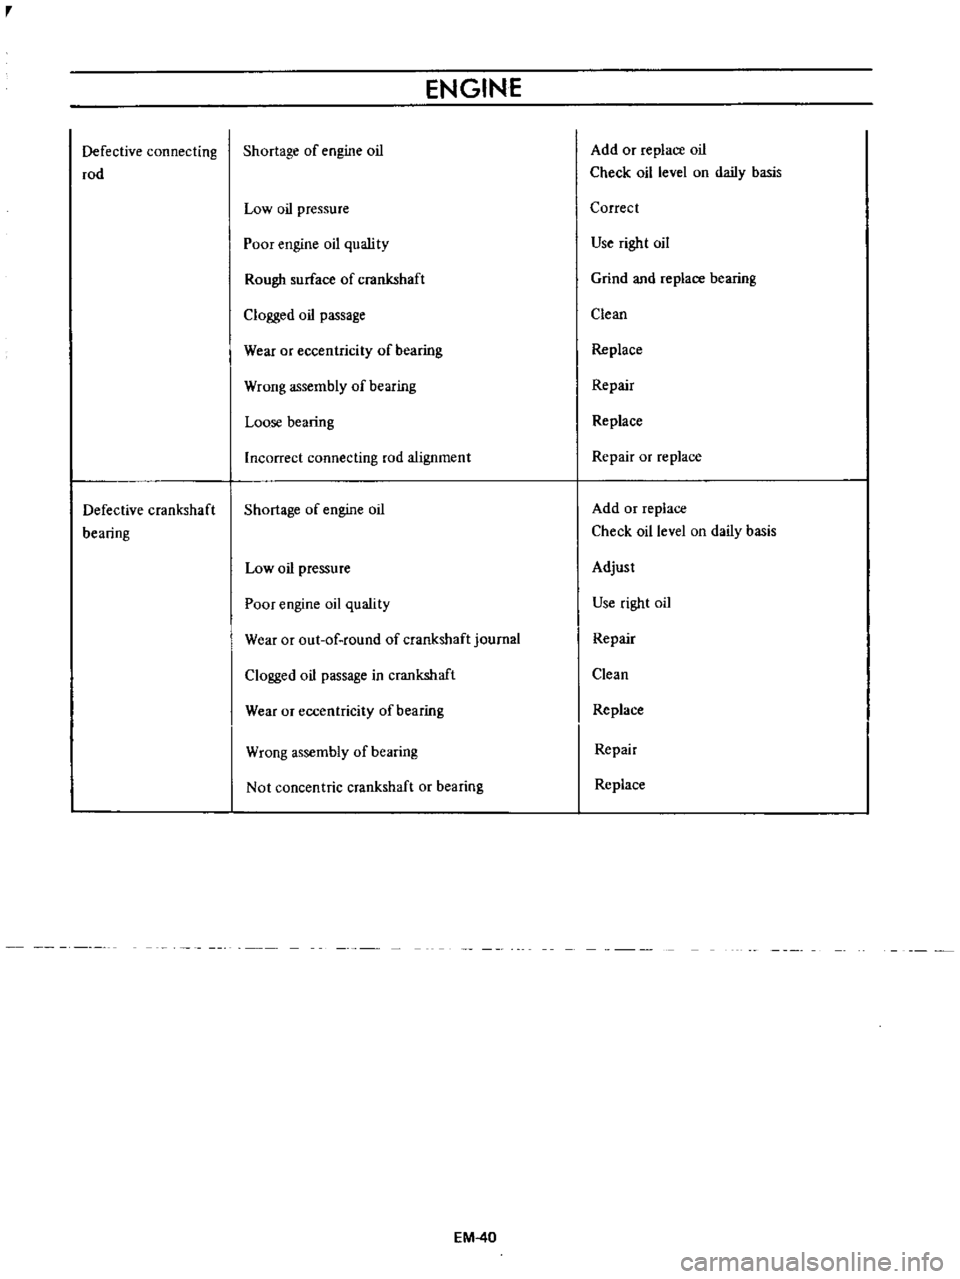
Defective
connecting
rod
Defective
crankshaft
bearing
ENGINE
Shortage
of
engine
oil
Low
oil
pressure
Poor
engine
oil
quslity
Rough
surface
of
crankshaft
Clogged
oil
passage
Wear
or
eccentricity
of
bearing
Wrong
assembly
of
bearing
Loose
bearing
Incorrect
connecting
rod
alignment
Shortage
of
engine
oil
Low
oil
pressure
Poor
engine
oil
quality
Wear
or
out
of
round
of
crankshaft
journal
Clogged
oil
passage
in
crankshaft
Wear
or
eccentricity
of
bearing
Wrong
assembly
of
bearing
Not
concentric
crankshaft
or
bearing
EM
40
Add
or
replace
oil
Check
oil
level
on
daily
basis
Correct
Use
right
oil
Grind
and
replace
bearing
Clean
Replace
Repair
Replace
Repair
or
replace
Add
or
replace
Check
oil
level
on
daily
basis
Adjust
Use
right
oil
Repair
Clean
Replace
Repair
Replace
Page 399 of 513
ENGINE
INSPECTION
Check
the
upper
and
lower
bodies
for
cracks
2
Check
the
valve
assembly
for
wear
of
the
valve
and
valve
spring
Blow
the
valve
assembly
by
breath
to
examine
its
function
3
Check
the
diaphragm
for
small
holes
cracks
and
wear
4
Check
the
rocker
arm
for
wear
at
the
portion
in
contact
with
the
camshaft
5
Check
the
rocker
arm
pin
for
wear
since
a
worn
pin
may
cause
oil
leakage
6
Check
all
other
components
for
any
abnormalities
and
replace
with
new
parts
as
required
ASSEMBLY
Assembly
is
done
in
reverse
order
of
disassembly
For
reassembly
and
reinstallation
the
following
matters
should
be
noted
Use
new
gasket
2
Lubricate
the
rocker
arm
link
rocker
arm
pin
and
lever
pin
before
installation
3
To
test
the
function
position
the
fuel
pump
assem
bly
about
I
meter
3
3
ft
above
fuel
level
with
a
pipe
connecting
the
fuel
pump
and
the
fuel
strainer
and
operate
the
rocker
afm
by
hand
If
fuel
is
drawn
up
soon
after
the
rocker
arm
is
released
the
function
of
the
pump
is
satisfactory
CARBURETOR
CONTENTS
DESCRIPTION
STRUCTURE
AND
OPERATION
EF
8
EF
9
EF
10
EF
11
EF
12
EF
12
EF
12
EF
14
EF
14
EF
15
EF
15
EF
16
EF
16
Primary
system
Secondary
system
Anti
dieseling
solenoid
valve
Float
system
Electric
automatic
choke
ADJUSTMENT
Idling
adjustment
Fuel
level
adjustment
Fast
idle
adjustment
Vacuum
break
adjustment
Choke
un
loader
adjustment
DESCRIPTION
The
carburetors
are
of
a
downdraft
type
which
is
designed
and
built
to
increase
power
and
fuel
economy
as
Bi
metal
setting
Adjustment
of
interlock
opening
of
primary
and
secondary
throttle
valves
Dash
pot
adjustment
MAJOR
SERVICE
OPERATIONS
Removal
Disassembly
Cleaning
and
inspection
Assembly
and
installation
JETS
SERVICE
DATA
AND
SPECIFICATIONS
TROUBLE
DIAGNOSES
AND
CORRECTIONS
EF
17
EF
18
EF
18
EF
19
EF
19
EF
19
EF
21
EF
22
EF
22
EF
22
EF
22
well
as
to
reduce
the
emission
of
exhaust
gases
These
carburetors
present
several
distinct
features
of
importance
to
the
car
owners
A
summary
of
features
is
as
follows
EF
8