Page 225 of 402

u (0 .-I N r--. N .-I 0
0
:E
Radio
Opening the radio
The radio supports the FM , A M and SiriusXM *
(satellite radio) bands. Using the HO Radio re
ceiver also allows you to receive radio stations
on the FM and AM bands in digital format.
Fig . 203 F M stat ion list ( HO Ra dio tec hn ology FM)
R.td10: SiriusXM
~000 ---=0---Radio ID ,
NoS19nal
... 001 Prev iew N oS19nal
J 002 H its 1
~
f) 003 20 on 20 N
oS19na l
004 40s on 4 NoS19nal
F ig. 204 S iri usXM station list
.. Press the I RAD IO I bu tton .
Afte r opening the rad io, t he last opened station
lis t is disp laye d.
.
I
Selecting a station : select and confirm a stat io n
from the station list . FM/ AM stations t hat can be
received by digital rad io are ma rked w ith the HD
R adio technology symbol
tQ) ® ¢fig. 203 . If re
ception quality decl ines, the r adio automatically
switches to the analog FM/AM station depe nding
on availability . D igi tal HD Radio s ta tions * may
contain multiple additional stations* . The ava ila
b le add itiona l stations* are listed under the radio
station. I f you lose reception, the add it iona l sta
tions* are muted since they can no longer be re
ceived.
Setting the frequency band : press the I RADIO I
button repeated ly until the desired frequency
band is set.
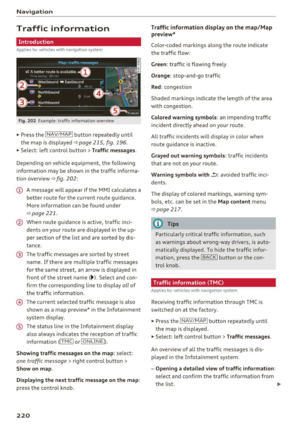
The follow ing information is displayed in the sta
tion list ¢
fig. 203/ ¢ fig . 204:
Radio
(D Presets
The s tat ion is stored as a preset. The symbo l
shows the s to red lo cation in the prese ts list (fo r
example, 21) .
@Radio text (shortened display )
If avai lab le, program info rmation about the set
station is d isplayed in a ll of the statio n lists.
@ Frequency
@ Station name
® Stat io n w ith HD Radio t echnolog y available
tQ)
® Channel number
If there is a loss of radio signal (Sir iusXM*), the
fo llowing system in format ion is displayed in the
station list:
NoSignal : the tu ner is cu rrent ly not receiving a
sate llite s ignal
(j) .
The system informa tion turns off when the radio
st ations are rece ived again.
(D Tips
- Con tact the SiriusXM" provider if you would
like to receive sa tel lit e programming .
- B uilding s, tu nnels, b ridges, ope n area s, oth
er veh icles or objects o n the veh icle roof can
affect reception.
- Satel lite ra dio is not availab le in Alaska and
Hawaii.
223
Page 226 of 402

Radio
Radio functions
Free text search
App lies to: ve hicles w ith free text search
Using the free text search, you can select the or
der that the search terms are entered in the in
put field. Search in all frequency bands for a sta
tion name or program type such as
News ).
Fig . 20 5 Input field a nd results l ist fo r free tex t sea rch
- Opening the free text search : when in a s ta tion
l ist, keep turning the contro l knob to the left
u nt il the
free tex t search inp ut fie ld is dis
played .
-Using the free text sear ch : see c::> page 165,
Free text search.
You can a lso search for frequencies .
Stat ions from the presets @ are disp layed in the
results list
(D c::> fig. 205. The symbo l@ indicates
which station list you sw itched to based on the
station selection.
Additional options
.,. Se lect : I RADIO I button > right contro l button.
The follow ing options are ava ilable depending on
the frequency band:
- Sou nd settings : see c::>page 253.
-Store a s fa vorite : see c::> page 226 , Pr esets .
-Manage Siriu sXM al ert s: see c::> page 225, Sir-
iusXM alerts.
- Re ceive alert s for thi s arti st/ Re cei ve alert s fo r
thi s tr ack :
see c::> page 225, SiriusXM alerts.
-Manu al tuning : the frequency ba rs a re dis
played . Se lect and confirm the desired frequen
cy .
-See k: the radio tunes to the prev ious or next re
ce ivable station .
224
-Scan : all s tations are p layed for severa l seconds
each.
- Radio settin gs: see c::> page 226.
Radio text
.,. Select: I RADIO I button > left control button > a
frequency band (such as
FM ) > a station.
.,. Select: r ight control button>
Rad io te xt.
Information that accompanies the program (such
as artist, composer, t rack) is displayed .
Browsing through radio text entrie s: turn the
contro l knob to t he left or right.
Requirement: a rad io text entry must be dis
played and the station must be broadcast ing a
phone number, a navigation dest inat ion or a text
message number as Radio Text Plus in formation .
If a location, a phone number or a text message
numbe r is included with a radio text entry, the
r ad io text will be shown wi th a colored borde r.
You have the following opt ions:
Call* /Start route gu idance */Write t ext mes
s age *:
-Sel ect a radio text entry with Radio Text Plus in
formation and press the control knob.
- Select and confirm
Call */Start route guid
a nce* /W rite te xt me ssage* . O r:
press the
I BACK I button to cancel.
(!') Tips
The availability of radio text and Radio Text
P lus depends on the radio station.
Page 227 of 402

u (0 ...... N r--. N ...... 0
0
:E
SiriusXM alerts
Appl ies to: ve hicles with SiriusXM
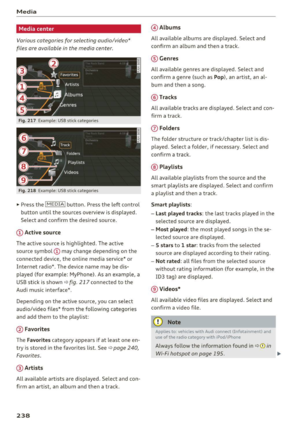
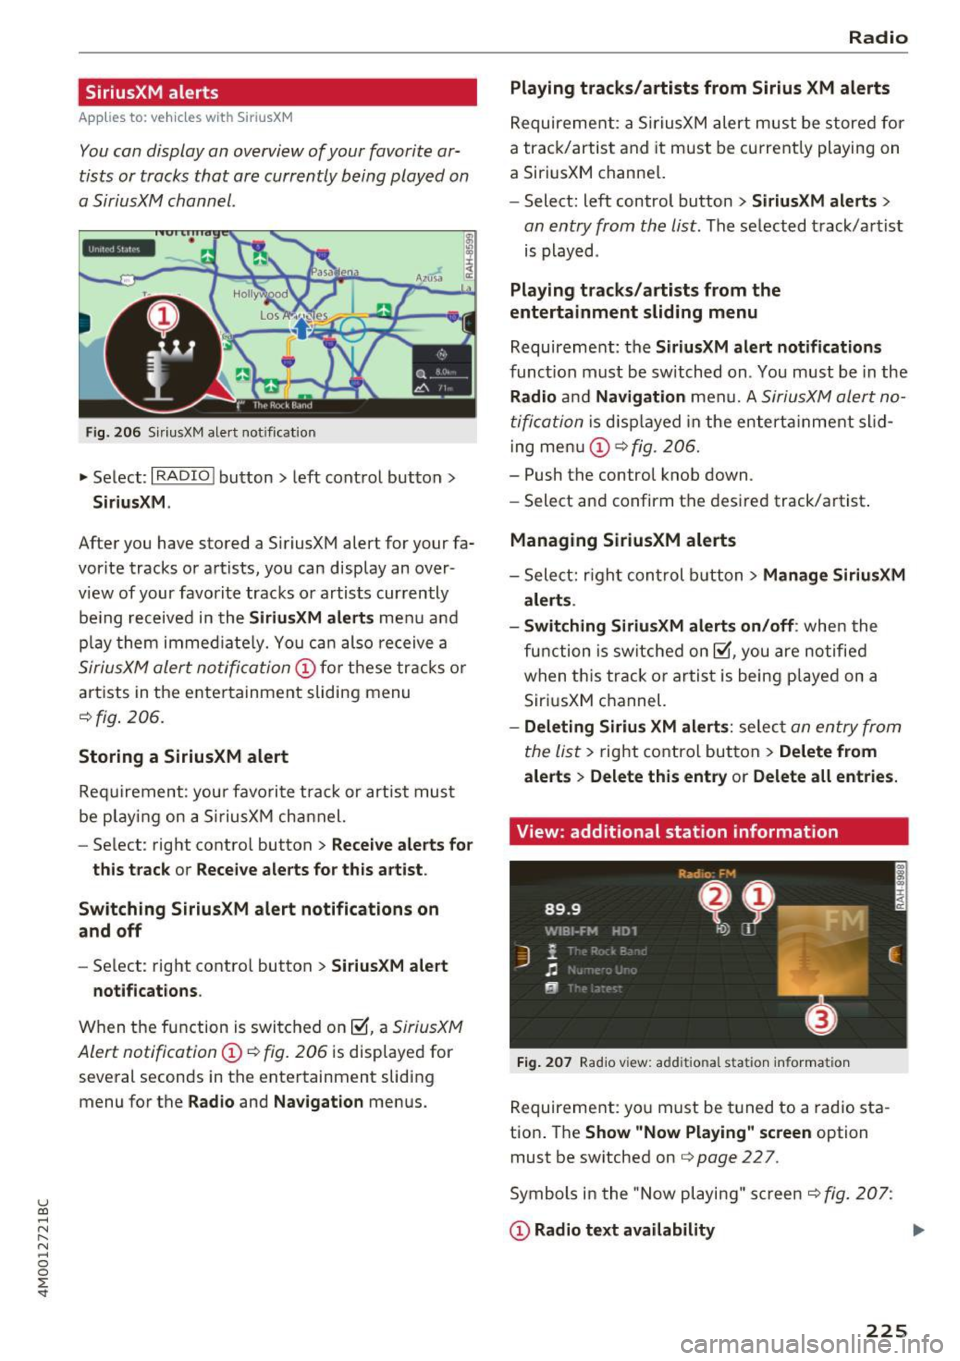
You can display an overview of your favorite ar
tists or tracks that are currently being played on
a SiriusXM channel .
Yll,IIMl1&1
Fig. 206 SiriusXM ale rt not if icat ion
• Select : I RADIO I button > left control button >
SiriusXM .
After you have stored a SiriusXM alert for your fa
vor ite tracks or artists, you can display an over
view of your favorite tracks or artists currently
be ing received in the
SiriusXM alerts menu and
play them immed iately. You can also receive a
SiriusXM alert notification CD for these tracks or
artists in the enter tainment sliding menu
<=:> fig . 206.
Storing a SiriusXM alert
Requirement: your favorite track or artist must
be playing on a SiriusXM channel.
- Se lect : right contro l button
> Receive alerts for
this track or Receive alerts for this artist .
Switching SiriusXM alert notifications on
and off
- Se lect: right contro l button > SiriusXM alert
notifications.
When the function is switched on~' a SiriusXM
Alert notification
CD c::> fig. 206 is disp layed for
several seconds in the entertainment sliding
menu for the
Radio and Navigation menus.
Radio
Playing tracks/artists from Sirius XM alerts
Requireme nt: a SiriusXM alert must be stored for
a track/artist and it must be current ly playing on
a SiriusXM channe l.
- Select: left control button
> SiriusXM alerts >
an entry from the list . The selected track/artist
is played .
Playing tracks/artists from the
entertainment sliding menu
Requirement: the SiriusXM alert notifications
function must be switched on . You must be in the
Radio and Navigation menu. A SiriusXM alert no
tification
is d isplayed in the enterta inment slid
i ng menu
CD <=:>fig. 206.
-Push the control knob down.
- Select and confirm the desired track/artist .
Managing SiriusXM alerts
-Select: right con trol button > Manage SiriusXM
alerts .
- Switching SiriusXM alerts on/off :
when the
fu nction is switched on~' you are notified
when th is track or artist is being played on a
SiriusXM channel.
-Deleting Sirius XM alerts : select an entry from
the list>
right control button > Delete from
alerts
> Delete this entry or Delete all entries.
View: additional station information
Fig. 207 Radio v iew: add it io nal sta ti on info rma tion
Requirement: yo u must be tuned to a radio sta
tion . The
Show "Now Playing " screen option
must be switched on
c::> page 22 7.
Symbols in the "Now playing " screen
c::> fig. 207:
CD Radio text availability ..,.
225
Page 228 of 402

Radio
Radi o te xt
is availab le for the selected stat ion.
See
c::> page 224.
@ FM HD Radio technolo gy
The station is received through FM HD Radio
technology .
@ Screen view
Display Cov er a rt or Station log o. See
c::> page 22 7, Pr efer red p icture vie w *.
Di splaying the station list:
T ur n the control knob. Or : press the !BACK ! but
ton .
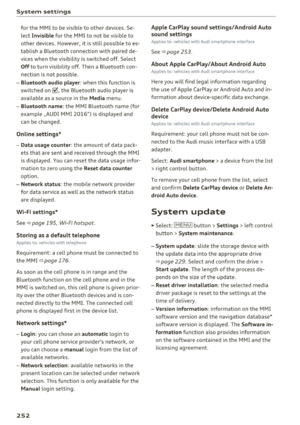
Radio menu
Fig. 208 Example : Rad io menu
.,. Se lect: I RADIO I button > left cont rol but ton .
Setting the frequen cy band : select and confi rm
the desired freq uency band in the radio menu
c::> fig. 208 . Or: press the I RADIO ! button repeat
ed ly until the desired frequency band is set. The
station list is displayed .
© Presets
The presets list is d isplayed c::> page 226, Pre
sets.
@ SiriusXM alerts
Appl ies to: ve hicles w ith SiriusXM alerts
After you have stored a S iriusXM alert for your fa
vor ite tracks or artists
c::> page 225 , an overview
of your favor ite tracks or artists current ly being
received on Siri usXM is displayed.
@ Siriu sXM
A ppl ies to: ve hicles w ith SiriusXM alerts
The S iri usX M * station list is displayed.
226
Additional frequency bands
Depend ing o n the vehicle equipment, you may al
so be able to select additiona l frequency bands
@ l@ c::> fig. 208 in the selection men u.
Presets
You can store your favorite stations from every
frequency band in the presets list.
.. Select: the I RADIO I button > left control button
> Pre set s.
Requirement: the p resets list must be disp layed.
- Storing pr esets : select and confirm a free pre
set space.
Follow the system instructions.
- Select and confirm
a station from the list if
necessary.
Requirement: a station list must be d isplayed .
-Sto ring pre set s: se lect: an entry from the list>
r igh t con trol b utton > Store as pr eset . Or :
press and ho ld the contro l knob for severa l sec
onds .
The shortcut keys are au tomatically assig ned to
the p rese ts 1 to 8. You ca n select the stat ions di
rectly using the preset buttons
c::> page 163 .
-Di spl aying the pr esets list: se lect: I RADIO! b ut-
ton
> Pre sets .
Requirement: the favorites list must be d is
played .
-Listening to p re sets : select and confirm a pre
set from the list.
- Mo ve pre set : select a preset from the list >
right control button > Move pre set . Or : press
and hold the control knob for several seconds .
Select and confirm the location of the selected
favorite.
- Deleti ng p resets: select a preset from the list >
right control button > Delete p reset > Delete
th is p reset or Delete all pres ets .
Additional settings
Radio settings
.. Select: I RADIO I button > rig ht control button >
Radio setting s. Ill>
Page 229 of 402

u co ...... N r-... N ...... 0
0
:E: -
The following settings can be selected, depending on the band that is selected:
Station names (FM )
Variabl e:
scroll ing text transmitted by the FM
stations is shown in the Infotainment system d is
p lay .
Fixe d: scro lling text transm itted by the FM sta
tions is no t shown in the Infotainment system
d isp lay. On ly the cu rrent sect ion of the scro lling
text is displayed .
FM/ AM HD Radio*
You can switch HD Radio recept ion on or off .
Station sorting (Sirius XM* )
You can set the station so rt ing for SiriusXM sta
tion lists* by:
- Channel number : the stations are sorted in as
cending order according to their cha nnel num
ber.
- Channel name : the stations are listed in a lpha
betica l order.
- First category, then channel number : the sta
tions are sorted by their category and then by
their channe l numbers.
- First category, then channel name : the sta
t ions are sorted by their category and then by
their channe l names.
Cat egory filter (Siriu sXM* )
The stations shown in the s ta ti on list c an be fi l
tered by your personal prefe re nces and by pro
gram type. The program categories that you can
select depend on what is offered by your provid
er. Select the
All catego ries option to deactivate
all filter opt ions and disp lay all available stations
in the sate llite station list .
Troubleshooting
Problem Solution
Radio
Show "Now Playing" screen
When the funct io n is switched on@' and the sta
t ions or presets list is open, the disp lay w ill
switch to the
Show "Now Playing" screen view
after approximate ly five seconds ¢
page 225. De
pending on availab ility, information about the
set station (such as station name, artist and sta
t ion logo) is displayed in this v iew .
Prefe rred picture view*
You can set your preferred screen v iew for the
Show "Now Playing " screen ¢page 225 .
-Stati on lo go : the station logo is displayed, de
pending on availability .
-Cov er ar t: the album cover is displayed if availa
b le.
Gracenote online database*
Requirement: the MMI must be connected to t he
Internet . T he
Cover art opt ion m ust be selected
¢ page 22 7, Preferred pictur e view *.
When the funct io n is switched on@', the album
cove r or genre cover for the song that is p lay ing
is loaded from the Gracenote online database,
depe nd ing on ava ilabil ity.
Subscription status (SiriusXM )*
This opt io n is available when your subscription is
about to expire or has already expired . The expi
ration date fo r your license is displayed .
Call to SiriusXM *: the contact info rmat ion for
your sate llite rad io prov ider is displayed . To call
your satellite rad io prov ider using the MMI, press
Call to SiriusXM *.
A station with poo r reception is no longer Store the stat ion as a preset in advance . Access the pre-
displayed in the station list once you se ts usi ng the presets list
¢ page 226 .
switch to a d ifferen t sta tion.
227
Page 230 of 402

Media
Media
Introduction
There are various media drives and connections
avai lab le in the MMI. For example, you can p lay
aud io/video* fi les from the Jukebox* or connect
your mob ile dev ice to the Aud i m usic interface *
and operate it through the MMI.
Notes
General information
Media and format restrictions :
the MMI (includ
in g the SD card reade r and the USB storage de
vice co nnect ion *) was tested w ith a var iety of
products and media on the market. However,
there may be cases where ind iv idual devices or
media and audio/video files" may not be recog
n ized, may play o nly w ith restr ictions, o r may not
p lay a t all.
Dig ital Rights Management : please note that
t he audio/v ideo" files are subject to copyright
protection .
The media drives do not p lay f iles that a re pro
tected by OR M and that are ident ified with the
symbo l
!'.TI.
Data secu rity : never store im portant data on SD
cards, the Ju kebox *, CDs/DVDs o r mobile devices.
Aud i AG is not responsib le for damaged or lost
fi les and media .
Loading times : th e mo re files/fo lde rs/ play lists
that are on a sto rage medium, the longer it will
take to load the audio/video* files . Audi recom
mends us ing storage media tha t on ly conta in au
d io/video files* . T o decrease the t ime it takes to
load audio/v ideo f iles*, crea te subfo lders ( fo r ex
a m ple , fo r th e a rt ist o r album). The loading time
will also increa se whe n importing fi les.
Additional information : when playing, audio
fil es are automatically displayed with any add i
tional informa tion that is s to red (such as the ar
tis t, track and al bum cover).
If this in forma tio n is
no t a vai lable o n the storage mediu m, t he MMI
wi ll check the Gr ace no te met adata database .
228
However, in some cases, the additional in forma
tion may not be dis played.
Restri cted functionality : reset the Media set
tings
t o the facto ry de fault se ttings i f func tional
i ty is restric ted ¢
page 250 .
If functionality is restr icte d, reset the Jukebox*
to t he fa ctory defa ult se tt in gs ¢ page 250.
Fo r informa tion abo ut the propert ies of s upport
ed med ia and fi le formats, see
¢ page 243 .
W Note
Always fo llow the information fo und in c::> (D in
W i- Fi
hotspot on page 195 .
CD/DVD operation
CD /DVD and format restrictions :
th e f unct iona li
ty o f indivi dual sto rage media m ay be limi ted due
to t he v ariety of b lank C Ds/DV Ds av a ila b le and
t h e v arious cap acities. Audio CDs or video DV Ds
with copy protection, CDs/D VDs that do not con
form to the standard and mult isess ion CDs may
hav e limit ed playback or may not play at all. Audi
r ecommends finali zing the recording process
whe n creat ing mult isess ion CDs . Mult isess ion is
not supported for DVDs .
Using CDs/DVDs, the CD dr ive or the DVD drive :
to ensure correct, hig h-q uality playback and to
prevent damage to the dr ive or disc read ing er
r ors, always store CDs/DVDs in a protec tive
s leeve and do no t expose them to direct s unlight .
Do
not u se:
- Damaged, dirty or sc ratched CDs/DVDs
- Single CDs/DVDs with 3 in (8 cm) d iameter
- CD/DVDs that a re not roun d
- CDs/DV Ds w ith labe ls
- Protec tive rings
- Clean ing CDs
Thermal protection switch : CD/DVD playback
may be temporarily unavailable if o utside tem
p eratures a re extremely hot or co ld. A t hermal
pro tect io n sw itch is insta lled t o protect the C D/
DVD and t he laser.
Laser devices : las er devices a re divide d into safe -
ty classes 1 to 4 in accordance with DI N IE C 76 .,..
Page 231 of 402

(CO) 6/VDE 0837. The various types of audio
equipment installed conform to safety class
1.
T he laser uses so little power or is sh ielded so
there is no danger when it is used correctly .
Media drives
SD card reader
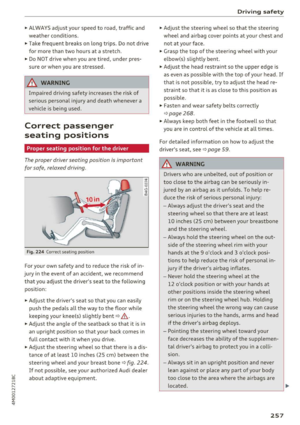
Fig. 209 In se rting the SD card
Depending on the vehicle equipment, there is ei
ther one or two SD card readers in the glove com
partment @
¢page 8, fig. 2.
- Inserting the SD card: the angled corner of the
SD card must face toward the right front. Sl ide
the SD card into the card reader slot@
<=:>fig . 209 until the SD card clicks into place .
-Automatic playback: playback will start auto
matically if the inserted SO card contains sup
ported audio/video files*¢
page 243.
-Removing the SD card: press briefly on the SD
card.
The SO card reader is accessed and operated
through the MMI @
¢page 237, fig . 215 .
(D Note
Only use one-piece SO cards. If adapter cards
(SO cards with more than one piece) are used,
the card could fall out of the adapter when
driving because of vibrations . Individual
pieces could then become stuck in the drive
and impair the functionality.
(r} Tips
~ The SIM card reader then does not function . ...... N r--. N ...... 0
0
:E
Media
DVD drive
Applies to: vehicles with a DVD drive
Fig. 210 CD drive
The DVD drive is located in the glove compart
ment @<=:>
page 8, fig . 2.
-Loading a CD/DVD: the CO/DVD is pulled in au
tomatically. Slide the CD/DVD straight into the
DVD slot @with the label facing up
c::> fig. 210.
-Automatic playback: playback wi ll start auto-
matically if the inserted CD/DVD contains sup
ported aud io/video* files
<=:> page 243.
-Ejecting a CD/DVD : press the button (D
c::> fig. 210.
The CD/DVD is pulled in again automatically if it
is not removed from the DVD slot within approxi
mately ten seconds after ejecting it.
The DVD drive is accessed and operated through
the
MMI @c::>poge237, fig. 215.
(D Note
-Never force a CD/DVD into the drive. The
CO/DVD is pulled in automatically.
- Do not insert CDs/DVDs with labels into the
dr ive. Labe ls can come loose from the CO/
DVD and damage the drive.
(D Tips
- The CO/DVD playback is not ensured with
audio files that have a high data rate .
- Th e SIM card reader then does not function.
229
Page 232 of 402

Media
CD drive
Applies to: vehicles w ith a CD drive
Fig. 2 11 CO drive
The CD drive is located in the glove compartment
@ <=>page 8, fig. 2.
-Loading a CD : the CD is pulled in automatically .
Slide the CD straight into the CD slot@
<=>fig . 211 with the label facing up.
- Automatic playbac k: playback will start auto
matically if the inserted CD conta ins supported
audio files
c:> page 244, CD drive .
-Eje cting a CD : press the button(!)<=> fig. 211 .
The CD is pulled in again automatically if it is not
removed from the slot w ith in ten seconds of
ejecting it.
The CD d rive is accessed and operated thro ugh
the MMI
<=> page 237, Playing media .
(D Note
- Never force a CD into the drive . The CD is
p ull ed in automatically .
- Do not inse rt CDs with labels into the drive.
L abe ls can come loose from the CD and
damage the dr ive.
@ Tips
CD playback ca nnot be guaranteed with audio
files that have a hig h data rate.
230
· Jukebox
App lies to: vehicles wit h Jukebox
After you have filled the Jukebox with music and/
or videos, for example from your SD card , you
can play these files directly from the Jukebox .
The Jukebox memory capacity is approximately
10 GB .
.,. Press the I M EDIA ! button . Press the left control
button unti l the sources overv iew
c:> page 23 7
is displayed. Select and co nfirm
Jukebo x.
Adding files to the Jukebox
- Press the IM EDIA ! button . Press the left control
button until the sources overv iew
c:> page 23 7
is displayed . Select one of the following sou rces
to copy to the Jukebox: SD card*, CD-ROM *,
DVD-ROM*, USB storage devi ce* .
Requirement: the media center (for example,
tracks, albums) must be open .
-Select ing an entr y: select an entry from the
media cente r. Se lect : right contro l button >
Copy to Jukebox > Th is ent ry or Entire list .
Requirement: the p layli st mus t be ope n. See
<=> page 240.
-Selec ting a track : select the track that is cur
rently playing . Select : right control button>
Copy to juk ebo x> This tra ck or Entir e album
or This arti st.
Requirement: a v ideo f ile must be playing.
- Sele ct: r ight cont rol b utton>
C opy to Jukebo x.
The copying process begins. The status of the
copy ing p rocess is shown in the MMI.
- Hiding the importing pro ces s: se lect and con
firm
Continue cop ying in background . The im
porting p rocess is hidden .
-Canceling the impo rt ing process : select and
confirm
Can cel cop ying : O r: remove the source
that is being imported . Files already copied re
ma in.
Requirement: the copying p rocess m ust be active
in the background.
- Showing the copying proces s: select: right
cont rol button >
Copying in progre ss.