Page 49 of 294

M N <( I.J "". rl I.O
"' N I.O rl
.. To increase or reduce the brightness, turn the
knob and press it .
The inte rior lighting turns on when you switch
the headlights on whi le the ignition is on .
(D Tips
The setting is automat ically stored and as
signed to the remote control key that is in
use.
Instrument illumination
The brightness of the illumination for the instru
ments, display and head-up display* can be ad
justed.
Fig. 41 Instrument illumination
.. Press the knob to release it.
.. Turn the knob toward" -" or"+" to reduce or in
crease the brightness.
.. Press the knob again to return it to its original
pos ition.
@ Tips
The instrument illumination for the needles
and dia ls turns on when the ignition is turned
on and the lights are turned off. The illumina
tion for the dials reduces automatically and
eventually turns off as brightness outside in
creases. This function reminds the driver to
turn the headlights on at the appropriate
time.
Lights and Vision
Vision
Adjusting the exterior mirrors
Fig. 42 Driver 's doo r: knob fo r the exterior mirrors
Turn the knob to the desired position:
Q/P -Adjusting the left/right exterior mirror.
Move the knob in the des ired direction.
4iil -Heating the mirror glass depending on the
outside temperature.
8 -Folding exterior mirrors*. In the Infotain
ment system , you can select if the mirrors fold in
a utomat ically when you lock the vehicle
~page 33.
Front passenger's exterior mirror tilt
function*
To help you see the curb when backing into a
parking space, the surface of the mirror tilts
slight ly . For this to happen, the knob must be in
the position for the front passenger's outside
mirror.
You can adjust the tilted mirror surface by turn
ing the knob in the desired direction. When you
move out of reverse and into another gear, the
new mirror position is stored and assigned to the
key you are using.
T he m irror goes back into its orig inal position
once you drive forward faster than 9 mph (15
km/h) or switch the ign ition off.
A WARNING
-Curved (i . e. convex) mirror surfaces increase
your f ield of view . Remember that veh icles or
other objects will appear smaller and farther
away than when seen in a fla t mirror . If you
47
Page 50 of 294

Lights and Vision
use this mirror to estimate distances of fol
lowing vehicles when changing lanes, you
could estimate incorrectly and cause an acci
dent .
CD Note
- If the mirror housing was moved by force
(for example, by running into an object
when maneuvering the vehicle), the mirror
must be folded all the way in using the pow
er folding function. The mirror housing
must not be moved back into place by hand
because this would impair the function of
the mirror mechanism.
- If you wash the vehicle in an automatic car
wash, you must fold the exterior mirrors in
to reduce the risk of damage to the mirrors. Never fold power folding exterior mirrors*
by hand. Only fold them in and out using
the power controls.
@ Tips
- If the power adjusting function malfunc
tions, the glass in both mirrors can be ad
justed by pressing on the edge of it by hand.
- The exterior mirror settings are stored with
the memory function*~
page 56.
Dimming the mirrors
Fig. 43 Automa tic dimming rearview mirror*
Manual anti-glare adjustment
~ Move the small lever (located on the bottom
edge of the mirror) to the rear.
Automatically dimming mirrors*
~ To dim the rearview mirror and both exterior
mirrors, press the@ button . The diode ®
48
0 ... M 9 :x:
~
turns on. The rearview and exterior mirrors dim
automat ically when light shines on them, for
example from headlights on a vehicle to the rear.
A WARNING
Electrolyte fluid can leak from automatic dim
ming mirrors if the glass is broken . Electrolyte
fluid can irritate skin, eyes and respiratory system.
- Repeated or prolonged exposure to electro
lyte can cause irritation to the respiratory
system, especially among people with asth
ma or other respiratory conditions. Get
fresh air immediately by leaving the vehicle
or, if that is not possible, open windows and
doors all the way.
- If electrolyte gets into the eyes, flush them
thoroughly with large amounts of clean wa
ter for at least 15 minutes; medical atten
tion is recommended.
- If electrolyte contacts skin, flush affected
area with clean water for at least 15 mi
nutes and then wash affected area with
soap and water; medical attention is recom
mended . Thoroughly wash affected clothing
and shoes before reuse.
- If swallowed and person is conscious, rinse
mouth with water for at least 15 minutes .
Do not induce vomiting unless instructed to
do so by medical professional. Get medical
attention immediately.
CD Note
Liquid electrolyte leaking from broken mirror
glass will damage any plastic surfaces it
comes in contact with . Clean up spilled elec
trolyte immediately with clean water and a
sponge.
(j) Tips
- Switching off the dimming function of the
inside rear view mirror also deactivates the
automatic dimming function of the exterior
mirrors.
...
Page 51 of 294

M N <( I.J "". rl I.O
"' N I.O rl
-The automatic dimming mirrors do not dim
when the interior lighting is turned on or
the reverse gear is selected .
-A utomatic dimming for the mirror only op
erates properly if the light striking the in
side mirror is not hindered in any way.
Sun visors
( J
Fig. 44 Front passenger's side: sun visor
The sun visors for the driver and passenger can
be released from their brackets and turned to
ward the doors (!).
The mirror light switches on when the cover over
the vanity mirror @opens.
Sun shade
Applies to vehicles: with sun shade
The sun shade is located on the luggage com
portment shelf.
@ 0
.___ •a_:__.~ ,~
Fig. 45 Sun shade in lowere d position
When the sun shade is in the lowered position, it
is secured in the retainer @.
.. To raise @ the sun shade, remove it from the
retainer.
Lights and Vision
A WARNING
-Do not use the sun shade to secure cargo. The
luggage compartment cover is not a surface
for storing objects. Objects placed on the cov
er could endanger all vehicle occupants dur
i ng sudden braking maneuvers or in a crash.
Windshield wipers
Switching the windshield wipers on
Fig. 46 Windshie ld wiper lever
Move the windshie ld w iper lever to the corre
sponding position:
@ -Windshield wipers off
~
"' 0 :i:
(!) -Rain sensor mode . The windshield wipers
switch on once the veh icle speed exceeds approx
imately 2 mph (4 km/h) and it is raining . The
highe r the ra in sensor sens itivity is set (switch @
to the right), the earlier the windshield wipe rs re
act to moisture on the windshield. You can deac
tivate rain sensor mode in the MMI, which wi ll
then activate intermittent mode . Select:
!CARI
function button > (Car)* systems control button
> Driver assist > Rain sensor > Off. In intermit
tent mode, you can adjust the interval time using
the switch @.
@ -Slow wiping
@ -Fast wiping
@ -Single wipe . If you ho ld the lever in this posi
tion longer, the wipe rs switch from slow w iping
to fast wiping.
®-Clean the windshield. The wipers wipe one
t ime after several seconds of driving to remove
water drop lets. You can swit ch th is function off ..,.
49
Page 52 of 294

Ligh ts a nd Vi sion
by moving the lever to position ® within 10 sec
onds after the afterwipe. The afterwipe function
is reactivated the next time you switch the ign i
tion on.
Cleaning the headlights *. The headlight washer
system* operates only when the low beam head lights are on. If you move the lever to position
® , the headlights and the night vision assist
camera* are washed in intervals.
A WARNING
-The rain sensor is only intended to assist the
dr iver . The driver is st ill responsible for
manually switching the wipers on according
to the v is ibility conditions.
- The w indshield may not be treated w ith wa
te r-repell ing windsh ield coating agents. Un
favorable conditions, such as wetness, dark ness or low sun, can resu lt in increased
glare, which increases the risk of an acci
dent. Wiper blade chatter is also possible.
- Properly functioning w indshield w iper
blades are required for a clear view and safe
driving ~
page 50, Replacing windshield
wiper blades.
(Jd) Note
- If there is frost, make sure the windshield
wiper blades are not frozen to the wind
s h ield. Switching on the winds hield wipers
when the blades are frozen to the wind
sh ield can damage the wiper blades.
- Prior to using a car wash, the winds hield
wiper system must be switched off (lever in
position 0). This prevents unintentional
switching on and damage to the w indshield
wiper system.
(Di Tips
- The windshield wipers switch off when the
i gnition is turned off. You can act ivate the
windsh ield wipers after the ignition is
switched back on by moving the windsh ield
wiper lever to any pos it ion.
- Worn or dirty windshield w iper blades result
i n streaking. This can affect the rain sensor
so
f unction. Check your w indshield wiper
blades regu larly .
- T he washer fluid nozz les o f the windshie ld
washer system are heated at low tempera
t ur es when the ignition is on.
- When stopping temporarily, such as at a traffic light, the speed of the windshield
wipers automatica lly reduces by one leve l.
Cleaning windshield wiper blades
Clean the wiper blades when you see wiper
streaks. Use a soft cloth and a glass cleaner.
.,. Place the windshie ld wiper arms in the service
position
c:> page 50.
.,. Fold the windshie ld w iper arms away from the
w indshield.
A WARNING
Dirty windsh ield wiper b lades can impair vi
sion, wh ich increases the risk of an accident .
Replacing windshield wiper blades
Fig. 47 Remov ing windshield wiper blades
Wiper serv ice position /bla de repl acement
posit ion
.,. Switch the ignit io n off and move the windshield
w iper lever to position @briefly
c:> page 49,
fig. 46. The w indshie ld w ipers move into the
service pos ition.
.,. To bring the w iper blades back into the or igina l
position, switch the ignition on and ope rate the
windshield wiper lever.
You can also tu rn the se rv ice position on or off in
t h e Info tainment sys tem: .,..
Page 53 of 294
 ..,.,
N \!) ,....,
~ Switch the windshield wipers off (position@
c:>poge49, fig. 46).
~ Select: the ICARI function button > (Car)* Sys
tems
control button")
M N <( (.J
'SI: ,...., \!) ..,.,
N \!) ,....,
~ Switch the windshield wipers off (position@
c:>poge49, fig. 46).
~ Select: the ICARI function button > (Car)* Sys
tems
control button > Servi ce & cont rol > W ip
er cha nge posit ion
> On /O ff.
R emoving the wip er blade
~ Fold the windshield wiper arm away from the
windshield.
~ Press the locking knob@c:> fig. 47 on the wiper
blade. Hold the wiper blade firm ly.
~ Remove the wiper blade in the direction of the
arrow.
In sta ll in g t he w ip er bl ade
~ Insert the new wiper blade into the mount on
the wiper arm@ unti l you hear it latch into
place.
~ Place the wiper arm back on the windshield.
~ Turn the service pos ition off.
A WARNING
For safety reasons, the windshield wiper
blades should be replaced once or twice each
yea r.
0 Note
- Only fold the windshield wipe rs away when
i t is in the service pos ition. Otherw ise, you
r isk damag ing the pa int on the hood or the
windsh ield wiper motor.
- You should not move you r vehicle or ope rate
the windshie ld w iper lever when the wiper
arms are folded away from the windshield.
The windshield wipers would move back in
to t heir original position and could damage
the hood and windshield.
(D Tips
- You can also use the service pos ition, for ex
ample, if you want to protect the windshield
from icing by using a cover.
- You cannot activate the service position when the hood is open.
Light s and Vis ion
5 1
Page 54 of 294

Seats and storage
Seats and storage
General information
Why is your seat adjustment so important?
The safety belts and the airbag system can only
provide maximum protection if the front seats are correctly adjusted .
There are various ways of adjusting the front
seats to provide safe and comfortable support
for the dr iver and the front passenger . Adjust
your seat properly so that :
- you can easily and quickly reach all the switches
and controls in the instrument panel
- your body is properly supported thus reducing
physical stress and fatigue
- the safety belts and a irbag system can offer
maximum protection
¢ page 143.
In the following sections, you will see exactly
how you can best adjust your seats.
There are special regulations and instructions for
installing a child seat on the front passenger's
seat. Always fo llow the information regarding
child safety provided in ¢
page 167, Child safe
ty .
A WARNING
Incorrect seating position of the driver and all
other passengers can resu lt in serious person
al injury .
- Always keep your feet on the floor when the
vehicle is in motion - never put your feet on
top of the instrument panel, out of the win dow or on top of the seat cushion. This ap
plies espec ially to the passengers. If you r
seating pos ition is incorrect, you increase
the risk of injury in the case of sudden brak
ing or an accident . If the airbag inf lates and
the seating position is incorrect, this could
result in personal injury or even death.
- It is important for both the driver and front
passenger to keep a distance of at least 10 inches (25 cm) between themselves and
the steering wheel and/or instrument panel. If you're sitting any closer than this, the air
bag system cannot protect you properly. In
52
addition, the front seats and head restraints
must be adjusted to your body height so
that they can give you maximum protection.
- Always try to keep as much distance as pos
sible between yourself and the steer ing
wheel or instrument panel.
- Do not adjust the driver's or front passeng er's seat while the vehicle is moving. Your
seat may move unexpectedly, causing sud
den loss of vehicle control and personal in
jury . If you adjust your seat while the vehicle
is moving, you are out of position.
Driver's seat
The correct seat position is important for safe
and relaxed driving .
We recommend that you adjust the driver's seat
in the following manner:
.,. Adjust the seat in fore and aft direction so that
you can easily push the pedals to the floor
while keeping your knees slightly bent¢&.
in
Why is your seat adjustment so important? on
page 52 .
.,. Adjust the backrest so that when you sit with
your back against the backrest, you can still
grasp the top of the steering wheel.
.,. For adjustable head restraints: adjust the head
restraint so the upper edge is as even as possi
ble with the top of your head. If that is not pos
sible, try to adjust the head restraint so that it
is as close to this position as possible
¢page 55. Move the head restraint so that it
is as close to the back of the head as possible.
A WARNING
Never place any objects in the dr iver's foot
well. An object could get into the pedal area
and interfere with pedal function. In case of
sudden braking or an acc ident, you would not
be ab le to brake or accelerate.
Page 55 of 294

M N <( I.J -
"' N I.O rl
Front passenger's seat
Always move the front passenger seat into the rearmost position .
To avoid contact with the airbag while it is de
ploying, do not sit any closer to the instrument
panel than necessary and always wear the three
point safety belt provided adjusted correctly . We
recommend that you adjust the passenger's seat
in the following manner:
.. Bring the backrest up to an (almost) upright
position .
Do not ride with the seat reclined .
.. For adjustable head restraints: adjust the head
restraint so the upper edge is as even as possi
ble with the top of your head. If that is not pos
sible, try to adjust the head restraint so that it
is as close to this position as possible
c:::> page 55. Move the head restraint so that it
is as close to the back of the head as possible.
.. Place your feet on the floor in front of the pas
senger's seat .
Front seats
Controls
Moving the seat forward or back and adjusting
the height, backrest angle and seat angle.
Fig. 48 Front seat: adjusting the seat
@-Moving the seat forward/back: press the but
ton forward/back ¢ .&,.
@ -Moving the seat up/down: press the button
up/down
c:::> .&, . To adjust the front section of the
seat, press the front button up/down
c:::> .&, . To ad
just the rear section of the seat, press the rear button up/down
c:::> .&,.
Seats and storage
@ -Turn the massage function* on/off. You can
select the type of massage using the multifunc
tion button
c:::> page 54.
© -Backrest forward/back: press the button for
ward/back ¢.&, .
(D-Lumbar support* : press the button in the
corresponding position
c:::> .&. or multifunction
button*¢ .&.,
c:::> page 54 .
& WARNING
=
-Never adjust the driver's or front passeng-
er 's seat while the vehicle is moving. If you
do this while the vehicle is moving, you will
be out of position. Always adjust the driver's
or front passenger's seat when the vehicle is
not moving.
- Be careful when adjusting the seat height.
Check to see that no one is in the way, or se
rious injury could result!
- Because the seats can be electrically adjust
ed with the ignition off, never leave children
unattended in the vehicle . Unsupervised use
of the electric seat adjustments may cause
serious injury.
- To reduce the risk of injury in the case of
sudden braking or accident, front passen
gers must never ride in a moving vehicle
with the backrest reclined. Safety belts and
the airbag system only offer maximum pro
tect ion when the backrest is upright and the
safety belts are properly positioned on the
body. The more the backrest is reclined, the
greater the risk of personal injury from an incorrect seating position and improperly
positioned safety belts.
-
53
Page 56 of 294

Seats and storag e
Multifunction button
Applies to vehicles: with memory function
You con adjust the massage function, lumbar
support, side bolsters and seating surface using
the multifunction button .
Fig . 4 9 MMI display: seat settings
Operating
.. The MMI displays the possible seat sett ings @
when you tu rn the m ultif unction button @
¢
page 53, fig. 48 to the left or right¢ fig. 49,
¢£ .
.. To select a seat setting, turn the multifunction
button
(D unti l the desired seat setting is h igh
lighted with a red border .
.. The arrows @ indicate the possib le adjust
ments . For example, to move the lumbar sup
po rt down, press the multifunction button
(D
down. The corresponding arrow © lights up .
The following seat sett ings @are possible:
Mas sag e function* -Massage type Wave, K nock
ing, Stret ch , Lumbar , Shoulder or Off .
You can
set the massage strength level from 1 to 5. You
can turn the selected massage on/off using the
button @¢
page 53, fig . 48.
L u mbar support -Moving the lumbar support
up/down and making it firmer/softer¢ &,.
Side bolst ers* -Increasing/reducing the side sup
port in the seat using the side bolsters on the
seating surface and backrest¢&, .
Se ating surfac e -Making the seating surface lon
ge r/shorter ¢ &, .
54
A WARNING
-Never adjust the driver's or front passeng
er's seat while the veh icle is moving. If you
do this while the veh icle is moving, you will
be out of posit ion . Always adjust the d river's
or front passenger's seat when the vehicle is
no t moving.
- Be careful when adjusting the seat he ight.
Check to see that no one is in the way, or se
r io us inju ry co uld resul t!
- Because the seat s can be elec trically adjust
ed w ith the ignition off, never leave children
unattended in the vehicle. Unsupervised use
of the e lectric seat adjustments may cause
serious injury .
- To reduce the risk of injury in the case of
sudden b raking or accident, front passen
gers must never ride in a moving veh icle
with the backrest reclined. Safety belts and
the airbag system only offer max imum pro
tect ion when the backrest is upright and the
safety belts are properly positioned on the
body . The more the backrest is recl ined, t he
greater the ris k of persona l inju ry from an
incor rect seating posit ion and imprope rly
positioned sa fety belts .
(D Tips
- The massage funct ion sw itches off automat
ically after approximately 10 minutes.
- The side bolsters* deflate when the d river's
door is ope ned . Th is allows you to enter and
ex it comfortably. The side bolsters i nflate
ag ain once you begin drivi ng.
 1
1 2
2 3
3 4
4 5
5 6
6 7
7 8
8 9
9 10
10 11
11 12
12 13
13 14
14 15
15 16
16 17
17 18
18 19
19 20
20 21
21 22
22 23
23 24
24 25
25 26
26 27
27 28
28 29
29 30
30 31
31 32
32 33
33 34
34 35
35 36
36 37
37 38
38 39
39 40
40 41
41 42
42 43
43 44
44 45
45 46
46 47
47 48
48 49
49 50
50 51
51 52
52 53
53 54
54 55
55 56
56 57
57 58
58 59
59 60
60 61
61 62
62 63
63 64
64 65
65 66
66 67
67 68
68 69
69 70
70 71
71 72
72 73
73 74
74 75
75 76
76 77
77 78
78 79
79 80
80 81
81 82
82 83
83 84
84 85
85 86
86 87
87 88
88 89
89 90
90 91
91 92
92 93
93 94
94 95
95 96
96 97
97 98
98 99
99 100
100 101
101 102
102 103
103 104
104 105
105 106
106 107
107 108
108 109
109 110
110 111
111 112
112 113
113 114
114 115
115 116
116 117
117 118
118 119
119 120
120 121
121 122
122 123
123 124
124 125
125 126
126 127
127 128
128 129
129 130
130 131
131 132
132 133
133 134
134 135
135 136
136 137
137 138
138 139
139 140
140 141
141 142
142 143
143 144
144 145
145 146
146 147
147 148
148 149
149 150
150 151
151 152
152 153
153 154
154 155
155 156
156 157
157 158
158 159
159 160
160 161
161 162
162 163
163 164
164 165
165 166
166 167
167 168
168 169
169 170
170 171
171 172
172 173
173 174
174 175
175 176
176 177
177 178
178 179
179 180
180 181
181 182
182 183
183 184
184 185
185 186
186 187
187 188
188 189
189 190
190 191
191 192
192 193
193 194
194 195
195 196
196 197
197 198
198 199
199 200
200 201
201 202
202 203
203 204
204 205
205 206
206 207
207 208
208 209
209 210
210 211
211 212
212 213
213 214
214 215
215 216
216 217
217 218
218 219
219 220
220 221
221 222
222 223
223 224
224 225
225 226
226 227
227 228
228 229
229 230
230 231
231 232
232 233
233 234
234 235
235 236
236 237
237 238
238 239
239 240
240 241
241 242
242 243
243 244
244 245
245 246
246 247
247 248
248 249
249 250
250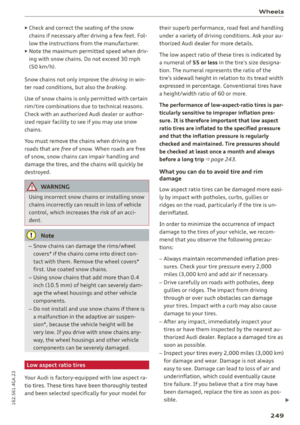 251
251 252
252 253
253 254
254 255
255 256
256 257
257 258
258 259
259 260
260 261
261 262
262 263
263 264
264 265
265 266
266 267
267 268
268 269
269 270
270 271
271 272
272 273
273 274
274 275
275 276
276 277
277 278
278 279
279 280
280 281
281 282
282 283
283 284
284 285
285 286
286 287
287 288
288 289
289 290
290 291
291 292
292 293
293