Page 193 of 291

STARTING AND DRIVING191
3
TOWING TRAILERS
IMPORTANT
For towing caravans or trailers the car must be fitted with
a certified tow hook and an adequate electrical system. In-
stallation should be carried out by specialised personnel
who will issue the required papers for travelling on roads.
Install any specific and/or additional door mirrors as spec-
ified by the Highway Code.
Remember that when towing a trailer, steep hills are hard-
er to climb, braking spaces increase and overtaking takes
longer depending on the overall weight.
Engage a low gear when driving downhill, rather than con-
stantly using the brake.
The weight the trailer exerts on the car tow hook reduces
the car’s loading capacity by the same amount. To make
sure that the maximum towable weight is not exceeded
(given in the car registration document) account should
be taken of the fully laden trailer, including accessories
and luggage.
Do not exceed the speed limits specific to each country you
are driving in, in the case of vehicles towing trailers. In
any case, the top speed must not exceed 100 km/h.
The ABS with which the vehicle may be
equipped does not control the braking system
of the trailer. Take specific care when trav-
elling on slippery roads.
Never modify the braking system of the car
to control the trailer brake. The trailer brak-
ing system must be fully independent from
the hydraulic system of the car.
183-194 Delta GB 1ed 26/08/13 12.15 Pagina 191
Page 194 of 291

192STARTING AND DRIVING
IMPORTANT When using snow tyres with a maximum
speed index below the one that can be reached by the car
(increased by 5%), place a notice in the passenger com-
partment, plainly in view, which states the maximum
speed allowed by the snow tyres (as per EC Directive).
All four tyres should be the same (brand and track) to en-
sure greater safety when driving and braking and better
driveability.
Remember that it is inadvisable to change the rotation di-
rection of tyres.
The maximum speed for snow tyres marked
“Q” is 160 km/h; in any case, make sure you
comply with the regulations of the highway
code.
SNOW TYRES
Use snow tyres of the same size as the normal tyres pro-
vided with the car.
A Lancia Dealership will be happy to provide advice con-
cerning the most suitable type of tyre for your require-
ments.
For the type of snow tyre to fit, the inflation pressures and
specifications, follow the instructions in the “Wheels” para-
graph in chapter “6” very carefully. The winter features of
these tyres are reduced considerably when the tread depth
is below 4 mm. Replace them in this case.
Due to snow tyre characteristics, under normal conditions
of use or on long motorway journeys, the performance of
these tyres is lower than that of standard tyres. Limit per-
formance according to the use for which they were certified.
183-194 Delta GB 1ed 26/08/13 12.15 Pagina 192
Page 195 of 291

STARTING AND DRIVING193
3
Keep your speed down when snow chains are
fitted. Do not exceed 50 km/h. Avoid potholes,
steps and pavements and also avoid driving
long distances on roads not covered with snow in
order to prevent damaging the car and the roadbed.
SNOW CHAINS
The use of snow chains should be in compliance with lo-
cal regulations.
The snow chains may be applied only onto the front wheel
(drive wheels).
Check the tension of the snow chains after the first few
metres have been driven.
IMPORTANT Snow chains cannot be fitted to the space-
saver wheel. So, if a front (drive) wheel is punctured and
chains are needed, a rear wheel should be fitted to the front
of the car and the space-saver wheel should be fitted to
the rear. In this way, with two normal drive wheels at the
front, snow chains can be fitted.
CAR INACTIVITY
If the car is to be left inactive for longer than a month, the
following precautions should be followed:
❍ park the car in a covered, dry and, if possible, well-
ventilated place;
❍ engage a gear;
❍ check that the handbrake is not engaged;
❍ disconnect the negative battery terminal;
❍ clean and protect the painted parts of the vehicle with
protective wax;
❍ clean and protect the shiny metal parts using special
compounds commercially available;
❍ sprinkle talcum powder on the rubber windscreen and
rear window wiper blades and lift them off the glass;
❍ open the windows slightly;
❍ cover the car with a fabric or perforated plastic sheet.
Do not use sheets of non-perforated plastic as they do
not allow moisture on the car body to evaporate;
❍ inflate tyres to a pressure of +0.5 bar above the nor-
mal specified pressure and check regularly;
❍ do not drain the engine cooling system.
183-194 Delta GB 1ed 26/08/13 12.15 Pagina 193
Page 196 of 291
194STARTING AND DRIVING
blank page
183-194 Delta GB 1ed 26/08/13 12.15 Pagina 194
Page 197 of 291

4
IN AN EMERGENCY195
Starting the engine .................................................................. 196
Fix&Go Automatic kit.............................................................. 198
Replacing a wheel ................................................................... 203
Replacing a bulb ..................................................................... 211
Replacing an exterior bulb ....................................................... 214
Replacing an interior bulb ....................................................... 219
Replacing fuses ....................................................................... 223
Battery recharging ................................................................... 230
Lifting the car ........................................................................\
. 231
Towing the car ........................................................................\
231
In an emergency we recommend that you call the freephone number found in\
the
Warranty Booklet. It is also possible to go to the www.lancia.com website to find the closest Lancia Dealership.
195-232 Delta GB 1ed 03/03/14 09.14 Pagina 195
Page 198 of 291
196IN AN EMERGENCY
STARTING THE ENGINE
Go to a Lancia Dealership immediately if instrument pan-
el
Ywarning light remains on constantly.
JUMP STARTING fig. 1
If the battery is flat, the engine may be started using an
auxiliary battery with the same capacity or a little high-
er than the flat one.
fig. 1L0E0074m
Strictly avoid using a rapid battery charger
for jump starting: this could damage the elec-
tronic systems and the engine fuel supply and
ignition control units.
This starting procedure must be carried out
by expert personnel as incorrect manoeuvres
can cause electrical discharges of consider-
able intensity. Furthermore, battery fluid is poiso-
nous and corrosive: avoid contact with skin and
eyes. Keep naked flames away from the battery. No
smoking. Do not cause sparks.
195-232 Delta GB 1ed 03/03/14 09.14 Pagina 196
Page 199 of 291

IN AN EMERGENCY197
4
Proceed as follows to start the car:
❍connect the positive terminals (+ sign close to the ter-
minal) of both batteries using a lead;
❍ with a second lead, connect the negative terminal –
of the auxiliary battery to an earthing point E
on the
engine or the gearbox of the car to be started;
❍ start the engine;
❍ when the engine has been started, follow the sequence
above in reverse order to remove the leads.
If after a few attempts the engine does not start, do not
persist but contact a Lancia Dealership.
IMPORTANT Do not directly connect the negative ter-
minals of the two batteries: any sparks may ignite the ex-
plosive gas which could come out of the battery. If the aux-
iliary battery is installed on another car, prevent any con-
tact between metal parts of the two cars. BUMP STARTING
Never bump start the engine by pushing, towing or coast-
ing downhill.
This could cause fuel to flow into the catalytic converter
and damage it beyond repair.
IMPORTANT Remember that the brake servo and elec-
trical power steering system (where provided) are not op-
erational until the engine is started, a greater effort will
therefore be required to press the brake pedal or turn the
steering wheel.
195-232 Delta GB 1ed 03/03/14 09.14 Pagina 197
Page 200 of 291
198IN AN EMERGENCY
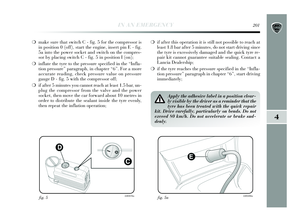
❍a compressor D - fig. 2 including a pressure gauge and
connectors, found in the compartment;
❍ a pair of protective gloves located in the side com-
partment of the compressor;
❍ adapters for inflating different elements.
The quick tyre repair kit also contains a screwdriver and
a tow hook.
fig. 3L0E0076m
FIX & GO AUTOMATIC KIT
The Fix & Go Automatic quick tyre repair kit is located
in the luggage compartment.
The kit fig. 2 includes:
❍ a bottle A containing sealant and fitted with:
– filler pipe B;
– an adhesive label C with the message “max. 80 km/h” to be applied in a position clearly visible by
the driver (on the dashboard) after repairing the tyre;
❍ informative leaflet (see fig. 3), used to ensure the cor-
rect use of the quick tyre repair kit and then given to
the personnel who will be handling the treated tyre;
fig. 2L0E0075m
195-232 Delta GB 1ed 03/03/14 09.14 Pagina 198