Page 65 of 200

Lights and visibility
Turn signal and main beam lever Fig. 47
Turn signal and main beam lever. The turn signal and main beam lever also op-
erates the parking lights and the headlight
flasher.
Right and left-hand
turn signal
– Move the lever ››› Fig. 47 up A or down
B .
– In order for the turn signals to flash three
times (turn signal to change lanes), move
the lever briefly up or down just as far as
point of resistance and then release it.
– Keep the lever held down at the point of re-
sistance for the turn signals to flash for as
long as you hold the lever, e.g. when
changing lanes.
Main beams
– Switch on the dipped beam ›››
page 61. –
Press the lever ››› Fig. 47 forward in the di-
r ection indic
ated by arrow C .
– Pull the lever back to its original position in
the direction indicated by arrow D to
switch the main beam off.
Headlight flasher
– Pull the lever ››› Fig. 47 towards the steer-
ing wheel (point of resistance) in the direc- tion indicated by arrow D .
Parking lights
Instructions for use ››› page 65. CAUTION
Never use the main beam headlights or the
headlight flasher if they could dazzle other
drivers. Note
● The turn signals only work when the igni-
tion is switched on. The corresponding warn-
ing lamp or flashes in the general instru-
ment p
anel.
● The turn signals switch off automatically
when the steering wheel is returned to the
straight-ahead position.
● If a turn signal bulb is defective, the control
lamp flashes at double speed. Automatic headlight control (AHC)
If the light switch is in this position
››› Fig. 45, the side lights, headlights and the
number p l
ate lights will turn on or off auto-
matically.
The light is adjusted according to the data re-
corded by the light sensor that is installed
between the windscreen and the inside rear
view mirror.
If the light switch is in position , the sym-
bol located next to the light switch will il-
luminate. If the light illuminates automatical-
ly, symbol located next to the light switch
will also illuminate.
Automatic headlights in case of rain
If the light switch is in position and is
connected to the automatic wipe in case of
rain for more than 10 seconds or wipe (posi-
tion 2 or
3 ) for longer than 15 seconds,
››› page 69 then the side lights and head-
lights w
ill automatically switch on.
The light automatically switches off if more
than 4 minutes have elapsed and the auto-
matic wipe or wipe (position 2 or
3 ) have
not been switched on. »
63
Technical specifications
Advice
Operation
Safety
Page 66 of 200

Operation
CAUTION
Do not cover the windscreen light sensor with
stickers or similar objects; this could impair
operation. Front fog lights*
Fig. 48
Instrument panel: light switch. Switching on front fog lights
– First turn the light switch ›››
Fig. 48 to posi-
tion , or
.
– Pull on the light switch to position 1 .
The ›››
page 32 warning lamp lights up on
the g ener
al instrument panel if the front fog
lights are switched on. Front fog lights with cornering
function* 3 Not valid for vehicles fitted with Full-LED lights
Fr ont
fog lights with cornering function pro-
vide better lighting of the area around the car
when driving through a corner or parking,
etc.
Front fog lights with cornering function
switch on depending on how far you turn the
steering wheel or whether or not the turn sig-
nals 1)
are switched on, if the following condi-
tions are met:
● The vehicle is stationary, the ignition is
switched on or you are moving at a speed of
less than 40 km/h (25 mph);
● The daytime driving light is switched off
● The dipped beam is switched on
● The fog lights are switched off
● Reverse gear is not engaged Rear fog light Switching on the rear fog light
– First turn the light switch ››› Fig. 48
››› page 64 to position
, or .
– Pull on the light switch to position 2 .
If the vehicle is not equipped with front fog
lights ››› page 64, the rear fog light is switch-
ed on b y
turning the switch to position or
and pulling it to position 2 . This type of
switch only has one position.
The ››› page 32
warning lamp lights up on
the g ener
al instrument panel if the rear fog
lights are switched on.
If you are towing a trailer or caravan equip-
ped with a rear fog light on a vehicle with a
factory-fitted towing bracket or one installed
using parts from the original SEAT parts
catalogue
, only the rear fog light on the trail-
er or caravan will light up. 1)
In the event of a conflict between both functions,
i.e. if you turn the steering wheel to the left while the
right-hand turn signal is on, the turn signals will take
priority.
64
Page 67 of 200

Lights and visibility
“Coming Home”/“Leaving Home”*
function This function makes it possible, under poor
visibility conditions, to automatically turn on
the lights for a brief period of time after the
vehicle has been parked or when approach-
ing the vehicle.
The function is automatically turned on if the
following conditions are met:
● The light switch is in position
››› page 63
.
● The v
isibility around the vehicle is reduced.
● The ignition is switched off.
To turn on this function, switch on the head-
light flasher prior to exiting the vehicle.
The light is adjusted according to the data re-
corded by the light sensor that is installed
between the windscreen and the inside rear
view mirror.
The function automatically turns on the side
lights and headlights, the lighting for the en-
try area on the exterior mirrors and the num-
ber plate light.
“Coming Home” function
The light is automatically switched on when
the driver door is opened (for 60 seconds af-
ter the ignition is switched off). The lights is switched off when all the doors
and the boot lid are closed.
If a door or the boot lid remains open, the
light will switch off after 60 seconds.
“Leaving Home” function
The light is automatically switched on when
the vehicle is unlocked using the remote con-
trol.
The light is switched off after 10 seconds or
when the vehicle is locked.
Hazard warning light switch Fig. 49
Instrument panel: switch for hazard
warning lights. –
Press the button ››› Fig. 49 to switch the
h az
ard warning lights on or off.
The warning lamps on the instrument panel
and the warning lamp on the switch will flash at the same time as the turn signals when
the hazard warning lights are switched on.
The hazard warning lights also work when
the ignition is switched off.
The hazard warning lights come on automati-
cally in the event of an accident in which an
airbag is triggered.
Note
Switch on the hazard warning lights to warn
other road users, for example:
● When reaching the tail end of a traffic jam
● if the vehicle has a technical fault or you
are involved in an emergency situation. Parking lights*
Parking lights
– Switch the ignition off.
– Move the turn signal lever ›››
Fig. 47
››› page 63 up or down to turn on the right
or l ef
t-hand parking lights respectively.
Parking light on both sides – Turn the light switch ›››
Fig. 45
››
› page 61 to position and eng age the
steering lock. »
65
Technical specifications
Advice
Operation
Safety
Page 68 of 200

Operation
Note
● The parking lights can only be activated
with the ignition disconnected.
● The parking light will not come on automat-
ically after switching off the ignition if the
left- or right-hand turn signal is left on. Adjusting the headlights
The light beam of the dipped beam lights is
asymmetric: the side of the road on which
you are driving is lit more intensely.
When a car that is manufactured in a country
that drives on the right travels to a country
that drives on the left (or vice versa), it is nor-
mally necessary to cover part of the headlight
bulbs with stickers or to change the adjust-
ment of the headlights to avoid dazzling oth-
er drivers.
In such cases, the regulations specify certain
light values that must be complied with for
designated points of the light distribution.
This is known as “Tourist light”.
The light distribution of the halogen and full-
LED headlights of the SEAT Toledo allows the
specific “tourist light” values to be met with-
out the need for stickers or changes in the
settings. Note
“Tourist light” is only allowed temporarily. If
you are planning a long stay in a country that
drives on the other side, you should take the
vehicle to an Authorised Technical Service to
change the headlights. Interior lights
Interior lighting – version 1 Fig. 50
Interior lighting – version 1. Switching on the interior light
– Move the switch A
›››
Fig. 50 toward the
s ide of
the light. The symbol will be dis-
played.
Switching off the interior light – Move the switch A
›››
Fig. 50 to the centre
po s
ition O. Operating the courtesy light
–
Move the switch A
››› Fig. 50 to the centre
of the light
. The symbol will be dis-
played.
Reading lights
– The reading lights are switched on and off
by pressing switch B
››› Fig. 50 .
Wher e the c
ourtesy light is on (switch A ›››
Fig. 50 in position
), the light will come
on if:
● the
vehicle is unlocked,
● one of the doors is opened,
● The key is removed from the ignition
When the courtesy light is on (switch A in
position ), the light will switch off if:
● the vehicle is locked,
● the ignition is switched on,
● 30 seconds after all of the doors have been
closed
If a door is left open or if switch A is in the
position, the interior lighting switches off
after about 10 minutes to prevent the battery
from running flat.
66
Page 69 of 200

Lights and visibility
Interior lighting – version 2 Fig. 51
Interior lighting – version 2. Switching on the interior light
– Move the light switch to position
››› Fig. 51 .
Sw it
ching off the interior light
– Move the light switch to position 0.
Operatin
g the courtesy light
– Move the light switch to position .
The lights in version 2 are operated using the
same guidelines as ››› page 66, Interior light-
ing – version 1 . Rear interior light
Fig. 52
Rear interior light. Press the button
››› Fig. 52 to switch the light-
in g on or off
.
Glove compartment light The light will come on automatically when
the glove compartment is opened. The light
will go out when the glove compartment is
closed.
Luggage compartment light The light switches on automatically when the
boot is open and switches off automatically
10 minutes after the boot lid has been
opened.Visibility
Heated rear window Fig. 53
Heated rear window switch. –
Switch the heated rear window on or off by
pressing the button
››› Fig. 53 , the warn-
in g l
amp in the button will come on or go
off respectively.
The heated rear window only works when the
engine is running.
After approximately 7 minutes, the heating
device of the rear window switches off auto-
matically. For the sake of the environment
The heated rear window should be switched
off as soon as the glass is demisted. By sav-
ing electrical power you can also save fuel
››› page 106.
» 67
Technical specifications
Advice
Operation
Safety
Page 70 of 200

Operation
Note
In the event of a drop in voltage in the on-
board systems, the heated rear window
switches off automatically to ensure enough
power to control the engine ››› page 143, Au-
tomatic disconnection of electrical equip-
ment. Sun visors
Fig. 54
Driver's sun visor. Fig. 55
Front passenger's sun visor. The sun visors for the driver and the front
passenger can be pulled out of their central
supports and turned towards the doors in the
direction of arrow
1
››› Fig. 54 and 2 ›››
Fig. 55 respectively.
The s trip A is to store small objects such as
notepaper, etc.
The front passenger sun visor includes a van-
ity mirror B with a cover. The cover is
opened by sliding it in the direction indicated
by arrow 3
››› Fig. 55 . WARNING
Do not turn sun visors with attached objects
such as ball-pens, etc. toward the head pro-
tection airbag triggering zone on the side
windows. The head protection airbags could
injure occupants if triggered. Windscreen wipers and
windscreen washers
Introduction The windscreen wipers and windscreen
washers only work when the ignition is
switched on.
The speed of the automatic wipe in case of
rain is automatically adjusted according to
the intensity of the rainfall.The rear window is wiped once if the wind-
screen wipers are switched on and reverse
gear is engaged.
Fill the windscreen washer fluid
››› page 139. WARNING
● Make sure the blades ››› page 162 are in
perfect condition for good visibility and safe
driving.
● In cold conditions, you should not use the
wash/wipe system unless you have warmed
the windscreen with the heating and ventila-
tion system. The windscreen washer fluid
could otherwise freeze on the windscreen and
obscure your view of the road. CAUTION
● During winter, always check that the wind-
screen wiper blades are not frozen to the
glass before each trip or before switching on
the ignition. If you switch on the windscreen
wipers when the wiper blades are frozen to
the glass, this could damage both the wiper
blades and the wiper motor.
● If the ignition is switched off when the
windscreen wipers are on, they will start op-
erating in the same mode when the ignition
is switched back on. The wiper blades may be
frozen to the glass at low temperatures when
the ignition is switched off.
● Carefully separate the frozen wipers from
the windscreen or rear window. 68
Page 71 of 200

Lights and visibility
●
Remove snow and ice from the wipers be-
fore starting your journey.
● Careless handling could lead to the wiper
arms damaging the windscreen.
● For safety reasons, the wiper blades should
be changed once or twice a year. They can be
purchased at a SEAT Authorised Service.
● The ignition cannot be switched on while
the windscreen wiper arms are in a raised po-
sition. Otherwise, the windscreen wipers
would return to their original position and
could damage the paintwork on the bonnet. Note
Keep the wipers clean. The wipers can be
soiled with remains of wax solutions from car
washes ››› page 124.
● On vehicles equipped with windscreen
washer jets, these are heated once the en-
gine is running. Handling windscreen wipers and
washers
Fig. 56
Window wiper lever. Short wipe
– Give the windscreen a brief wipe by moving
the lever down to position 4
››› Fig. 56 .
W ipe int
ervals/automatic wipe with rain
sensor*
– Push the lever up to position 1
››› Fig. 56 .
– With sw
itch A , adjust the wipe interval or
rain sensor sensitivity.
Switch A has 4 positions.
The rain sensor* is part of the intermittent
wipe function.
The rain sensor* controls the frequency of
the windscreen wiper intervals, depending
on the amount of rain. Slow wipe
–
Push the lever up to position 2
››› Fig. 56 .
C ontinuou
s wipe
– Push the lever up to position 3
››› Fig. 56 .
Aut om
atic windscreen wash and wipe
– Pull the lever towards the steering wheel,
position 5
››› Fig. 56 , and the windscreen
w a
sher and wipers are switched on.
– Release the lever. The washer will stop and
the windscreen wipers will keep running for
1-3 wipes (depending on the windscreen
washer operating time).
Rear window wiper*
– Press the lever forward to position 6 ›››
Fig. 56 and the rear window wiper will
ru n ev
ery 6 seconds.
Automatic rear window wash and wipe* – Press the lever fully forward to position 7 ›››
Fig. 56 and the rear window wiper and
w a
sher switch on at the same time.
– Release the lever. The rear window washer
will stop and the rear window wipers will
keep running for 1-3 wipes (depending on
the jet operating time). When released, the
lever remains in position 6 .
»
69
Technical specifications
Advice
Operation
Safety
Page 72 of 200

Operation
Switching off the wipers – Move the lever to position 0
››› Fig. 56 . WARNING
The rain sensor may not detect enough rain
to switch on the wipers.
● If necessary, switch on the wipers manually
when water on the windscreen obstructs visi-
bility. Note
Do not put stickers on the windscreen in front
of the rain sensor*. This may cause sensor
disruption or faults. Headlight washer system*
The headlight washers operate briefly if the
dipped headlights or headlights are on and
the lever is moved to position
5
›››
Fig. 56 .
The he a
dlight washer system also operates
every 10 windscreen wash cycles.
Clean off stubborn dirt (insects, etc.) from the
headlights at regular intervals, for instance
when filling the fuel tank. Please observe the
following indications ›››
page 126, Head-
lights.
To en
sure the system works properly in win-
ter, keep the nozzle holders free of snow and
remove any ice with a de-icer spray. CAUTION
Never pull on the nozzle holders. Risk of
damage to the system! Rear vision mirrors
Interior rear vision mirror with manual
anti-dazzle adjustment Basic settings
– Push the lever at the bottom of the mirror
forward.
Rear vision mirror anti-dazzle setting – Pull the lever at the bottom of the mirror to-
wards you.
Exterior mirrors Fig. 57
Door interior: adjuster knob. Before beginning any journey, adjust the rear
view mirrors for a good rear visibility.
Heated rear vision mirrors*
–
Turn the knob to position
›
›› Fig. 57
.
Electrical adjustment of the left-hand
exterior mirror*
– Turn the knob to position ›
›› Fig. 57. The
mirror movements are the same as those of
the knob.
Electrical adjustment of the right-hand
exterior mirror*
– Turn the knob to position ››› Fig. 57. The
mirror mo
vements are the same as those of
the knob. WARNING
● Convex (wide-angle) rear vision mirrors give
a larger field of vision. However, they make
objects appear smaller and further away than
they really are. For this reason, you should
not rely on these rear vision mirrors for judg-
ing the distance of vehicle behind.
● If possible, use the interior rear vision mir-
ror to estimate distances to vehicles behind
you. Note
● Exterior mirrors are only heated when the
engine is running. 70
 1
1 2
2 3
3 4
4 5
5 6
6 7
7 8
8 9
9 10
10 11
11 12
12 13
13 14
14 15
15 16
16 17
17 18
18 19
19 20
20 21
21 22
22 23
23 24
24 25
25 26
26 27
27 28
28 29
29 30
30 31
31 32
32 33
33 34
34 35
35 36
36 37
37 38
38 39
39 40
40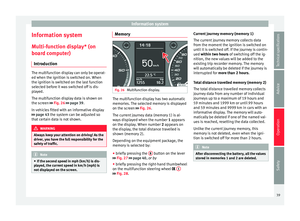 41
41 42
42 43
43 44
44 45
45 46
46 47
47 48
48 49
49 50
50 51
51 52
52 53
53 54
54 55
55 56
56 57
57 58
58 59
59 60
60 61
61 62
62 63
63 64
64 65
65 66
66 67
67 68
68 69
69 70
70 71
71 72
72 73
73 74
74 75
75 76
76 77
77 78
78 79
79 80
80 81
81 82
82 83
83 84
84 85
85 86
86 87
87 88
88 89
89 90
90 91
91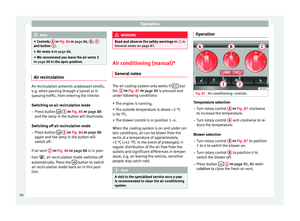 92
92 93
93 94
94 95
95 96
96 97
97 98
98 99
99 100
100 101
101 102
102 103
103 104
104 105
105 106
106 107
107 108
108 109
109 110
110 111
111 112
112 113
113 114
114 115
115 116
116 117
117 118
118 119
119 120
120 121
121 122
122 123
123 124
124 125
125 126
126 127
127 128
128 129
129 130
130 131
131 132
132 133
133 134
134 135
135 136
136 137
137 138
138 139
139 140
140 141
141 142
142 143
143 144
144 145
145 146
146 147
147 148
148 149
149 150
150 151
151 152
152 153
153 154
154 155
155 156
156 157
157 158
158 159
159 160
160 161
161 162
162 163
163 164
164 165
165 166
166 167
167 168
168 169
169 170
170 171
171 172
172 173
173 174
174 175
175 176
176 177
177 178
178 179
179 180
180 181
181 182
182 183
183 184
184 185
185 186
186 187
187 188
188 189
189 190
190 191
191 192
192 193
193 194
194 195
195 196
196 197
197 198
198 199
199