Page 129 of 200

Care and maintenance
Underbody sealant The underside of the vehicle is coated to per-
manently protect it from chemical and me-
chanical agents.
Given that damage to the
protective coating
during driving cannot be completely ruled
out, we recommend you check the condition
of the protective coating on the underbody
and suspension at regular intervals, prefera-
bly before the start and end of the coldest
season of the year.
Authorised SEAT dealers have suitable spe-
cial products and the necessary facilities and
are aware of the techniques required for their
application. We therefore recommend all
touch-up work or additional anti-corrosion
measures be performed by an authorised
SEAT dealer. WARNING
Do not apply underseal or anti-corrosion
coatings to the exhaust pipes, catalytic con-
verter, particulate filter or heat shields on the
exhaust system. Once the engine has
reached operating temperature, these sub-
stances could catch fire. Risk of fire! Cavity waxing
All cavities on the vehicle exposed to corro-
sion are permanently factory-protected by a
wax solution
.
This wax solution does not need to be
checked or touched up. Should wax run out
of the cavities at high ambient temperatures,
remove it using a plastic scraper and clean
away any stains using lighter fluid. WARNING
Note the regulations concerning safety and
environmental protection if you use lighter
fluid to remove the wax. Risk of fire! Leatherette and upholstery
Leatherette can be cleaned with a damp
cloth. If this is not sufficient, these parts
should only be cleaned with
solvent-free
plastic care and cleaning products .
Textile covers and trim parts on doors, boot
lid, etc. can be cleaned with special deter-
gents, e.g. dry foam. A soft sponge or brush
or a micro-fibre cloth for normal cleaning can
be used. Use special products to clean the
headliner.
The dye used in many garments, for example
dark jeans, is not always sufficiently colour-
fast. Seat upholstery (fabric and leather), es- pecially when light-coloured, may visibly dis-
colour if the dye comes out of clothing, even
in normal conditions. This is not an uphols-
tery defect but indicates that the dye in the
item of clothing is not solid enough.
Heated seat upholstery Do not clean the seat upholstery with
damp
products, as this could damage the seat
he atin
g system.
Clean the upholstery with special products,
e.g. dry foam, etc.
Natural leather Leather should be looked after from time to
time, depending on its use.
Normal cleaning
Moisten a cotton or woollen cloth with water
and wipe over the leather surfaces.
More stubborn dirt
Do not let water soak through the leather or
penetrate the seams.
Dry it with a soft, dry cloth.
»
127
Technical specifications
Advice
Operation
Safety
Page 130 of 200

Advice
Removing stains
Remove fresh water-based
stains such as cof-
f
ee, tea, juices, blood, etc. with an absorbent
cloth or kitchen roll. Use the special deter-
gent to clean dried-on stains.
Remove fresh
fat-based stains such as but-
ter
, mayonnaise, chocolate, etc. with an ab-
sorbent cloth or paper towel or use the spe-
cial detergent if the stain has not yet soaked
through the surface.
Use a grease-dissolving product to treat
dried-in, fat-based stains.
Treat less common stains such as ball-pen
and other inks, felt-tip pens, nail polish,
emulsion paint, shoe cream etc. with a spe-
cial leather stain remover.
Leather care
The leather should be treated regularly
(about twice a year) with a leather-care prod-
uct.
Apply the protective product very sparingly.
Dry the leather with a soft, dry cloth. CAUTION
● Avoid exposing leather to direct sunlight
for long periods so that it does not lose its
colour. If the car is left for a prolonged period
outdoors, cover the leather so that it does
not lose its colour. ●
Sharp-edged objects on clothing, such as
zips, rivets or belts can leave permanent
scratches and rough marks on the surface of
the leather.
● Use of a mechanical steering wheel lock
can damage the leather surface of the steer-
ing wheel. Note
● Use a suitable impregnating cream with ul-
tra-violet protection at regular intervals and
after cleaning. The cream will nourish and
moisturise the leather, keep it supple and
able to breathe. In addition, it will also help
to protect the surface of the leather.
● Clean the leather every 2 to 3 months and
remove fresh dirt as necessary.
● Preserve the colour of the leather. A special
coloured cream for leather will renew the col-
our of more heavily worn areas as required.
● Leather is a natural material with specific
properties. During vehicle use, the appear-
ance of parts of the leather covers may
change; folds or wrinkles may appear as a re-
sult of their use. Seat belts
Keep the seat belts clean!
Wash soiled seat belts with mild, soapy wa-
ter, removing any heavier dirt with a soft
brush.Check the condition of all seat belts at regu-
lar intervals.
Very soiled belts may not retract properly.
WARNING
● The seat belts should never be removed
from the vehicle for cleaning.
● Never clean using chemical products, as
chemical detergents destroy the fabric. En-
sure that the seat belts do not come into con-
tact with corrosive fluids such as acids, etc.
● If you find any damage to the belt webbing,
belt fittings, the belt retractor or the buckle,
the belt in question must be replaced by an
Official Service.
● Make sure that the inertia reel seat belts
are completely dry before allowing them to
retract. 128
Page 131 of 200

Checking and refilling levels
Checking and refilling levels
Fuel Introduction The correct type of fuel for your vehicle is in-
dicated on a sticker on the inside of the fuel
tank flap, along with the tyre size and pres-
sure
››› Fig. 107 . WARNING
Observe all relevant statutory regulations on
transporting spare fuel canisters. For safety
reasons, we do not recommend carrying a
spare canister in the vehicle. The canister
could be damaged in an accident and fuel
may leak. Risk of fire! CAUTION
● Never completely empty the tank! An irreg-
ular fuel supply can cause ignition faults,
which can result in damage to a substantial
amount of engine parts and the exhaust sys-
tem.
● If any fuel is spilt onto the paintwork of the
vehicle, it should be removed immediately.
Risk of damage to paintwork! Refuelling
Fig. 107
Vehicle as seen from the rear right:
fuel tank flap/fuel tank flap with tank un-
screwed cap attached. Vehicles with a fuel cap with key
–
Press the flap in the direction of the arrow
1
››› Fig. 107 .
– Open the c o
ver in the direction indicated
by the arrow 2 .–
Hold onto the fuel tank cap with one hand
and unlock it using the ignition key, turning
it anti-clockwise.
– Unscrew the tank cap anti-clockwise and
place it on top of the tank flap ››› Fig. 107
.
– Inser
t the pump nozzle into the fuel feed
tube as far as it will go.
The fuel tank is full as soon as the automatic
filler nozzle cuts out ››› .
– Remove the pump nozzle from the fuel feed
tube and place it back on the pump.
– Screw the tank cap clockwise until it clicks
into place.
– Hold onto the fuel tank cap with one hand
and lock it using the ignition key, turning it
clockwise.
– Press the tank flap with your hand to close
it.
– Check that the fuel flap is correctly closed.
Vehicles with a keyless fuel cap (the side
flap will unlock using the central locking
system)
– Once the vehicle has been unlocked using
the central locking button, press the fuel
flap in the direction of the arrow 1 ›››
Fig. 107 .
– Open the c o
ver in the direction indicated
by the arrow 2 .
»
129
Technical specifications
Advice
Operation
Safety
Page 132 of 200

Advice
– Unscrew the tank cap anti-clockwise and
place it on top of the tank flap ››› Fig. 107
.
– Insert the pump nozzle into the fuel feed
tube as far as it will go.
The fuel tank is full as soon as the automatic
filler nozzle cuts out ››› .
– Remove the pump nozzle from the fuel feed
tube and place it back on the pump.
– Screw the tank cap clockwise until it clicks
into place.
– Close the tank flap. Make sure you hear it
click into place.
– Check that the fuel flap is properly closed. CAUTION
● Switch off the auxiliary heater (heater and
independent heater) before filling the tank.
● The fuel tank is full as soon as the automat-
ic filler nozzle cuts out. Do not continue fill-
ing, as this will fill the expansion chamber. Note
The fuel tank capacity is around 55 litres, of
which 7 litres are the reserve. Unleaded petrol
Your vehicle must only be run on
unleaded
petrol that complies with the Standard EN
228 (in Germany, also DIN 51626 – 1, or E10
for unleaded petrol with 95 and 91 octane
rating (RON) or DIN 51626 – 2, or E5 for un-
leaded petrol with 95 and 98 RON).
Prescribed fuel – unleaded petrol (95/91
RON)
Use unleaded petrol with 95
RON. Unleaded
petrol with 91 RON can also be used, al-
though thi s
will result in a slight loss of pow-
er.
If, as an emergency measure, you have to fill
the tank with petrol with a lower RON to that
prescribed, use only moderate engine
speeds and light throttle. High engine speed
and full throttle can seriously damage the en-
gine! Fill up with petrol with the correct RON
as soon as possible.
Prescribed fuel – unleaded petrol (min. 95
RON)
Use unleaded petrol with 95 RON.
If u
nleaded petrol with 95 RON is not availa-
bl
e, you can fill up with petrol with 91 RON as
an emerg
ency measure. In this case, use only
moderate engine speeds and a light throttle.
High engine speed and full throttle can seri- ously damage the engine! Fill up with petrol
with the correct RON as soon as possible.
Petrol with a RON below
91 cannot be used,
even a
s an emergency measure. Risk of seri-
ously damaging the engine!
Unleaded petrol with higher RON
Unleaded petrol with a higher RON to that
prescribed can be used without limits.
In vehicles running on prescribed unleaded
petrol with 95/91 RON
, there is no notable
increase in power or lower fuel consumption
when petrol with a RON higher than 95
is
used.
In vehicles running on prescribed unleaded
petrol with min. 95 RON
, there is an increase
in power and a lower fuel consumption when
petrol with a RON higher than 95
is used.
Prescribed fuel – unleaded petrol (98/(95)
RON)
Use unleaded petrol with 98
RON. Unleaded
petrol with 95 RON can also be used, al-
though this will result in a slight loss of pow-
er.
If unleaded petrol with 98
or 95 RON is not
available, you can fill up with petrol with 91
RON as an emergency measure. In this case,
use only moderate engine speeds and a light
throttle. High engine speed and full throttle
can seriously damage the engine! Fill up with
130
Page 133 of 200

Checking and refilling levels
petrol with the correct RON as soon as possi-
ble.
Petrol with a RON below 91 cannot be used,
ev en a
s an emergency measure. Risk of seri-
ously damaging the engine!
Petrol additives
The quality of the fuel influences the behav-
iour, power and service life of the engine.
This is why the petrol you use should carry
suitable additives already included by the
petrol industry, free of metals. These addi-
tives will help to prevent corrosion, keep the
fuel system clean and prevent deposits from
building up in the engine.
If good-quality petrol with metal-free addi-
tives is not available or engine problems
arise, the necessary additives must be added
when refuelling ››› .
Not all petrol additives have been shown to
be effective. The use of unsuitable petrol ad-
ditives may cause significant damage to the
engine and the catalytic converter. Metal ad-
ditives should never be used. Metal additives
may also be contained in petrol additives for
improving anti-detonation ratings or octane
ratings ››› .
SEAT recommends “genuine Volkswagen
Group Fuel Additives for petrol engines”.
These additives can be bought at SEAT deal-
ers, where information on how to use them
can also be obtained. CAUTION
● Do not refuel if the filler indicates that the
fuel contains metal. LRP (lead replacement
petrol) fuels contain high concentrations of
metal additives. Using them may damage the
engine!
● All SEAT vehicles with petrol engines can
only run on unleaded petrol. Refuelling just
once with leaded petrol disables the exhaust
system!
● Use of petrol with a lower RON to that pre-
scribed could damage the engine compo-
nents.
● Fuels marked as containing metal on the
garage fuel pump cannot be used. Risk of
damage to most engine parts or the exhaust
system!
● The use of unsuitable additives in petrol
can cause damage to most engine parts or
the exhaust system. Diesel fuel
Your vehicle can only run on
diesel fuel that
complies with the Standard EN 590 (in Ger-
m an
y, also DIN 51628, in Austria also
ÖNORM C 1590 , in Russia also GOST R
52368-2005/EN 590:2004).
Wint
er driving – winter-grade diesel
In winter use diesel fuel that complies with
the Standard EN 590
(in Germany, also DIN 51628, in Austria also ÖNORM C 1590
, in
Russia also
GOST R 52368-2005/EN
590:2004). “Winter-grade diesel” still per-
forms well at -20 °C (-4 °F).
In countries with other weather conditions,
diesel is often available that behaves differ-
ently with regards to the temperature. The
authorised SEAT dealers and petrol stations
in each country will inform you on the normal
diesel fuel of the country in question.
Preheating the fuel filter
The vehicle is fitted with a glow plug system
for the fuel filter. Therefore, the reliability of
the diesel is ensured at ambient tempera-
tures of down to approximately -25 °C
(-13 °F).
Fuel additives
Fuel additives, known as “thinners” (petrol or
similar substances) should not be mixed with
the diesel fuel. CAUTION
● Even one tankful of diesel fuel that does
not comply with the standard could damage
engine parts, the fuel system and the ex-
haust system!
● If fuel different to the prescribed diesel fuel
(e.g. petrol) is used by mistake, never start
the engine or switch on the ignition! Risk of » 131
Technical specifications
Advice
Operation
Safety
Page 134 of 200

Advice
serious damage to the engine! Contact an au-
thorised SEAT dealer to clean the engine fuel
system.
● Water allowed to collect in the fuel filter
can cause engine faults.
● Your vehicle is not prepared for use of bio-
fuel (RME) and, therefore, this fuel must not
be used for refuelling or driving. The use of
biofuel (RME) could cause serious damage to
the engine or the fuel system. Engine compartment
Introduction Always be aware of the danger of injury and
scalding as well as the risk of accident or fire
when working in the engine compartment,
e.g. when checking and refilling fluids.
Therefore, always observe the warnings and
follow all general safety precautions. The en-
gine compartment is a dangerous area
.WARNING
● Never open the bonnet if you see steam,
smoke or coolant escaping from the engine
compartment. Risk of scalding! Wait until no
steam or coolant can be seen before opening
the bonnet.
● Switch off the engine and remove the key
from the ignition. ●
Engage neutral in vehicles with manual
gearbox and move the selector lever to posi-
tion P in vehicles with automatic gearbox.
● Apply the handbrake firmly.
● Wait for the engine to cool down.
● For safety reasons, the bonnet must always
be closed when the vehicle is moving. There-
fore, after closing the bonnet always check
that it is properly secured.
● Should you notice that the bonnet is not
safely secured when the vehicle is moving,
stop the vehicle immediately and close the
bonnet properly. Risk of accident!
● Keep children away from the engine com-
partment.
● Do not touch hot engine parts. Risk of
burns!
● Never spill fluids on hot engine compart-
ments. These fluids can cause a fire (e.g. anti-
freeze in coolant)!
● Take care not to cause short circuits in the
electrical system, especially when working
on the battery.
● Never touch the radiator fan when the en-
gine is hot. The fan may start running sud-
denly!
● Never cover the engine with additional in-
sulating materials such as a blanket. Risk of
fire!
● Do not unscrew the cap on the coolant ex-
pansion tank when the engine is hot. The
cooling system is under pressure! ●
Protect face, hands and arms from any hot
steam or hot coolant released by covering the
cap with a large, thick rag when opening the
expansion tank.
● Do not leave any objects, such as cloths or
tools, in the engine compartment.
● When working underneath the vehicle, se-
cure it so that it cannot roll away and support
it safely on suitable supports. The hydraulic
jack is not sufficient for this purpose. Risk of
injuries!
● If any tests have to be performed with the
engine running, there is an extra safety risk
from rotating parts, such as the drive belt, al-
ternator and radiator fan, etc., and from the
high-voltage ignition system. You should also
note the following:
– Never touch the electrical wiring of the
ignition system.
– Keep away from moving engine parts
when wearing jewellery, loose clothing or
long hair. Risk of fatal injuries! All jewel- lery must be removed, hair tied back and
close-fitting clothing worn.
● Observe the following additional warnings
if work on the fuel system or the electrical
system is necessary.
–Always disconnect the battery from the
on-board network.
– Do not smoke.
– Never work near naked flames.
– Always keep an approved fire extinguish-
er immediately available. 132
Page 135 of 200

Checking and refilling levels
CAUTION
● When topping up fluids, make sure the cor-
rect fluid is put into the correct filler opening.
Otherwise this can cause serious malfunc-
tions or engine damage!
● Never open the bonnet using the release
catch. Risk of damage! For the sake of the environment
Due to the environmentally-friendly disposal
of fluids, the equipment necessary and the
knowledge required, let an authorised SEAT
dealer change fluids during service inspec-
tions of the vehicle. Note
● Please contact an authorised SEAT dealer
with any doubts regarding fluids.
● Fluids of the correct specifications can be
acquired from the selection of SEAT Original
Accessories. Opening and closing the bonnet
Fig. 108
Unlocking the bonnet. Fig. 109
Locking the bonnet. Opening the bonnet
–
Open the front left door.
– Pull the lever 1
››› Fig. 108 under the dash
p anel
in the direction indicated by the ar-
row.
Before opening
the bonnet, make sure that
the windscreen wiper arms are not lifted »
133
Technical specifications
Advice
Operation
Safety
Page 136 of 200

Advice
away from the glass. Otherwise the paint-
work may be damaged.
– Pull the release catch in the direction of the
arrow 2
››› Fig. 108 and the bonnet will be
r el
eased.
– Hold and lift the bonnet.
– Remove the support strut 3
››› Fig. 109
from its fastening in the direction of the ar- row and secure the raised bonnet so that
the end of the strut hooks onto the opening
in the bonnet
4 .
Closing the bonnet – Lift the bonnet slightly and unhook the
support strut keeping the bonnet open and
insert it into its fastening 3 .
–
Let the bonnet drop from a height of
around 20 cm into the catch Do not press
down afterwards!
– Check that the bonnet is correctly closed.
Checking fluid levels Fig. 110
Diagram for the location of the various elements. From time to time, the levels of the different
fluids in the vehicle must be checked. Never
fill with incorrect fluids, otherwise serious
damage to the engine may be caused.
Coolant expansion tank . . . . . . . . . . .138
Window washer water tank . . . . . . . .139
Engine oil filler cap . . . . . . . . . . . . . . .137
1 2
3 Engine oil level dipstick
. . . . . . . . . . .136
Brake fluid reservoir . . . . . . . . . . . . . .139
Battery . . . . . . . . . . . . . . . . . . . . . . . . . . . 140
The checking and replenishment of the serv-
ice fluids are carried out on the components
mentioned above. These operations are de-
scribed in the ››› page 132 .
4 5
6 Overview
You will find further explanations, instruc-
tions and restrictions on the technical speci-
fications as of
››› page 174 . Note
The layout of the engine compartment is very
similar to all petrol and diesel engines. 134
 1
1 2
2 3
3 4
4 5
5 6
6 7
7 8
8 9
9 10
10 11
11 12
12 13
13 14
14 15
15 16
16 17
17 18
18 19
19 20
20 21
21 22
22 23
23 24
24 25
25 26
26 27
27 28
28 29
29 30
30 31
31 32
32 33
33 34
34 35
35 36
36 37
37 38
38 39
39 40
40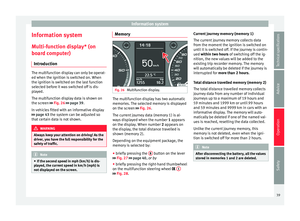 41
41 42
42 43
43 44
44 45
45 46
46 47
47 48
48 49
49 50
50 51
51 52
52 53
53 54
54 55
55 56
56 57
57 58
58 59
59 60
60 61
61 62
62 63
63 64
64 65
65 66
66 67
67 68
68 69
69 70
70 71
71 72
72 73
73 74
74 75
75 76
76 77
77 78
78 79
79 80
80 81
81 82
82 83
83 84
84 85
85 86
86 87
87 88
88 89
89 90
90 91
91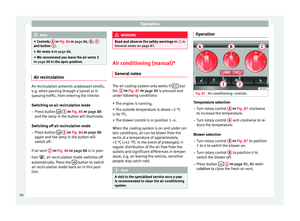 92
92 93
93 94
94 95
95 96
96 97
97 98
98 99
99 100
100 101
101 102
102 103
103 104
104 105
105 106
106 107
107 108
108 109
109 110
110 111
111 112
112 113
113 114
114 115
115 116
116 117
117 118
118 119
119 120
120 121
121 122
122 123
123 124
124 125
125 126
126 127
127 128
128 129
129 130
130 131
131 132
132 133
133 134
134 135
135 136
136 137
137 138
138 139
139 140
140 141
141 142
142 143
143 144
144 145
145 146
146 147
147 148
148 149
149 150
150 151
151 152
152 153
153 154
154 155
155 156
156 157
157 158
158 159
159 160
160 161
161 162
162 163
163 164
164 165
165 166
166 167
167 168
168 169
169 170
170 171
171 172
172 173
173 174
174 175
175 176
176 177
177 178
178 179
179 180
180 181
181 182
182 183
183 184
184 185
185 186
186 187
187 188
188 189
189 190
190 191
191 192
192 193
193 194
194 195
195 196
196 197
197 198
198 199
199