Page 49 of 200
Communication
Audio system operation Fig. 31
Controls on the steering wheel.ButtonRadioMedia (except AUX)AUX
A TurnUp/down volumeUp/down volumeUp/down volume
A PressNo functionNo functionNo function
BMutePauseMute
CSearch for last stationShort press: switch to the previous song
Hold down: quick rewindNo function
DSearch for the next stationShort press: switch to the next song
Hold down: fast forwardNo function
EPrevious presetPrevious folderNo function
FNext preset stationNext folderNo function
GChange sourceChange sourceChange source
H TurnSwitch MFA functionSwitch MFA functionSwitch MFA function
H PressActs on the MFAActs on the MFAActs on the MFA 47
Technical specifications
Advice
Operation
Safety
Page 50 of 200
AUXTelephone a)Navigation a)
A TurnUp/down volumeUp/down volumeUp/down volumeUp/down v")
Operation
Audio + telephone system operation Fig. 32
Controls on the steering wheel.ButtonRadioMedia (except AUX)AUXTelephone a)Navigation a)
A TurnUp/down volumeUp/down volumeUp/down volumeUp/down volumeUp/down volume
A PressMutePauseMuteMuteMute
B
Short press:
access to the tele-
phone menu on the dash pan- ela)
.
Hold down: redial a)Short press:
access to the tele-
phone menu on the dash pan- ela)
.
Hold down: redial a)Short press:
access to the tele-
phone menu on the dash pan- ela)
.
Hold down: redial a)Short press:
answer/hang up
calls, enable/open the tele- phone menu.
Hold down: reject an incoming call/switch to private/redial modeShort press: access to the tele-
phone menu on the dash pan- ela)
.
Hold down: redial a)
CSearch for last stationShort press:
switch to the pre-
vious song
Hold down: quick rewindNo functionNo function b)Radio/media functionality (ex-
cept AUX )
DSearch for the next stationShort press: switch to the next
song
Hold down: fast forwardNo functionNo function b)Radio/media functionality (ex-
cept AUX )
EChange menu on instrument panelChange menu on instrumentpanelChange menu on instrumentpanelChange menu on instrumentpanelChange menu on instrumentpanel48
Page 51 of 200
AUXTelephone
a)Navigation a)
FChange menu on instrument
panelChange menu on instrumentpanelChange menu on instrumentpanelChange menu on instrumentpanelChange")
CommunicationButtonRadioMedia (except AUX)AUXTelephone
a)Navigation a)
FChange menu on instrument
panelChange menu on instrumentpanelChange menu on instrumentpanelChange menu on instrumentpanelChange menu on instrumentpanel
GEnable/disable voice control a)Enable/disable voice controla)Enable/disable voice controla)No functionb)Enable/disable voice control
H TurnNext/previous preset station c)Next/previous songc)Acts upon the dash panel
menu depending on where it is locatedActs upon the dash panel
menu depending on where it is locatedActs upon the dash panel
menu depending on where it is located
H Press
Acts on the MFA or confirms
the menu option of the dash
panel depending on the menu optionActs on the MFA or confirms
the menu option of the dash
panel depending on the menu optionActs on the MFA or confirms
the menu option of the dash
panel depending on the menu optionActs on the MFA or confirms
the menu option of the dash
panel depending on the menu optionActs on the MFA or confirms
the menu option of the dash
panel depending on the menu option
a)According to the vehicle's equipment package.
b) When a call is being made, radio/media functionality (except AUX).
c) Only if the dash panel is in audio menu.
Voice control Fig. 33
Multifunction steering wheel: voice
control. The time during which the system is ready to
receive voice commands and execute them is
called dialogue. The system provides acous-
tic warnings and if necessary, will guide you
through the respective functions.
It is recommended to use the
Help menu the
first time that voice control is used in order to
familiarize yourself with this function.
Optimum operation of the voice commands
depends on several factors:
● Speak slowly and clearly, as far as possi-
ble. The system will not recognise words pro-
nounced unclearly, or words and numbers in
which syllables are omitted. ●
Speak with normal voice volume, without
exaggerated intonation or long pauses.
● Close the doors, windows and sunroof for
the purpose of dampening or insulating
against unwanted noise from the exterior. Do
not aim the air from the diffusers at the roof.
● If you are driving very fast, it is recommen-
ded that you speak a little louder.
● While talking, avoid making other noise in-
side the vehicle, i.e., occupants that are talk-
ing at the same time.
● Do not speak when the system is providing
information. »
49
Technical specifications
Advice
Operation
Safety
Page 52 of 200

Operation
The microphone for the voice control is loca-
ted in the headliner and is pointing at the
driver and the front passenger. Therefore, the
driver and the front passenger are the only
persons who can operate the device.
Enter the telephone number
The telephone number can be entered as a
straight row of memorized numbers in se-
quence (the whole number at once) or in
blocks (separated by brief pauses). After
each series of digits (separated by a brief
pause) the system repeats the digits that
have been recognised.
Digits 0 - -9 and symbols +, , #
are allowed.
The sy
stem does not recognise coherent
number combinations such as twenty-three.
Voice control activation
Briefly press button 1
››› Fig. 33 on the
mu ltif
unction steering wheel.
Disabling voice control
If the system is playing a message, end the
message by briefly pressing button 1 ›››
Fig. 33 on the multifunction steering
wheel .
If
the system is waiting for a voice command,
the dialogue may be completed as follows:
● use the CANCEL voice command; ●
briefly press button 1
››› Fig. 33 on the
mu ltif
unction steering wheel.
Basic voice commands
Voice com-
mandAction
HELPAfter this command, the system plays all
the possible commands.
CALL A [XYZ]This command is used to call a contact
in the phone book.
PHONE
BOOKFor example, after this command you
can play the phone book, correct or de-
lete a voice recording for a contact, etc.
CALL LISTList of selected numbers, lost calls, etc.
DIAL NUM-
BERAfter this command you can enter a
phone number to call the desired per-
son.
REDIALAfter this command the system dials the
last number that was selected.
MUSICMusic playback from the mobile phone
or other connected telephone.
OTHER OP-
TIONSAfter this command, the system offers
other commands depending on the con-
text.
SETTINGSSelection for adjusting the Bluetooth ®
,
dialogue, etc.
CANCELThe dialogue ends. Note
● An incoming call will immediately end the
dialogue.
● Voice control is only possible in vehicles
equipped with a multifunction steering wheel
with telephone control (High version). 50
Page 53 of 200

Opening and closing
Multimedia AUX-IN and MDI Inputs Fig. 34
AUX-IN input/MDI input. The operating description is located in the re-
spective Instruction Manuals of the audio
system or the navigation system. AUX-IN Input
The AUX-IN input is located in one of the fol-
lowing places:
● in the centre console between the front
seats ››› Fig. 34 -
;
● abo
ve the storage compartment in the front
centre console ››› Fig. 34 -
;
● in the front panel of the SEAT Media System
2.2 navigation system.
The purpose of the AUX-IN input is to connect
external devices in order to play music (i.e.
iPod ®
or an mp3 player) using the factory-fit-
ted audio system or the navigation system.
MDI Input
The MDI input is located above the storage
compartment in the front centre console
››› Fig. 34 - ;
The MDI input
is composed of the USB and
AUX-IN inputs.
The purpose of the MDI input is to connect
external devices (i.e. iPod ®
, mp3 players or
USB memories) in order to play music using
the audio system or the navigation system.
In order to connect Apple multimedia devices
(such as an iPod ®
/iPhone ®
, etc.) the corre-
sponding adaptor from the SEAT Original Ac-
cessories Catalogue is required. Opening and closing
Remote control General notes The remote control key can
● Lock and unlock the vehicle
● Unlock or open the rear lid
The remote control transmitter and the bat-
teries are integrated in the key. The receiver
is inside the vehicle. The remote control key
has a maximum range of 30 metres. The
range is reduced as the batteries start to lose
power.
The key includes a foldaway part that can be
used to manually lock or unlock the vehicle
and to start the engine.
If a lost key is replaced or the receiver is re-
paired or changed, the remote control key
must be adapted by an authorised SEAT deal-
er. Only then can the remote control key be
used again. Note
● The remote control is automatically deacti-
vated when the ignition is switched on.
● The remote control function may be tempo-
rarily limited by interference from other » 51
Technical specifications
Advice
Operation
Safety
Page 54 of 200
.
● If the central locking system or the anti-
theft alarm only responds to th")
Operation
transmitters near the vehicle that operate on
the same frequency (e.g. mobile phone, tele-
vision transmitter).
● If the central locking system or the anti-
theft alarm only responds to the remote con-
trol at a distance of less than 3 metres, then
the battery must be replaced ››› page 53.
● If the driver door is open, the vehicle can-
not be locked using the remote control. Unlocking and locking the vehicle
Fig. 35
Remote control key Unlocking the vehicle
– Press button 1 .
Locking the vehicle
– Press button 3 . Deactivating the Safe lock
– Press button 3 twice in 2 seconds. Further
information ››› page 54.
Unlocking the rear lid
– Pr e
ss button 2 . Further information
››› page 59 .
Unf o
lding the key shaft
– Press button 4 .
Folding the key shaft
– Press button 4 and fold the key shaft back
to its original position.
The turn signals will flash twice when the ve-
hicle is unlocked. If the vehicle is unlocked
using button 1 and none of the doors or the
rear lid is opened in the following 30 sec-
onds, the vehicle will automatically relock
and the Safe lock or the anti-theft alarm will
be activated. This function prevents the vehi-
cle from being unlocked by mistake.
Locking indication
The turn signals will flash if the vehicle has
been correctly locked.
Should any of the doors or the rear lid remain
open when the vehicle is locked, the turn sig-
nals will only flash when they are closed. WARNING
Do not leave people or animals in vehicles
locked from outside with the Safe lock activa-
ted: the doors and windows cannot then be
opened from the inside. Doors locked in this
manner could delay assistance in an emer-
gency. Risk of death! Note
● Only use the remote control when the
doors and the rear lid are locked and the ve-
hicle is within sight.
● Do not press the lock button on the re-
mote control before inserting the key in the
ignition, otherwise the vehicle could be
locked by mistake. Should this occur, press
the unlock button on the remote control.
Remote control synchronisation
f the vehicle cannot be locked or unlocked
using the remote control, the key code may
not match that of the control unit. This can
occur when the remote control buttons are
frequently pressed outside the range of the
system or if the remote control battery has
been replaced.
In this case, it must be synchronised as fol-
lows:
● Press any key on the remote control key.
52
Page 55 of 200

Opening and closing
● Open the door using the key within the
next minute.
Keys General notes Fig. 36
Key with remote control/Key without
remote control. Two keys are always supplied with the vehi-
cle. Depending on the model version, your
car may include keys without remote control
››› Fig. 36
or w
ith remote control › ›› Fig. 36
. WARNING
● Never leave the key inside whenever you
leave the vehicle - even if only for a moment.
This is particularly important if children are
to remain in the vehicle. Children might start
the engine or some other electrical compo-
nent, e.g. electric windows. Risk of injury!
● Wait until the vehicle has completely stop-
ped before taking the key out of the ignition.
Otherwise the steering wheel may lock sud-
denly. Risk of accident! CAUTION
● Each key contains electronic components
and must, therefore, be protected from damp-
ness and strong vibrations.
● Keep the grooves in the key shaft clean.
Any dirt (fibre from clothing, dust, etc.) has a
negative impact on locks, ignition, etc. Note
Should a key be lost, request a duplicate key
from an Authorised SEAT dealer. Replacing the battery in the remote
control key
Fig. 37
Remote control key: removing the cov-
er/taking out the battery. Each remote control key contains a battery
that is fitted below the cover
A
››› Fig. 37 . If
the b att
ery is flat, the red control lamp
››› Fig. 36
will not light up when one of the
buttons is pressed. We recommend replacing
the battery at a SEAT dealer. You can replace
the battery yourself as follows. »
53
Technical specifications
Advice
Operation
Safety
Page 56 of 200

Operation
– Unfold the key shaft.
– Remove the battery cover by pressing down
with your thumb or a flat screwdriver in the
location of the arrows 1
››› Fig. 37 .
– Remo
ve the flat battery from the key by
pressing downwards in the location of the
arrows 2 .
– Insert the new battery. Check that the “+”
symbol on the battery is facing upwards.
The correct polarity is indicated on the bat-
tery cover.
– Replace the battery cover and press down
until it clicks. CAUTION
● The correct polarity must always be ob-
served when replacing the battery.
● The new battery must be of the same type
as the original. For the sake of the environment
Dispose of the used battery in line with na-
tional legislation. Note
If it is not possible to unlock or lock the vehi-
cle with the remote control key once the bat- tery has been replaced, it will need to be re-
synchronised
››› page 52. Central locking system
General notes All of the doors, the boot lid and the fuel cap
fl ap w
ill1)
unlock at the same time when the
central locking system is used.
Warning lamp on the driver door
Once the doors are locked, the warning lamp
will flash quickly for 2 seconds and then at a
slower rate.
If the vehicle is locked with Safe lock engag-
ed ››› page 55, the warning lamp on the
driv er door w
ill flash quickly for 2 seconds
before switching off for 30 seconds and then
flashing at a slower rate.
If the warning lamp flashes quickly for 2 sec-
onds and then remains switched on before
flashing at a slower rate after 30 seconds,
there is a fault in the interior monitor and
tow-away protection system ››› page 58. Go
to a technical service. Individual settings Unlocking single doors
This optional function unlocks the driver door
only. The other doors remain locked and are
only unlocked when the next command is giv-
en (unlock).
Automatic unlock and lock
The doors and the rear lid are locked auto-
matically when the vehicle reaches a speed
of about 15 km/h (9 mph).
The doors unlock automatically when the key
is removed from the ignition. Additionally,
the driver or front passenger can unlock the
doors by pressing the
›››
page 56 central
lock button or by pulling the front door han-
dle. WARNING
Locking the doors prevents intruders from
getting into the car, e.g. while waiting at in-
tersections. However, it can also delay assis-
tance in the event of an accident. Risk of
death! Note
● Activation of the single door setting can be
requested at your SEAT dealer. 1)
Valid for vehicles with a keyless fuel tank cap.
54
 1
1 2
2 3
3 4
4 5
5 6
6 7
7 8
8 9
9 10
10 11
11 12
12 13
13 14
14 15
15 16
16 17
17 18
18 19
19 20
20 21
21 22
22 23
23 24
24 25
25 26
26 27
27 28
28 29
29 30
30 31
31 32
32 33
33 34
34 35
35 36
36 37
37 38
38 39
39 40
40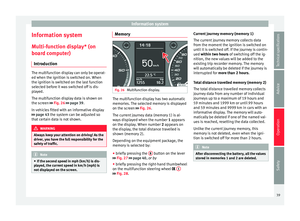 41
41 42
42 43
43 44
44 45
45 46
46 47
47 48
48 49
49 50
50 51
51 52
52 53
53 54
54 55
55 56
56 57
57 58
58 59
59 60
60 61
61 62
62 63
63 64
64 65
65 66
66 67
67 68
68 69
69 70
70 71
71 72
72 73
73 74
74 75
75 76
76 77
77 78
78 79
79 80
80 81
81 82
82 83
83 84
84 85
85 86
86 87
87 88
88 89
89 90
90 91
91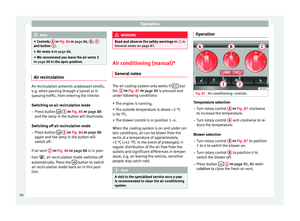 92
92 93
93 94
94 95
95 96
96 97
97 98
98 99
99 100
100 101
101 102
102 103
103 104
104 105
105 106
106 107
107 108
108 109
109 110
110 111
111 112
112 113
113 114
114 115
115 116
116 117
117 118
118 119
119 120
120 121
121 122
122 123
123 124
124 125
125 126
126 127
127 128
128 129
129 130
130 131
131 132
132 133
133 134
134 135
135 136
136 137
137 138
138 139
139 140
140 141
141 142
142 143
143 144
144 145
145 146
146 147
147 148
148 149
149 150
150 151
151 152
152 153
153 154
154 155
155 156
156 157
157 158
158 159
159 160
160 161
161 162
162 163
163 164
164 165
165 166
166 167
167 168
168 169
169 170
170 171
171 172
172 173
173 174
174 175
175 176
176 177
177 178
178 179
179 180
180 181
181 182
182 183
183 184
184 185
185 186
186 187
187 188
188 189
189 190
190 191
191 192
192 193
193 194
194 195
195 196
196 197
197 198
198 199
199AUX
A TurnUp/down volumeUp/down volumeUp/down volume
A PressNo functionNo functionNo function")