Page 81 of 200

Transport and practical equipment
WARNING
Never put flammable materials in the ashtray.
Risk of fire! CAUTION
Never hold onto the ashtray by the lid when
removing it. Risk of breaking the lid. 12 Volt power socket
Fig. 71
Centre console: 12 V power socket. The 12 V power socket is located at the front
of the centre console
›››
Fig. 71 .
U s
ing the power socket
– Open the cover or remove the cigarette
lighter concealing the socket.
– Insert the plug of the electrical appliance
into the socket. Additional information
››› page 122, Acces-
sories and modifications to the vehicle . WARNING
● Improper use of the sockets or electrical
appliances can cause a fire and lead to burns
and other serious injuries.
● Never leave children unsupervised in the
vehicle. The 12 V power socket is also func-
tional when the ignition is switched off and
the key is removed.
● Should the connected appliance overheat,
immediately switch it off and disconnect it
from the socket. CAUTION
● The 12 V power socket can only be used to
power appliances with a power rating of up to
120 watts.
● Never exceed the maximum permitted pow-
er, as this could cause damage to the vehicle
electrical installation.
● With the engine switched off, however, the
vehicle battery will drain. Risk of discharging
the battery!
● Only use suitable plugs so as not to dam-
age the power socket.
● Only use appliances that have been tested
for electromagnetic compatibility in compli-
ance with current regulations.
● Before switching the ignition on or off, un-
plug the appliances from the power socket to protect them from any damage caused by
fluctuations in voltage.
● Follow the instructions for use of connected
appliances! Multimedia compartment
Fig. 72
Front centre console: multimedia
compartment. The multimedia compartment is in the stor-
age compartment of the front centre console
››› Fig. 72 .
The c omp
artment can be used to hold mobile
phones, mp3 players or similar devices. WARNING
Never use the multimedia compartment as an
ashtray or to store flammable materials. Risk
of fire! 79
Technical specifications
Advice
Operation
Safety
Page 82 of 200
glasses* Fig. 73
Close-up of roof panel: storage com-
partment for eyeglasses. –
Press the compartment lid and it will drop
down ››› Fig. 73 . WARNING")
Operation
Storage compartment for
(sun)glasses* Fig. 73
Close-up of roof panel: storage com-
partment for eyeglasses. –
Press the compartment lid and it will drop
down ››› Fig. 73 . WARNING
This compartment must only remain open
when removing or replacing glasses. CAUTION
● Do not place heat-sensitive objects in the
compartment as they could be damaged.
● The side compartment supports a maxi-
mum load of 0.25 kg. Coat hooks*
The coat hooks are located on the B-pillars
and on the handles on the interior lining
above each rear door.
WARNING
● Make sure that any items of clothing hang-
ing from the coat hooks do not obstruct your
view to the rear.
● Only use the coat hooks for light items of
clothing and make sure that there are no
heavy or sharp objects in the pockets.
● Do not use clothes hangers to hang up the
clothing, as this could interfere with the func-
tion of the head-protection airbags. CAUTION
The side hooks support a maximum load of 2
kg. Net pockets on back of front backrests
Fig. 74
Front seats backrests: net pockets. There are net pockets on the inside part of
the front seats backrests
››› Fig. 74 .
The se poc
kets are designed to hold light-
weight objects such as a mobile phone or an
mp3 player. WARNING
● Do not exceed the maximum load that the
net pockets can support. Heavy objects can-
not be safely secured. Risk of injuries! CAUTION
● The net pockets support a maximum load of
150 g.
● Do not place overly large objects in the
pockets (e.g. bottles) or objects with sharp
edges. Risk of damage to the pockets. 80
Page 83 of 200

Transport and practical equipment
Storage compartments in centre
console Fig. 75
Centre console: storage compartment Open storage compartment in centre console
››› Fig. 75 .
St or
age compartment in front door Fig. 76
Storage compartment in door trim. There is a bottle carrier in part
B
››› Fig. 76
of the storage compartment in the front door. WARNING
Only use part A
››› Fig. 76 of the compart-
ment in the fr
ont door to store objects that do
not protrude from it so as not obstruct the de-
ployment area of the side airbags. Storage compartment in luggage
compartment*
Fig. 77
Luggage compartment: storage com-
partment The lid from the side storage compartment
can be removed to increase the size of the
boot.
– Hold onto the top of the lid and pull it out
in the direction indicated by the arrow
››› Fig. 77 . CAUTION
● The compartments are designed to hold
small objects with a total weight of 1.5 kg.
● Make sure you do not damage the storage
compartment or the boot trim when using the
compartment. Storing objects
Loading the luggage compartment All luggage and other loose objects must be
safely secured in the luggage compartment.
Unsecured objects which shift back and forth
could impair the driving safety or driving
characteristics of the vehicle by shifting the
centre of gravity.
– Distribute the load evenly in the luggage
compartment.
– Place heavy objects as far forward as possi-
ble in the luggage compartment.
– Place the heavy objects first.
– Secure heavy objects to the fastening rings
››› page 82 . WARNING
● Loose luggage and other objects in the lug-
gage compartment could cause serious inju-
ries. » 81
Technical specifications
Advice
Operation
Safety
Page 84 of 200

Operation
●
Always stow objects in the luggage com-
partment and secure them on the fastening
rings.
● Use suitable straps to secure heavy ob-
jects.
● During sudden manoeuvres or accidents,
loose objects can be thrown forward, injuring
vehicle occupants or passers-by. This in-
creased risk of injury will be further increased
if a loose object is struck by an inflating air-
bag. If this happens, objects may shoot out-
ward like a missile. Risk of fatal injury.
● Please note that the centre of gravity may
shift when transporting heavy objects; this
may affect vehicle handling and lead to an ac-
cident. Therefore, it is essential to adjust
your speed and driving style accordingly, to
avoid accidents.
● Never exceed the allowed axle weights or
allowed maximum weight. If said weights are
exceeded, the driving characteristics of the
vehicle may change, leading to accidents, in-
juries and damage to the vehicle.
● Never leave your vehicle unattended, espe-
cially when the rear lid is open. Children
could climb into the luggage compartment,
closing the door behind them; they will be
trapped and run the risk of death.
● Never allow children to play in or around
the vehicle. Close and lock all the doors and
rear lid when you leave the vehicle. Before
you lock the vehicle, make sure that there are
no adults or children in the vehicle. Note
● Air circulation in the vehicle helps reduce
fogging of the windows. Used air escapes
through ventilation slits in the side trim of
the luggage compartment. Ensure that the
ventilation slots are never covered.
● Straps for securing the load to the fasten-
ing rings are commercially available. Fastening rings*
There can be four fastening rings in the lug-
gage compartment for fastening luggage and
other objects.
–
Always use suitable and undamaged straps
to secure luggage and other objects to the fastening rings ››› in Loading the lug-
gage compartment on page 81.
– Pull up the fastening rings to attach the
straps.
During a collision or an accident, even small
and light objects can build up so much ener-
gy that they can cause very severe injuries.
The amount of kinetic “energy” depends on
the speed of the vehicle and the weight of
the object. The most significant factor, how-
ever, is the speed of the vehicle.
Example: An object weighing 4.5 kg is lying
unsecured in the vehicle. During a frontal col-
lision at a speed of 50 km/h (31 mph), this object generates a force corresponding to 20
times its weight. That means that the effec-
tive weight of the object increases to approxi-
mately 90 kg. You can imagine the severity of
the injuries which might be sustained if this
“object” strikes an occupant as it flies
through the interior of the vehicle. This in-
creased risk of injury will be further increased
if a loose object is struck by an inflating air-
bag.
WARNING
● If pieces of baggage or other objects are se-
cured to the fastening rings with inappropri-
ate or damaged retaining cords, injuries
could result in the event of braking manoeu-
vres or accidents.
● Never secure a child seat on the fastening
rings. Luggage compartment
Introduction Please observe the following points to ensure
the vehicle handles well at all times:
– Distribute the load as evenly as possible.
– Place heavy objects as far forward in the
luggage compartment as possible.
– Secure luggage using the fastening rings or
retaining net ›››
page 83.
82
Page 85 of 200

Transport and practical equipment
During an accident, even small and light ob-
jects can have so much kinetic energy that
they can cause very severe injuries. The
amount of kinetic energy depends on the
speed of the vehicle and the weight of the
object. However, the speed of the vehicle is
the most important factor.
Example: An unsecured object weighing 4.5
kg produces energy corresponding to 20
times its weight in a frontal collision at 50
km/h (31 mph). This means that its weight
reaches around 90 kg. You can imagine the
severity of the injuries that might be sus-
tained if this “projectile” strikes an occupant
as it flies through the vehicle interior. WARNING
● Store objects in the luggage compartment
and secure to the fastening points.
● In an accident or sudden manoeuvre, loose
objects in the interior can be flung forward
and possibly injure vehicle occupants or oth-
ers. This risk is even greater if the flying ob-
jects hit a triggering airbag. In this case, any
rebounding objects could injure vehicle occu-
pants. Risk of fatal injuries!
● Take into account that transporting heavy
objects changes the centre of gravity that
could also cause changes in vehicle handling.
Risk of accident! Therefore, always adjust
your speed and driving style to suit these cir-
cumstances. ●
Securing the load to the rings using unsuit-
able or damaged straps could lead to injuries
in the event of an accident or sudden braking
manoeuvre. Secure suitable straps safely to
the rings to ensure this does not happen.
● Position the load so it cannot move forward
during a sudden braking manoeuvre. Risk of
injuries!
● If transporting sharp or dangerous objects
in the space provided when the rear seats are
folded, ensure the safety of the occupant of
the remaining rear seat ››› page 8.
● If the r
ear seat located alongside a folded
seat is occupied, ensure safety, for example,
by placing the load so that it stops the seat
from folding backward in the event of being
hit from behind.
● Never drive with the rear lid open or half-
closed, exhaust gases may penetrate into the
interior of the vehicle. Danger of poisoning!
● Never exceed the allowed axle loads or al-
lowed maximum weight. Risk of accident!
● Never transport passengers in the luggage
compartment! CAUTION
Make sure sharp objects stored in the boot
cannot not damage the rear window heating
filaments. Note
Tyre pressure must be adapted to suit the
load ››› page 144, Life cycle of tyres . Category N1 vehicles
Category N1 vehicles with no protection grille
must use a retaining set compliant with
Standard EN 12195 (1 – 4) to secure the
load.
Retaining elements* Fig. 78
Luggage compartment: retaining ele-
ments. The following retaining elements are fitted in
the boot
›››
Fig. 78 :
Rin g
s to secure the load and the retain-
ing nets.
Rings used solely for the retaining nets. »
A B
83
Technical specifications
Advice
Operation
Safety
Page 86 of 200
Operation
CAUTION
The rings support a maximum load of 3.5 kN
(350 kg). Note
The front ring B is below the folding back-
rest of the rear seats ››› Fig. 78. Hook*
Fig. 79
Luggage compartment: hook. There are hooks on both sides of the boot to
secure light items of luggage such as bags,
etc.
›››
Fig. 79 . CAUTION
The side hooks support a maximum load of
7.5 kg. Retaining nets*
Fig. 80
Retaining nets. Fig. 81
Retaining nets. Example of securing retaining nets
››› Fig. 80
and ››› Fig. 81 .
Sidew a
ys bag
Ground net
Lengthways bag
A B
C WARNING
Do not exceed the maximum load that the
nets can support. Heavy objects cannot be
safely secured. Risk of injury! CAUTION
● The retaining nets support a maximum load
of 1.5 kg.
● Do not place any item with sharp edges in
the net. Risk of damaging the net! 84
Page 87 of 200

Transport and practical equipment
Rear shelf Fig. 82
Remove the shelf. Fig. 83
Remove the shelf. The shelf can be removed if a large load is to
be transported.
Removing the shelf
–
Remove the straps from the shelf 1›››
Fig. 82 . –
Remo ve the shelf from its housing
2 by
knocking it gently from underneath be-
tween the supports.
Fitting the shelf – Place the shelf on the side supports on the
trim.
– Adjust the shelf supports 3
››› Fig. 83 to fit
the s up
ports 2 in the trim.
– Fit into place by knocking the top of the
shelf gently between the supports.
– Attach the straps 1 to the tray.
WARNING
Do not place objects on the rear shelf that
could endanger the vehicle occupants in case
of a sudden braking manoeuvre or an acci-
dent. CAUTION
● The rear shelf supports a maximum load of
1 kg.
● If handled incorrectly, the tray could bend
on closing the rear lid and become damaged
or damage the trim. Follow the instructions
below:
– The shelf supports 3
››› Fig. 83 must be
sec ur
ely in place in the trim supports 2 .
– The size of the load must not exceed the
height of the shelf. –
When open, the shelf must not be bent
against the shelf seal.
– There must be no objects in the space be-
tween the open shelf and the backrest of
the rear seat. Note
The shelf will lift when the rear lid is opened. Roof rack*
Introduction WARNING
● The load on the roof carrier must be proper-
ly secured. Risk of accident!
● Always secure the load using retaining
straps that are in good condition.
● Distribute the load evenly.
● When transporting heavy or large objects
on the roof, any change in normal vehicle be-
haviour due to a change in the centre of gravi-
ty or increased wind resistance must be taken
into account. Risk of accident! For this rea-
son, speed and driving style must be adjus-
ted for the situation.
● Avoid sudden manoeuvres and braking.
● Adjust your driving style to suit visibility,
the weather and road and traffic conditions. » 85
Technical specifications
Advice
Operation
Safety
Page 88 of 200

Operation
●
Never exceed the allowed axle loads or al-
lowed maximum weight. Risk of accident! CAUTION
● Only use SEAT-authorised roof carriers.
● Where roof carriers from other systems are
used or where they are not fitted properly,
any damage caused to the vehicle will not be
covered by the warranty. Therefore, carefully
follow the Instruction Manual for installation
of the roof carrier.
● Remember that the rear lid must not hit the
roof load.
● The total height of the vehicle increases ac-
cording to the roof load. Compare the height
of the vehicle with the heights of bridges or
other underpasses, for example, the height
of the garage door.
● Do not forget to remove the roof carrier be-
fore entering an automatic carwash.
● Take into account that the load must not
damage the aerial located on the roof. For the sake of the environment
If aerodynamic resistance increases, fuel con-
sumption will also increase. Attachment points
Fig. 84
Basic roof carrier attachment points. Location of the basic roof carrier attachment
points
››› Fig. 84 :
R e
ar attachment points
Front attachment points
Install and remove following the instructions
given. A B CAUTION
Follow the instructions given in the manual. Roof load
The maximum permissible roof load (includ-
ing the support system) of
75 kg and the to-
t al
authorised weight of the vehicle must not
be exceeded.
It will not be possible to carry the full maxi-
mum load if the roof carrier you are using is
rated for a load which is less than this figure.
In this case, you can only load the roof carrier
to the maximum load permitted in your in-
stallation manual. 86
 1
1 2
2 3
3 4
4 5
5 6
6 7
7 8
8 9
9 10
10 11
11 12
12 13
13 14
14 15
15 16
16 17
17 18
18 19
19 20
20 21
21 22
22 23
23 24
24 25
25 26
26 27
27 28
28 29
29 30
30 31
31 32
32 33
33 34
34 35
35 36
36 37
37 38
38 39
39 40
40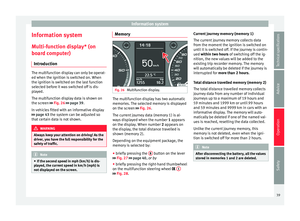 41
41 42
42 43
43 44
44 45
45 46
46 47
47 48
48 49
49 50
50 51
51 52
52 53
53 54
54 55
55 56
56 57
57 58
58 59
59 60
60 61
61 62
62 63
63 64
64 65
65 66
66 67
67 68
68 69
69 70
70 71
71 72
72 73
73 74
74 75
75 76
76 77
77 78
78 79
79 80
80 81
81 82
82 83
83 84
84 85
85 86
86 87
87 88
88 89
89 90
90 91
91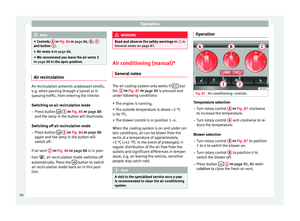 92
92 93
93 94
94 95
95 96
96 97
97 98
98 99
99 100
100 101
101 102
102 103
103 104
104 105
105 106
106 107
107 108
108 109
109 110
110 111
111 112
112 113
113 114
114 115
115 116
116 117
117 118
118 119
119 120
120 121
121 122
122 123
123 124
124 125
125 126
126 127
127 128
128 129
129 130
130 131
131 132
132 133
133 134
134 135
135 136
136 137
137 138
138 139
139 140
140 141
141 142
142 143
143 144
144 145
145 146
146 147
147 148
148 149
149 150
150 151
151 152
152 153
153 154
154 155
155 156
156 157
157 158
158 159
159 160
160 161
161 162
162 163
163 164
164 165
165 166
166 167
167 168
168 169
169 170
170 171
171 172
172 173
173 174
174 175
175 176
176 177
177 178
178 179
179 180
180 181
181 182
182 183
183 184
184 185
185 186
186 187
187 188
188 189
189 190
190 191
191 192
192 193
193 194
194 195
195 196
196 197
197 198
198 199
199. Note
The front ring B is below the folding back-
rest of the rear seats ››› Fig. 78. Hook*
Fig. 79
Luggage compartment:")