Page 57 of 200

Opening and closing
●
In the event of an accident in which the air-
bags deploy, the doors will be automatically
unlocked for easier access and assistance.
● If the central locking system should fail to
work at any time, only the driver door can be
locked or unlocked using the key
››› page 55. All other doors and the boot
h at
ch can be operated manually.
– Manual release ››› page 161.
– Manual release of the rear lid
››› page 161. Unlocking the vehicle with the key
Fig. 38
Key positions during vehicle locking
and unlocking. –
Turn the key in the driver door in the for-
ward driving direction to its unlock position
A
››› Fig. 38 .
– Pu
ll the handle and open the door.
● All doors (driver door only on vehicles with
anti-theft alarm) are unlocked.
● The rear lid is unlocked.
● The fuel tank flap is unlocked 1)
.
● The courtesy lights switch on.
● The Safe lock is deactivated.
● The driver door warning lamp stops flash-
ing (on vehicles not equipped with an anti-
theft system) ››› page 57. Note
If the vehicle is equipped with an anti-theft
alarm system, you have 15 seconds from the
time the door is opened to insert the key in
the ignition and start the vehicle. If, during
these 15 seconds, the vehicle is not started,
the alarm is triggered. Locking the vehicle with the key
–
Turn the key in the driver door lock cylinder
in the reverse direction to its lock position
B
›››
Fig. 38 . ●
The door s, the boot
lid and the fuel tank
flap 1)
will be locked.
● The courtesy lights switch off.
● The Safe lock is immediately activated.
● Warning lamp on the driver door starts to
flash. Note
The vehicle doors cannot be locked if the
driver door is open. Safe Lock
The central locking system is equipped with a
Safe lock
. If the vehicle is closed from out-
s ide, the door loc
ks will automatically lock.
The warning lamp on the driver door will
flash quickly for about 2 seconds and then at
a slower rate. It is not possible to open any of
the doors from the inside or outside using
the handle. This limits the possibility of in-
truders getting into the vehicle.
The Safe lock can be deactivated by pressing
the lock button twice in less than 2 seconds.
If Safe lock is out of service, the control lamp
on the driver door will flash quickly for about
2 seconds before switching off for 30 sec-
onds and then flashing at a slower rate. »1)
Valid for vehicles with a keyless fuel tank cap.
55
Technical specifications
Advice
Operation
Safety
Page 58 of 200

Operation
The Safe lock is re-activated on unlocking
and locking the vehicle again.
If the vehicle is locked and the Safe lock is
deactivated, the vehicle can be opened from
inside by pulling on the door handle. WARNING
Do not leave people or animals in locked ve-
hicles with Safe lock activated: the doors and
windows cannot then be opened from the in-
side. Doors locked in this manner could delay
assistance in an emergency. Risk of death! Note
● The anti-theft alarm switches on automati-
cally when the vehicle is locked, even if the
Safe lock is deactivated. The Vehicle interior
monitoring, however, is not activated.
● Given that the Safe function will be activa-
ted on locking the vehicle, CHECK DEADLOCK
will be shown on the general instrument pan-
el display. On vehicles equipped with an in-
formative display, Caution SAFE! On-board doc- umentation! Central locking button
Fig. 39
Central lock button. If the vehicle has not been locked from out-
side, it is possible to lock and unlock the
doors from inside by pressing the
››› Fig. 39
button, even without the key in the ignition.
Locking of all doors, the boot lid and the fuel
tank flap 1)
– Press the button ››› Fig. 39 . The warning
l amp
on the button will light up.
Unlocking of all doors, the boot lid and the
fuel tank cap 1)
– Press the button ››› Fig. 39. The warning
lamp
on the button will switch off. If the vehicle has been locked using the cen-
tral lock button.
● The rear boot lid cannot be unlocked from
the outside (security measure, e.g. when
stopped at an intersection).
● The doors can be unlocked individually by
pulling the handle.
● The vehicle doors cannot be locked if any
of the doors are open.
● In the event of an accident in which the air-
bags activate, doors locked from the inside
will be automatically unlocked for easier ac-
cess and assistance. WARNING
The central locking system remains operative
when the ignition is switched off. Never leave
children unattended in the vehicle, as doors
locked from the inside delay assistance in an
emergency. Risk of sustaining fatal injuries! Note
The handles and the central lock buttons will
not work if the Safe lock ››› page 55 is activa-
ted. 1)
Valid for vehicles with a keyless fuel tank cap.
56
Page 59 of 200

Opening and closing
Childproof locks Fig. 40
Activating the childproof lock. The childproof lock prevents the rear doors
from being opened from the inside. Doors
can only be opened from the outside.
The childproof lock is activated and deactiva-
ted using the ignition key.
Activating the childproof lock
– Turn the slot in the direction of the arrow
››› Fig. 40 (in the other direction on the
right -h
and door).
Deactivating the childproof lock
– Turn the slot in the opposite direction of
the arrow (in the other direction on the
right-hand door). Anti-theft alarm system*
General notes The anti-theft alarm system increases vehicle
protection from intruders. The system will ini-
tiate acoustic and optical warning signals
when your vehicle is tried to be forced.
Activating the alarm system
The anti-theft alarm switches on automatical-
ly when the vehicle is locked using the re-
mote control key or inserting the key in the
driver door. The alarm is activated around 30
seconds after the vehicle is locked.
Deactivating the alarm system
The anti-theft alarm system is deactivated
when the remote control unlock button is
pressed. If the vehicle is not opened within
30 seconds after emitting the radio frequen-
cy signal, the system will be reactivated.
If the vehicle is unlocked using by inserting
the key in the driver door, the ignition must
be switched on within 15 seconds. This deac-
tivates the alarm system. If, during these 15
seconds,
the vehicle is not started , the alarm
i
s triggered . When does the system trigger an alarm?
The following areas of the vehicle are moni-
tored:
● Bonnet
● Rear lid
● Doors
● Ignition
● Tilt angle ››› page 58, Vehicle interior
monitoring and tow-away protection system
● The interior ››› page 58, Vehicle interior
monitoring and tow-away protection system
● Drop in voltage in the car systems
● The factory-fitted towing bracket
The alarm is triggered immediately if one of
the battery cables is disconnected while the
alarm system is active.
How to turn OFF the alarm
To deactivate the alarm, press the unlock but-
ton on the remote control key or switch on
the ignition. Note
● The alarm horn power supply has a 5-year
useful life. Contact an Official Service for
more detailed information.
● To make sure that the anti-theft alarm is
fully operative when leaving the vehicle, » 57
Technical specifications
Advice
Operation
Safety
Page 60 of 200

Operation
check that all the doors and windows are
closed.
● Remote control and receiver unit coding
means that the remote control cannot be
used on other vehicles. Vehicle interior monitoring and tow-
away protection system
Fig. 41
Button for vehicle interior monitoring
and the tow-away protection system. The Vehicle interior monitoring system is acti-
vated if movements are detected in the interi-
or of the vehicle.
Deactivating Vehicle interior monitoring and
the tow-away protection system
– Switch the ignition off.
– Open the driver door. –
Press the
››› Fig. 41 button on the centre
column. The red backlit symbol on the
button turns orange.
– Lock the vehicle within the next 30 sec-
onds.
The Vehicle interior monitoring system and
the tow-away protection system are reactiva-
ted when the vehicle is unlocked again. Note
● The vehicle interior monitoring system and
the tow-away protection system must be de-
activated if there is a danger of the alarm be-
ing triggered due to movements by children
or animals in the interior when being trans-
ported (e.g. by boat or by train) or towed.
● The effectiveness of the Vehicle interior
monitoring system is reduced if the spectacle
case is left open. Always close the storage
compartment before locking the vehicle to
ensure that this monitoring system operates
correctly. Rear lid
Automatic boot hatch lock Where the vehicle has been locked by press-
ing the
button on the remote control with
the boot lid open, the boot lid will lock auto-
matically when closed. The automatic rear lid locking time extension
function can be activated. When this function
is activated and once the boot lid has been
unlocked by pressing the
button on the
remote control key 2
››› page 52, the boot
lid can be re-opened for a certain length of
time.
Where required, the automatic boot lid lock-
ing time extension function can be activated
or deactivated at a SEAT Authorised Service,
which will provide all of the necessary infor-
mation.
Before the vehicle locks automatically, there
is a risk of intruders getting into the vehicle.
Therefore, we recommend you always lock
the vehicle by pressing the button on the
remote control or by using the key without re-
mote control ››› page 55
58
Page 61 of 200

Opening and closing
Boot hatch Fig. 42
Rear lid: opening from the outside. Fig. 43
Close-up of the inside trim of the rear
lid: hand grip The rear lid opening system operates electri-
cally. It is activated by using the handle on
the boot lid. Opening the rear lid
– Pull on the release lever and lift the rear lid
››› Fig. 42 . The rear lid will automatically
open.
C lo
sing the rear lid
– Hold the rear lid by one of the two handles
on the interior lining and close it, pushing
slightly.
This system may or may not be operative, de-
pending on the situation of the vehicle.
If the rear lid is locked then it cannot be
opened, however if it is unlocked then the
opening system is operative and the rear lid
may be opened.
To lock/unlock, press the button or the
button 1 on the remote control key.
A warning appears on the instrument panel
display if the boot lid is open or not properly
closed.* An audible warning is also given if
the boot lid is opened while the vehicle is
moving faster than 6 km/h (4 mph)*. WARNING
● Always close the rear lid properly. Risk of
accident or injury.
● Do not close the rear lid by pushing it down
with your hand on the rear window. The glass
could smash. Risk of injury! ●
Ensure the rear lid is locked after closing it.
If not, it may open unexpectedly while driv-
ing.
● Never allow children to play in or around
the vehicle. A locked vehicle can be subjected
to extremely high and low temperatures, de-
pending on the time of year, thus causing se-
rious injuries/illness. It could even have fatal
consequences. Close and lock both the rear
lid and all the other doors when you are not
using the vehicle.
● Closing the rear lid without observing and
ensuring it is clear could cause serious injury
to you and to third parties. Make sure that no
one is in the path of the rear lid.
● Never drive with the rear lid open or half-
closed, exhaust gases may penetrate into the
interior of the vehicle. Danger of poisoning!
● If you only open the rear lid, do not leave
the key inside. The vehicle will not be opened
if the key is left inside. Note
● Once the rear lid is closed, its lock is en-
gaged and the alarm system is activated. On-
ly valid if the vehicle has been locked before
the rear lid is closed.
● The release catch located at the top of the
registration plate recess is deactivated on ac-
celerating or at speeds of over 5 km/h (3
mph). The catch is reactivated when the vehi-
cle comes to a standstill and a door is
opened. 59
Technical specifications
Advice
Operation
Safety
Page 62 of 200

Operation
Electric window opening and
closing Introduction WARNING
● When locking the vehicle from the outside,
make sure that nobody is inside the vehicle,
as the windows cannot be opened from the
inside in an emergency.
● For safety reasons, use safety button 5›››
Fig. 44 that deactivates the window
sw it
ches on the rear doors when children are
travelling in the rear seats. CAUTION
● Keep the windows clean to ensure the sys-
tem operates correctly.
● Defrost ››› page 125, Windows and exterior
mirrors any frozen windows before use. Oth-
er w
ise you run the risk of damaging the elec-
tric window riser mechanism.
● Always make sure all of the windows are
closed on leaving the locked vehicle. Note
● The vehicle heating and ventilation system
should be used to ventilate the interior while
driving. Leaving the windows open could al-
low dust and other dirt to enter the vehicle and cause unpleasant noises at certain
speeds.
● Do not leave the side windows open at high
speeds, as this will overly increase fuel con-
sumption. Using electric window switches
Fig. 44
Detail of the driver door: controls for
the windows. The electric window opening and closing sys-
tem only works when the ignition is switched
on.
Opening
– Press gently on the respective button on
the door to open the window. The process
will stop when the button is released.
– The driver door window can also be auto-
matically opened by pressing the button as far as it will go (fully open). Press the but-
ton again to immediately stop it.
Closing
– Press the respective button gently to close
the window. The process will stop when the
button is released.
Window control buttons Button for window in front left door
Button for window in front right door
Button for window in rear left door
Button for window in rear right door
Safety switch for deactivating the electric
window buttons in the rear doors
Safety button
Press the safety button 5
››› Fig. 44 to deac-
tiv at
e the controls on the rear doors. Pressing
the safety button 5 again will reactivate the
controls on the rear doors.
If the rear door controls are deactivated, the
warning lamp on the safety button 5 will
light up. Note
The electric window opening mechanism is
equipped with a thermostat switch. This may
overheat if the window is opened and closed
repeatedly. This causes the window to lock
temporarily. Once the thermostat switch has 1
2
3
4
5
60
Page 63 of 200

Lights and visibility
cooled down, the window can be operated
once again.
Roll-back function on electric
windows
The electric windows are equipped with a
roll-back system that reduces risk of injury
when closing windows.
If an obstacle is present, the closing mecha-
nism will stop and the window will roll back a
few centimetres.
If an obstacle prevents closing for the next
10 seconds, the closing mechanism will once
again stop and the window will roll back an-
other few centimetres.
If in the next 10 seconds you attempt to close
the window after it has rolled back the sec-
ond time, only the closing mechanism will be
stopped even if the obstacle is still present.
The roll-back function is still connected.
The roll-back function will only be disconnec-
ted if you once again attempt to close the
window in the following 10 seconds. In this
case, the window will close at full force
.
If you wait for a further 10 seconds, the roll-
back function will be once again connected. Lights and visibility
Lights Introduction The location of the controls of
right-hand
drive cars differs slightly from the location
sho wn her
e ››› Fig. 45 ››› page 61. However,
the symbols indicating the respective posi-
tions of the controls remain the same. WARNING
Never drive with only the side lights on! The
side lights are not bright enough to illumi-
nate the road ahead and to ensure that other
road users are able to see you. Always use
your dipped beam headlights if it is dark or if
visibility is poor. CAUTION
● Use the lights in line with local law.
● However, drivers always remain responsi-
ble for correctly adjusting and using the
lights. Note
● An audible warning will be heard when the
light control is set to and you remove the
ignition k ey
and open the door. Once the
driver door is closed (ignition off), the audi-
ble warning will stop, whereas the side lights will remain on to light up the stationary vehi-
cle in case this is necessary.
● Depending on weather conditions (cold or
wet), the lights may mist up temporarily on
the inside. This is particularly the case in the
event of a difference in temperature between
the inside and in front of the light. By switch-
ing on the lights, the area through which the
beam of light is projected will quickly be
demisted, although the edges may remain
misted. The real lights and turn signals can
mist up. This has no influence on the useful
life of the lighting system. Sidelight and headlight
Fig. 45
Instrument panel: light control. Switching on side lights
– Turn the light switch ››› Fig. 45 to position
. »
61
Technical specifications
Advice
Operation
Safety
Page 64 of 200

– Turn the light switch ››› Fig. 45 t")
Operation
Switching on dipped beam – Turn the light switch ››› Fig. 45 to position
.
Sw it
ching off lights (except daytime driving
lights)
– Turn the light switch ››› Fig. 45 to position
0.
Ran
ge control of main lights Fig. 46
Instrument panel: light range control. –
Turn the control ››› Fig. 46 to set the lights
t o the r
equired setting.
Positions
The control positions roughly correspond to
the following vehicle load conditions. Two front occupants, luggage compart-
ment empty.
- All seats occupied, luggage compartment
empty.
All seats occupied, luggage compartment
fully loaded.
Driver only, luggage compartment fully
loaded.
CAUTION
Always adjust the range of the lights so that:
● Your vehicle does not dazzle others, partic-
ularly oncoming traffic
● The range of the headlights is sufficient for
safe driving Note
Make sure you set the range of the main
lights when the dipped beam headlights are
switched on. Daytime driving light
Daytime running lights are signalling devices
for improving road safety. The lights are built
into the headlights and come on each time
the ignition is turned on if the light switch is
in position
0
or ›
››
Fig. 45. It is automati-
cally switched off when the side lights are
turned on. 1 2
3 Automatic control of the dipped beam in
combination with the daytime running lights
If the
dipped beam control and the
daytime
r
unning lights are activated at the same
time, the dipped beams and the instrument
panel lighting will automatically come on as
required (e.g. when entering a tunnel) and
the daytime running lights will switch off.
When the automatic dipped beam control
switches off the dipped beams (e.g. when
coming out of a tunnel), the daytime running
lights come back on. WARNING
The rear lights do not come on with the day-
time driving light. A vehicle which does not
have the rear lights on may not be visible to
other drivers in the darkness, if it is raining
or in conditions of poor visibility. Note
Please observe any relevant legal require-
ments which may apply in your country. 62
 1
1 2
2 3
3 4
4 5
5 6
6 7
7 8
8 9
9 10
10 11
11 12
12 13
13 14
14 15
15 16
16 17
17 18
18 19
19 20
20 21
21 22
22 23
23 24
24 25
25 26
26 27
27 28
28 29
29 30
30 31
31 32
32 33
33 34
34 35
35 36
36 37
37 38
38 39
39 40
40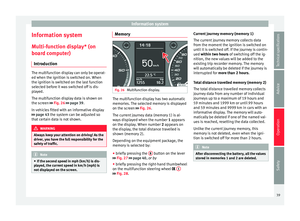 41
41 42
42 43
43 44
44 45
45 46
46 47
47 48
48 49
49 50
50 51
51 52
52 53
53 54
54 55
55 56
56 57
57 58
58 59
59 60
60 61
61 62
62 63
63 64
64 65
65 66
66 67
67 68
68 69
69 70
70 71
71 72
72 73
73 74
74 75
75 76
76 77
77 78
78 79
79 80
80 81
81 82
82 83
83 84
84 85
85 86
86 87
87 88
88 89
89 90
90 91
91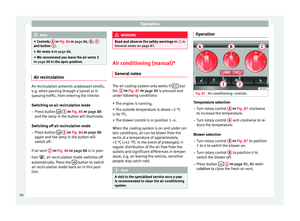 92
92 93
93 94
94 95
95 96
96 97
97 98
98 99
99 100
100 101
101 102
102 103
103 104
104 105
105 106
106 107
107 108
108 109
109 110
110 111
111 112
112 113
113 114
114 115
115 116
116 117
117 118
118 119
119 120
120 121
121 122
122 123
123 124
124 125
125 126
126 127
127 128
128 129
129 130
130 131
131 132
132 133
133 134
134 135
135 136
136 137
137 138
138 139
139 140
140 141
141 142
142 143
143 144
144 145
145 146
146 147
147 148
148 149
149 150
150 151
151 152
152 153
153 154
154 155
155 156
156 157
157 158
158 159
159 160
160 161
161 162
162 163
163 164
164 165
165 166
166 167
167 168
168 169
169 170
170 171
171 172
172 173
173 174
174 175
175 176
176 177
177 178
178 179
179 180
180 181
181 182
182 183
183 184
184 185
185 186
186 187
187 188
188 189
189 190
190 191
191 192
192 193
193 194
194 195
195 196
196 197
197 198
198 199
199