Page 73 of 200

Seats and head restraints
●
Do not touch the exterior mirrors when the
heating system is running.
● If the electrical adjustment should ever fail
to operate, the rear vision mirrors can be ad-
justed by hand by pressing the edge of the
mirror glass.
● Visit the technical service in the event of a
fault in the electrical rear vision mirror ad-
justment system. Seats and head restraints
Adjusting seats and head
restraints
Introduction Set the driver seat in such a way that the
pedals can be fully depressed with your legs
slightly bent.
Set the driver seat backrest so that you can
reach the upper point of the steering wheel
with your arms slightly bent.
The correct seat position is very important
for:
●
reaching all of the controls safely and
quickly,
● a relaxed posture that will not produce fati-
gue,
● maximum protection from the seat belts
and airbag system WARNING
● Adjust the driver seat only when the vehi-
cle is stationary. Risk of accident!
● Be careful when adjusting the front seats!
Careless and uncontrolled adjustment can
cause injuries. ●
The backrests must not be reclined too far
back while driving. This could limit the effect
of the seat belts and the airbag system. Risk
of injury!
● Never transport more than the permitted
amount of people in your vehicle.
● Every occupant in the vehicle must properly
fasten and wear the seat belt belonging to
his or her seat. Children must be protected
with an appropriate child restraint system
››› page 24, Transporting children safety.
● The front seats, head restraints and seat
belts must always be adjusted to the size of
the vehicle occupant to provide you and your
passengers with the greatest possible protec-
tion.
● Your feet should remain in the footwell
while the vehicle is moving; never rest them
on the dash panel, on the window or on the
seat! This also applies to passengers. An in-
correct sitting position exposes you to an in-
creased risk of injury in case of a sudden
braking or an accident. If the airbag is trig-
gered, you could sustain severe injuries due
to an incorrect sitting position!
● It is important for the driver and front pas-
senger to keep a distance of at least 25 cm
from the steering wheel and dash panel. Fail-
ure to respect the minimum distance means
that the airbag will not protect you. Risk of
fatal injury if triggered!
● Objects must not be placed in the footwell,
as they could move to the area of the pedals
in the event of a braking manoeuvre or
change of direction. This would prevent the » 71Technical specifications
Advice
Operation
Safety
Page 74 of 200
. Risk of accident! Note
After a certain")
Operation
clutch, brake or accelerator from being press-
ed.
●
Do not place any items on the front passen-
ger seat other than those allowed (e.g. child
seat). Risk of accident! Note
After a certain time, the backrest angle ad-
justment mechanism may gain a certain
amount of play. Manually adjusting the front seats
Fig. 58
Seat adjustment controls/Adjustment
controls for a sports seat Adjusting the seat forwards and backwards
– Lift the lever 1
››› Fig. 58 (the central part)
and mo v
e the seat forwards or backwards.
– Then release the lever 1 and move the
seat further until the catch engages. Adjusting seat height
– To raise, pump the lever 2
››› Fig. 58 (sev-
er al
times if required) upwards to the re-
quired seat position.
– To lower, pump the lever 2 (several times
if required) downwards to the required seat
position.
Adjusting the backrest angle
– Take your weight off the backrest and pull
the lever 3
››› Fig. 58 backwards, pressing
on the b ac
krest to the required angle.
– When the lever 3 is released, the backrest
will remain in the set position. Head restraints
Fig. 59
Head restraints: adjusting/removing
head restraints. Head restraints cannot be moved up or down
or removed on sports seats.
Adjusting height
– Take hold of the sides of the head restraint
and pull upwards.
72
Page 75 of 200

Seats and head restraints
– To lower the head restraint, press button
A
››› Fig. 59 while pushing the head re-
s tr
aint downward.
Fitting and removing head restraints on front
seats
– Push the head restraint up as far as it will
go.
– Press catch A
››› Fig. 59 and remove the
he a
d restraint.
– To refit, insert the head restraint into the
holes in the backrest, pushing it down until
it engages.
Fitting and removing head restraints on rear
seats
– Push the head restraint up as far as it will
go.
– Press catch 1
››› Fig. 59 while pressing on
the c at
ch in hole 2 with a max. 5 mm flat-
headed screwdriver and remove the head
restraint.
– To refit, insert the head restraint into the
holes in the backrest, pushing it down until
it engages.
For maximum head restraint protection, ad-
just the head restraint so that its upper edge
is at the same level as the top of your head.
The head restraint must be adjusted in line
with the height of users. Correct adjustment of the head restraint, together with the seat
belts, ensure effective passenger protection
››› page 6 . WARNING
● Badly adjusted head restraints increase the
risk of injuries in the event of an accident.
● Never drive with the head restraints re-
moved. Risk of injuries!
● If the seats are in use, never drive with the
rear head restraints in their out-of-use posi-
tion. Seat functions
Heated front seats* Fig. 60
Heated front seats. The cushion and backrest of the front seats
can be heated electrically. Press the
or
››› Fig. 60 button to switch
on and a dju
st the heated front seats.
Press once to connect the heating at maxi-
mum force.
Press the button again to reduce the force of
the heating and switch it off. The force is indi-
cated by the number of warning lamps lit on
the button. WARNING
Do not use the heated seat if your perception
of pain and/or temperature or that of your
passenger is limited, e.g. due to medication,
paralysis or chronic illness (e.g. diabetes). It
could cause burns on the back, buttocks and
legs that are difficult to heal. If you still want
to use the heated seat, take frequent breaks
on long journeys so that the body can recover
from the trip. Ask your doctor about your par-
ticular situation. CAUTION
● To avoid damaging the heating elements,
do not kneel on the seat or apply sharp pres-
sure at a single point to the seat cushion or
backrest.
● Do not use the heated seats if nobody is
sitting on them or if there are items attached
to or lying on them, such as a child seat or a
bag, etc. This could lead to a fault in the seat
heating elements.
● Do not clean the seats with anything damp
››› page 127.
» 73
Technical specifications
Advice
Operation
Safety
Page 76 of 200
Operation
Note
● Only connect the heated seats when the
engine is running. This provides considerable
savings on the battery capacity.
● In the event of a drop in voltage in the on-
board systems, the heated seats switch off
automatically to ensure enough power to con-
trol the engine ››› page 143, Automatic dis-
connection of electrical equipment . Armrest on front seats with inner
storage*
Fig. 61
Armrest/Opening and closing the
storage compartment. Adjusting armrest height
– Lift the armrest as far as it will go and then
fold it downward. –
Raise the armrest until it engages in one of
the 5 positions.
Opening storage compartment
– Press the button located on the front of the
armrest ››› Fig. 61 -
.
– Lif
t the storage compartment lid ››› Fig. 61 -
.
Armre
sts on rear seats Fig. 62
Rear seats: armrest. The armrest can be folded away for greater
comfort using the handle
››› Fig. 62 .
74
Page 77 of 200

Seats and head restraints
Folding the rear backrest Fig. 63
Unlocking the backrest. Folding
– Before folding the rear seats, adjust the po-
sition of the front seats so that the rear
seats are not damaged. When the front
seats are adjusted to the rear position,
their head restraints should be removed
before folding the backrests on the rear
seats. Store the removed head restraints in such a way that they cannot be soiled or
damaged.
– Insert the seat belt latch plate into hole A ›››
Fig. 63 located on the corresponding
s ide of
the vehicle – safety position.
– Press the lock button B to unlock the
backrest and fold it forward.
Returning to the initial position
– Where the head restraint has been re-
moved, insert it into the backrest when par-
tially raised.
– Push the backrest backwards to its original
position until the lock button engages –
check that it is locked by pulling on the
backrest ››› .
– Make sure the red protruding part C is not
visible. WARNING
● Once the backrests have been lifted, the
seat belts and their buckles must be in their
initial position – ready for use.
● The backrests must be safely locked to en-
sure any items in the boot cannot move
around the interior of the vehicle in the event
of a sudden braking manoeuvre. Risk of inju-
ries!
● Make sure the rear backrests are correctly
locked. Only then will the three-point auto-
matic seat belt on the rear central seat work
correctly. CAUTION
Take care when handling the rear backrests
so as not to damage the seat belts. The seat
belt must never be left behind the lifted back-
rest. 75
Technical specifications
Advice
Operation
Safety
Page 78 of 200

Operation
Transport and practical
equipment Practical equipment Passenger side glove compartment Fig. 64
Instrument panel: passenger side
glove compartment. Fig. 65
Storage: cooling control. Opening and closing passenger side glove
compartment
– Pull the catch on the lid in the direction in-
dicated by the arrow ››› Fig. 64
and open
the lid.
– Clo
se the lid and push it until it engages.
Glove compartment cooling*
Open or close the air outlet by turning the
thumbwheel ››› Fig. 65.
If the air outl
et is open and the air condition-
ing is on, the cooled air will be released into
the glove compartment.
If the air outlet is open and the air condition-
ing is off, outdoor air (not conditioned) will
be released into the glove compartment.
The air outlet should be closed if the air con-
ditioning is being used in heating mode or
where glove compartment cooling is not in
use. WARNING
● For safety reasons, all storage compart-
ments must be closed while the vehicle is
moving.
● Never place any objects on the instrument
panel. These objects could be flown around
the interior while the vehicle is moving (on
accelerating or turning) and distract you. Risk
of accident! ●
Make sure objects remain in the centre con-
sole or other compartments while the vehicle
is moving. Otherwise, this could prevent you
from braking, changing gear or accelerating.
Risk of accident! Note
The glove compartment can hold a bottle no
larger than 1 litre. Compartment for reflective vest
Fig. 66
Driver seat: storage compartment There is a compartment below the driver seat
››› Fig. 66 to store the reflective vests. WARNING
The compartment is solely designed to store
the reflective vest and no other objects. Ob-
jects falling out of the storage compartment
could limit or prevent use of the pedals. 76
Page 79 of 200

Transport and practical equipment
CAUTION
The compartment is solely designed to store
the reflective vest and no other objects, since
there is a risk of damaging the storage com-
partment. Front seat storage compartments
There is a storage pocket on the rear part of
the backrest of the front seats.
These pockets are designed to hold maps,
magazines, etc.
WARNING
Do not place heavy objects in the pockets.
Risk of injury! CAUTION
Do not place overly large objects in the pock-
ets (e.g. bottles) or objects with sharp edges.
Risk of damage to the pockets and the up-
holstery. Drink holder in centre console
Fig. 67
Centre console: drink holder Front drink holder in the centre console
Rear drink holder in the centre console
WARNING
● Do not put hot drinks in the drink holders.
They could spill while the vehicle is moving.
Risk of scalding! A
B ●
Do not use cups or glasses made of fragile
materials (e.g. glass or china). These could
cause injury in the event of an accident. CAUTION
Avoid putting open drinks containers in the
drink holder while the vehicle is moving.
They could spill (e.g. on braking) and cause
damage to the electrical equipment or the
seat covers. Drink holder in the rear armrest
Fig. 68
Rear seats armrest: drink holder Two drinks can be placed in the drink holder.
Use the detachable parts
A and
B ›››
Fig. 68 to change the size of the holes.
– Remo
ve part A or
B in the direction indi-
cated by the arrow and replace in the re-
quired position in the drink holder.
77
Technical specifications
Advice
Operation
Safety
Page 80 of 200

Operation
Cigarette lighter* Fig. 69
Centre console: lighter The cigarette lighter is located at the front of
the centre console
››› Fig. 69 .
U s
ing the cigarette lighter
– Press the cigarette lighter knob ››› Fig. 69.
– Wait
for the lighter to spring out.
– Pull out the cigarette lighter and light the
cigarette on the glowing coil immediately.
– Put the cigarette lighter back in its socket. WARNING
● Take care when using the cigarette lighter!
Carelessness or negligence when using the
cigarette lighter can cause burns and serious
injuries.
● The cigarette lighter also works when the
ignition is off and when the ignition key is re- moved. Therefore, never leave children unsu-
pervised in the vehicle.
Note
● The 12 V power socket of the cigarette
lighter can also be used as a power source for
electrical appliances ››› page 79, 12 Volt
power socket .
● Ad dition
al information ››› page 122, Acces-
sories and modifications to the vehicle . Ashtrays*
Fig. 70
Centre console: front ashtray/rear
ashtray. Removing the ashtray
– Pull the ashtray ››› Fig. 70 upwards to re-
mo v
e.
Inserting the ashtray
– Push the ashtray down.
78
 1
1 2
2 3
3 4
4 5
5 6
6 7
7 8
8 9
9 10
10 11
11 12
12 13
13 14
14 15
15 16
16 17
17 18
18 19
19 20
20 21
21 22
22 23
23 24
24 25
25 26
26 27
27 28
28 29
29 30
30 31
31 32
32 33
33 34
34 35
35 36
36 37
37 38
38 39
39 40
40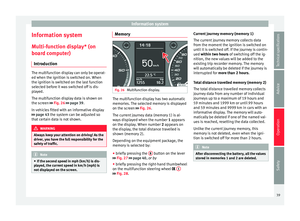 41
41 42
42 43
43 44
44 45
45 46
46 47
47 48
48 49
49 50
50 51
51 52
52 53
53 54
54 55
55 56
56 57
57 58
58 59
59 60
60 61
61 62
62 63
63 64
64 65
65 66
66 67
67 68
68 69
69 70
70 71
71 72
72 73
73 74
74 75
75 76
76 77
77 78
78 79
79 80
80 81
81 82
82 83
83 84
84 85
85 86
86 87
87 88
88 89
89 90
90 91
91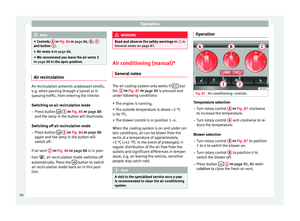 92
92 93
93 94
94 95
95 96
96 97
97 98
98 99
99 100
100 101
101 102
102 103
103 104
104 105
105 106
106 107
107 108
108 109
109 110
110 111
111 112
112 113
113 114
114 115
115 116
116 117
117 118
118 119
119 120
120 121
121 122
122 123
123 124
124 125
125 126
126 127
127 128
128 129
129 130
130 131
131 132
132 133
133 134
134 135
135 136
136 137
137 138
138 139
139 140
140 141
141 142
142 143
143 144
144 145
145 146
146 147
147 148
148 149
149 150
150 151
151 152
152 153
153 154
154 155
155 156
156 157
157 158
158 159
159 160
160 161
161 162
162 163
163 164
164 165
165 166
166 167
167 168
168 169
169 170
170 171
171 172
172 173
173 174
174 175
175 176
176 177
177 178
178 179
179 180
180 181
181 182
182 183
183 184
184 185
185 186
186 187
187 188
188 189
189 190
190 191
191 192
192 193
193 194
194 195
195 196
196 197
197 198
198 199
199