Page 25 of 200

Airbag system
● the airbag is disabled, signalled with the
warning lamp
which lights up with the
word placed in the cen-
tre part of the dash panel ››› Fig. 18 3 .
Note
● Follow the current legislation in your coun-
try regarding the disabling of airbags.
● At your authorised SEAT dealer you can find
information on which vehicle airbags can be
disabled. Front passenger front airbag switch
Fig. 18
Front passenger front airbag
switch/warning lamp for disabling the front
passenger airbag. The switch disables only the front passenger
front airbag.
Disabling the airbag
– Switch the ignition off.
– Open the passenger side storage compart-
ment. –
Insert the key into the slot of the switch for
deactivating the front passenger airbag
››› Fig. 18 . About 3/4 of the key should en-
t er
, as far as it will go.
– Then turn the key gently to the position.
Do not f
orce it if you feel resistance, and
make sure you have inserted the key fully.
– Check, with the ignition switched on, that
the control lamp
illuminates with the
word in the centre
part of the dash panel.
Switching on the airbag
– Switch the ignition off.
– Open the passenger side storage compart-
ment.
– Insert the key into the slot of the switch for
deactivating the front passenger airbag
››› Fig. 18. About 3/4 of the key should en-
ter
, as far as it will go.
– Then turn the key gently to the position.
Do not force it if you feel resistance, and
make sure you have inserted the key fully.
– Close the passenger side storage compart-
ment.
– Check, with the ignition switched on, that
the control lamp does not illuminate,
with the words in the
centre of the dash panel. »
23
Technical specifications
Advice
Operation
Safety
Page 26 of 200

If the front passenger front airbag is disa-
bled
, after switching")
Safety
Control lamp with the word
(front passenger airbag disabled)
If the front passenger front airbag is disa-
bled
, after switching on the ignition, the con-
trol lamp will illuminate for several seconds,
then it will switch off for about 1 s and then
switch on again.
If the control lamp is flashing, there is a fault
in the disabling of the airbag system ››› .
Please go immediately to an Official Service. WARNING
● The driver of the vehicle is responsible for
disabling or switching on the airbag.
● Always switch off the ignition before disa-
bling the front passenger airbag! Failure to do
so could result in a fault in the airbag disa-
bling system.
● Never leave the key in the airbag disabling
switch as it could get damaged or enable or
disable the airbag during driving.
● If the (airbag disabled) control lamp
fl a
shes, the front passenger front airbag will
not trigger in the event of an accident! Have
the system immediately checked by an Offi-
cial Service. Transporting children safety
Safety for children Introduction For safety reasons, as we have learned from
accident statistics, we recommend that chil-
dren under 12 years of age travel in the rear
seats. Depending on their age, height and
weight, children travelling in rear seats must
use a child seat or a seat belt. For safety rea-
sons, the child seat should be installed in the
rear seat, behind the front passenger seat or
in the centre back seat.
The physical laws involved and the forces
acting in a collision apply also to children
››› page 13 . But unlike adults, children do not
h av
e fully developed muscle and bone struc-
tures. This means that children are subject to
a greater risk of injury.
To reduce the risk of injuries, children must
always use special child restraint systems
when travelling in the vehicle.
We recommend the use of child safety prod-
ucts from the SEAT Original Accessories Pro-
gramme, which includes systems for all ages
made by “Peke” (not for all countries).
These systems have been especially de-
signed and approved, complying with the
ECE-R44. regulation. Follow the manufacturer's instructions and
observe any statutory requirements when in-
stalling and using child seats. Always read
and note
››› page 25.
We r
ecommend you always carry the manu-
facturer's Child Seat Instruction Manual to-
gether with the on-board documentation.
24
Page 27 of 200

Transporting children safety
Important information regarding the
front passenger's airbag Fig. 19
Passenger's side sun visor: airbag
sticker. Fig. 20
On the rear frame of the passenger
side door: airbag sticker. A sticker with important information about
the passenger airbag is located on the pas-
senger's sun visor and/or on the passenger
side door frame. Read and always observe the safety information included in the follow-
ing chapters:
● Safety distance with respect to the passen-
ger airbag ››› page 16, Why wear a seat belt
and assume the correct sitting position? .
● Objects between the passenger and the
passenger side airbag ››› in Front airbags
on page 20 .
The p a
ssenger side front airbag, when ena-
bled, is a serious risk for a child that is facing
backward since the airbag can strike the seat
with such force that it can cause serious or
fatal injuries. Children up to 12 years old
should always travel on the rear seat.
Therefore we strongly recommend you to
transport children on the rear seats. This is
the safest location in the vehicle. Alternative-
ly, the front passenger airbag can be disa-
bled with a key-operated switch ››› page 22.
When transporting children, use a child seat
suitable for the age and size of each child
››› page 24. WARNING
● If a child seat is secured to the front pas-
senger seat, the risk to the child of sustain-
ing critical or fatal injuries in the event of an
accident increases.
● An inflating front passenger airbag can
strike the rear-facing child seat and project it with great force against the door, the roof or
the backrest.
●
Never install a child seat facing backwards
on the front passenger seat unless the front
passenger front airbag has been disabled.
Risk of potentially fatal injuries to the child!
However, if it is necessary, in exceptional ca-
ses, to transport a child in the front passen-
ger seat, the front passenger front airbag
must always be disabled ››› page 22. If the
front passenger seat has a height adjustment
option, move it to the highest position.
● For those vehicles that do not include a key
lock switch to deactivate the airbag, the vehi-
cle must be taken to a technical service.
● All vehicle occupants, especially children,
must assume the proper sitting position and
be properly belted in while travelling.
● Never hold children or babies on your lap,
this can result in potentially fatal injuries to
the child!
● Never allow a child to be transported in a
vehicle without being properly secured, or to
stand up or kneel on a seat while travelling.
In an accident, the child could be flung
through the vehicle, causing possibly fatal in-
juries to themselves and to the other vehicle
occupants.
● If children assume an improper sitting posi-
tion when the vehicle is moving, they expose
themselves to greater risk of injury in the
event of a sudden braking manoeuvre or in an
accident. This is particularly important if the
child is travelling on the front passenger seat » 25
Technical specifications
Advice
Operation
Safety
Page 28 of 200

Safety
and the airbag system is triggered in an acci-
dent; as this could cause serious injury or
even death.
●
A suitable child seat can protect your child!
● Never leave a child alone in the child seat
or inside the vehicle because depending on
the season, very high temperatures may be
reached inside a parked vehicle, which could
be fatal.
● Children who are less than 1.5 metres tall
must not wear a normal seat belt without a
child seat, as this could cause injuries to the
abdominal and neck areas during a sudden
braking manoeuvre or in an accident.
● Only one child may occupy a child seat
››› page 26, Child seats. Child seats
Categorisation of child seats into
groups Use only child seats that are officially ap-
proved and suitable for the child.
Child seats are subject to the regulation ECE-
R 44. ECE-R stands for: Economic Commis-
sion for Europe Regulation.
The child seats are grouped into 5 catego-
ries: Group 0: Up to 10 kg (up to around 9
months)
Group 0+
: Up to 13 kg (up to around 18
months)
Gr oup 1: From 9 to 18 kg (up to around 4
years old)
Group 2
: from 15 to 25 kg (up to approx. 7
years old)
Group 3: From 22 to 36 kg (over around 7
ye
ars old)
Child seats that have been tested and ap-
proved under the ECE R44 standard bear the
test mark on the seat (the letter E in a circle
with the test number below it).
Follow the manufacturer's instructions and
observe any statutory requirements when in-
stalling and using child seats.
We recommend you to always include the
manufacturer's Child Seat Instruction Manual
together with the on-board documentation.
SEAT recommends you use child seats from
the
Original Accessories Catalogue . These
child seats have been designed and tested
for use in SEAT vehicles. You can find the
right child seat for your model and age group
at SEAT dealers. WARNING
Read and always observe information and
warnings concerning the use of child seats
››› page 25. Possible ways to secure child seats
You can secure a child seat to the rear seat or
front passenger seat in the following ways:
● Child seats in groups 0 to 3 can be secured
w ith a se
at belt.
● Child seats for groups 0, 0+ and 1 can be
f a
stened without seatbelts, using the “ISO-
FIX” and Top Tether* system, using the “ISO-
FIX” and Top Tether* securing rings
››› page 27.
CategoryWeight
Seat locations
Front
passen- gerRear
outerRear
centre
Group 0<10 kgU*U/LU
Group
0+<13 kgU*U/LU
Group 19-18 kgU*U/LU
Group
2/315-36 kgU*UU 26
Page 29 of 200
.
Move the front")
Transporting children safety
Suitable for universal approved restrain-
ing systems for use in this age category
(universal retention systems are those
fitted using the adult seat belt).
Move the front passenger seat as far
back as possible, as high as possible
and always disable the airbag.
Suitable for retention systems using the
“ISOFIX” and Top Tether* anchors. WARNING
● When travelling, children must be secured
in the vehicle with a restraint system suitable
for age, weight and size.
● Read and always observe information and
warnings concerning the use of child seats
››› page 25. Child seats fastened with the
“ISOFIX” and Top Tether* system
Fig. 21
ISOFIX securing rings. U:
*:
L:
Fig. 22
Top Tether* securing ring. Child seats with the “ISOFIX” or Top Tether*
system can be secured quickly, easily and
safely on the rear outer seats.
When removing or fitting the child seat,
please be sure to follow the manufacturer's
instructions.
– Move the rear seat as far to the rear as it
will go.
– Press the child seat onto the “ISOFIX” re-
taining rings until the child seat can be
heard to engage. If the child seat is equip-
ped with Top Tether* anchor points, secure
it to the correspondent ring. Observe the
manufacturer's instructions.
– Pull on both sides of the child seat to en-
sure that it is secure.
Two “ISOFIX” retaining rings are fitted on
e ac
h rear seat. In some vehicles, the rings
are secured to the seat frame and, in others,
they are secured to the rear floor. Access to the “ISOFIX” rings is between the rear seat
backrest and the seat cushioning. The Top
Tether* rings are located at the rear of the
backrests of the rear seats (behind the seat
backrest or in the boot).
Child seats with the “ISOFIX” and Top Tether*
attachment system are available from Techni-
cal Services.
WARNING
● The retaining rings are designed only for
use with “ISOFIX” and Top Tether* system
child seats.
● Never secure other child seats that do not
have the “ISOFIX” or Top Tether* system, or
retaining belts or objects to the fastening
rings - this can result in potentially fatal inju-
ries to the child.
● Ensure that the child seat is secured cor-
rectly using the “ISOFIX” and Top Tether* se-
curing rings. 27
Technical specifications
Advice
Operation
Safety
Page 30 of 200
Operation
Fig. 23
Interior.28
Page 31 of 200

Controls and displays
Operation
Controls and displays Overview Electric window controls
. . . . . . . . . .60
Control for adjusting electric exteri-
or mirrors . . . . . . . . . . . . . . . . . . . . . . . . 70
Air outlets . . . . . . . . . . . . . . . . . . . . . . . . 88
Multifunction switch lever:
– Turn signals, headlights, parking
lights, headlight flasher . . . . . . . .63
– Cruise control system . . . . . . . . . . .111
Steering wheel:
– With horn
– With the driver front airbag . . . . . .19
– With controls for audio, naviga-
tion system and telephone . . . . . .46
General instrument panel: instru-
ments and warning lamps . . . . . . . .29
Multifunction switch lever:
– Multifunction display . . . . . . . . . . .39
– Windscreen wipers and wind-
screen washers . . . . . . . . . . . . . . . . . 69
Air outlets . . . . . . . . . . . . . . . . . . . . . . . . 88
Depending on the equipment:
– Audio system
1 2
3
4
5
6
7
8
9 –
Navigation system
Hazard warning lights switch . . . . . .65
Control lamp for front passenger
airbag deactivated warning lamp . .23
Front passenger airbag switch . . . .23
Passenger side storage compart-
ment . . . . . . . . . . . . . . . . . . . . . . . . . . . . . 76
Front passenger airbag . . . . . . . . . . .19
Light switch and main lights range
control . . . . . . . . . . . . . . . . . . . . . . . . . . . 61, 62
Bonnet release lever . . . . . . . . . . . . . .133
Fuse compartment . . . . . . . . . . . . . . . . 164
Steering column adjustment lever .7
Ignition lock . . . . . . . . . . . . . . . . . . . . . . 97
Driver seat heating control . . . . . . . .73
ASR switch . . . . . . . . . . . . . . . . . . . . . . . 108
Central lock button . . . . . . . . . . . . . . .56
Depending on the equipment:
– Gear lever (manual gearbox) . . . .100
– Selector lever (automatic gear-
box) . . . . . . . . . . . . . . . . . . . . . . . . . . . . 101
Depending on the equipment:
– Drink holder . . . . . . . . . . . . . . . . . . . . 77
– Ashtray holder . . . . . . . . . . . . . . . . . . 78
Glove compartment/storage com-
partment . . . . . . . . . . . . . . . . . . . . . . . . . 76
Heated rear window control . . . . . . .67
Passenger seat heating control . . . .73
10 11
12
13
14
15
16
17
18
19
20
21
22
23
24
25
26
27 Depending on the equipment:
– Heating controls . . . . . . . . . . . . . . . . 88
– Air conditioning controls . . . . . . . .90
– Climatronic controls . . . . . . . . . . . .93 Note
The location of the controls of right-hand
drive cars differs slightly from the location
shown here ››› Fig. 23. However, the symbols
c orr
espond to the respective controls. 28
29
Technical specifications
Advice
Operation
Safety
Page 32 of 200

Operation
Instruments and warning lamps
Dash General instrument panel Fig. 24
General dash panel. Rev counter
››› page 31
Digital display:
– with trip counter ››› page 32
– with service interval display
››› page 45
– with digital clock ››› page 32
– with multifunction display ››› page 39
– with informative digital display
››› page 43
– with outside temperature indicator
››› page 40
Speedometer ››› page 31
1 2
3 Coolant temperature indicator
››› page 31
Control for selecting the mode:
– adjust hours/minutes
– activate/deactivate according to speed
in mph or km/h respectively
– service intervals – show the days and
kilometres (miles) remaining
Switch for:
– delete trip counter
– reset the service intervals
– adjust hours/minutes
4 5
6 –
activate/deactivate the selected mode
Fuel reserve indicator ››› page 31 WARNING
● Always keep your attention on driving! As
the driver, you have the full responsibility for
the safety of traffic.
● Never use the instrument panel controls
when the vehicle is in motion. Do so only
when the vehicle is stopped! 7
30
 1
1 2
2 3
3 4
4 5
5 6
6 7
7 8
8 9
9 10
10 11
11 12
12 13
13 14
14 15
15 16
16 17
17 18
18 19
19 20
20 21
21 22
22 23
23 24
24 25
25 26
26 27
27 28
28 29
29 30
30 31
31 32
32 33
33 34
34 35
35 36
36 37
37 38
38 39
39 40
40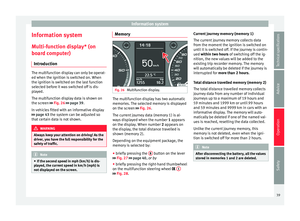 41
41 42
42 43
43 44
44 45
45 46
46 47
47 48
48 49
49 50
50 51
51 52
52 53
53 54
54 55
55 56
56 57
57 58
58 59
59 60
60 61
61 62
62 63
63 64
64 65
65 66
66 67
67 68
68 69
69 70
70 71
71 72
72 73
73 74
74 75
75 76
76 77
77 78
78 79
79 80
80 81
81 82
82 83
83 84
84 85
85 86
86 87
87 88
88 89
89 90
90 91
91 92
92 93
93 94
94 95
95 96
96 97
97 98
98 99
99 100
100 101
101 102
102 103
103 104
104 105
105 106
106 107
107 108
108 109
109 110
110 111
111 112
112 113
113 114
114 115
115 116
116 117
117 118
118 119
119 120
120 121
121 122
122 123
123 124
124 125
125 126
126 127
127 128
128 129
129 130
130 131
131 132
132 133
133 134
134 135
135 136
136 137
137 138
138 139
139 140
140 141
141 142
142 143
143 144
144 145
145 146
146 147
147 148
148 149
149 150
150 151
151 152
152 153
153 154
154 155
155 156
156 157
157 158
158 159
159 160
160 161
161 162
162 163
163 164
164 165
165 166
166 167
167 168
168 169
169 170
170 171
171 172
172 173
173 174
174 175
175 176
176 177
177 178
178 179
179 180
180 181
181 182
182 183
183 184
184 185
185 186
186 187
187 188
188 189
189 190
190 191
191 192
192 193
193 194
194 195
195 196
196 197
197 198
198 199
199