Page 57 of 219

Lights and visibility
sunroof encounters resistance or an obstacle
when closing, it will immediately reopen.
● Check why the sliding/tilting sunroof has
not closed.
● Try to close it again.
● If it is still not possible to close it due to an
obstacle or resistance, it will remain in the
corresponding position. Close it without the
anti-trap function.
Closing the sliding/tilting electric panoramic
sunroof without the anti-trap function
● Within about 5 seconds of activating the
anti-trap function, pull knob ››› Fig. 42 5 un-
til the sliding/tilting sunroof is fully closed.
● As such, the sliding/tilting sunroof will
close without the anti-trap function!
● If the sunroof still cannot be closed, visit a
specialised workshop.
If the knob is released during the closing op-
eration, the sliding/tilting electric panoramic
sunroof opens automatically. WARNING
Closing the sliding/tilting electric panoramic
sunroof without the anti-trap function can re-
sult in serious injury.
● The sliding/tilting sunroof should always
be closed carefully. ●
No person should ever remain in the way of
the sliding/tilting sunroof, especially when
closing without the anti-trap function.
● The anti-trap function does not prevent fin-
gers or other parts of the body from becom-
ing trapped against the roof frame and inju-
ries occurring. Lights and visibility
Lights Introduction The legal requirements regarding the use of
vehicle lights in each country must be ob-
served.
The driver is personally responsible for the
correct use and adjustment of the lights in all
situations.
WARNING
If the headlights are set too high and the
main beam is not used correctly, there is a
risk of dazzling or distracting other road
users. This could result in a serious accident.
● Always make sure that the headlights are
correctly adjusted.
● Never use the main beam or flashed head-
lamps as this could dazzle other drivers. Control lampsIt lights
upPossible causeSolution
Rear fog light switched
on.›››
page 56» 55
Technical specifications
Advice
Operation
Safety
Page 58 of 219

OperationIt lights
upPossible causeSolution
Front fog lights switch-
ed on›››
page 56
Left or right turn sig-
nal.
The control lamp flash-
es twice as fast when a
vehicle turn signal is
faulty.
If necessary,
check the vehi-
cle's lights.
Main beam on or
flasher on.›››
page 57 Several warning and control lamps light up
for a few seconds when the ignition is switch-
ed on, signalling that the function is being
verified. They will switch off after a few sec-
onds.
WARNING
Observe the safety warnings ››› in Control
and warning lamps on page 40. Turning on and off lights
Fig. 43
Next to the steering wheel: diagram
of some of the types of light switch The legal requirements regarding the use of
vehicle lights in each country must be ob-
served.
Turn the light switch to the required position
››› Fig. 43:
When the ignition is
switched offWhen the ignition
is on
Fog lights, dipped
beam and side lights
off.Lights off, daytime
driving light on.
Side light on.Side light on.
Dipped beam off; if
necessary, the side
light comes on for a
time.Dipped beam switched
on. Fog lights*
The control lamp
appears on the fog lights
c ontr
ol connected.
● Switching on the front fog lights
: Turn
the switch to position or pull out to the
first stop.
● Switching on the rear fog light
: turn the
light switch to position or pull out to
the maximum.
● To switch off the fog lights, press the light
switch or turn it to position
.
Audible warnings to advise the driver that
the lights have not been switched off
If the key is not in the ignition and the driver
door is open, an audible warning signal is
heard in the following cases: this is a remind-
er to turn off the lights.
● When the light switch is in position .
● When the light switch is in position . WARNING
The side lights or daytime driving lights are
not bright enough to illuminate the road
ahead and to ensure that other road users are
able to see you.
● Always use your dipped beam head lights if
it is raining or if visibility is poor. 56
Page 59 of 219

Lights and visibility
Lights and visibility: functions Parking light remains on both sides
If when switching off the ignition, the light
control remains in the position
and the ve-
hic
le is closed from outside, both headlights,
in addition to the side lights and the rear
lights will light up.
Daytime driving light
The daytime driving light consists of individu-
al lights in the front headlamps.
When the daytime driving light is switched
on, only the individual lights come on ››› .
The daytime lights are switched on each time
the ignition is turned on if the light switch is
in position .
Switching the daytime driving light on and
off
To switch the daytime driving light on or off,
it is necessary to fit or remove the corre-
sponding fuse. Ask for professional assis-
tance for this. WARNING
If the road is not well-lit and the vehicle is
not clearly visible to other drivers, an acci-
dent may occur.
● Never use the daytime driving light if the
road is not well-lit as a result of the weather conditions and poor visibility. The daytime
driving lights are not bright enough to illumi-
nate the road ahead and to ensure that other
road users are able to see you.
●
The rear lights do not come on with the
daytime driving light. A vehicle which does
not have the rear lights on may not be visible
to other drivers in the darkness, if it is rain-
ing or in conditions of poor visibility. Note
The headlights, rear lights and turn signals
may mist up temporarily on the inside in cool
or damp weather. This is normal and in no
way effects the useful life of the vehicle light-
ing system. Turn signal and main beam lever
Fig. 44
Turn signal and main beam lever in
their initial position Move the lever to the required position:
Right turn signal.
Left turn signal.
Switching on main beam ››› . When the
main beam headlights are switched on,
the warning lamp is switched on in the
instrument panel.
Switch on the flasher or switch off the
main beam headlights. The flashed beam
comes on if the lever is pressed. The
warning lamp
will light up during this
pr
ocess.
Push the lever all the way down to turn off
the corresponding function.
Convenience turn signals
For the convenience turn signals, move the
lever as far as possible upwards or down-
wards and release the lever. The turn signal
will flash 3 times.
The convenience indicators can be deactiva-
ted at a Specialised workshop. WARNING
Incorrect use of the headlights may cause ac-
cidents and serious injury, as the main beam
may distract or dazzle other drivers. » 1
2
3
4
57
Technical specifications
Advice
Operation
Safety
Page 60 of 219

Operation
Note
● The turn signal only works when the igni-
tion is switched on. The hazard warning
lights also work when the ignition is switch-
ed off ››› page 170.
● If an
y of both turn signals fails, the warning
lamp will start flashing twice faster than nor-
mal.
● The main beam headlights can only be
sw
itched on if the dipped beam headlights
are already on. Adjusting the headlights
In those countries where vehicles drive on
the other side of the road to the home coun-
try, the asymmetric dipped beam may dazzle
drivers of oncoming vehicles.
For this reason, stickers may be needed to
cover the headlights when driving abroad.
For further information, please refer to a spe-
cialised workshop. SEAT recommends visiting
a technical service.
Note
The use of stickers to cover headlights is only
permitted over a short period. To modify the
direction of the headlamps more permanent-
ly, please take the vehicle to a specialised
workshop. SEAT recommends taking your car
in for technical service. Headlight range control, lighting of
instruments and controls
Fig. 45
Next to the steering wheel: Headlight
range control Headlamp height adjustment
The headlight range control
››› Fig. 45 is
modified ac c
ording to the value of the head-
light beam and the vehicle load status. This
offers the driver optimum visibility and the
headlights do not dazzle oncoming drivers
››› .
The headlights can only be adjusted when
the dipped beam is switched on.
To reset, turn switch ››› Fig. 45:
ValueVehicle load status a)
–Two front occupants, luggage compart-
ment empty
To reset, turn switch
››› Fig. 45:
ValueVehicle load status a)
1All seats occupied, luggage compartment
empty
2All seats occupied, luggage compartment
full
3Driver only, luggage compartment full
a)
If the vehicle load does not correspond to those shown in the
table, it is possible to select intermediary positions.
Instrument and switch lighting
When the side lights or dipped beam head-
lights are switched on, the lighting for instru-
ments and controls lights up at a constant
brightness. WARNING
Heavy objects in the vehicle may mean that
the headlights dazzle and distract other driv-
ers. This could result in a serious accident.
● Adjust the light beam to the vehicle load
status so that it does not blind other drivers. Reading light
But-
ton/SwitchFunction
Switching off the reading light.
58
Page 61 of 219
.
The reading light comes on automati-
cally when the vehicle")
Lights and visibilityBut-
ton/SwitchFunction
Switching on the reading light.
Switches door contact control on (cen-
tral position).
The reading light comes on automati-
cally when the vehicle is unlocked, a
door is opened or the key is removed
from the ignition.
The light goes off a few seconds after
all the doors are closed, the vehicle is
locked or the ignition is switched on.
Note
The reading lights go out when the vehicle is
locked, or a few minutes after the key is re-
moved from the ignition. This prevents the
vehicle's battery from discharging. Visibility
Sun visors Fig. 46
Sun visor Options for adjusting driver and front
passenger sun visors:
● Lower the sun visor towards the wind-
screen.
● The sun visor can be pulled out of its
mounting and turned towards the door.
● Swing the sun visor towards the door, lon-
gitudinally backwards.
Vanity mirror*
There may be a vanity mirror in the folded
sun visor on the passenger side and a card-
holder in the driver sun visor. WARNING
Folded sun blinds can reduce visibility.
● Always roll or fold sun blinds and visors
away when not in use. Heat-insulating glass windscreen
Fig. 47
Windscreen with reflective infrared
and metal coating and small window (red sur-
face) The heat-insulating windscreens include a re-
flective infrared coating. The section above
the rear vision mirror has been left uncoated
(communication window) to allow electric
components from the accessories shop to
operate correctly
›››
Fig. 47 .
»
59
Technical specifications
Advice
Operation
Safety
Page 62 of 219

Operation
CAUTION
When the uncoated surface is covered or has
a sticker on the interior or exterior, malfunc-
tions in the electronic components may oc-
cur. Never cover the uncoated surface on the
interior or exterior. Windscreen wiper and rear
window wiper systems
Introduction WARNING
Water from the windscreen washer water bot-
tle may freeze on the windscreen if it does
not contain enough anti-freeze, reducing for-
ward visibility.
● In winter, ensure the windscreen washer
contains enough anti-freeze.
● In cold conditions, you should not use the
wash/wipe system unless you have warmed
the windscreen with the ventilation system.
The antifreeze could freeze on the windscreen
and reduce visibility. WARNING
Worn or dirty wiper blades reduce visibility
and increase the risk of accident and serious
injury. ●
Always replace damaged or worn blades or
blades which do not clean the windscreen
correctly. CAUTION
In icy conditions, always check that the wiper
blades are not frozen to the glass before us-
ing the wipers for the first time. In cold
weather, it may help to leave the vehicle
parked with the wipers in service position
››› page 61
. Window wiper lever
Fig. 48
Operating the windscreen wiper and
rear wiperMove the lever to the required position ››› :
0 Windscreen wiper off.
1
Windscreen interval wipe.
Move the lever to the required position
››› :
2 Slow wipe.
3
Continuous wipe.
4
Brief wipe - short wipe. Hold the lever
down for more time to increase the wipe
frequency.
5
Automatic wipe for cleaning wind-
screens with the lever up.
6
Interval wipe for rear window. The wiper
will wipe the window approximately ev-
ery six seconds.
7
Automatic wipe for cleaning rear win-
dows with the lever pressed.
CAUTION
If the ignition is switched off while the wind-
screen wipers are on, the windscreen wipers
carry on wiping at the same level when the
ignition is switched back on. Ice, snow and
other obstacles may damage the windscreen
wiper and the respective motor. ● If necessary, remove snow and ice from the
windscreen wipers before starting your jour-
ney.
● Carefully lift the frozen windscreen wipers
from the glass. SEAT recommends a de-icer
spray for this operation. 60
Page 63 of 219

Lights and visibility
Note
● The windscreen wipers will only work when
the ignition is switched on.
● The interval wipe speed varies according to
the vehicle speed. The faster the vehicle is
moving, the more often the windscreen is
cleaned.
● The rear wiper is automatically switched on
when the windscreen wiper is on and the car
is in reverse gear. Windscreen wiper functionsWindscreen wiper performance in different sit-
uations
If the vehicle is at a
standstillThe activated position provision-
ally changes to the previous posi-
tion.
For intermittent wip-
ersIntervals between wipes depend
on the vehicle's speed. The high-
er the vehicle speed the shorter
the intervals.
Note
The wiper will try to wipe away any obstacles
that are on the windscreen. The wiper will
stop moving if the obstacle blocks its path.
Remove the obstacle and switch the wiper
back on again. Windscreen wipers service position
Fig. 49
Wipers in service position The wiper arms can be raised when the wip-
ers are in service position
››› Fig. 49 . To place
the w ind
screen wipers in the service posi-
tion, proceed as follows:
● The bonnet must be closed ››› page 143.
● Switch the ignition on and off.
● Press the windscreen wiper lever down-
wards briefly ››› Fig. 48 4 .
Before driving, always lower the wiper arms.
When the ignition is switched on, the wind-
screen wiper arms return to their initial posi-
tion upon activating the windscreen wiper
lever.
Lifting and returning windscreen wiper arms
● Place the wiper arms in the service position
››› .●
Only hold the wiper arms at the point
where the blade is fixed. CAUTION
● To prevent damage to the bonnet and the
wiper arms, only leave them in the service
position.
● Before driving, always lower the wiper
arms. Rear vision mirror
Rear vision mirror Fig. 50
Manual anti-dazzle function for rear
vision mirror The driver should always adjust the rear vi-
sion mirror to permit adequate visibility
through the rear window.
»
61
Technical specifications
Advice
Operation
Safety
Page 64 of 219

Operation
Manual anti-dazzle function for interior rear
vision mirror
● Basic position: point the lever at the bot-
tom of the mirror forwards.
● Pull the lever to the back to select the anti-
dazzle function ››› Fig. 50 .
Ext erior mirr
ors Fig. 51
In the front doors: button to adjust
the mechanical exterior rear vision mirror Fig. 52
In the driver door: rotary control for
the exterior electric mirrors Adjust the exterior mirrors by pressing the
adjust button
››› Fig. 51 or the rotary control*
› ›
› Fig. 52.
Turn the rotary control ››› Fig. 52 to the required
position:
Switch on the exterior mirror heating
Adjust the left-hand exterior mirror by turning
the knob forward, backward, to the right or to
the left.
Zero position. Exterior mirror heating switched
off, it is not possible to adjust the exterior mir-
rors.
Adjust the right-hand exterior mirror by turning
the knob forward, backward, to the right or to
the left.
Folding in the exterior mirrors and returning
them to their original position is possible
through a mechanical system. Carefully foldthe exterior rear vision mirror casing towards
the side window or pull it away from the win-
dow until it clicks into place.
WARNING
Fold and unfold the exterior mirror, taking
care to avoid injuries.
● Only fold or unfold the exterior mirror when
there is no-one in the way of the mirror.
● When moving the mirror, take care not to
trap fingers between the mirror and the mir-
ror bracket. WARNING
Failure to correctly estimate the distance of
the vehicle behind could lead to serious acci-
dent.
● Rear-view convex or aspheric mirrors in-
crease the field of vision, however objects ap-
pear smaller and further away in the mirrors.
● The use of these mirrors to estimate the
distance to the next vehicle when changing
lane is imprecise and could result in serious
accident.
● If possible, use the rear vision mirror to es-
timate distances to vehicles behind you or in
other circumstances.
● Make sure that the rear visibility is ade-
quate. 62
 1
1 2
2 3
3 4
4 5
5 6
6 7
7 8
8 9
9 10
10 11
11 12
12 13
13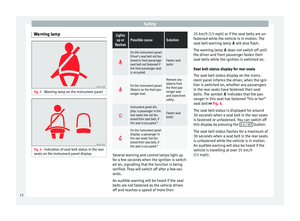 14
14 15
15 16
16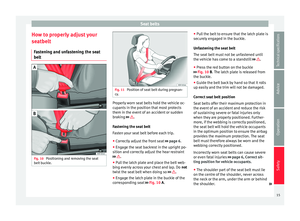 17
17 18
18 19
19 20
20 21
21 22
22 23
23 24
24 25
25 26
26 27
27 28
28 29
29 30
30 31
31 32
32 33
33 34
34 35
35 36
36 37
37 38
38 39
39 40
40 41
41 42
42 43
43 44
44 45
45 46
46 47
47 48
48 49
49 50
50 51
51 52
52 53
53 54
54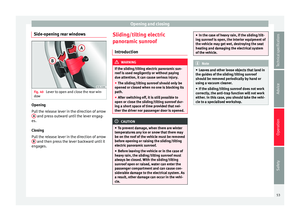 55
55 56
56 57
57 58
58 59
59 60
60 61
61 62
62 63
63 64
64 65
65 66
66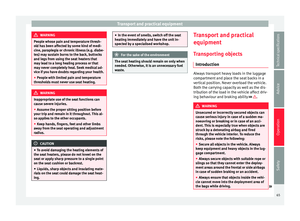 67
67 68
68 69
69 70
70 71
71 72
72 73
73 74
74 75
75 76
76 77
77 78
78 79
79 80
80 81
81 82
82 83
83 84
84 85
85 86
86 87
87 88
88 89
89 90
90 91
91 92
92 93
93 94
94 95
95 96
96 97
97 98
98 99
99 100
100 101
101 102
102 103
103 104
104 105
105 106
106 107
107 108
108 109
109 110
110 111
111 112
112 113
113 114
114 115
115 116
116 117
117 118
118 119
119 120
120 121
121 122
122 123
123 124
124 125
125 126
126 127
127 128
128 129
129 130
130 131
131 132
132 133
133 134
134 135
135 136
136 137
137 138
138 139
139 140
140 141
141 142
142 143
143 144
144 145
145 146
146 147
147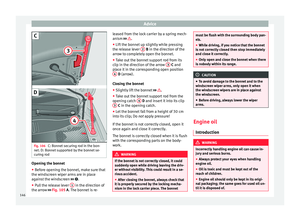 148
148 149
149 150
150 151
151 152
152 153
153 154
154 155
155 156
156 157
157 158
158 159
159 160
160 161
161 162
162 163
163 164
164 165
165 166
166 167
167 168
168 169
169 170
170 171
171 172
172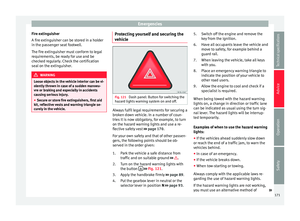 173
173 174
174 175
175 176
176 177
177 178
178 179
179 180
180 181
181 182
182 183
183 184
184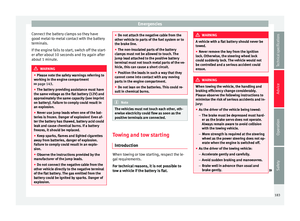 185
185 186
186 187
187 188
188 189
189 190
190 191
191 192
192 193
193 194
194 195
195 196
196 197
197 198
198 199
199 200
200 201
201 202
202 203
203 204
204 205
205 206
206 207
207 208
208 209
209 210
210 211
211 212
212 213
213 214
214 215
215 216
216 217
217 218
218