Page 81 of 219

Transport and practical equipment
●
Only use base supports and roof carrier
systems that are not damaged and are cor-
rectly fitted.
● The base support should only be fitted to
the points indicated in the diagram ››› Fig. 74.
● Sec ur
e the base supports and roof carrier
system correctly.
● Check the screws and attachments before
driving and after a short distance. During
each long journey, check the attachments
during every break.
● Always fit the roof carrier system correctly
for wheels, skis and surfboards, etc.
● Never modify or repair the basic supports
or roof carrier system. Note
Read and take into account the instructions
included with the roof carrier system fitted
and keep them in the vehicle. Loading the roof carrier system
Loads can only be correctly secured when the
roof carrier system is correctly fitted
››› .
Maximum authorised roof load
The maximum authorised roof load is 50 kg.
The r oof
load includes the weight of the base
support, the roof carrier system and the load
being transported ››› .Always check the weight of the base support,
the roof carrier system and the weight of the
load to be transported and, if necessary,
weigh them. Never exceed the maximum au-
thorised roof load.
If you are using a roof carrier with a lower
weight rating, you cannot transport the maxi-
mum roof load. Do not exceed the maximum
weight limit for the roof carrier given in the
fitting instructions.
Distributing a load
Uniformly distribute loads and secure them
correctly
››› .
Check attachments
After fitting the base supports and the roof
carrier system, always check the attachments
after a short trip and at regular intervals. WARNING
Exceeding the maximum authorised roof load
can result in accidents and/or vehicle dam-
age.
● Never surpass the maximum authorised
weight for the roof, the maximum authorised
weight on the axles and the total maximum
authorised weight of the vehicle.
● Never exceed the capacity of the roof carri-
er system even if this is less than the maxi-
mum authorised roof load. ●
Secure heavy items as far forward as possi-
ble and distribute the vehicle load uniformly. WARNING
Loose and incorrectly secured loads can fall
from the roof carrier system causing acci-
dents and injury.
● Always use suitable ropes and straps in
good condition.
● Always secure loads correctly. 79
Technical specifications
Advice
Operation
Safety
Page 82 of 219

Operation
Air conditioning
Heating, ventilation and air
conditioning system Introduction Dust and pollen filter
The dust and pollen filter with its activated
charcoal cartridge serves as a barrier against
impurities in the interior ambient air.
For the air conditioner to work with maximum
efficiency, the dust and pollen filter must be
replaced at the intervals specified in the
Maintenance Programme.
If the filter loses efficiency prematurely due
to use in areas with very high levels of air
pollution, the filter must be changed more
frequently than stated in the Service Sched-
ule.
WARNING
Reduced visibility through the windows in-
creases the risk of serious accidents. ●
Ensure that all windows are free of ice and
snow and that they are not fogged up pre-
venting a clear view of everything outside.
● The maximum heat output required to de-
frost windows as quickly as possible is only
available when the engine has reached its
normal running temperature. Only drive when
you have good visibility.
● Always ensure that you use the heating
system, ventilation, air conditioner and the
heated rear window to maintain good visibili-
ty.
● Never leave the air recirculation on for a
long period of time. If the cooling system is
switched off and air recirculation mode
switched on, the windows can mist over very
quickly, considerably limiting visibility.
● Switch air recirculation mode off when it is
not required. WARNING
Stuffy or used air will increase fatigue and re-
duce driver concentration possibly resulting
in a serious accident.
● Never leave the fresh air fan turned off or
use the air recirculation for long periods of
time; the air in the vehicle interior will not be
refreshed. CAUTION
● Switch the air conditioner off if you think it
may be broken. This will avoid additional
damage. Have the air conditioner checked by
a specialised workshop.
● Repairs to the air conditioner require spe-
cialist knowledge and special tools. SEAT rec-
ommends taking your car in for technical
service. Note
● When the cooling system is turned off, air
coming from the outside will not be dried. To
avoid fogging up the windows, SEAT recom-
mends leaving the cooler (compressor) on. To
do this, press the A/C button. The button
lamp should light up.
● The maximum heat output required to de-
frost windows as quickly as possible is only
available when the engine has reached its
normal running temperature.
● Keep the air intake slots in front of the
windscreen free of snow, ice and leaves to en-
sure heating and cooling are not impaired,
and to prevent the windows from misting
over. 80
Page 83 of 219

Air conditioning
Controls Fig. 76
In the centre console: Heating and ventilation system rotary control Fig. 77
In the centre console: Air conditioning system controlsControl buttonAdditional information. Heating and ventilation system ››› Fig. 76 and air conditioning system ››› Fig. 77.
1 TemperatureRotate the control to adjust the temperature accordingly.
2 FanSetting 0: fan and manual air conditioning switched off. Setting 4: maximum fan level.
3 Air distributionRotate the continuous control to direct the airflow to the desired area.
Heating and ventilation system:
defrost function. Distribution of air to the windscreen and the side windows in the exterior rear vision mirror area.
Air conditioning system: defrost function. Distribution of air to the windscreen and the side windows in the exterior rear vision mirror area. Press the
A/C
button, increase the fan speed and switch on air recirculation ››› page 84 to clear the windscreen of condensation as soon as possible.
Air distribution towards the body.
Air distribution towards the footwell.»
81
Technical specifications
Advice
Operation
Safety
Page 84 of 219

OperationControl buttonAdditional information. Heating and ventilation system
››› Fig. 76 and air conditioning system ››› Fig. 77.
Air distribution towards the windscreen and the footwell.
Air conditioner: press the button to turn off/on the cooling system
››› page 82.
4 Air conditioner: sliding control for air recirculation ››› page 84.
Switching offTurn the air fan switch 2 to position 0.Heated rear window
The heated rear window button
is located
on the centre console. The heated rear win-
dow only works when the engine is running
and switches off automatically after a maxi-
mum of 10 minutes. WARNING
Never turn off the air fan for a long time or the
air in the vehicle interior will not be refresh-
ed.
● Stuffy or used air will increase fatigue and
reduce driver and passenger concentration
possibly resulting in a serious accident. Heating and ventilation system user
instructions
Temperature
The desired temperature for the interior can-
not be lower than that of the exterior air tem- perature, as the heating and fresh air system
cannot cool or dehumidify the air.
Setting for conditions of optimal visibility
● Set the fan ››› Fig. 76 2 to setting 1 or 2.
● Turn the temperature control ››› Fig. 76 1 to the centre position.
●
Open and direct the air outlets in the dash
panel ››› page 83.
● Turn the air di
stribution control
››› Fig. 76 3 to the required position.
User instructions for the air
conditioner* The interior cooling system only works when
the engine is running and the fan is switched
on.
The air conditioning operates most effective-
ly with the windows closed. However, if the
vehicle has heated up after standing in thesun for some time, the air inside can be
cooled more quickly by opening the windows
briefly.
Setting for conditions of optimal visibility
When the air conditioning is switched on, the
temperature and the air humidity in the vehi-
cle interior drop. In this way, when the out-
side air humidity is high, the windows do not
mist over and comfort for the vehicle occu-
pants is improved.
● Disable air recirculation mode
››› page 84.
● Set the f
an to the required setting.
● Turn the temperature control to the centre
position.
● Open and direct the air outlets in the dash
panel ››› page 83.
● Turn the air di
stribution control to the de-
frost position.
82
Page 85 of 219

Air conditioning
● Press the A/C button to switch it on. The in-
dicator on the button will light up.
The cooling system does not switch on
If the air conditioning system cannot be
switched on, this may be caused by the fol-
lowing:
● The engine is not running.
● The fan is switched off.
● The air conditioner fuse has blown. ●
The outside temperature is lower than ap-
proximately +2 °C (+36 °F).
● The air conditioner compressor has been
temporarily switched off because the engine
coolant temperature is too high.
● Another fault in the vehicle. Have the air
conditioner checked by a specialised work-
shop.
Things to note
If the humidity and temperature outside the
vehicle are high, condensation
can drip off the ev aporator in the cooling system and
form a pool underneath the vehicle. This is
normal and does not indicate a leak! Note
After starting it, any residual humidity in the
air conditioner could mist over the wind-
screen. Switch on the defrost function as
soon as possible to clear the windscreen of
condensation. Air vents
Fig. 78
Dash panel: Air vents Air vents
Never close the air vents
››› Fig. 78 A com-
pletely to ensure heating, cooling and venti-
lation inside the vehicle. ●
To open the air vents press the recess with
one slat.
● Change the air direction by turning the
slats.
● To close the air vents, fold the slats. There are additional air vents in the centre of
the dash panel and in the footwell area.
»
83
Technical specifications
Advice
Operation
Safety
Page 86 of 219

Operation
CAUTION
Never place food, medicines or other heat-
sensitive objects close to the air vents. Being
heat-sensitive, they may be damaged or
made unsuitable for use by the air coming
from the air vents. Air recirculation
Important
Air recirculation mode prevents the ambient
air from entering the interior.
When the outside temperature is very high or
very low, selecting manual air recirculation
mode for a short period refreshes or heats
the interior more quickly.
● Switch off air recirculation mode by turning
the air distribution control to the ››› po-
sition.
Switching the air recirculation mode on and
off
Switching on: Move the sliding control
› ›
› Fig. 77 4 to the right to maximum.
Switching off: Move the sliding control
› ›
› Fig. 77 4 to the left to maximum. WARNING
Stuffy or used air will increase fatigue and re-
duce driver concentration possibly resulting
in a serious accident.
● Never use recirculation mode for long peri-
ods as it does not refresh the air inside the
vehicle.
● If the cooling system is switched off and air
recirculation mode switched on, the windows
can mist over very quickly, considerably limit-
ing visibility.
● Switch air recirculation mode off when it is
not required. CAUTION
Do not smoke when the air recirculation is ac-
tivated. The smoke taken in could lie on the
cooling system vaporiser and on the dust and
pollen filter, leading to a permanently un-
pleasant smell. Driving
Steering Introduction The power steering* is not hydraulic but elec-
tromechanical. The advantage of this steer-
ing system is that it disposes of hydraulic
tubes, hydraulic oil, the pump, filter and oth-
er components. The electromechanical sys-
tem saves fuel. While a hydraulic system re-
quires oil pressure to be maintained, electro-
mechanical steering only requires energy
when the steering wheel is turned.
With the power steering system, the assisted
steering function automatically adjusts ac-
cording to the vehicle speed, the steering tor-
que and the wheel turning angle. The power
steering only works when the engine is run-
ning.
WARNING
If the power steering is not working then the
steering wheel is much more difficult to turn
and the vehicle more difficult to control.
● The power steering only works when the
engine is running.
● Never allow the vehicle to move when the
engine is switched off.
● Never remove the key from the ignition if
the vehicle is in motion. The steering may 84
Page 87 of 219
Power steering
faulty.
The steering system
should be checked
b")
Driving
lock and it will not be possible to turn the
steering wheel.
Control and warning lampsIt lights
upPossible causeSolution
(red)Power steering
faulty.
The steering system
should be checked
by a specialised
workshop as soon as
possible.
(yellow)Power steering op-
eration reduced.
The steering system
should be checked
by a specialised
workshop as soon as
possible.
If, after restarting the
engine and driving
for a short distance,
the yellow warning
lamp no longer
comes on, it will
not
be necessary to take
the vehicle to a spe-
cialised workshop.
FlashesPossible causeSolution
(red)
Fault in the steer-
ing column elec-
tronic lock. Do not drive on!
Seek professional
advice.
FlashesPossible causeSolution
(yellow)
Steering column
deviation.Gently turn the steer-
ing wheel to and fro.
Steering wheel not
unlocked or
locked.
Remove the key from
the ignition and then
switch the ignition
back on. If necessa-
ry, check the mes-
sages displayed on
the instrument panel
display.
Do not drive on, if
the steering column
remains locked after
the ignition has
been switched on.
Seek specialist as-
sistance. Several warning and control lamps light up
for a few seconds when the ignition is switch-
ed on, signalling that the function is being
verified. They will switch off after a few sec-
onds.
WARNING
If the warning lamps are ignored, the vehicle
may stall in traffic, or may cause accidents
and severe injuries.
● Never ignore the warning lamps.
● Stop the vehicle safely as soon as possible. CAUTION
Failure to heed the warning lamps when they
appear may result in faults in the vehicle. Information on the steering
To prevent theft, we recommend you lock the
steering before leaving the vehicle.
Mechanical steering lock
Lock the steering column by removing the
key from the ignition when the vehicle is
stopped.
Please engage steer-
ing lockUnlocking the steering
Parking the vehicle
››› page 89.Insert the key in the igni-
tion lock.
Remove the key from the
ignition.Turn the steering wheel
slightly to release the
steering lock.
Turn the steering wheel
slightly until you hear the
steering lock.Hold the steering wheel in
this position and switch
on the ignition. Electromechanical power steering
With the power steering system, the assisted
steering function automatically adjusts ac-
cording to the vehicle speed, the steering tor-
que and the wheel turning angle. The power
»
85
Technical specifications
Advice
Operation
Safety
Page 88 of 219

Operation
steering only works when the engine is run-
ning.
You should remember that you will need con-
siderably more power than normal to steer
the vehicle if the power steering is not work-
ing correctly or not at all.
Stopping and starting the
engine
Introduction Immobiliser display
When an invalid key is used or in the event of
a system fault, is displayed on the instru-
ment panel. The engine cannot be started.
Pushing or towing
For technical reasons, the vehicle must
not
be push- or tow-started. Jump starting is pref-
erable. WARNING
Switching off the engine while driving makes
stopping the vehicle difficult. As a conse-
quence you may lose control of the vehicle
and there is a risk of serious accident.
● The assisted braking and steering systems,
the airbag system, seat belts and certain safety equipment are only active while the
engine is running.
●
The engine should only be switched off
when the vehicle is at a standstill. WARNING
While the engine is running or starting it
could help reduce the risk of serious injury.
● Never start or leave the engine running in
poorly ventilated or closed spaces. Exhaust
gas contains carbon monoxide, a toxic, col-
ourless and odourless gas. Carbon monoxide
can cause people to lose consciousness. It
can also cause death.
● Never leave the vehicle unattended if the
engine is running. The vehicle could move off
suddenly or something unexpected could
happen resulting in damage and serious in-
jury.
● Never use start boosters. Cold start sprays
could explode or increase the engine speed
unexpectedly. WARNING
The components of the exhaust system reach
very high temperatures. This could cause a
fire and considerable damage.
● Always park your vehicle so that no part of
the exhaust system can come in contact with
flammable materials (such as wood, leaves,
spilled fuel, dried grass, etc). ●
Never apply additional underseal or anti-
corrosion coatings to the exhaust pipes, cata-
lytic converter or the heat shields on the ex-
haust system. Ignition lock
Fig. 79
Vehicle key positions Car keys ››› Fig. 79
No key in the ignition lock: The steering lock may
be activated.
0Ignition switched off. Key can be removed from
the vehicle.
1Ignition is switched on. The steering lock can be
unlocked.
2Switch on the engine. Release the key when the
engine has started. When it is released, the key
returns to position 1
.86
 1
1 2
2 3
3 4
4 5
5 6
6 7
7 8
8 9
9 10
10 11
11 12
12 13
13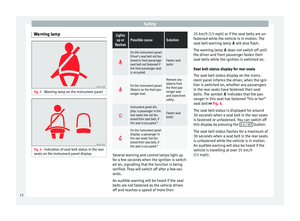 14
14 15
15 16
16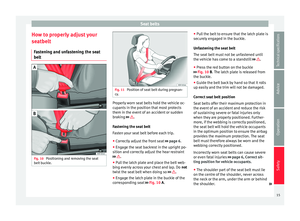 17
17 18
18 19
19 20
20 21
21 22
22 23
23 24
24 25
25 26
26 27
27 28
28 29
29 30
30 31
31 32
32 33
33 34
34 35
35 36
36 37
37 38
38 39
39 40
40 41
41 42
42 43
43 44
44 45
45 46
46 47
47 48
48 49
49 50
50 51
51 52
52 53
53 54
54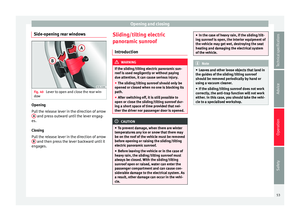 55
55 56
56 57
57 58
58 59
59 60
60 61
61 62
62 63
63 64
64 65
65 66
66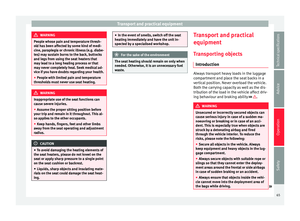 67
67 68
68 69
69 70
70 71
71 72
72 73
73 74
74 75
75 76
76 77
77 78
78 79
79 80
80 81
81 82
82 83
83 84
84 85
85 86
86 87
87 88
88 89
89 90
90 91
91 92
92 93
93 94
94 95
95 96
96 97
97 98
98 99
99 100
100 101
101 102
102 103
103 104
104 105
105 106
106 107
107 108
108 109
109 110
110 111
111 112
112 113
113 114
114 115
115 116
116 117
117 118
118 119
119 120
120 121
121 122
122 123
123 124
124 125
125 126
126 127
127 128
128 129
129 130
130 131
131 132
132 133
133 134
134 135
135 136
136 137
137 138
138 139
139 140
140 141
141 142
142 143
143 144
144 145
145 146
146 147
147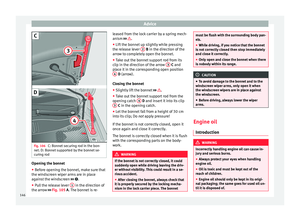 148
148 149
149 150
150 151
151 152
152 153
153 154
154 155
155 156
156 157
157 158
158 159
159 160
160 161
161 162
162 163
163 164
164 165
165 166
166 167
167 168
168 169
169 170
170 171
171 172
172 173
173 174
174 175
175 176
176 177
177 178
178 179
179 180
180 181
181 182
182 183
183 184
184 185
185 186
186 187
187 188
188 189
189 190
190 191
191 192
192 193
193 194
194 195
195 196
196 197
197 198
198 199
199 200
200 201
201 202
202 203
203 204
204 205
205 206
206 207
207 208
208 209
209 210
210 211
211 212
212 213
213 214
214 215
215 216
216 217
217 218
218