Page 49 of 377

To remove
To remove
the
head restraints, lift the head re-
straint with the height adjusting knob (A) pushed in.
To install
Confirm that the head restraint is facing the correct
direction, and then insert it into the seatback while
pressing the height adjusting knob (A) in the direc-
tion indicated by the arrow. CAUTION
l
Confirm that
the
height adjusting knob
(A) is correctly adjusted as shown in the
illustration, and also lift the head re-
straints to ensure that they do not come
out of the seatback. CAUTION
l
The head
restraints
for the seats differ in
shape and size. When installing head re-
straints, make sure the head restraints
are fitted in their respective seats. Making a luggage area
E00403400013 CAUTION
l
Do not
stack
luggage above the seatback
height.
Secure the luggage firmly.
Serious accidents could result due to un-
restrained objects entering the passenger
compartment during sudden braking.
l When folding, storing or removing the
seat, be sure not to catch your hand or leg.
Folding the rear seatbacks forward (3-
door models) /
Folding the second seat-
backs forward (5-door models) E00403500232
The passenger and luggage compartments can be
joined by folding
the rear (3-door models) / second
(5-door models) seatback forward. This is useful
for carrying long objects.
To fold
1. If your vehicle is equipped with a rear shelf (3-door models) / cargo area cover (5-door mod-
els), remove it before performing the follow-
ing steps. Refer to “Rear shelf (3-door mod-
els)” on page 5-95 and “Cargo area cover (5-
door models)” on page 5-96. Seat and seat belts
2-12
2
OBKE12E1
Page 50 of 377

2. Lift up the knob (A) behind the seatback,
then tilt the seatback forward. NOTE
l Each
seatback can
be folded forward using
the knob on its side.
3. Push the seat until you hear a “click” and the seat locks securely. To replace
Raise the seatback until it locks securely into place. Push lightly on the seatback to confirm that it has
actually been secured.
Folding the rear seats (3-door mod-
els) / Folding the second seats (5-door
models)
E00403700221
To create luggage space, you can fold the rear (3-
door models) / second (5-door models) seats.
If your vehicle
is equipped with the third seat, by
folding the second seat, you can get in and out easier. WARNING
l When driving
the
vehicle, do not allow
anyone to sit on the third seat if the sec-
ond seat is in the foldeddown position.
The second seat could tip rearward in the
event of hard braking or a collision, result-
ing in serious injuries. To fold
1. If your vehicle
is equipped with a rear shelf (3-
door models) / cargo area cover (5-door mod-
els), remove it before performing the follow-
ing steps. Refer to “Rear shelf (3-door mod-
els)” on page 5-95 and “Cargo area cover (5-
door models)” on page 5-96.
2. Lift up the knob (A) behind the seatback, then tilt the seatback forward. 3. Lift the seat until you hear a “click”. Seat and seat belts
2-13 2
OBKE12E1
Page 51 of 377
To replace
1. Hold the seat with your hand, then return the
seat to its original position while pushing the
stopper (A). 2. Push the seat until you hear a “click” and the
seat locks securely. 3. Raise the seatback until it locks securely into
place. Push
lightly
on the seatback to confirm that
it has actually been secured. Storage of the third seat
E00404100235
By folding the third seat into the luggage floor box,
large articles can be stored in the vehicle.
To store
1. Remove the luggage
floor board (A) and the
head restraints (B). Refer to “Luggage floor
box” on page 5-93 and “Head restraints” on
page 2-11. 2. Stow the removed head restraints in the lug-
gage floor
box with their front faces facing
upward. NOTE
l Stowing
the head
restraints with their front
faces facing downward would prevent the
third seat from being stowed.
3. Pull up knob (C) on the side of the seatback, then tilt the seatback forward. Seat and seat belts
2-14
2
OBKE12E1
Page 52 of 377

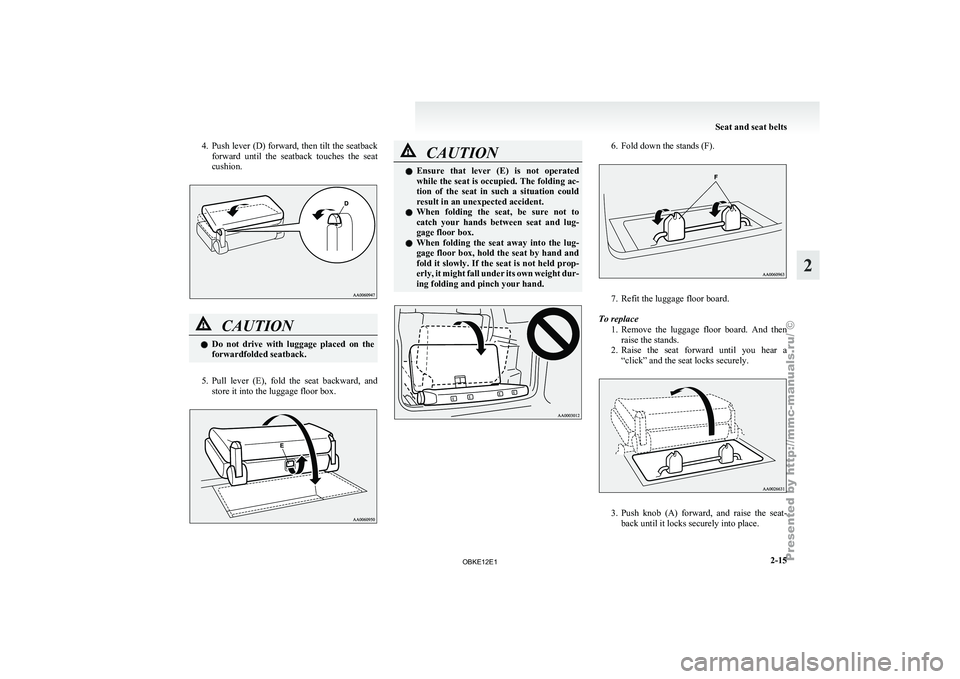
4. Push lever (D) forward, then tilt the seatback
forward until the seatback touches the seat
cushion. CAUTION
l
Do not
drive
with luggage placed on the
forwardfolded seatback.
5. Pull lever (E), fold the seat backward, and
store it into the luggage floor box. CAUTION
l
Ensure that lever
(E) is not operated
while the seat is occupied. The folding ac-
tion of the seat in such a situation could
result in an unexpected accident.
l When folding the seat, be sure not to
catch your hands between seat and lug-
gage floor box.
l When folding the seat away into the lug-
gage floor box, hold the seat by hand and
fold it slowly. If the seat is not held prop-
erly, it might fall under its own weight dur-
ing folding and pinch your hand. 6. Fold down the stands (F).
7. Refit the luggage floor board.
To replace 1. Remove the luggage
floor board. And then
raise the stands.
2. Raise the seat forward until you hear a “click” and the seat locks securely. 3. Push
knob (A) forward, and raise the seat-
back until it locks securely into place. Seat and seat belts
2-15 2
OBKE12E1
Page 53 of 377
After the operation, push lightly on the seat-
back to confirm
that it has actually been se-
cured. 4. Refit the luggage floor board and head re-
straints.
Removing the third seat E00404200177
To create
more luggage space, you can remove the
third seat. CAUTION
l
For safety,
do
not allow children to re-
move or refit the seat.
l Be careful not to trap your hands or feet
when removing or refitting the seat. Also,
be careful not to drop or trip over the
seat. If necessary, have someone help you
remove it.
To remove 1. Remove the head
restraints. Refer to “Head
restraints” on page 2-11. 2. Pull up knob (A) on the side of the seatback,
then tilt the seatback forward. 3. Push lever (B) forward, then tilt the seatback
forward until
the seatback touches the seat
cushion. 4. Pull the seat lock lever (C).
5. Fold the stands (D) towards you from the
seat side,
while lifting the front end of the seat.Seat and seat belts
2-16
2
OBKE12E1
Page 54 of 377
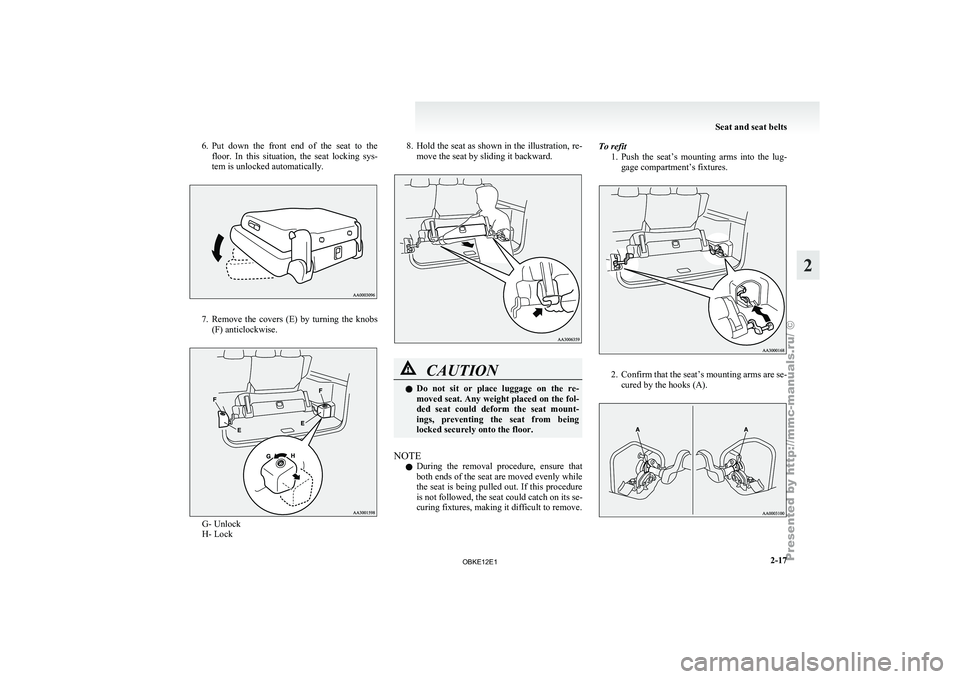
6. Put down the front end of the seat to the
floor. In this situation, the seat locking sys-
tem is unlocked automatically. 7. Remove the covers (E) by turning the knobs
(F) anticlockwise. G- Unlock
H- Lock 8. Hold the seat as shown in the illustration, re-
move the seat by sliding it backward. CAUTION
l
Do not
sit
or place luggage on the re-
moved seat. Any weight placed on the fol-
ded seat could deform the seat mount-
ings, preventing the seat from being
locked securely onto the floor.
NOTE l During
the removal
procedure, ensure that
both ends of the seat are moved evenly while
the seat is being pulled out. If this procedure
is not followed, the seat could catch on its se-
curing fixtures, making it difficult to remove. To refit
1. Push the
seat’s
mounting arms into the lug-
gage compartment’s fixtures. 2. Confirm that the seat’s mounting arms are se-
cured by the hooks (A). Seat and seat belts
2-17 2
OBKE12E1
Page 55 of 377

3. Fold the stands forward from the seat side,
while lifting the front end of the seat.
4. Refit
the covers on both sides of the luggage
room.
5. Push knob (B) forward, raise the seatback un- til it locks securely into place.
After the operation, push the seatback lightly
to confirm that it has actually been secured. 6. Refit the head restraints. Making a flat seat (Except for 3-
door models equipped with the power seat) E00404300631
By removing the
head restraints and fully reclining
the seatbacks of the seats, one large flat seat is ach-
ieved. WARNING
l Never drive
with
passengers on the flat
seat. This is highly dangerous. CAUTION
l
To make a
flat seat, stop the vehicle in a
safe place.
l Make sure the seat is adjusted by an
adult or with adult supervision for cor-
rect and safe operation.
l When sliding the seat, be sure not to
catch your hand or leg.
l Do not walk around on top of the seats af-
ter they have been laid flat.
l To ensure the seats are locked securely, at-
tempt to move them back and forth.
l Do not jump on, or impact the seatbacks
heavily.
l To raise the seatback, put a hand on the
seatback and raise slowly. Never have a
child do this operation, or an unexpected
accident may result. 1. If your vehicle is equipped with a rear shelf (3-
door models)
/ cargo area cover (5-door mod-
els), remove it before performing the follow-
ing steps. Refer to “Rear shelf (3-door mod-
els)” on page 5-95 and “Cargo area cover (5-
door models)” on page 5-96.
2. Remove the head restraints from the front seats.
If your vehicle is equipped with the third seat
(5-door models), store the third seat into the
luggage floor box.
Refer to “Head restraints” on page 2-11 and
“Storage of the third seat” on page 2-14. 3. Slide the front seats fully forward, then tip
their seatbacks backward.
On 5-door
models, slide the front seats back-
ward until their seatbacks touch the second
seat. Seat and seat belts
2-18
2
OBKE12E1
Page 56 of 377
Refer to “To adjust forward
or backward” on
page 2-05 and “To recline the seatback” on
page 2-06. 4. On 3-door models, remove the head re-
straints from the rear seat.
Recline the
rear (3-door models) / second (5-
door models) seatback backward. Refer to
“To recline the seatback” on page 2-09. NOTE
l On
5-door models,
each of the second seat’s
sidebacks (A) is foldable. When either side
of the seatback is reclined to a new position,
its sideback automatically folds inward ac-
cordingly. 5. On 3-door models, store the front head re-
straints and
rear centre head restraint be-
tween the front seats.
And store the rear outboard head restraints
on the side of the rear seat.
On 5-door models, store the front head re-
straints between the front seats.
The flat seat configuration is now complete. Reverse the above procedure when returning
the seat to the normal position.
5-door models
3-door models Seat and seat belts
2-19 2
OBKE12E1