2011 MITSUBISHI PAJERO IV turn signal bulb
[x] Cancel search: turn signal bulbPage 89 of 377

Indication lamps
E00501600012Turn-signal indication lamps/
Hazard warning indication
lamps
E00501700068
These indication lamps
blink on and off
when a turn-signal lamp is operating.
NOTE
l If the blinking is too fast, the
cause may be a blown lamp bulb
or a faulty turn-signal connection.
When the hazard warning lamp switch is
pressed, all turn-signal lamps will flash
on and off continuously. High-beam indication lamp
E00501800072
This indication lamp
illuminates when
the high-beam is used. Front fog lamp indication
lamp*
E00501900132
This indication lamp
illuminates while
the front fog lamps are on. Rear fog lamp indication lamp
E00502000084
This lamp illuminates
while the rear fog
lamp is on. Position lamp indication lamp
E00508900102
This lamp illuminates
with the lamp
switch at “ ” or “ ” position
Diesel preheat indication lamp
(diesel-powered vehicles)
E00502300146
This indication lamp
illuminates when
the ignition switch is placed in the “ON”
position. As the glow plug becomes hot,
the lamp goes out and the engine can be
started. CAUTION
l
If the
diesel
preheat indication
lamp comes on after the engine
is started, the engine speed may
not rise above the idling speed
because of fuel freezing. In this
case, keep the engine idling for
about ten minutes, then turn
off the ignition switch and im-
mediately turn it on again to
confirm that the diesel preheat
indication lamp is off.
NOTE l If
the engine
is cold, the diesel pre-
heat indication lamp is on for a lon-
ger time. l
When the
engine
has not been star-
ted within about 5 seconds after
the diesel preheat indication lamp
went out, return the ignition
switch to the “LOCK” position.
Then, turn the switch to the “ON”
position to preheat the engine
again.
l When the engine is warm, the die-
sel preheat indication lamp does
not come on even if the ignition
switch is placed in the “ON” posi-
tion. Fuel filter indication lamp (die-
sel-powered vehicles)
E00509900239
This indication lamp
illuminates when
the ignition switch is turned to the “ON”
position and goes off after the engine
has started. If it lights up while the en-
gine is running, it indicates that water
has accumulated inside the fuel filter; if
this happens, remove the water from the
fuel filter. Refer to “Removal of water
from the fuel filter (diesel-powered vehi-
cles only)” on page 6-06.
When the lamp goes out, you can re-
sume driving. If it either does not go out
or comes on from time to time, we rec-
ommend you to have the vehicle inspec-
ted. Instruments and controls
3-08
3
OBKE12E1
Page 116 of 377

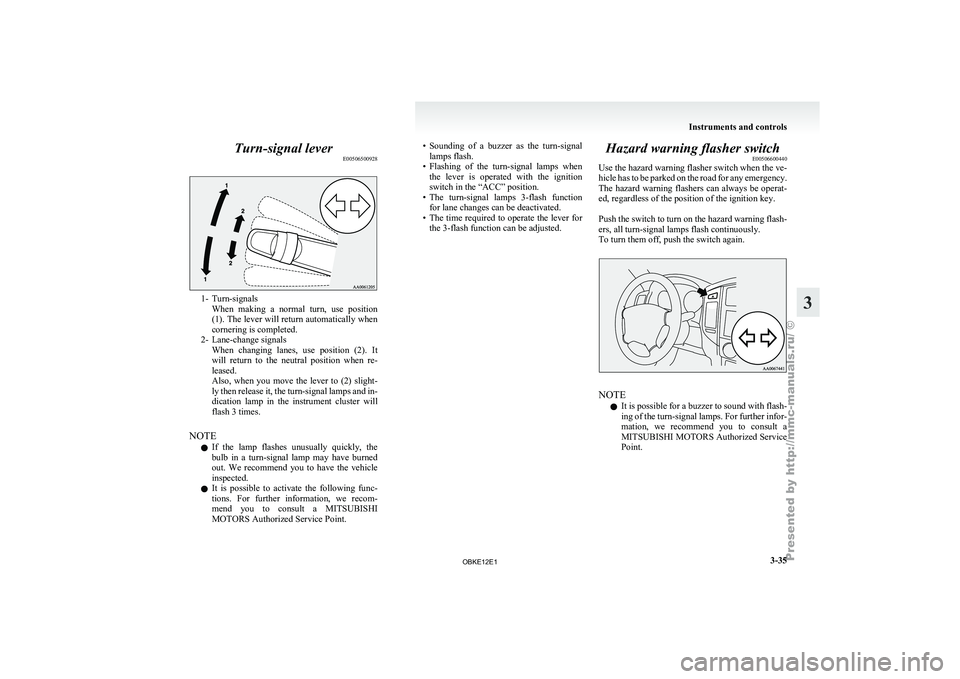
Turn-signal lever
E005065009281- Turn-signals
When making a
normal turn, use position
(1). The lever will return automatically when
cornering is completed.
2- Lane-change signals When changing lanes, use position (2). It
will return to the neutral position when re-
leased.
Also, when you move the lever to (2) slight-
ly then release it, the turn-signal lamps and in-
dication lamp in the instrument cluster will
flash 3 times.
NOTE l If the lamp flashes unusually quickly, the
bulb in a turn-signal lamp may have burned
out. We recommend you to have the vehicle
inspected.
l It is possible to activate the following func-
tions. For further information, we recom-
mend you to consult a MITSUBISHI
MOTORS Authorized Service Point. • Sounding
of a buzzer as the turn-signal
lamps flash.
• Flashing
of the turn-signal lamps when
the lever is operated with the ignition
switch in the “ACC” position.
• The turn-signal lamps 3-flash function for lane changes can be deactivated.
• The time required to operate the lever for the 3-flash function can be adjusted. Hazard warning flasher switch
E00506600440
Use the hazard
warning flasher switch when the ve-
hicle has to be parked on the road for any emergency.
The hazard warning flashers can always be operat-
ed, regardless of the position of the ignition key.
Push the switch to turn on the hazard warning flash-
ers, all turn-signal lamps flash continuously.
To turn them off, push the switch again. NOTE
l It
is possible
for a buzzer to sound with flash-
ing of the turn-signal lamps. For further infor-
mation, we recommend you to consult a
MITSUBISHI MOTORS Authorized Service
Point. Instruments and controls
3-35 3
OBKE12E1
Page 331 of 377

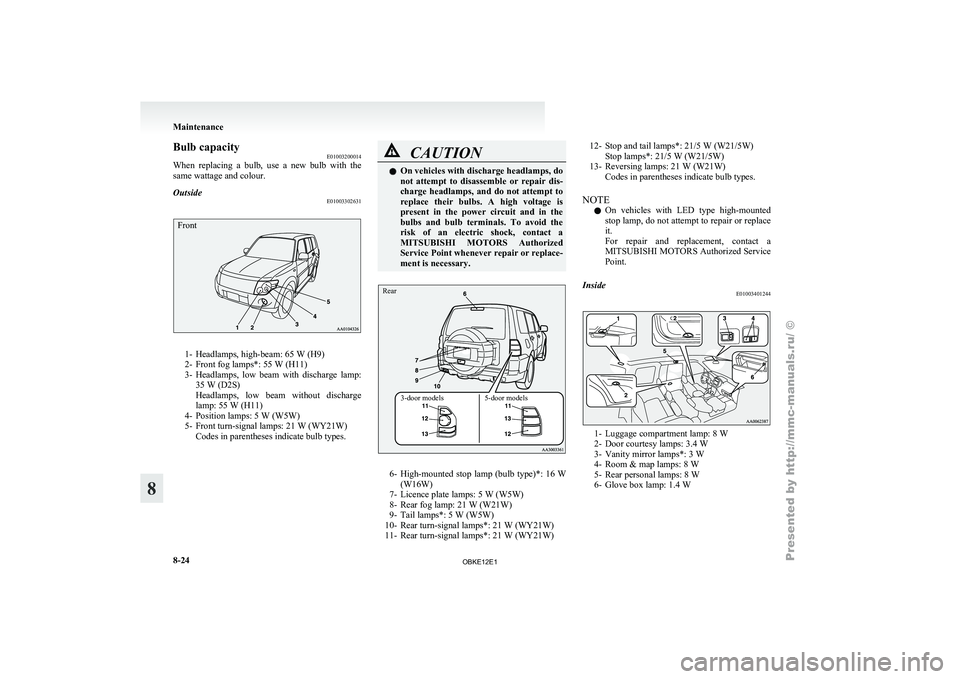
Bulb capacity
E01003200014
When replacing a
bulb, use a new bulb with the
same wattage and colour.
Outside E01003302631
Front1- Headlamps, high-beam: 65 W (H9)
2- Front fog lamps*: 55 W (H11)
3-
Headlamps,
low beam with discharge lamp:
35 W (D2S)
Headlamps, low beam without discharge
lamp: 55 W (H11)
4- Position lamps: 5 W (W5W)
5- Front turn-signal lamps: 21 W (WY21W) Codes in parentheses indicate bulb types. CAUTION
l
On vehicles with discharge headlamps, do
not attempt to
disassemble or repair dis-
charge headlamps, and do not attempt to
replace their bulbs. A high voltage is
present in the power circuit and in the
bulbs and bulb terminals. To avoid the
risk of an electric shock, contact a
MITSUBISHI MOTORS Authorized
Service Point whenever repair or replace-
ment is necessary.
3-door models 5-door models
Rear
6- High-mounted stop
lamp
(bulb type)*: 16 W
(W16W)
7- Licence plate lamps: 5 W (W5W)
8- Rear fog lamp: 21 W (W21W)
9- Tail lamps*: 5 W (W5W)
10- Rear turn-signal lamps*: 21 W (WY21W)
11- Rear turn-signal lamps*: 21 W (WY21W) 12- Stop and tail lamps*: 21/5 W (W21/5W)
Stop lamps*: 21/5 W (W21/5W)
13- Reversing lamps: 21 W (W21W) Codes in parentheses indicate bulb types.
NOTE l On
vehicles
with LED type high-mounted
stop lamp, do not attempt to repair or replace
it.
For repair and replacement, contact a
MITSUBISHI MOTORS Authorized Service
Point.
Inside E01003401244 1- Luggage compartment lamp: 8 W
2- Door courtesy lamps: 3.4 W
3-
Vanity mirror lamps*:
3 W
4- Room & map lamps: 8 W
5- Rear personal lamps: 8 W
6- Glove box lamp: 1.4 W Maintenance
8-24
8
OBKE12E1
Page 333 of 377

2. Remove the bulb from the socket by pulling
out. 3. To install the bulb, perform the removal
steps in reverse.
Front turn-signal lamps E01003800733
1. Turn
the
bulb socket anticlockwise to re-
move it.
2. Remove
the bulb from the socket by pulling
out. 3. To install the bulb, perform the removal
steps in reverse.
Front fog lamps* E01004001553
1. Remove the
5 clips (A, C) and screw (B) by
following procedures
then turn up the cover
(D). 2. Depress the tab (E) on the harness connector
(F) and
pull the harness connector to remove
it. 3. Remove the entire socket and bulb assembly
(G) by turning it anticlockwise. CAUTION
l
Handle halogen
lamp
bulbs with care.
The gas inside halogen lamp bulbs is high-
ly pressurized, so dropping, knocking, or
scratching a halogen lamp bulb can cause
it to shatter.
l Never hold the halogen lamp bulb with a
bare hand, dirty glove, etc.
The oil from your hand could cause the
bulb to break the next time the fog lamps
are operated. If the glass surface is dirty,
it must be cleaned with alcohol, paint thin-
ner, etc., and refit it after drying thorough-
ly. Maintenance
8-26
8
OBKE12E1
Page 334 of 377

4. To install the bulb, perform the removal
steps in reverse.
NOTE l When
refitting
the clips (H and I) of the cov-
er, push the pin (J). Rear combination lamps
E01004200659
On corner side 1.Remove the screws that hold the lamp unit.
2. Slide
the lamp unit out sideways to remove it.
Left side
Right side 3. Remove the socket and bulb assemblies by
turning them
anticlockwise. Remove the
bulb by pulling it out.
3-door models 5-door models A- Rear turn-signal lamp*
B- Stop and tail lamp* Stop lamp*
C- Reversing lamp
4.
To install the bulb, perform the removalsteps in reverse.
On bumper* 1. Remove the lens mounting screws. Maintenance
8-27 8
OBKE12E1
Page 335 of 377

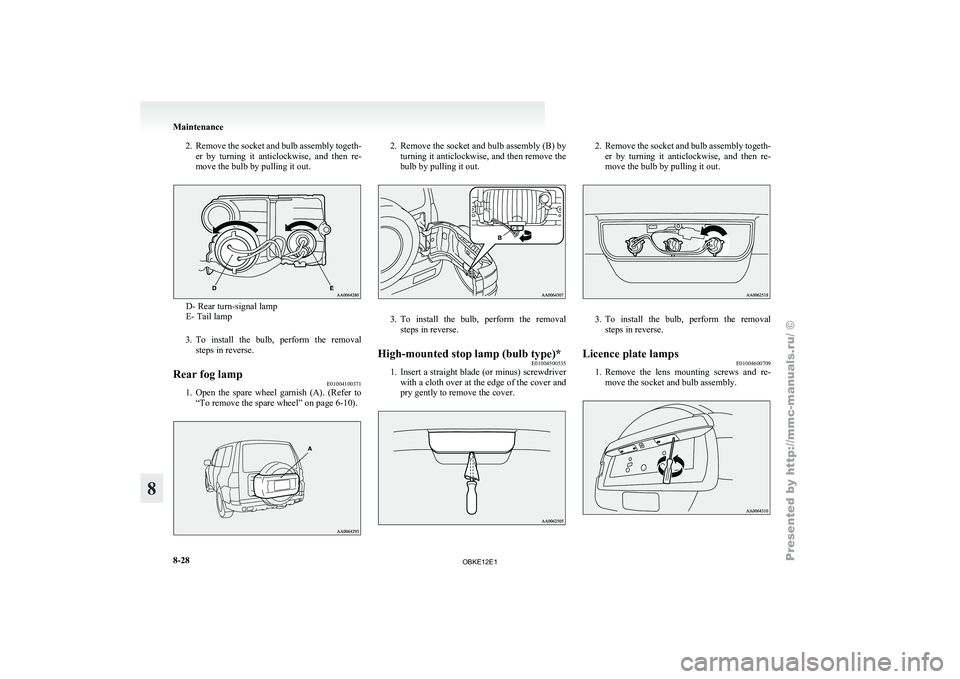
2. Remove the socket and bulb assembly togeth-
er by turning it anticlockwise, and then re-
move the bulb by pulling it out. D- Rear turn-signal lamp
E- Tail lamp
3. To install the
bulb, perform the removal
steps in reverse.
Rear fog lamp E01004100371
1. Open the spare wheel garnish (A). (Refer to
“To remove the spare wheel” on page 6-10). 2. Remove the socket and bulb assembly (B) by
turning it
anticlockwise, and then remove the
bulb by pulling it out. 3. To install the bulb, perform the removal
steps in reverse.
High-mounted stop lamp (bulb type)* E01004500535
1. Insert
a
straight blade (or minus) screwdriver
with a
cloth over at the edge of the cover and
pry gently to remove the cover. 2. Remove the socket and bulb assembly togeth-
er by
turning it anticlockwise, and then re-
move the bulb by pulling it out. 3. To install the bulb, perform the removal
steps in reverse.
Licence plate lamps E01004600709
1. Remove
the
lens mounting screws and re-
move the socket and bulb assembly. Maintenance
8-28
8
OBKE12E1
Page 359 of 377

Electrical system 9-11
Electronic immobilizer (Anti-theft starting sys-
tem) 1-03
Emergency starting 6-02
Engine Coolant 8-06,9-15
MIVEC 4-14
Number 9-02
Oil 8-04
Overheating 6-04
Specifications 9-10
Used engine oils safety instructions and disposal
information 06
Water temperature gauge 3-05
Error codes 5-59
Exterior and interior lamp operation
8-18
F Fluid
Automatic transmission fluid 9-15Brake fluid 8-08,9-15
Clutch fluid 8-09,9-15
Engine coolant 8-06,9-15
Manual transmission fluid 9-15
Power steering fluid 8-10,9-15
Washer fluid 8-07,9-15
Fog lamp switch 3-36
Foot lamps and ceiling lamp
5-90
For cold and snowy weather 8-19
Front automatic air conditioning 5-03
Front fog lamps Bulb capacity 8-24
Indication lamp 3-08
Replacement 8-26
Switch 3-36
Front passenger’s airbag OFF indication
lamp 2-36
Front seats 2-05 Front turn-signal lamps
Bulb capacity 8-24
Replacement 8-26
Fuel consumption 9-13
Fuel Filling the fuel tank
03
Fuel filter indication lamp 3-08
Fuel gauge 3-05
Fuel selection 02
Low fuel warning lamp 3-05
Modification/alterations to the electrical or fuel
systems 05
Tank capacity 03
Fuses 8-19
Fusible links 8-19
G Gauges 3-02
General maintenance 8-18
General vehicle data
9-04
Genuine parts 05
Glove box 5-92
Glove box lamp Bulb capacity
8-24
Replacement 8-31
H Handling of compact discs 5-65
Hazard warning flasher switch 3-35
Hazard warning indication lamps 3-08
Head restraints 2-11
Headlamp levelling
3-33
Headlamp washer switch 3-41
Headlamps Bulb capacity
8-24
Headlamp flasher 3-32
Replacement 8-25 Switch 3-31
Heated mirror 4-11
Heated seats 2-08
High-beam indication lamp 3-08
High-mounted stop lamp (bulb type) Replacement 8-28
High-mounted stop lamp Bulb capacity
8-24
Hinges and latches lubrication 8-18
Horn switch 3-43
I If the vehicle breaks down 6-02
Ignition switch 4-12
Indication lamps 3-08
Inside rear-view mirror 4-08
Inspection and maintenance following rough road
operation 4-35
Installation of accessories
04
Installation position for warning triangle
5-98
Instruments 3-02
Interior lamp switch 5-88
Interior lamps 5-87
J Jack handle 6-09
Jack
Storage 6-07
Jump starting (Emergency starting) 6-02
K Keyless entry system 1-04
Keys 1-02Alphabetical index
2
OBKE12E1
Page 360 of 377

L
Labeling 9-02
Lamp monitor buzzer 3-32
Lamps
(headlamps,
fog lamp, etc.) auto-cutout func-
tion 3-32
Leakage (Fuel, engine coolant, oil and exhaust
gas) 8-18
Licence plate lamps Bulb capacity 8-24
Replacement 8-28
Link System 5-67
Low fuel warning lamp 3-05
Lubricants 9-15
Luggage compartment lamp 5-89 Bulb capacity 8-24
Replacement 8-30
Luggage floor box 5-93
Luggage hooks 5-97
LW/MW/FM electronic tuning radio with CD au-
tochanger 5-26
LW/MW/FM electronic tuning radio with CD play-
er 5-12
MMaking a flat seat 2-18
Making a luggage area 2-12
Manual transmission 4-16
Oil 9-15
Mirror Inside rear-view mirror 4-08
Outside rear-view mirrors 4-10
MIVEC engine 4-14
Modification/alterations to
the electrical or fuel sys-
tems 05 OOdometer 3-02
Oil pressure warning lamp 3-10
Oil
Differential oil 9-15
Engine oil 8-04
Manual transmission oil 9-15
Transfer oil 9-15
Operation under adverse driving conditions 6-18
Outside rear-view mirrors 4-10
Overheating 6-04
P Parking 4-07
Parking brake 4-06
Position lamps Bulb capacity 8-24
Indication lamp 3-08
Replacement
8-25
Power brakes 4-37
Power steering Fluid 8-10,9-15
System 4-41
Precautions to observe when using wipers and wash-
ers 3-41
Pregnant women restraint 2-22
Puncture (Tyre changing) 6-09
R Radio
LW/MW/FM electronic tuning
radio with CD au-
tochanger 5-26
LW/MW/FM electronic tuning radio with CD
player 5-12
Rear air conditioning 5-10 Rear combination lamps
Bulb capacity 8-24
Replacement 8-27
Rear differential lock
4-29
Rear fog lamp Bulb capacity 8-24
Indication lamp 3-08
Replacement 8-28
Switch 3-36
Rear personal lamp Bulb capacity 8-24
Replacement 8-29
Rear personal lamps 5-89
Rear shelf (3-door models) 5-95
Rear side/quarter window 1-17
Rear turn-signal lamps Bulb capacity 8-24
Replacement 8-27
Rear window demister switch 3-42
Rear-view camera 4-52
Rear-view mirror Inside 4-08
Outside 4-10
Refill capacities 9-15
Removal of water from the fuel filter 6-06
Replacement of lamp bulbs 8-23
Reversing lamps Bulb capacity 8-24
Replacement 8-27
Reversing sensor system 4-49
Roof carrier precaution 4-56
Room & map lamps 5-88 Bulb capacity 8-24
Replacement 8-29
Running-in recommendations 4-04
S Safe driving techniques 4-03 Alphabetical index
3
OBKE12E1