Page 1090 of 3000
2GR-FE ENGINE MECHANICAL – ENGINE UNITEM–143
EM
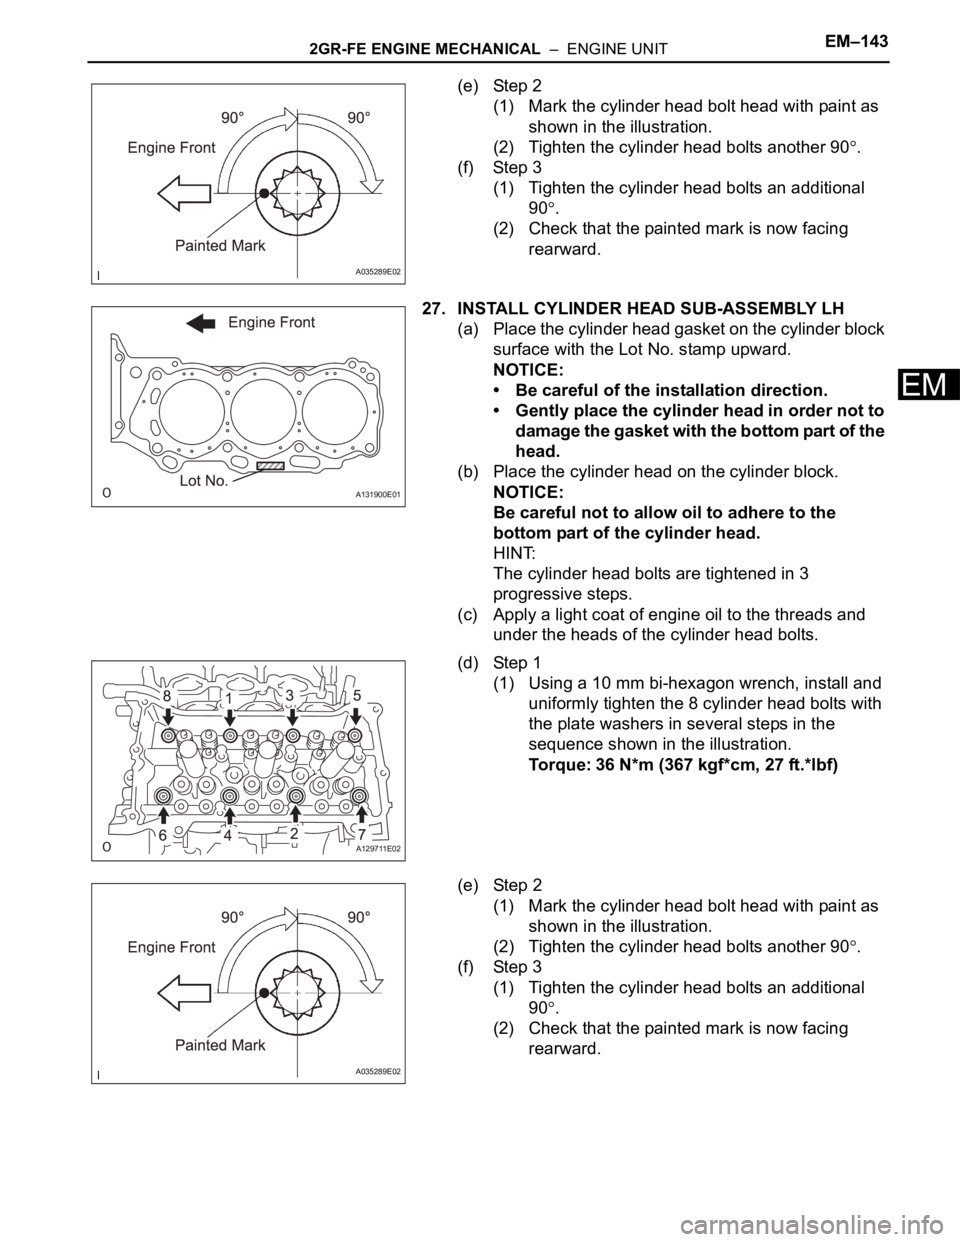
(e) Step 2
(1) Mark the cylinder head bolt head with paint as
shown in the illustration.
(2) Tighten the cylinder head bolts another 90
.
(f) Step 3
(1) Tighten the cylinder head bolts an additional
90
.
(2) Check that the painted mark is now facing
rearward.
27. INSTALL CYLINDER HEAD SUB-ASSEMBLY LH
(a) Place the cylinder head gasket on the cylinder block
surface with the Lot No. stamp upward.
NOTICE:
• Be careful of the installation direction.
• Gently place the cylinder head in order not to
damage the gasket with the bottom part of the
head.
(b) Place the cylinder head on the cylinder block.
NOTICE:
Be careful not to allow oil to adhere to the
bottom part of the cylinder head.
HINT:
The cylinder head bolts are tightened in 3
progressive steps.
(c) Apply a light coat of engine oil to the threads and
under the heads of the cylinder head bolts.
(d) Step 1
(1) Using a 10 mm bi-hexagon wrench, install and
uniformly tighten the 8 cylinder head bolts with
the plate washers in several steps in the
sequence shown in the illustration.
Torque: 36 N*m (367 kgf*cm, 27 ft.*lbf)
(e) Step 2
(1) Mark the cylinder head bolt head with paint as
shown in the illustration.
(2) Tighten the cylinder head bolts another 90
.
(f) Step 3
(1) Tighten the cylinder head bolts an additional
90
.
(2) Check that the painted mark is now facing
rearward.
A035289E02
A131900E01
A129711E02
A035289E02
Page 1091 of 3000
EM–1442GR-FE ENGINE MECHANICAL – ENGINE UNIT
EM
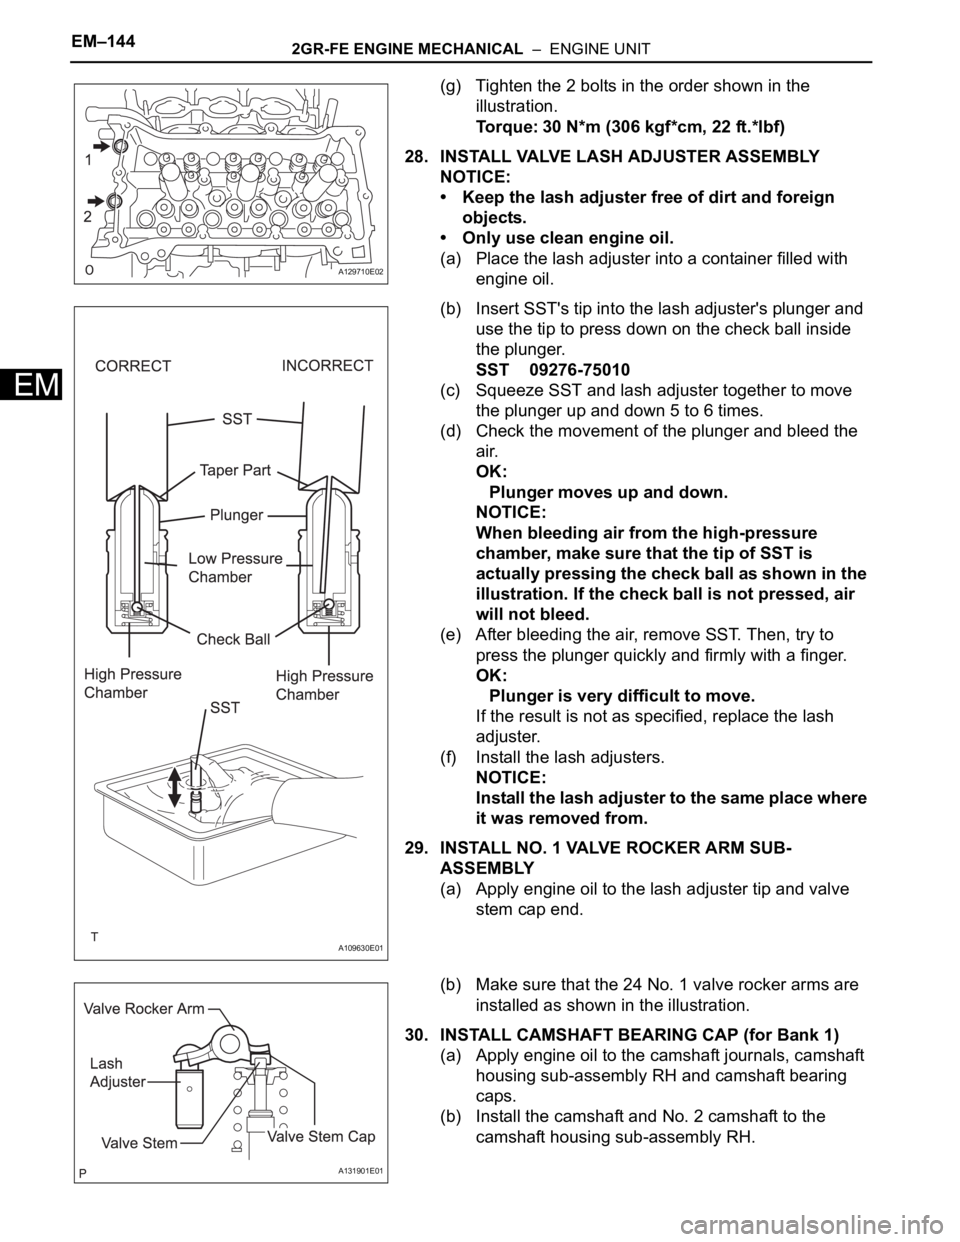
(g) Tighten the 2 bolts in the order shown in the
illustration.
Torque: 30 N*m (306 kgf*cm, 22 ft.*lbf)
28. INSTALL VALVE LASH ADJUSTER ASSEMBLY
NOTICE:
• Keep the lash adjuster free of dirt and foreign
objects.
• Only use clean engine oil.
(a) Place the lash adjuster into a container filled with
engine oil.
(b) Insert SST's tip into the lash adjuster's plunger and
use the tip to press down on the check ball inside
the plunger.
SST 09276-75010
(c) Squeeze SST and lash adjuster together to move
the plunger up and down 5 to 6 times.
(d) Check the movement of the plunger and bleed the
air.
OK:
Plunger moves up and down.
NOTICE:
When bleeding air from the high-pressure
chamber, make sure that the tip of SST is
actually pressing the check ball as shown in the
illustration. If the check ball is not pressed, air
will not bleed.
(e) After bleeding the air, remove SST. Then, try to
press the plunger quickly and firmly with a finger.
OK:
Plunger is very difficult to move.
If the result is not as specified, replace the lash
adjuster.
(f) Install the lash adjusters.
NOTICE:
Install the lash adjuster to the same place where
it was removed from.
29. INSTALL NO. 1 VALVE ROCKER ARM SUB-
ASSEMBLY
(a) Apply engine oil to the lash adjuster tip and valve
stem cap end.
(b) Make sure that the 24 No. 1 valve rocker arms are
installed as shown in the illustration.
30. INSTALL CAMSHAFT BEARING CAP (for Bank 1)
(a) Apply engine oil to the camshaft journals, camshaft
housing sub-assembly RH and camshaft bearing
caps.
(b) Install the camshaft and No. 2 camshaft to the
camshaft housing sub-assembly RH.
A129710E02
A109630E01
A131901E01
Page 1097 of 3000
EM–1502GR-FE ENGINE MECHANICAL – ENGINE UNIT
EM
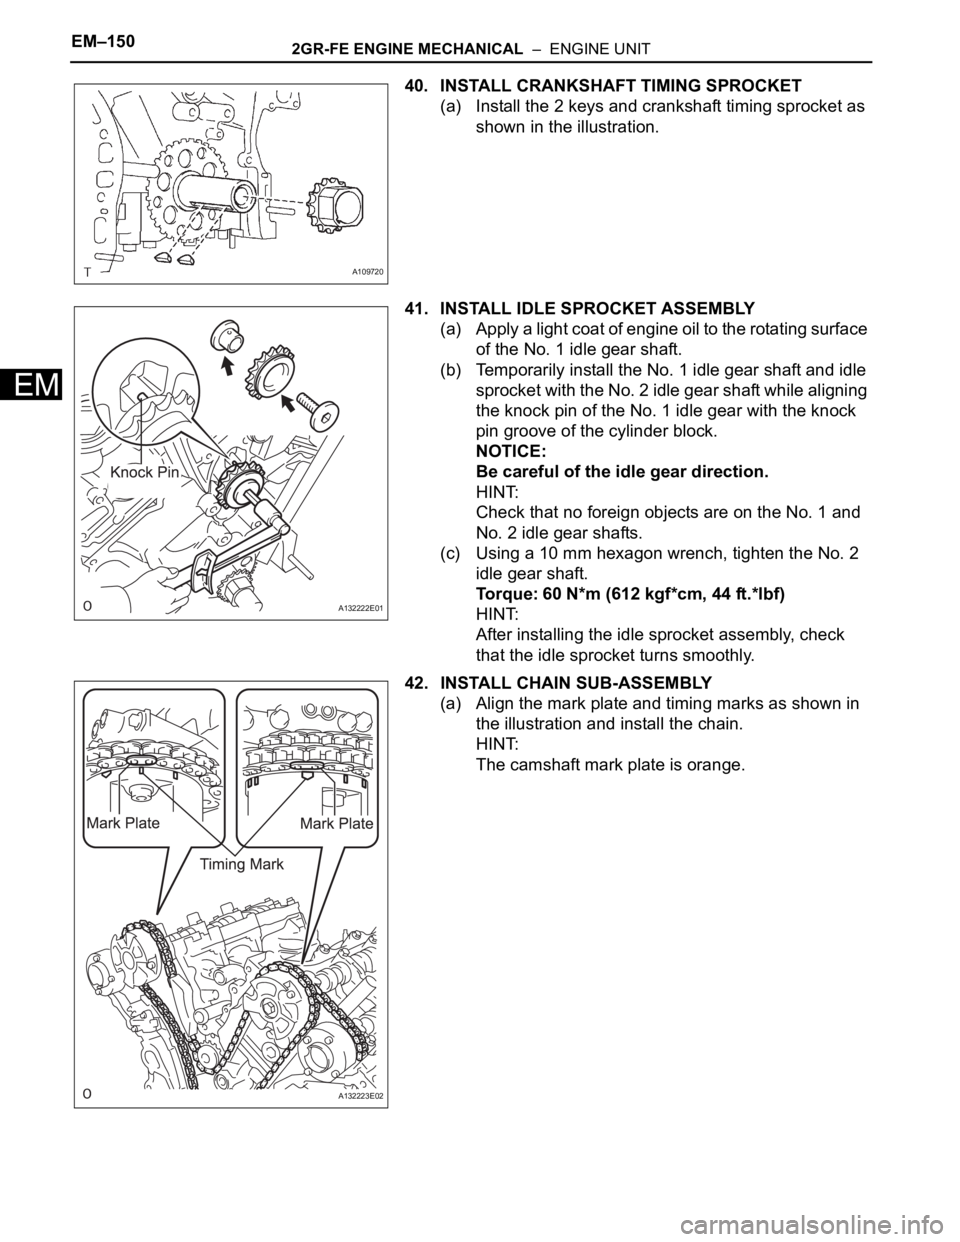
40. INSTALL CRANKSHAFT TIMING SPROCKET
(a) Install the 2 keys and crankshaft timing sprocket as
shown in the illustration.
41. INSTALL IDLE SPROCKET ASSEMBLY
(a) Apply a light coat of engine oil to the rotating surface
of the No. 1 idle gear shaft.
(b) Temporarily install the No. 1 idle gear shaft and idle
sprocket with the No. 2 idle gear shaft while aligning
the knock pin of the No. 1 idle gear with the knock
pin groove of the cylinder block.
NOTICE:
Be careful of the idle gear direction.
HINT:
Check that no foreign objects are on the No. 1 and
No. 2 idle gear shafts.
(c) Using a 10 mm hexagon wrench, tighten the No. 2
idle gear shaft.
Torque: 60 N*m (612 kgf*cm, 44 ft.*lbf)
HINT:
After installing the idle sprocket assembly, check
that the idle sprocket turns smoothly.
42. INSTALL CHAIN SUB-ASSEMBLY
(a) Align the mark plate and timing marks as shown in
the illustration and install the chain.
HINT:
The camshaft mark plate is orange.
A109720
A132222E01
A132223E02
Page 1100 of 3000
2GR-FE ENGINE MECHANICAL – ENGINE UNITEM–153
EM
(d) Remove the hexagon wrench of the chain tensioner.
Check that each timing mark is aligned with the
crankshaft at the TDC / compression.
(e) Remove the pulley set bolt.
45. INSTALL TIMING CHAIN CASE OIL SEAL
(a) Using SST, tap in a new oil seal until its surface is
flush with the timing gear case edge.
SST 09223-22010, 09506-35010
NOTICE:
• Keep the lip free of foreign matter.
• Do not tap on the oil seal at an angle.
• Make sure that the oil seal edge does not
stick out of the timing chain case.
A134895E05
A125109E04
Page 1110 of 3000
2GR-FE ENGINE MECHANICAL – ENGINE UNITEM–163
EM
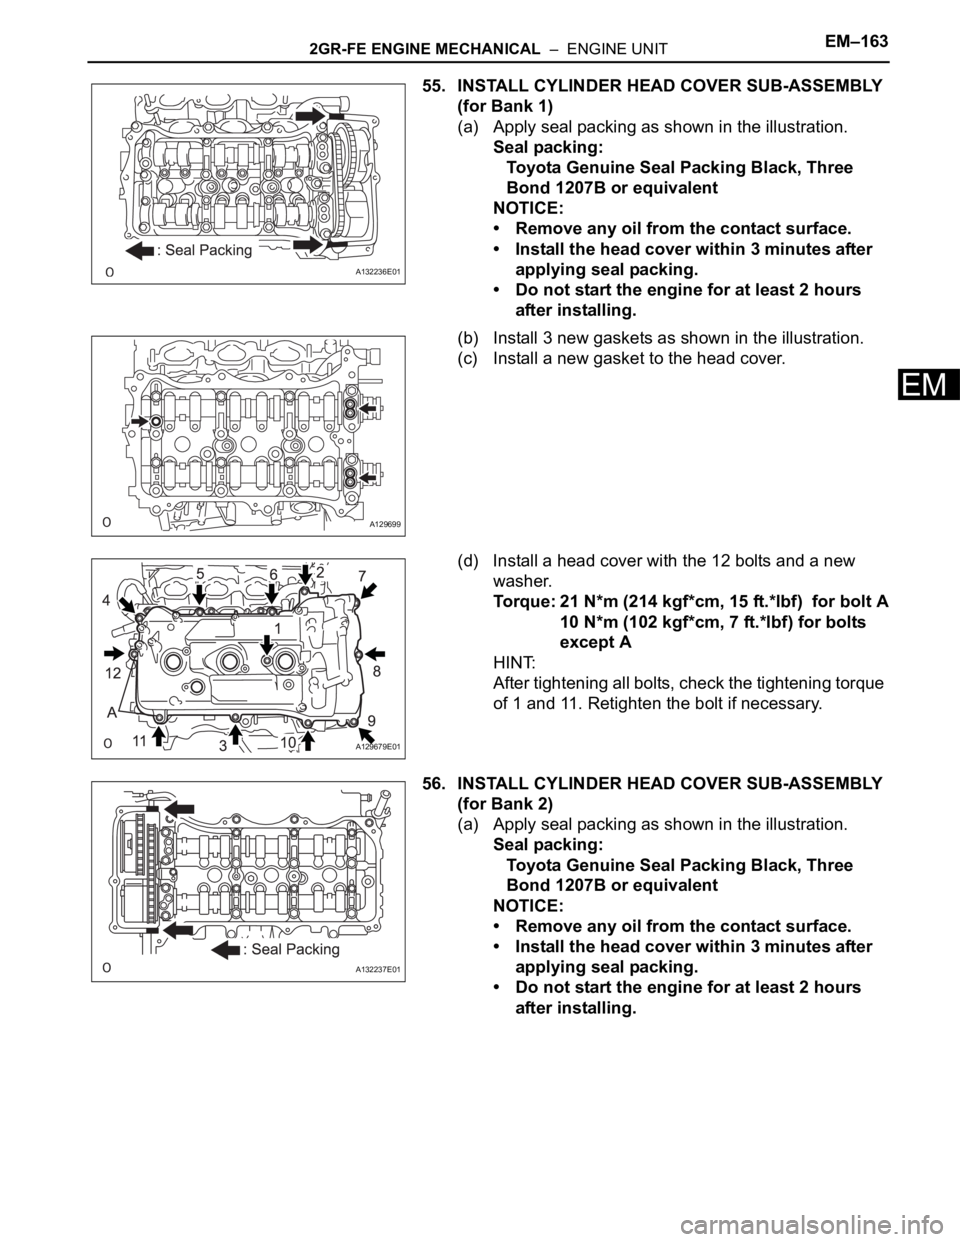
55. INSTALL CYLINDER HEAD COVER SUB-ASSEMBLY
(for Bank 1)
(a) Apply seal packing as shown in the illustration.
Seal packing:
Toyota Genuine Seal Packing Black, Three
Bond 1207B or equivalent
NOTICE:
• Remove any oil from the contact surface.
• Install the head cover within 3 minutes after
applying seal packing.
• Do not start the engine for at least 2 hours
after installing.
(b) Install 3 new gaskets as shown in the illustration.
(c) Install a new gasket to the head cover.
(d) Install a head cover with the 12 bolts and a new
washer.
Torque: 21 N*m (214 kgf*cm, 15 ft.*lbf) for bolt A
10 N*m (102 kgf*cm, 7 ft.*lbf) for bolts
except A
HINT:
After tightening all bolts, check the tightening torque
of 1 and 11. Retighten the bolt if necessary.
56. INSTALL CYLINDER HEAD COVER SUB-ASSEMBLY
(for Bank 2)
(a) Apply seal packing as shown in the illustration.
Seal packing:
Toyota Genuine Seal Packing Black, Three
Bond 1207B or equivalent
NOTICE:
• Remove any oil from the contact surface.
• Install the head cover within 3 minutes after
applying seal packing.
• Do not start the engine for at least 2 hours
after installing.
A132236E01
A129699
A129679E01
A132237E01
Page 1111 of 3000
EM–1642GR-FE ENGINE MECHANICAL – ENGINE UNIT
EM
(b) Install 3 new gaskets as shown in the illustration.
(c) Install a new cylinder head cover gasket to the
cylinder head cover sub-assembly.
(d) Install the cylinder head cover with the 12 bolts and
a new washer.
Torque: 21 N*m (214 kgf*cm, 15 ft.*lbf) for bolt A
10 N*m (102 kgf*cm, 7 ft.*lbf) for bolts
except A
HINT:
After tightening all bolts, check the tightening torque
of 1 and 10. Retighten the bolt if necessary.
57. INSTALL WATER OUTLET
(a) Install 2 new gaskets and a new O-ring.
HINT:
Apply soapy water to the O-ring.
(b) Install the water outlet with the 2 bolts and 4 nuts.
Torque: 10 N*m (102 kgf*cm, 7 ft.*lbf) for bolts
10 N*m (103 kgf*cm, 7 ft.*lbf) for nuts
NOTICE:
Be careful that the O-ring does not get caught
between the parts.
A129705
A129678E03
A129677
A129676E01
Page 1114 of 3000
2GR-FE ENGINE MECHANICAL – ENGINE UNITEM–167
EM
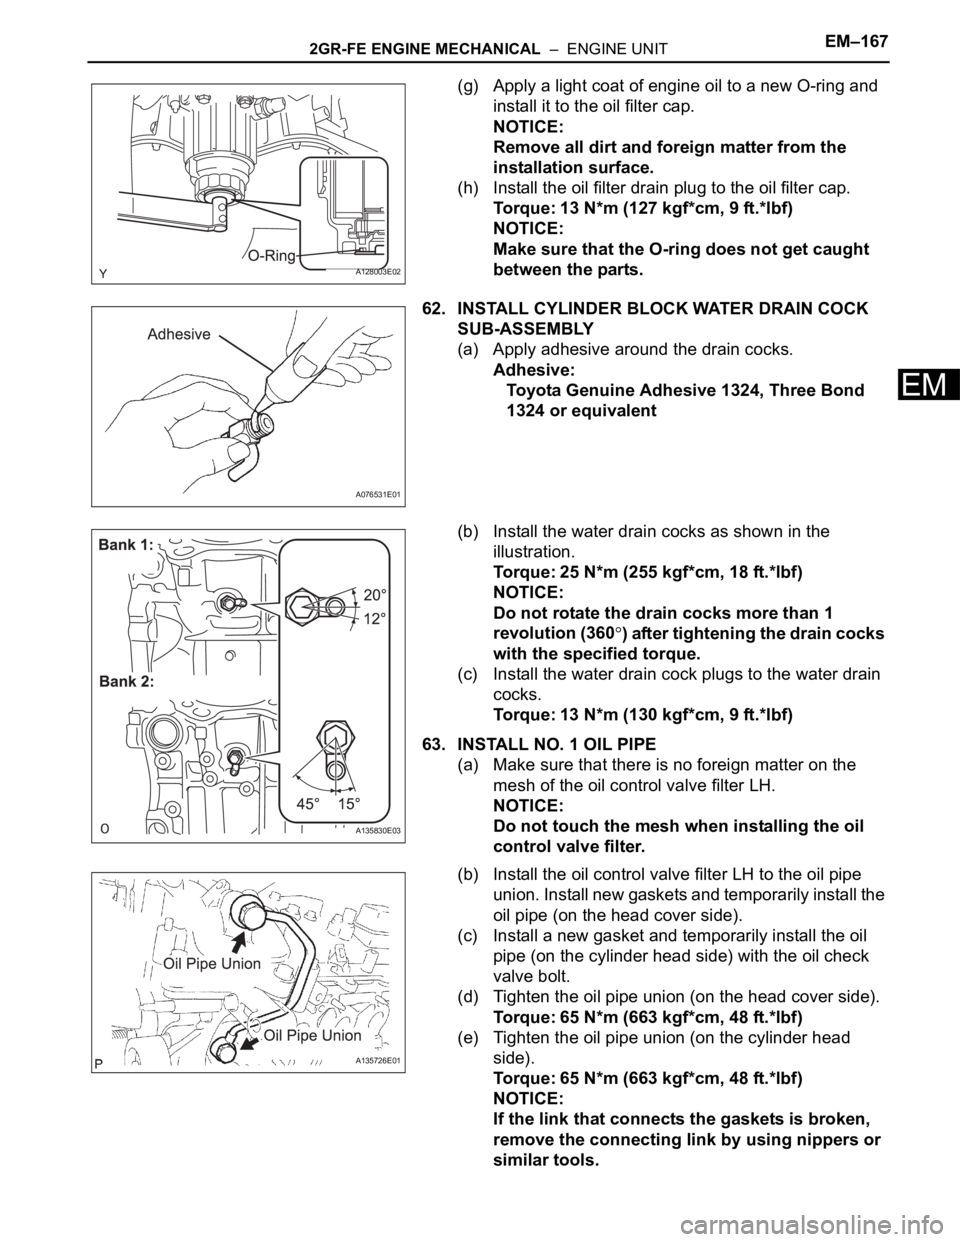
(g) Apply a light coat of engine oil to a new O-ring and
install it to the oil filter cap.
NOTICE:
Remove all dirt and foreign matter from the
installation surface.
(h) Install the oil filter drain plug to the oil filter cap.
Torque: 13 N*m (127 kgf*cm, 9 ft.*lbf)
NOTICE:
Make sure that the O-ring does not get caught
between the parts.
62. INSTALL CYLINDER BLOCK WATER DRAIN COCK
SUB-ASSEMBLY
(a) Apply adhesive around the drain cocks.
Adhesive:
Toyota Genuine Adhesive 1324, Three Bond
1324 or equivalent
(b) Install the water drain cocks as shown in the
illustration.
Torque: 25 N*m (255 kgf*cm, 18 ft.*lbf)
NOTICE:
Do not rotate the drain cocks more than 1
revolution (360
) after tightening the drain cocks
with the specified torque.
(c) Install the water drain cock plugs to the water drain
cocks.
Torque: 13 N*m (130 kgf*cm, 9 ft.*lbf)
63. INSTALL NO. 1 OIL PIPE
(a) Make sure that there is no foreign matter on the
mesh of the oil control valve filter LH.
NOTICE:
Do not touch the mesh when installing the oil
control valve filter.
(b) Install the oil control valve filter LH to the oil pipe
union. Install new gaskets and temporarily install the
oil pipe (on the head cover side).
(c) Install a new gasket and temporarily install the oil
pipe (on the cylinder head side) with the oil check
valve bolt.
(d) Tighten the oil pipe union (on the head cover side).
Torque: 65 N*m (663 kgf*cm, 48 ft.*lbf)
(e) Tighten the oil pipe union (on the cylinder head
side).
Torque: 65 N*m (663 kgf*cm, 48 ft.*lbf)
NOTICE:
If the link that connects the gaskets is broken,
remove the connecting link by using nippers or
similar tools.
A128003E02
A076531E01
A135830E03
A135726E01
Page 1115 of 3000
EM–1682GR-FE ENGINE MECHANICAL – ENGINE UNIT
EM
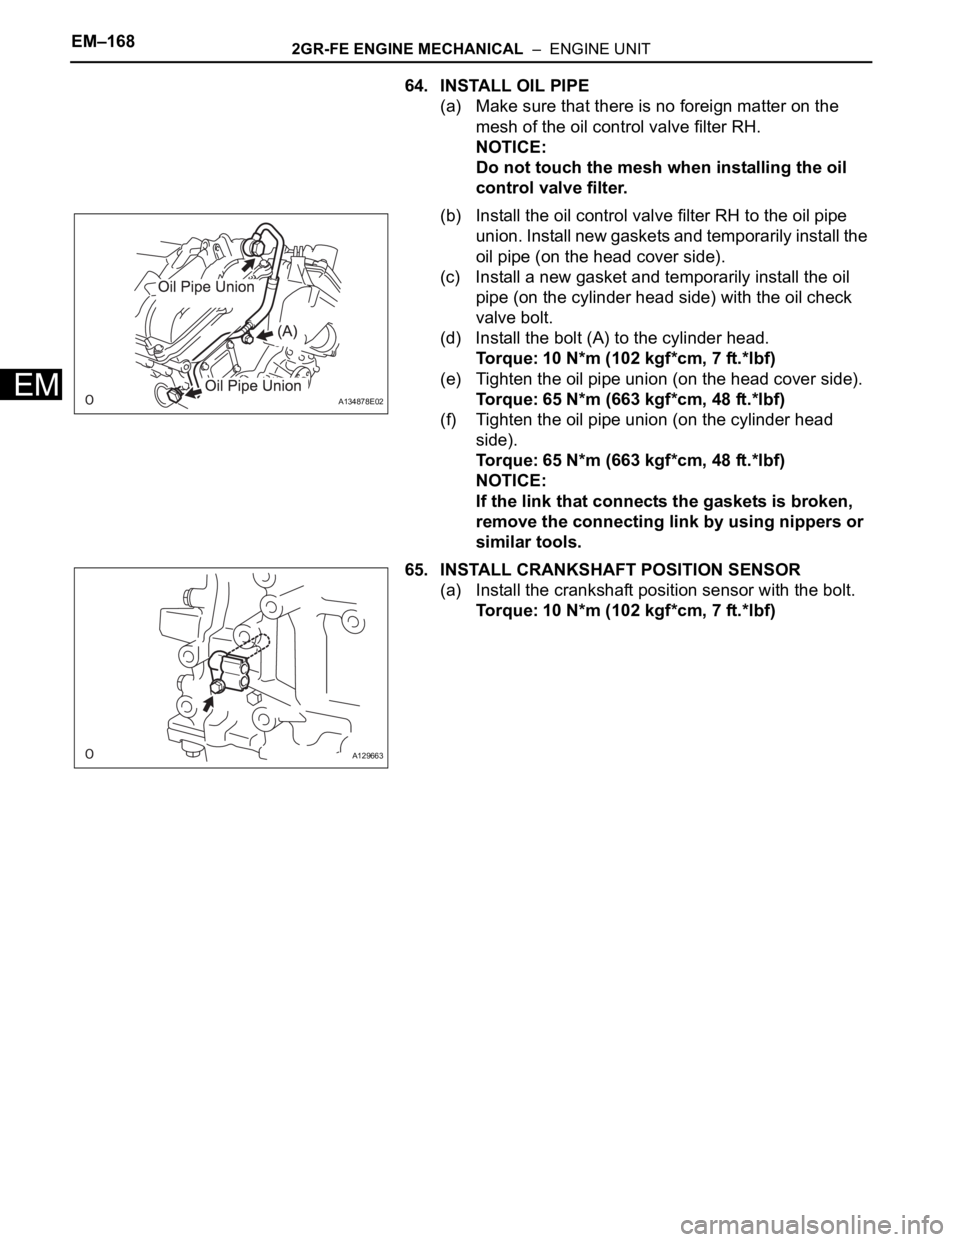
64. INSTALL OIL PIPE
(a) Make sure that there is no foreign matter on the
mesh of the oil control valve filter RH.
NOTICE:
Do not touch the mesh when installing the oil
control valve filter.
(b) Install the oil control valve filter RH to the oil pipe
union. Install new gaskets and temporarily install the
oil pipe (on the head cover side).
(c) Install a new gasket and temporarily install the oil
pipe (on the cylinder head side) with the oil check
valve bolt.
(d) Install the bolt (A) to the cylinder head.
Torque: 10 N*m (102 kgf*cm, 7 ft.*lbf)
(e) Tighten the oil pipe union (on the head cover side).
Torque: 65 N*m (663 kgf*cm, 48 ft.*lbf)
(f) Tighten the oil pipe union (on the cylinder head
side).
Torque: 65 N*m (663 kgf*cm, 48 ft.*lbf)
NOTICE:
If the link that connects the gaskets is broken,
remove the connecting link by using nippers or
similar tools.
65. INSTALL CRANKSHAFT POSITION SENSOR
(a) Install the crankshaft position sensor with the bolt.
Torque: 10 N*m (102 kgf*cm, 7 ft.*lbf)
A134878E02
A129663