Page 2785 of 3229
65
Child safety
R
Child restraint check list
Every time a child travels in the vehicle observe
the following :-
• Use appropriate child restraints.
• Carefully follow the restraint system
manufacturers instructions.
• Adjust the harnesses for every child on
every trip.
• Ensure that all slack is removed from the
adult seatbelt.
• Always attach the top tether when
installing an ISOFIX seat.
• Always check the security of the child
restraint. See ISOFIX ANCHOR POINTS
(page 67).
• Do not dress a child in bulky clothing, or
place any objects/padding between the
child and the restraint.
• Regularly check the fit and condition of
child restraints. If the fit is poor, or
wear/damage is visible replace the
restraint immediately.
• Set a good example - al ways wear your
seat belt.
Page 2787 of 3229
67
Child safety
R
ISOFIX ANCHOR POINTS
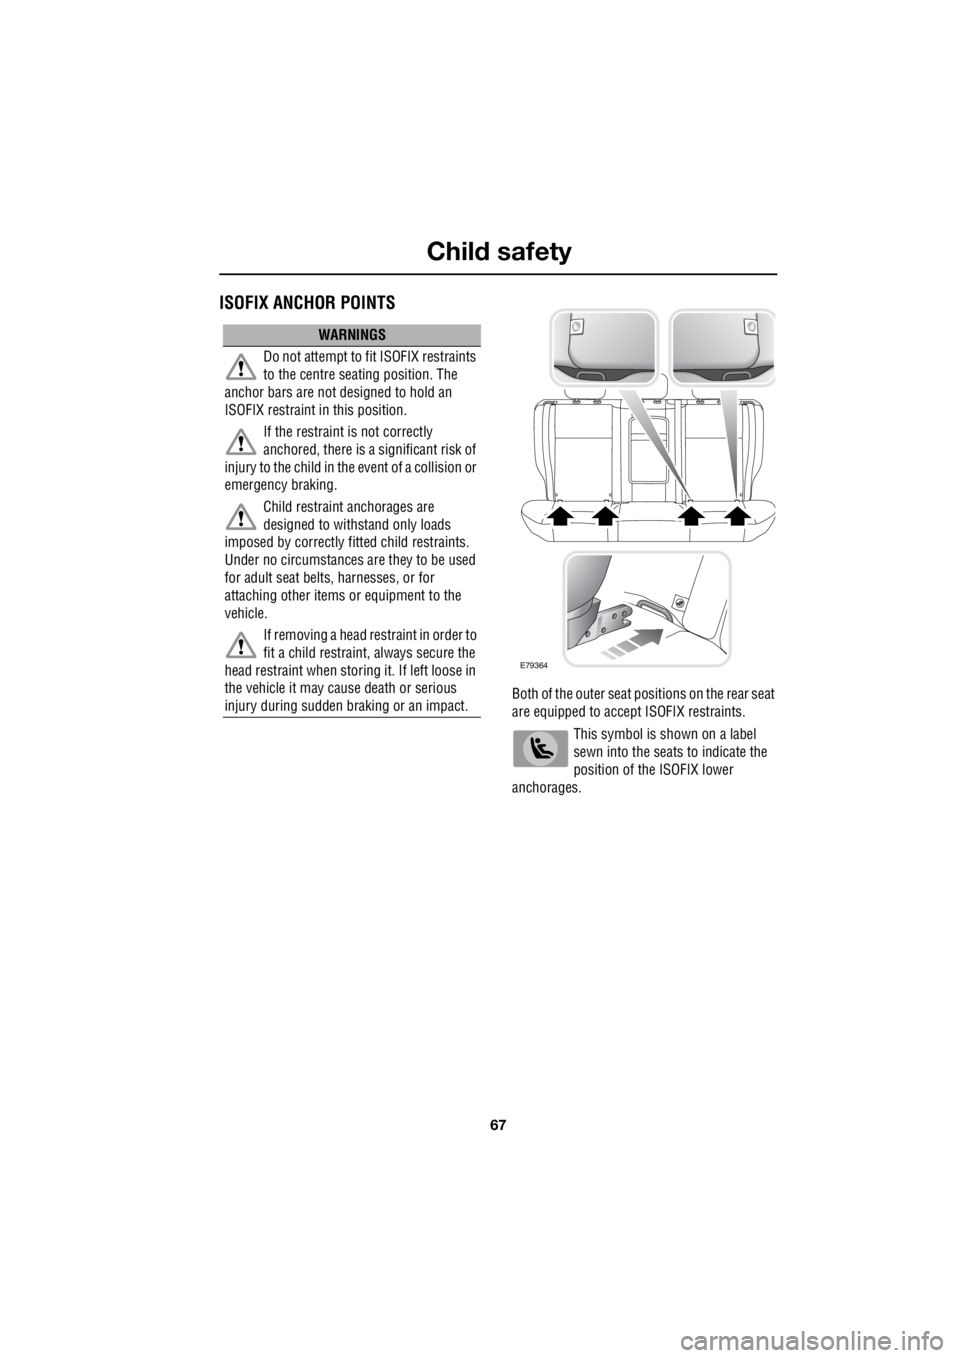
Both of the outer seat pos itions on the rear seat
are equipped to accept ISOFIX restraints.
This symbol is shown on a label
sewn into the seats to indicate the
position of the ISOFIX lower
anchorages.
WARNINGS
Do not attempt to fit ISOFIX restraints
to the centre seating position. The
anchor bars are not designed to hold an
ISOFIX restraint in this position.
If the restraint is not correctly
anchored, there is a significant risk of
injury to the child in the event of a collision or
emergency braking.
Child restraint anchorages are
designed to withstand only loads
imposed by correctly fi tted child restraints.
Under no circumstances are they to be used
for adult seat belts, harnesses, or for
attaching other items or equipment to the
vehicle.
If removing a head restraint in order to
fit a child restraint, always secure the
head restraint when stor ing it. If left loose in
the vehicle it may cause death or serious
injury during sudden braking or an impact.
E79364
Page 2788 of 3229
Child safety
68
L
ISOFIX child seats
• IUF = Suitable for ISOFIX forward child
restraint systems of universal category
approved for use in the mass group.
• IL = These ISOFIX child restraint systems
are of the specific vehicle, restricted, or
semi-universal categories.
• * = Child seats suitable for use in these
locations are Britax Cosy-Tot, and Römer
Baby Safe ISOFIX.
Installing an ISOFIX child seat
To install an ISOFIX child seat :-
1. Raise or remove the head restraint.
2. Lift the velcro flap to expose the ISOFIX
locking mechanism.
3. Slide the child seat into the locking
mechanism.
4. Test the security of the child restraint. To
do this attempt to pull the restraint away
from the vehicle seat and twist the restraint
from side to side. Even if the restraint
appears secure you should still check the
anchor points visually to ensure correct
attachment.
Note: Always ensure that if an upper tether is
provided, it is fitted and tightened correctly.
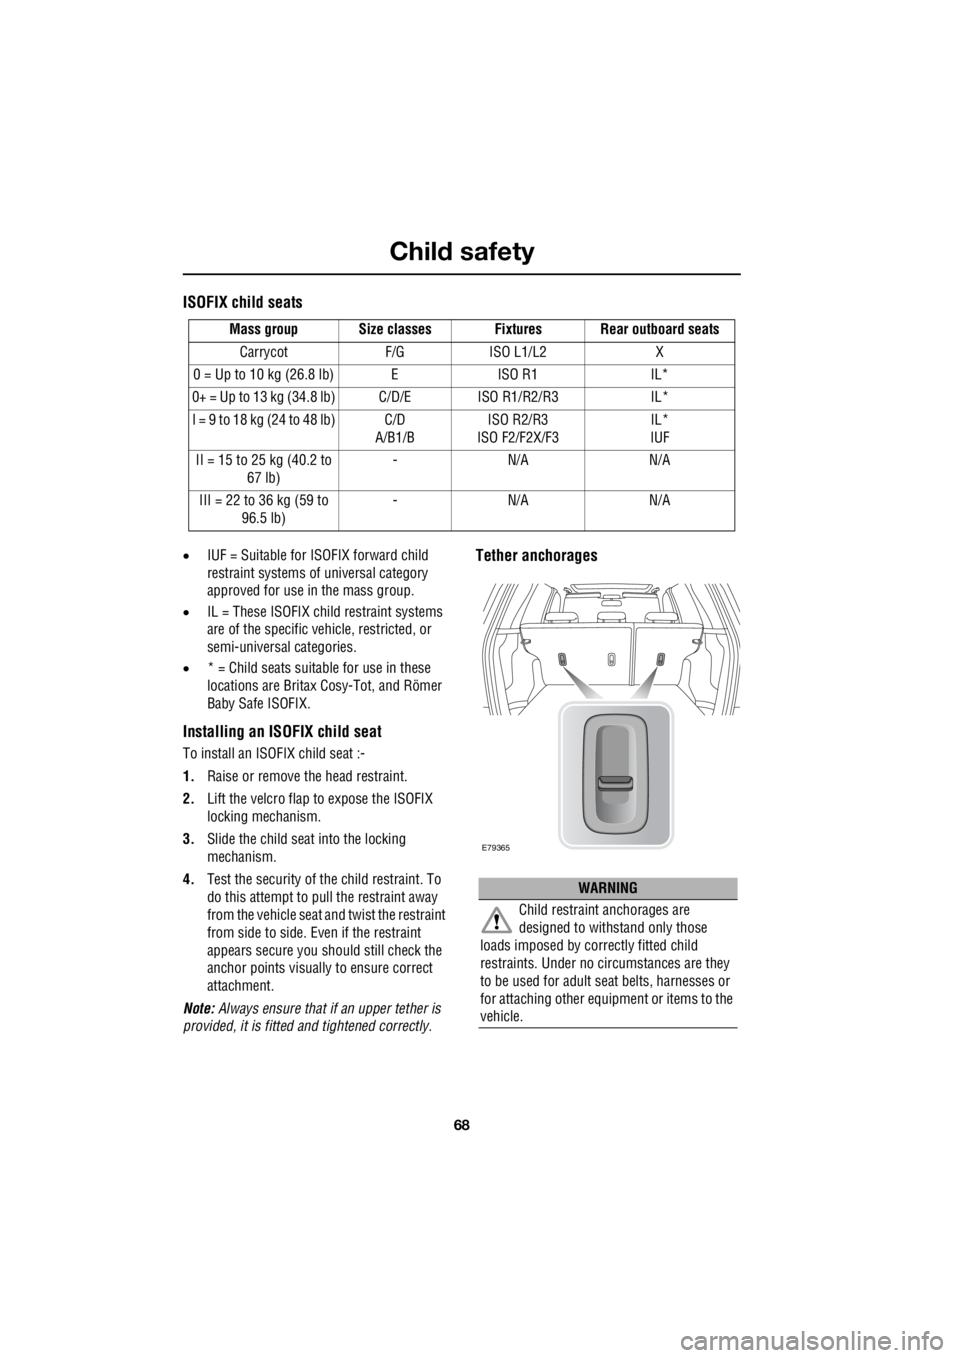
Tether anchorages
Mass group Size classes Fixtures Rear outboard seats
Carrycot F/G ISO L1/L2 X
0 = Up to 10 kg (26.8 lb) E ISO R1 IL*
0+ = Up to 13 kg (34.8 lb) C/D/E ISO R1/R2/R3 IL*
I = 9 to 18 kg (24 to 48 lb) C/D A/B1/B ISO R2/R3
ISO F2/F2X/F3 IL*
IUF
II = 15 to 25 kg (40.2 to 67 lb) -N/A N/A
III = 22 to 36 kg (59 to 96.5 lb) -N/A N/A
WARNING
Child restraint anchorages are
designed to withstand only those
loads imposed by correctly fitted child
restraints. Under no circumstances are they
to be used for adult se at belts, harnesses or
for attaching other equipment or items to the
vehicle.
E79365
Page 2832 of 3229
Convenience features
112
L
STORAGE COMPARTMENTS
1. Coin/trinket trays.
2. Map pockets.
3. Storage compartments.
4. Glove box.
5. Rear armrest storage compartment.
E82050
1
3
1
1
2
3
1
4
3
2
3
1
5
22
5
4
WARNING
Ensure that any items stored in the
vehicle are secure and cannot move. If
the vehicle is involved in an accident,
or subject to sudden braking or direction
change, loose items can cause serious injury.
Page 2868 of 3229
Load carrying
148
L
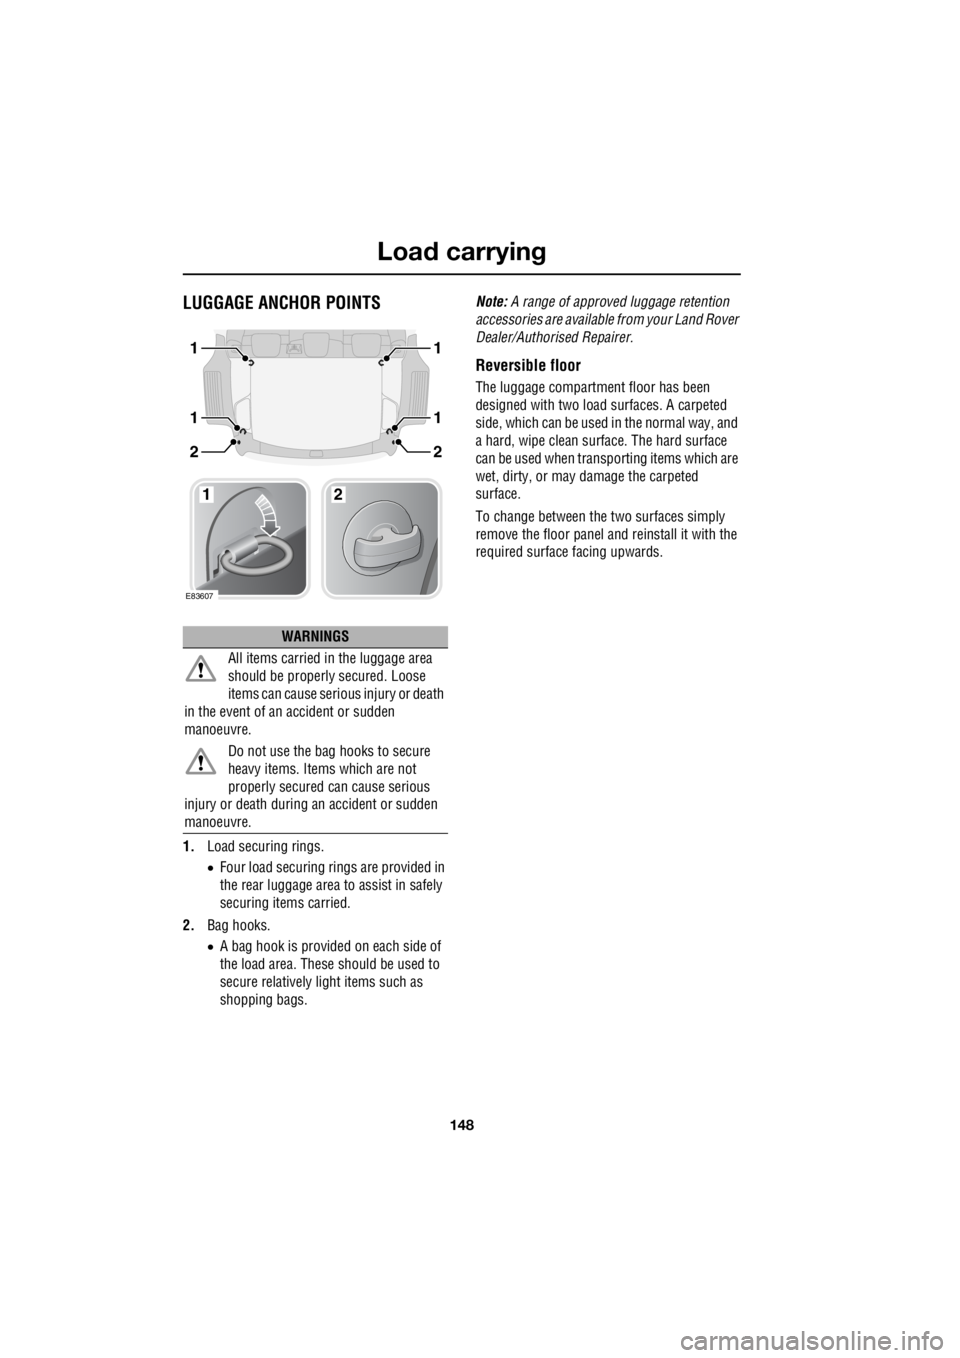
LUGGAGE ANCHOR POINTS
1. Load securing rings.
• Four load securing rings are provided in
the rear luggage area to assist in safely
securing items carried.
2. Bag hooks.
• A bag hook is provided on each side of
the load area. These should be used to
secure relatively light items such as
shopping bags. Note:
A range of approved luggage retention
accessories are available from your Land Rover
Dealer/Authorised Repairer.
Reversible floor
The luggage compartment floor has been
designed with two load surfaces. A carpeted
side, which can be used in the normal way, and
a hard, wipe clean surface. The hard surface
can be used when transporting items which are
wet, dirty, or may damage the carpeted
surface.
To change between the two surfaces simply
remove the floor panel and reinstall it with the
required surface facing upwards.
WARNINGS
All items carried in the luggage area
should be properl y secured. Loose
items can cause serious injury or death
in the event of an accident or sudden
manoeuvre.
Do not use the bag hooks to secure
heavy items. Items which are not
properly secured can cause serious
injury or death during an accident or sudden
manoeuvre.
1
E83607
2
1
1
2
1
1
2
Page 2871 of 3229
151
Towing
R
LEVELLING
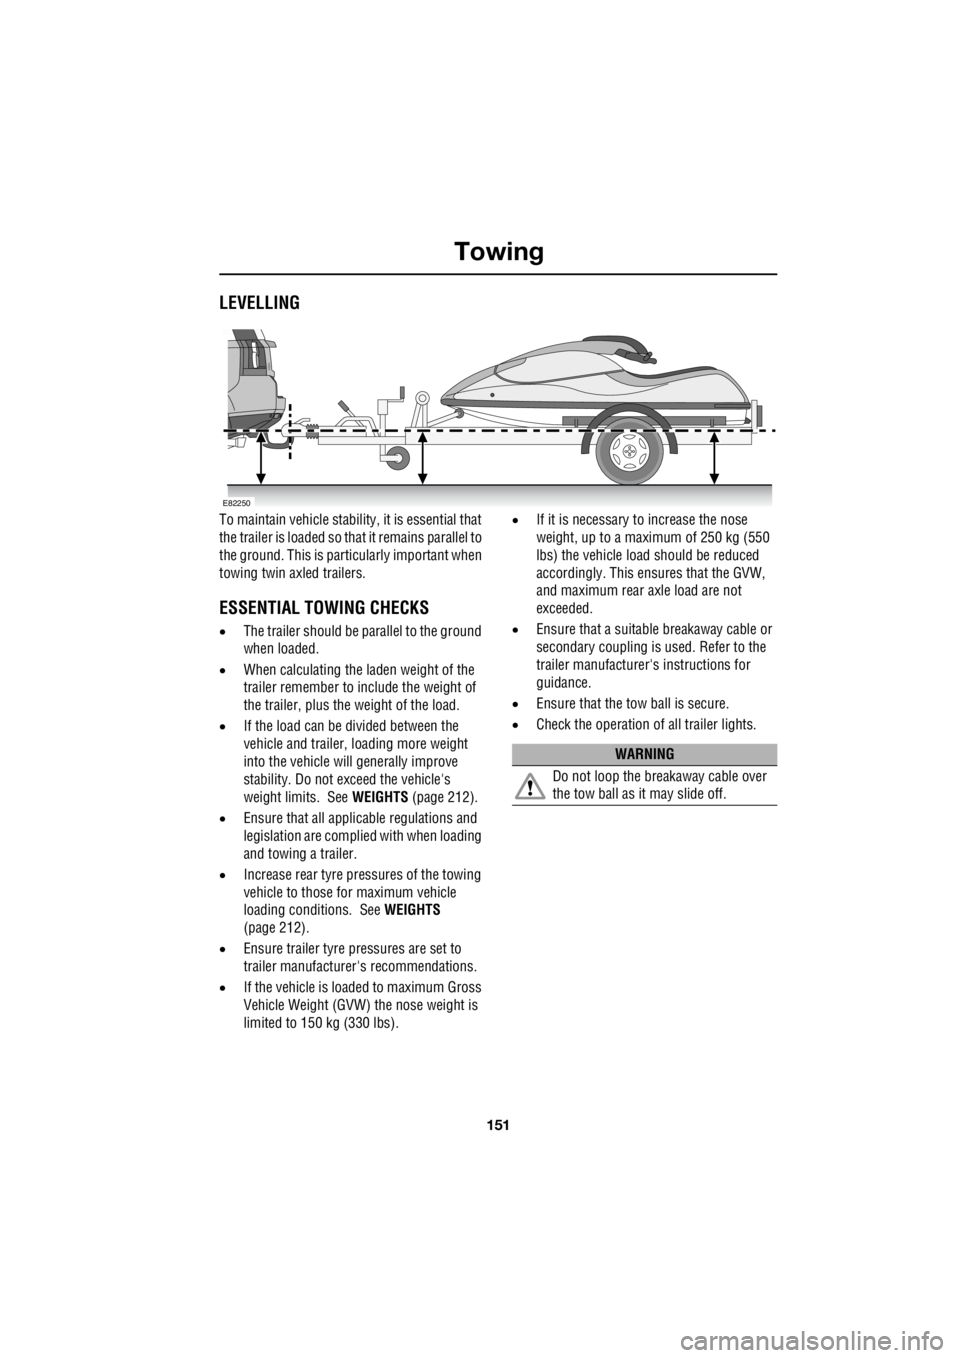
To maintain vehicle stability, it is essential that
the trailer is loaded so that it remains parallel to
the ground. This is partic ularly important when
towing twin axled trailers.
ESSENTIAL TOWING CHECKS
• The trailer should be pa rallel to the ground
when loaded.
• When calculating the laden weight of the
trailer remember to include the weight of
the trailer, plus the weight of the load.
• If the load can be divided between the
vehicle and trailer, loading more weight
into the vehicle will generally improve
stability. Do not exceed the vehicle's
weight limits. See WEIGHTS (page 212).
• Ensure that all applic able regulations and
legislation are complied with when loading
and towing a trailer.
• Increase rear tyre pressures of the towing
vehicle to those for maximum vehicle
loading conditions. See WEIGHTS
(page 212).
• Ensure trailer tyre pressures are set to
trailer manufacture r's recommendations.
• If the vehicle is loaded to maximum Gross
Vehicle Weight (GVW) the nose weight is
limited to 150 kg (330 lbs). •
If it is necessary to increase the nose
weight, up to a maximum of 250 kg (550
lbs) the vehicle load should be reduced
accordingly. This ensures that the GVW,
and maximum rear axle load are not
exceeded.
• Ensure that a suitable breakaway cable or
secondary coupling is used. Refer to the
trailer manufacturer' s instructions for
guidance.
• Ensure that the tow ball is secure.
• Check the operation of all trailer lights.
E82250
WARNING
Do not loop the breakaway cable over
the tow ball as it may slide off.
Page 2893 of 3229
173
Vehicle battery
R
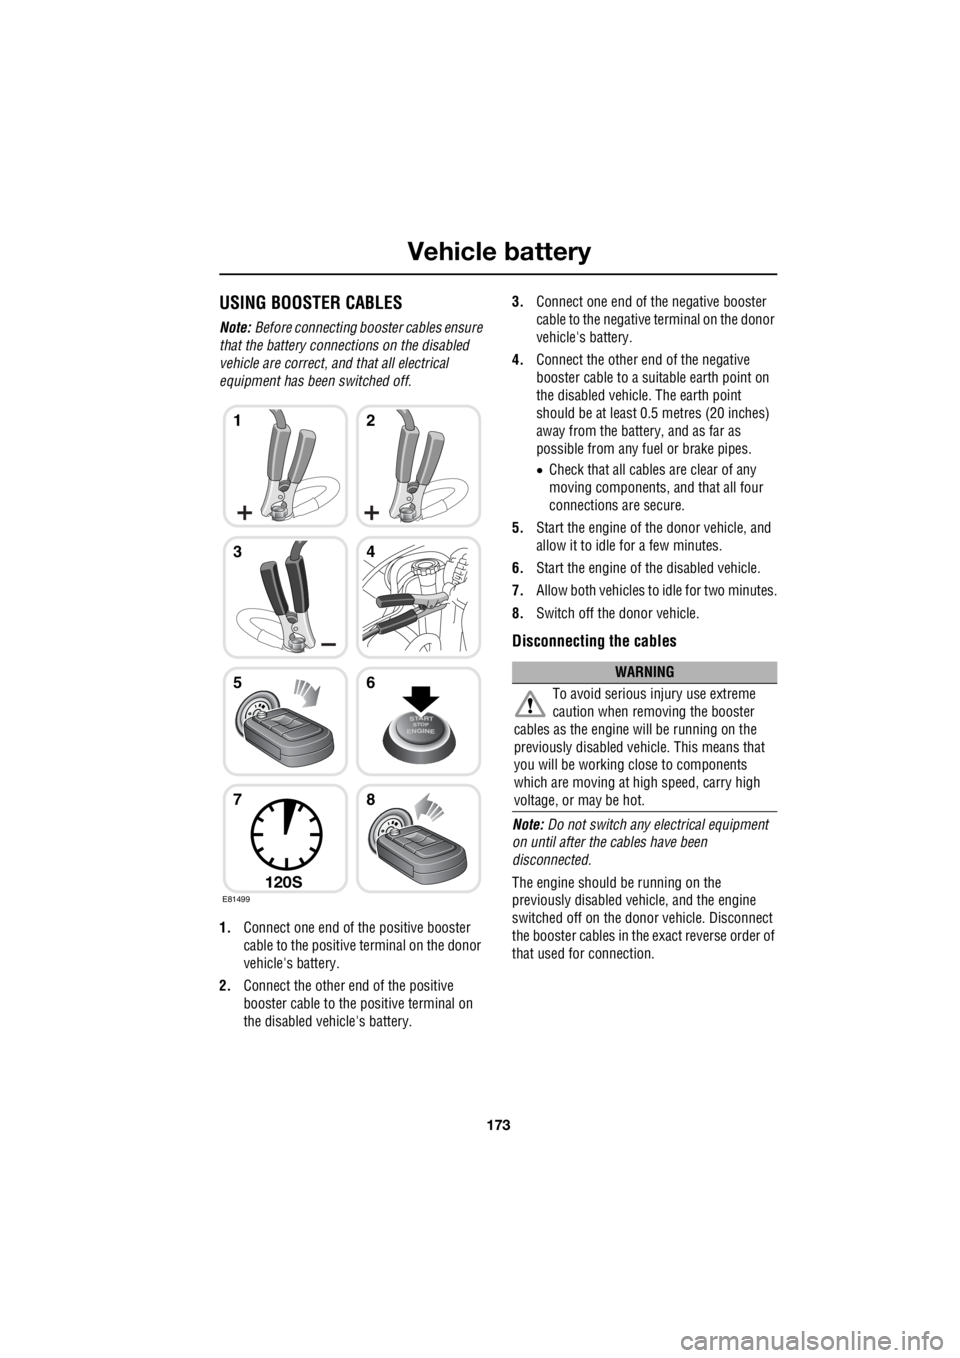
USING BOOSTER CABLES
Note: Before connecting boos ter cables ensure
that the battery connections on the disabled
vehicle are correct, and that all electrical
equipment has been switched off.
1. Connect one end of the positive booster
cable to the positive terminal on the donor
vehicle's battery.
2. Connect the other e nd of the positive
booster cable to the positive terminal on
the disabled vehicle's battery. 3.
Connect one end of the negative booster
cable to the negative terminal on the donor
vehicle's battery.
4. Connect the other en d of the negative
booster cable to a suit able earth point on
the disabled vehicle. The earth point
should be at least 0.5 metres (20 inches)
away from the battery, and as far as
possible from any fuel or brake pipes.
• Check that all cables are clear of any
moving components, and that all four
connections are secure.
5. Start the engine of the donor vehicle, and
allow it to idle for a few minutes.
6. Start the engine of the disabled vehicle.
7. Allow both vehicles to idle for two minutes.
8. Switch off the donor vehicle.
Disconnecting the cables
Note: Do not switch any electrical equipment
on until after the cables have been
disconnected.
The engine should be running on the
previously disabled ve hicle, and the engine
switched off on the donor vehicle. Disconnect
the booster cables in the exact reverse order of
that used for connection.
E81499
12
34
56
78
120S
WARNING
To avoid serious in jury use extreme
caution when removing the booster
cables as the engine will be running on the
previously disabled vehicle. This means that
you will be working close to components
which are moving at high speed, carry high
voltage, or may be hot.
Page 2895 of 3229
175
Vehicle battery
R
Effects of disconnecting
Disconnecting the battery can affect a number
of vehicle systems, especially if there is
insufficient battery power prior to
disconnection. For example, the alarm may
trigger depending on it's state when the battery
was disconnected. If the alarm does sound,
use the remote control in the normal way to
disarm the security system. The windows may
need resetting to enable the one-shot feature to
operate correctly. See ELECTRIC WINDOWS
(page 93).
Replacement batteries
Battery disposal
Note: Used batteries must be disposed of
correctly as they contain a number of harmful
substances. Seek advice on disposal from your
Land Rover Dealer/Authoris ed Repairer, and/or
your local authority.
Refitting
A new battery should be supplied with plastic
terminal covers. Leave the covers in place
when fitting the battery, and remove them one
at a time to fit the battery cable clamps.
Refitting is an exact reversal of the removal
procedure. If you are in any doubt about fitting
a battery seek qualified assistance before
attempting to fit the battery.
WARNING
Only fit a battery of the correct type and
rating. Fitting an in correct battery may
result in a fire, or damage to the electrical
system. If you are in any doubt when fitting a
battery seek qualified assistance.
WARNING
When refitting the battery ensure that
no metal objects , or vehicle
components, come into contact with the
battery terminals. Metal objects can cause a
spark or short circuit, both of which may result
in an explosion.
CAUTIONS
Ensure that when fitting a battery to the
vehicle, the terminals and battery clamps
are clean, and lightly coated with petroleum
jelly. This will ensure good electrical
connections are made, and help to prevent
corrosion.
Always follow the battery manufacturers
instructions. Failure to do so may result
in damage to the vehicl e and/or the electrical
system.