2006 LAND ROVER FRELANDER 2 ECO mode
[x] Cancel search: ECO modePage 2823 of 3229
103
Climate control
R
AUTOMATIC CLIMATE CONTROL
Controls
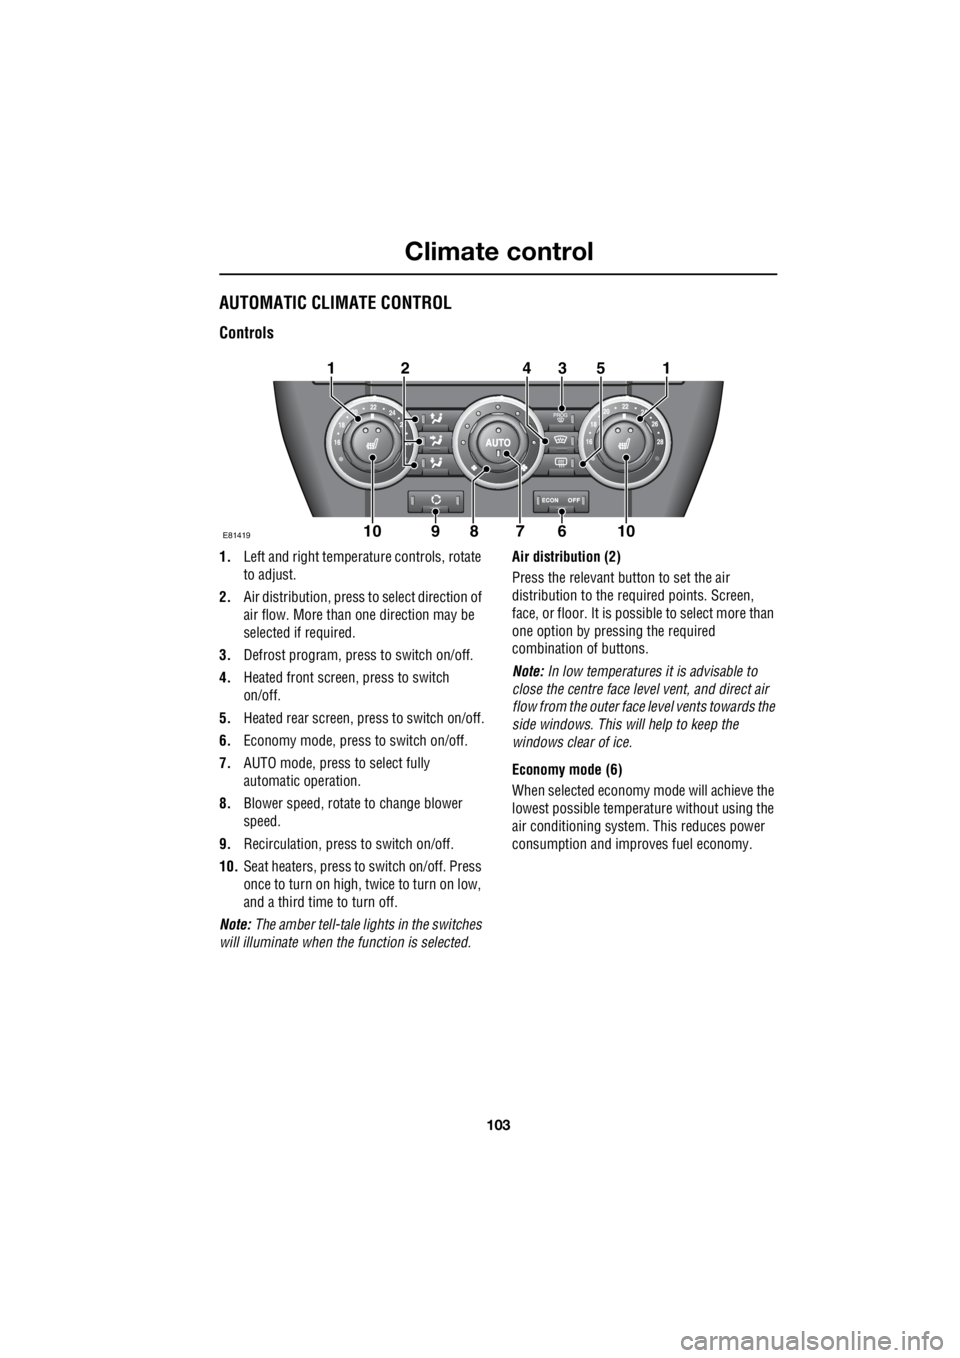
1. Left and right temperat ure controls, rotate
to adjust.
2. Air distribution, press to select direction of
air flow. More than one direction may be
selected if required.
3. Defrost program, press to switch on/off.
4. Heated front screen, press to switch
on/off.
5. Heated rear screen, press to switch on/off.
6. Economy mode, press to switch on/off.
7. AUTO mode, press to select fully
automatic operation.
8. Blower speed, rotate to change blower
speed.
9. Recirculation, press to switch on/off.
10. Seat heaters, press to switch on/off. Press
once to turn on high, twice to turn on low,
and a third time to turn off.
Note: The amber tell-tale lights in the switches
will illuminate when the function is selected. Air distribution (2)
Press the relevant button to set the air
distribution to the required points. Screen,
face, or floor. It is possible to select more than
one option by pressing the required
combination of buttons.
Note: In low temperatures it is advisable to
close the centre face leve l vent, and direct air
flow from the outer face level vents towards the
side windows. This will help to keep the
windows clear of ice.
Economy mode (6)
When selected economy mode will achieve the
lowest possible temperat ure without using the
air conditioning system . This reduces power
consumption and impr oves fuel economy.
E81419
131
6910
254
1078
Page 2840 of 3229
Transmission
120
L
Sport mode and CommandShift™
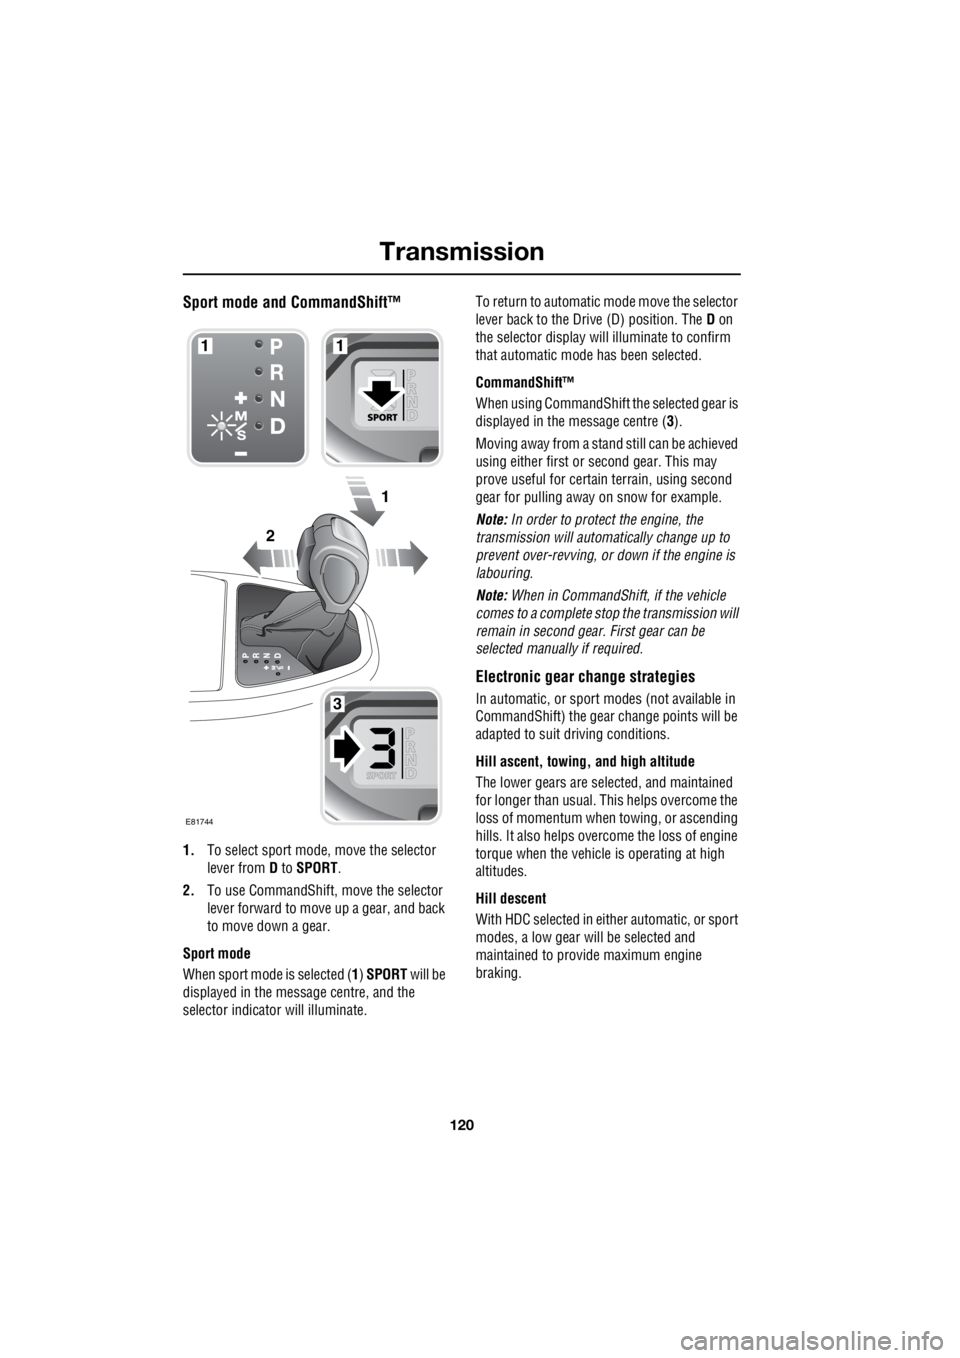
1. To select sport mode, move the selector
lever from D to SPORT .
2. To use CommandShift, move the selector
lever forward to move up a gear, and back
to move down a gear.
Sport mode
When sport mode is selected ( 1) SPORT will be
displayed in the message centre, and the
selector indicator will illuminate. To return to automatic m
ode move the selector
lever back to the Drive (D) position. The D on
the selector display will illuminate to confirm
that automatic mode has been selected.
CommandShift™
When using CommandShift th e selected gear is
displayed in the message centre ( 3).
Moving away from a stand still can be achieved
using either first or second gear. This may
prove useful for certai n terrain, using second
gear for pulling away on snow for example.
Note: In order to protect the engine, the
transmission will automatically change up to
prevent over-revving, or down if the engine is
labouring.
Note: When in CommandShift, if the vehicle
comes to a complete stop the transmission will
remain in second gear. First gear can be
selected manually if required.
Electronic gear change strategies
In automatic, or sport modes (not available in
CommandShift) the gear change points will be
adapted to suit driving conditions.
Hill ascent, towing, and high altitude
The lower gears are selected, and maintained
for longer than usual. This helps overcome the
loss of momentum when towing, or ascending
hills. It also helps over come the loss of engine
torque when the vehicle is operating at high
altitudes.
Hill descent
With HDC selected in either automatic, or sport
modes, a low gear will be selected and
maintained to provide maximum engine
braking.
2
1
1
3
1
E81744
Page 2848 of 3229

Driving hints
128
L
Driving hintsGENERAL DRIVING POINTS
Battery charging - red
Illuminates as a bulb check when
the ignition is turned on and
extinguishes once the engine is
running. If it remains on, or illuminates whilst
driving, a fault with the battery charging
system is indicated. Seek qualified assistance
urgently.
Low oil pressure - red
Illuminates as a bulb check when
the ignition is turned on and
extinguishes when the engine is
started. If the indicator remains on, flashes on
and off, or illuminates whilst driving, stop the
vehicle as soon as safety permits and switch
off the engine immediat ely. Seek qualified
assistance before driving. Always check the oil
level when this indicator illuminates.
REDUCED ENGINE PERFORMANCE
Engine management syst em (EMS) fault
Illuminates amber in the
instrument pack when the engine
management system detects a
serious fault - reduce d performance may be
experienced. Avoid high speeds and consult
your Land Rover Dealer/A uthorised Repairer as
soon as possible.
Check engine - petrol models only
Illuminates amber in the
instrument pack as a bulb and
system check when the starter
switch is turned on and extinguishes as soon
as the engine is starte d. Illumination at any
other time indicates that the emission
performance of the engine management
system is impaired - seek qualified assistance.
If the indicator flashes while driving,
immediately reduce e ngine power to avoid
catalytic converter damage.
RUNNING-IN
The engine, gearbox, tyre s, and brakes need
time to bed-in. During the first 800 km (500
miles) it is essential th at the vehicle is driven
with consideration for the running-in process.
During the running in period the following
advice should be followed.
• Limit the engine speed to a maximum of
3000 rpm, and the road speed to a
maximum of 110 km/h (68 mph).
• Do not use full accelerator pedal travel, and
use the gears to avoid over-revving or
labouring the engine.
• Do not use sport mode during the running
in period.
• Avoid rapid accelerati on or heavy braking
wherever possible.
• Ensure that servicing is carried out on
time, and follow any advice regarding use
in arduous conditions.
Note: The advice given for running in will aid
fuel economy, and s hould be adopted as
general driving practice even after the running
in period.
Page 2850 of 3229
Cruise control
130
L
Cruise controlPRINCIPLE OF OPERATION
Cruise control enables the driver to maintain a
constant road speed without using the
accelerator pedal. This is particularly useful for
motorway cruising, or for any journey where a
constant speed can be maintained for a lengthy
period.
USING CRUISE CONTROL
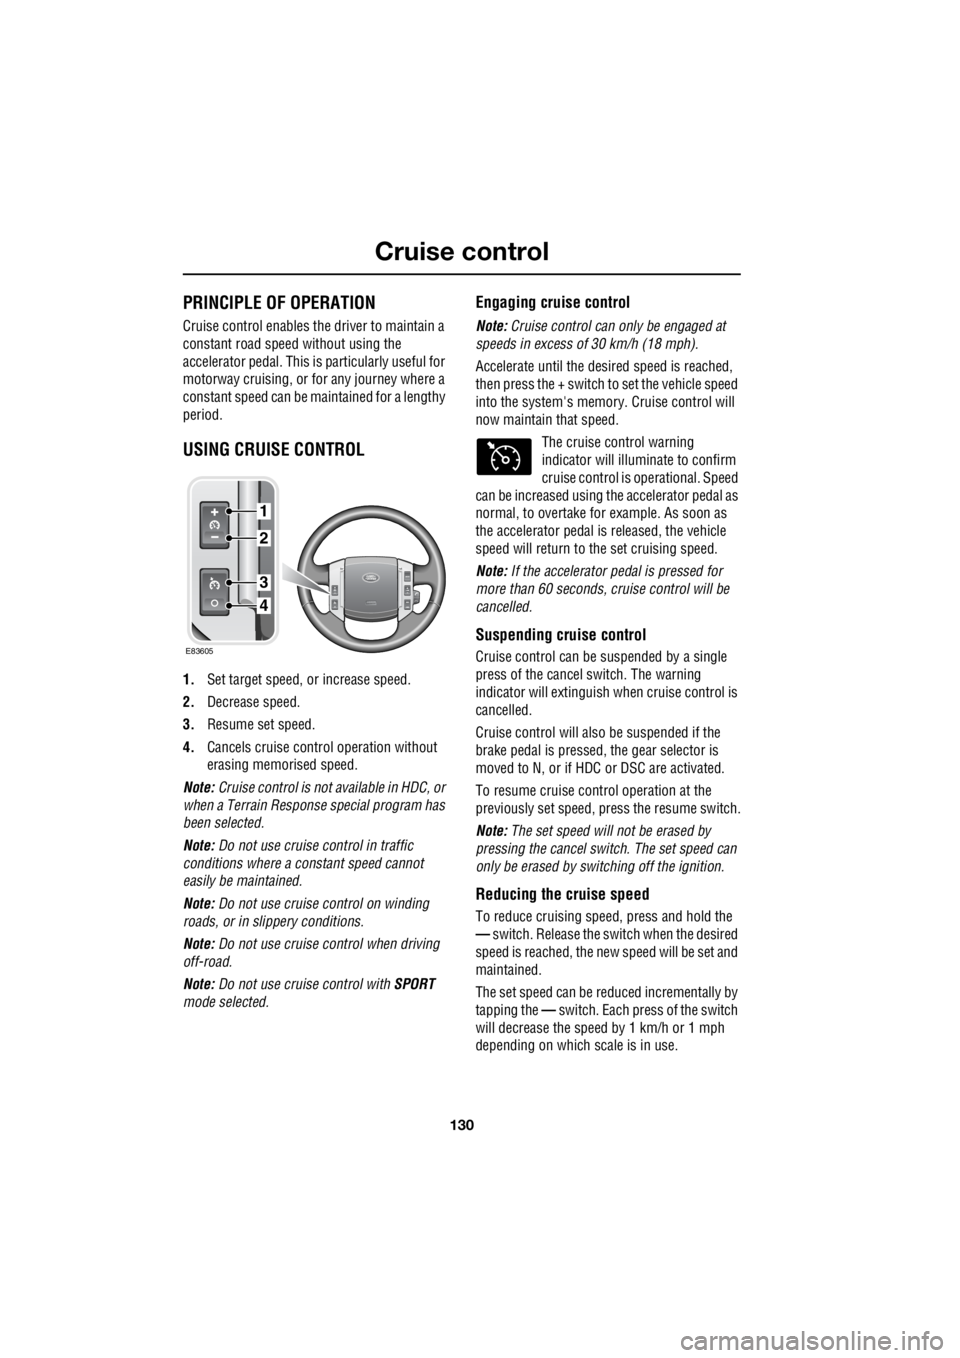
1. Set target speed, or increase speed.
2. Decrease speed.
3. Resume set speed.
4. Cancels cruise contro l operation without
erasing memorised speed.
Note: Cruise control is not available in HDC, or
when a Terrain Respons e special program has
been selected.
Note: Do not use cruise control in traffic
conditions where a constant speed cannot
easily be maintained.
Note: Do not use cruise control on winding
roads, or in slippery conditions.
Note: Do not use cruise control when driving
off-road.
Note: Do not use cruise control with SPORT
mode selected.
Engaging cruise control
Note: Cruise control can only be engaged at
speeds in excess of 30 km/h (18 mph).
Accelerate until the desired spee d is reached,
then press the + switch to set the vehicle speed
into the system's memory. Cruise control will
now maintain that speed.
The cruise control warning
indicator will illuminate to confirm
cruise control is operational. Speed
can be increased using th e accelerator pedal as
normal, to overtake fo r example. As soon as
the accelerator pedal is released, the vehicle
speed will return to the set cruising speed.
Note: If the accelerator pedal is pressed for
more than 60 seconds, cruise control will be
cancelled.
Suspending cruise control
Cruise control can be suspended by a single
press of the cancel switch. The warning
indicator will extinguish when cruise control is
cancelled.
Cruise control will also be suspended if the
brake pedal is pressed, the gear selector is
moved to N, or if HDC or DSC are activated.
To resume cruise cont rol operation at the
previously set speed, press the resume switch.
Note: The set speed will not be erased by
pressing the cancel switch. The set speed can
only be erased by switching off the ignition.
Reducing the cruise speed
To reduce cruising speed, press and hold the
— switch. Release the switch when the desired
speed is reached, the ne w speed will be set and
maintained.
The set speed can be reduced incrementally by
tapping the — switch. Each press of the switch
will decrease the spee d by 1 km/h or 1 mph
depending on which scale is in use.
1
E83605
2
3
4
Page 2883 of 3229

163
Maintenance
R
Topping up the oil
1. Unscrew the oil filler cap.
2. Add oil to maintain the level between the
MIN and MAX marks or notches on the
dipstick. Clean up any oil spilled during
topping-up.
3. Check the oil level again after 5 minutes.
It is essential to use the correct specification
oil, and to ensure it is suitable for the climatic
conditions in which the vehicle is to be
operated.
Note: The approximate quantity of oil required
to raise the level from MIN to MAX on the
dipstick is 0.8 litres (1.4 pints) - petrol models
or 1.5 litres (2.6 pi nts) - diesel models.
Engine oil specification
Land Rover recommends Castrol oils.
ENGINE COOLANT CHECK
If the quantity of fluid in the coolant
reservoir drops below the
recommended level, an amber
warning indicator in the instrument pack will
illuminate. Stop the vehicle and check the
coolant level.
On vehicles with a message centre, the
message LOW COOLANT LEVEL or COOLING
SYSTEM FAULT MONITOR GAUGE will be
displayed in place of the warning indicator.
Checking the coolant level
The coolant level in the expansion tank should
be checked at least week ly (more frequently in
high mileage or arduous operating conditions).
Always check the level when the system is
cold.
Ensure the coolant level is maintained between
the level indicator marks located on the side of
the expansion tank.
CAUTIONS
Your vehicle warranty may be invalidated
if damage is caused by using oil that
does not meet the required specification.
Failure to use an oil that meets the
required specification could cause
excessive engine wear, a build up of sludge
and deposits, and increase pollution. It could
also lead to engine failure.
Overfilling with oil could result in severe
engine damage. Oil should be added in
small quantities and the level re-checked to
ensure that the engine is not overfilled.
Model Specification
Petrol engine Use only 0W-30 engine oil, meeting ACEA A5 or
B5 specification.
Diesel engine Use only 5W-30 oil meeting Ford 913-B
specification.
CAUTION
Running the engine without coolant will
cause serious engine damage.
E83616
Page 2939 of 3229
219
Audio unit overview
R
Audio unit overviewAUDIO UNIT OVERVIEW
Premium audio overview
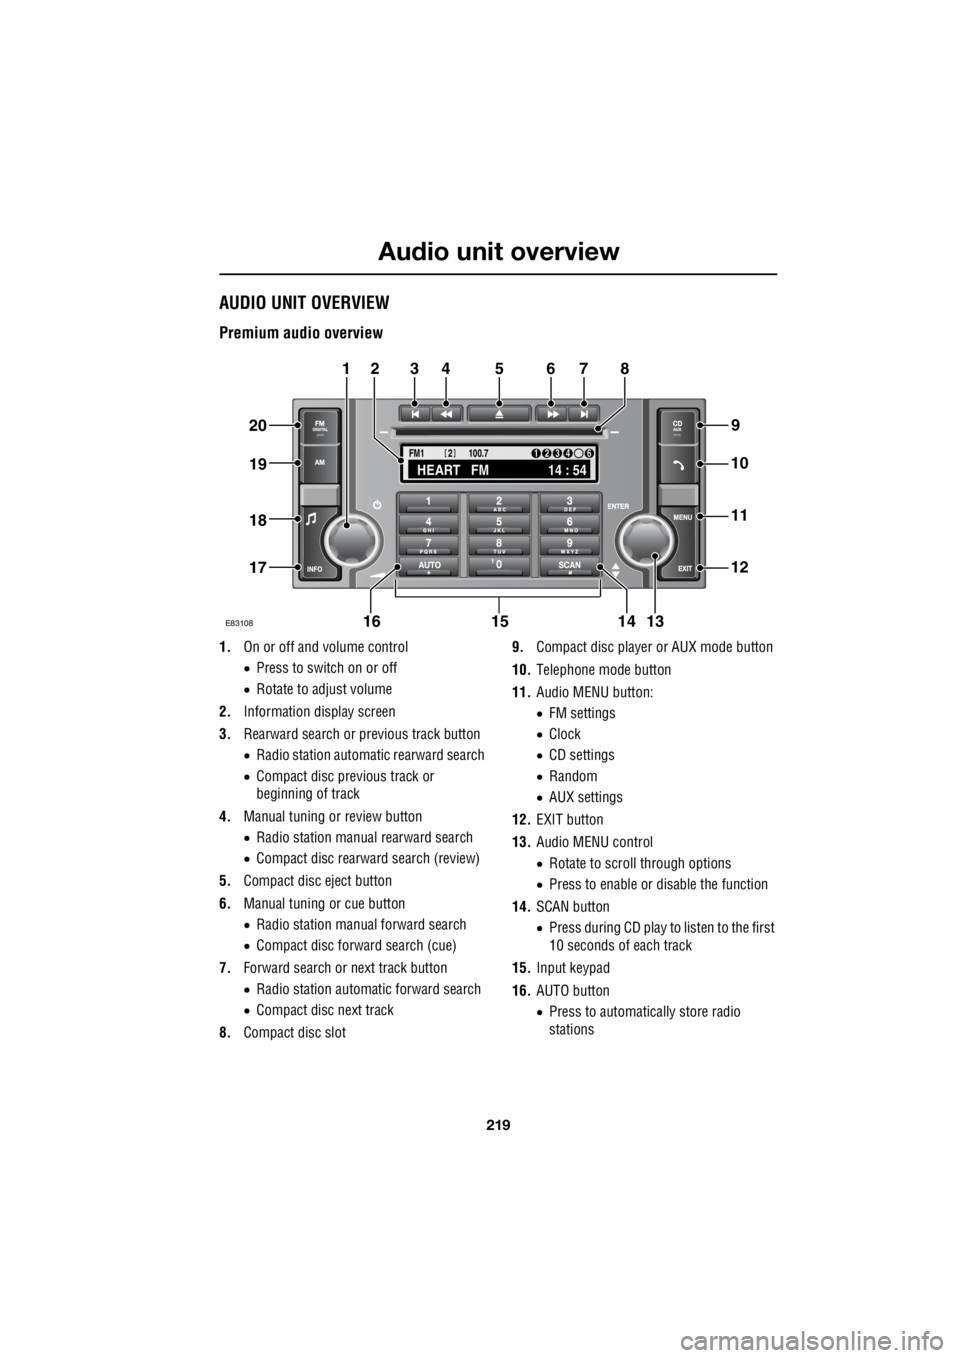
1. On or off and volume control
• Press to switch on or off
• Rotate to adjust volume
2. Information display screen
3. Rearward search or previous track button
• Radio station automatic rearward search
• Compact disc previous track or
beginning of track
4. Manual tuning or review button
• Radio station manual rearward search
• Compact disc rearward search (review)
5. Compact disc eject button
6. Manual tuning or cue button
• Radio station manual forward search
• Compact disc forward search (cue)
7. Forward search or next track button
• Radio station automatic forward search
• Compact disc next track
8. Compact disc slot 9.
Compact disc player or AUX mode button
10. Telephone mode button
11. Audio MENU button:
• FM settings
• Clock
• CD settings
• Random
• AUX settings
12. EXIT button
13. Audio MENU control
• Rotate to scroll through options
• Press to enable or disable the function
14. SCAN button
• Press during CD play to listen to the first
10 seconds of each track
15. Input keypad
16. AUTO button
• Press to automatically store radio
stations
TA
NEWSPTY100.7
FM1
14 : 54
HEART FM
1234 6
2
E83108
34567
9
21
11
12
10
13141516
17
18
19
20
8
Page 2950 of 3229
Audio unit menus
230
L
Alternative Frequency (AF) - Premium
audio
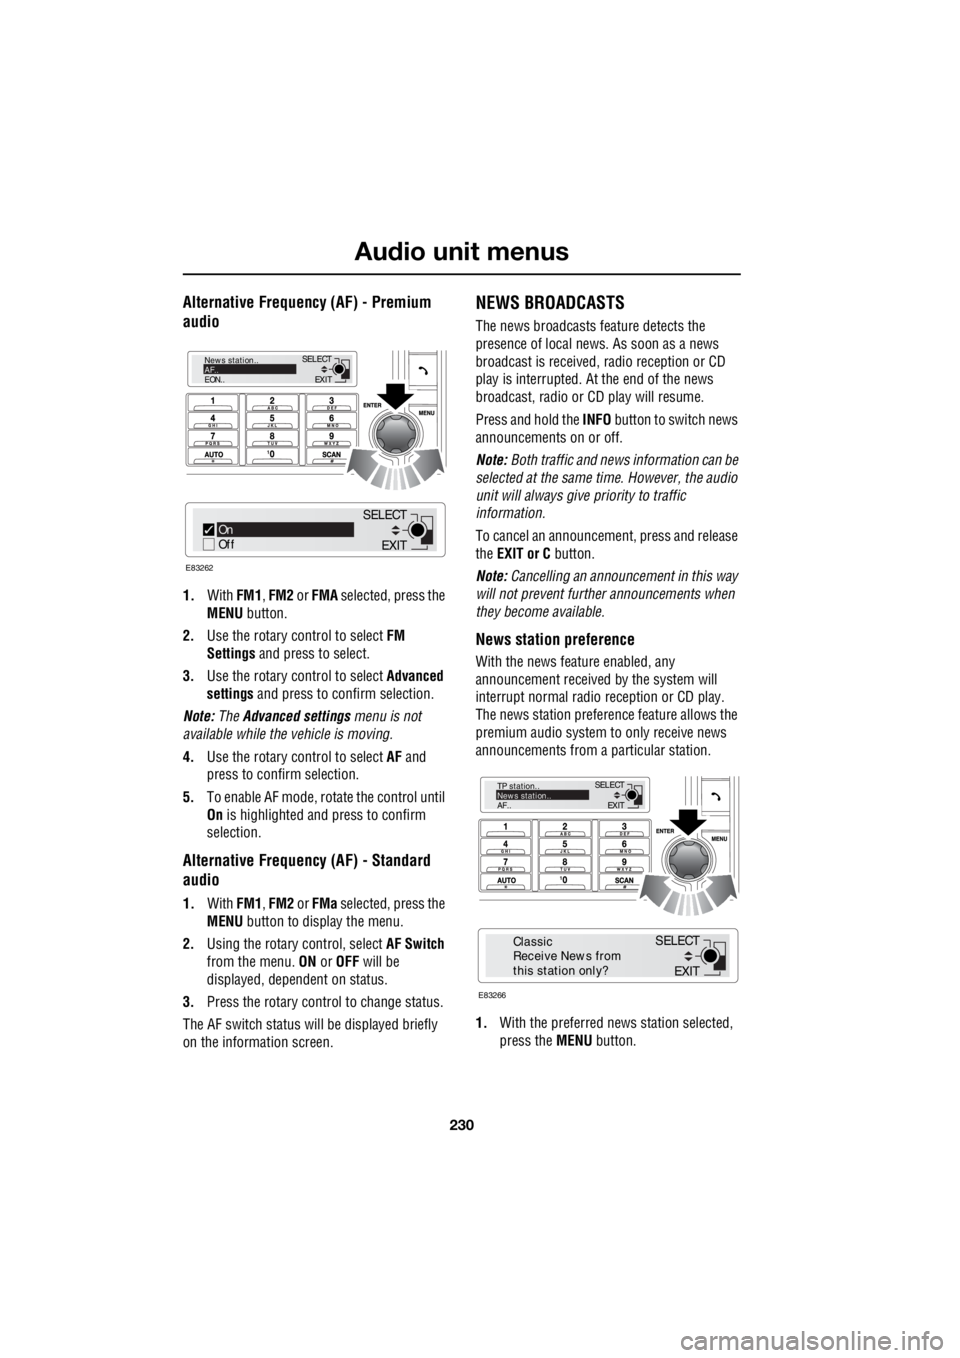
1. With FM1, FM2 or FMA selected, press the
MENU button.
2. Use the rotary c ontrol to select FM
Settings and press to select.
3. Use the rotary c ontrol to select Advanced
settings and press to c onfirm selection.
Note: The Advanced settings menu is not
available while the vehicle is moving.
4. Use the rotary c ontrol to select AF and
press to confirm selection.
5. To e nable AF mode , r o tate the control until
On is highlighted and press to confirm
selection.
Alternative Frequency (AF) - Standard
audio
1. With FM1, FM2 or FMa selected, press the
MENU button to display the menu.
2. Using the rotary control, select AF Switch
from the menu. ON or OFF will be
displayed, dependent on status.
3. Press the rotary control to change status.
The AF switch status w ill be displayed briefly
on the information screen.
NEWS BROADCASTS
The news broadcasts feature detects the
presence of local news. As soon as a news
broadcast is received, radio reception or CD
play is interrupted. At the end of the news
broadcast, radio or CD play will resume.
Press and hold the INFO button to switch news
announcements on or off.
Note: Both traffic and news information can be
selected at the same time. However, the audio
unit will always give priority to traffic
information.
To cancel an announcemen t, press and release
the EXIT or C button.
Note: Cancelling an announcement in this way
will not prevent further announcements when
they become available.
News station preference
With the news feature enabled, any
announcement received by the system will
interrupt normal radio reception or CD play.
The news station preferen ce feature allows the
premium audio system to only receive news
announcements from a particular station.
1. With the preferred news station selected,
press the MENU button.
EXIT
SELECT
News station..
AF..
EON..
On
Off
E83262
EXIT
SELECT
EXIT
SELECT
TP station..
News station..
AF..
E83266
EXIT
SELECT
Classic
Receive News from
this station only?
Page 2960 of 3229
Digital audio broadcasting
240
L
SETTINGS
A number of different f unctions are available
from the DAB settings menu. Follow the
procedure below to access the menu.
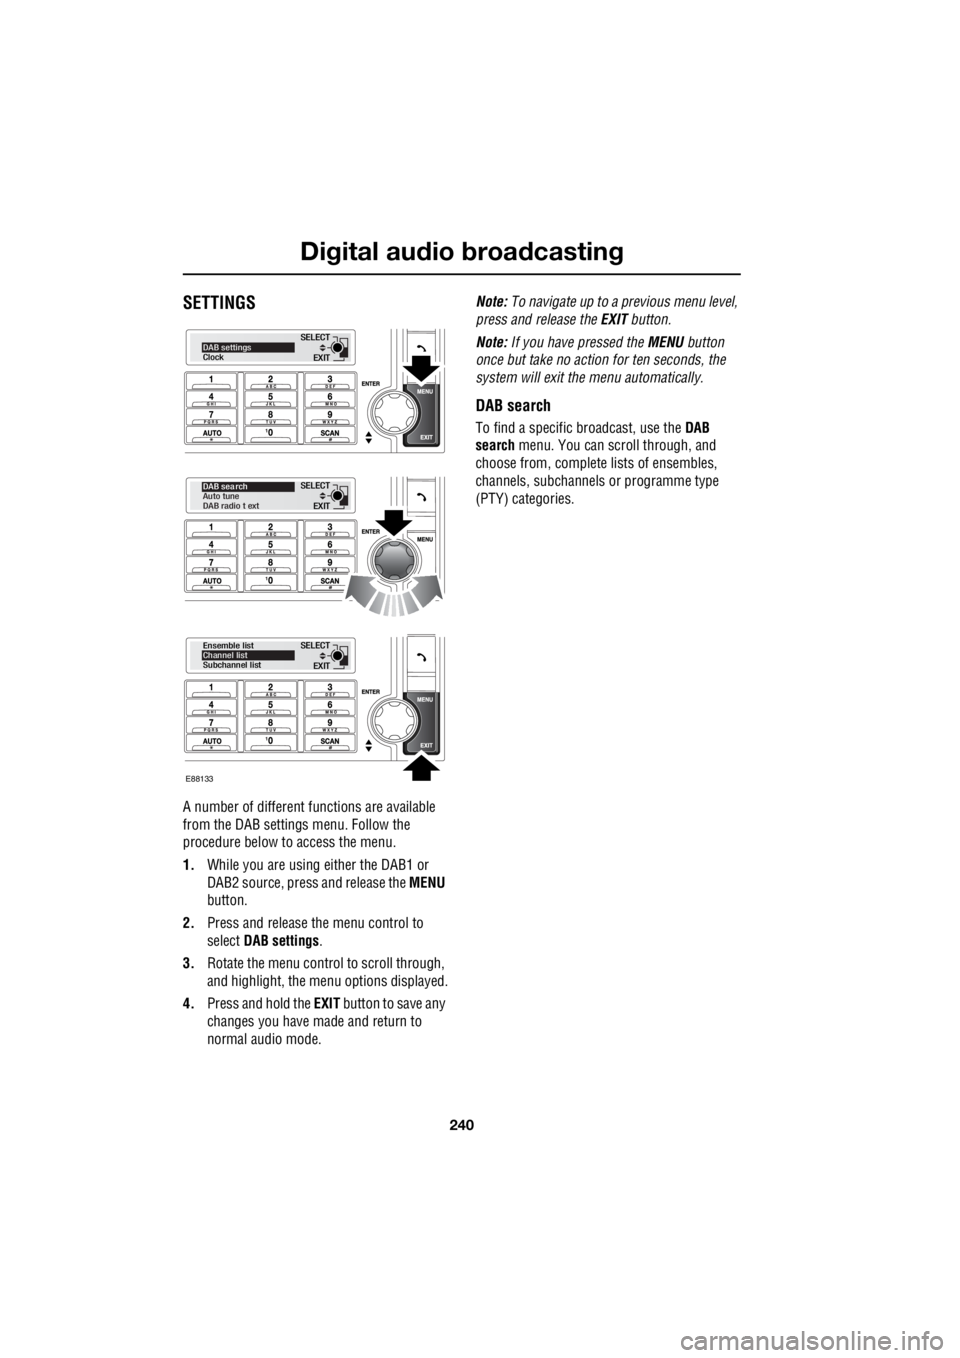
1. While you are using either the DAB1 or
DAB2 source, press and release the MENU
button.
2. Press and release the menu control to
select DAB settings .
3. Rotate the menu control to scroll through,
and highlight, the menu options displayed.
4. Press and hold the EXIT button to save any
changes you have made and return to
normal audio mode. Note:
To navigate up to a pr evious menu level,
press and release the EXIT button.
Note: If you have pressed the MENU button
once but take no action for ten seconds, the
system will exit the menu automatically.
DAB search
To find a specific br oadcast, use the DAB
search menu. You can scroll through, and
choose from, complete lists of ensembles,
channels, subchannels or programme type
(PTY) categories.
EXIT
SELECTDAB settings
Clock
EXIT
SELECT
DAB sea rch
Auto tune
DAB radio t ext
EXIT
SELECT
Ensemble list
Channel list
Subchannel list
E88133