2006 LAND ROVER FRELANDER 2 ECO mode
[x] Cancel search: ECO modePage 2965 of 3229
245
Compact disc player
R
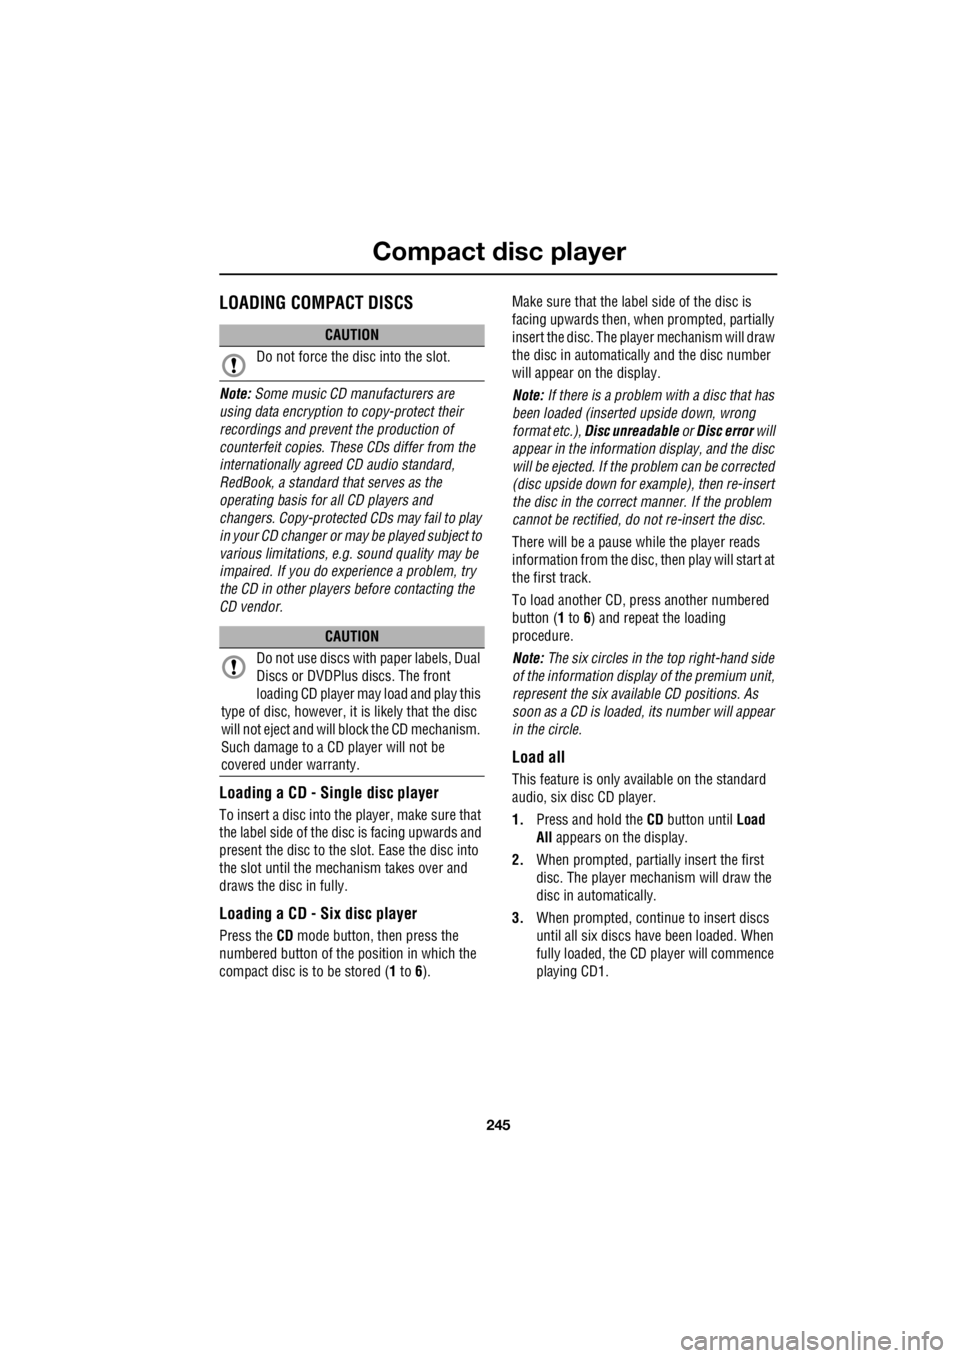
Compact disc playerLOADING COMPACT DISCS
Note: Some music CD manufacturers are
using data encryption to copy-protect their
recordings and prevent the production of
counterfeit copies. These CDs differ from the
internationally agreed CD audio standard,
RedBook, a standard that serves as the
operating basis for all CD players and
changers. Copy-pro tected CDs may fail to play
in your CD changer or ma y be played subject to
various limitations, e. g. sound quality may be
impaired. If you do ex perience a problem, try
the CD in other player s before contacting the
CD vendor.
Loading a CD - Single disc player
To insert a disc into the player, make sure that
the label side of the di sc is facing upwards and
present the disc to the slot. Ease the disc into
the slot until the mech anism takes over and
draws the disc in fully.
Loading a CD - Six disc player
Press the CD mode button, then press the
numbered button of the position in which the
compact disc is to be stored ( 1 to 6). Make sure that the label side of the disc is
facing upwards then, when prompted, partially
insert the disc. The play er mechanism will draw
the disc in automatica lly and the disc number
will appear on the display.
Note: If there is a problem with a disc that has
been loaded (inserted upside down, wrong
format etc.), Disc unreadable or Disc error will
appear in the information display, and the disc
will be ejected. If the problem can be corrected
(disc upside down for example), then re-insert
the disc in the correct manner. If the problem
cannot be rectified, do not re-insert the disc.
There will be a pause while the player reads
information from the disc, then play will start at
the first track.
To load another CD, pr ess another numbered
button ( 1 to 6) and repeat the loading
procedure.
Note: The six circles in the top right-hand side
of the information display of the premium unit,
represent the six available CD positions. As
soon as a CD is loaded, its number will appear
in the circle.
Load all
This feature is only available on the standard
audio, six disc CD player.
1. Press and hold the CD button until Load
All appears on the display.
2. When prompted, partia lly insert the first
disc. The player mechanism will draw the
disc in automatically.
3. When prompted, conti nue to insert discs
until all six discs have been loaded. When
fully loaded, the CD player will commence
playing CD1.
CAUTION
Do not force the disc into the slot.
CAUTION
Do not use discs with paper labels, Dual
Discs or DVDPlus discs. The front
loading CD player may load and play this
type of disc, however, it is likely that the disc
will not eject and will block the CD mechanism.
Such damage to a CD player will not be
covered under warranty.
Page 2966 of 3229
Compact disc player
246
L
EJECTING COMPACT DISCS
It is only possible to eject a single disc, if it is
currently selected or playing.
To eject a disc, press and release the eject
button. A confirmation message will be shown
on the information display. After a short pause,
the disc will be presente d. The disc should then
be removed.
Note: If the disc is not removed from the slot
within fifteen seconds, it will be drawn back
into the player.
EJECTING MULTIPLE COMPACT
DISCS
All the discs loaded in the player can be ejected
in sequence. To eject all of the discs, press and
hold the eject button. A confirmation message
will be shown on the information display. After
a short pause, the first disc will be presented.
The disc should then be removed.
The discs will be ejected one at a time with a
short pause in between each.
To stop the process, press any CD number
button ( 1 to 6).
COMPACT DISC SELECTION
To select one of the loaded discs, briefly press
the disc number required ( 1 to 6). If the
position selected does not contain a disc, there
will be a pause and a message will appear on
the information display.
Once a disc has been inserted, there will be a
pause while the player reads the disc
information. Playback will then begin at the
start of track one.
COMPACT DISC PLAYBACK
To start compact disc pl ayback, briefly press
the CD mode button, followed by the disc
number required. If no di sc number is selected,
playback will begin at one of two places:
• If the discs have not been removed since
their last use, playback will begin from the
point at which it wa s stopped previously.
• If the discs have not been used since they
were inserted, playback will begin at the
start of the first loaded disc.
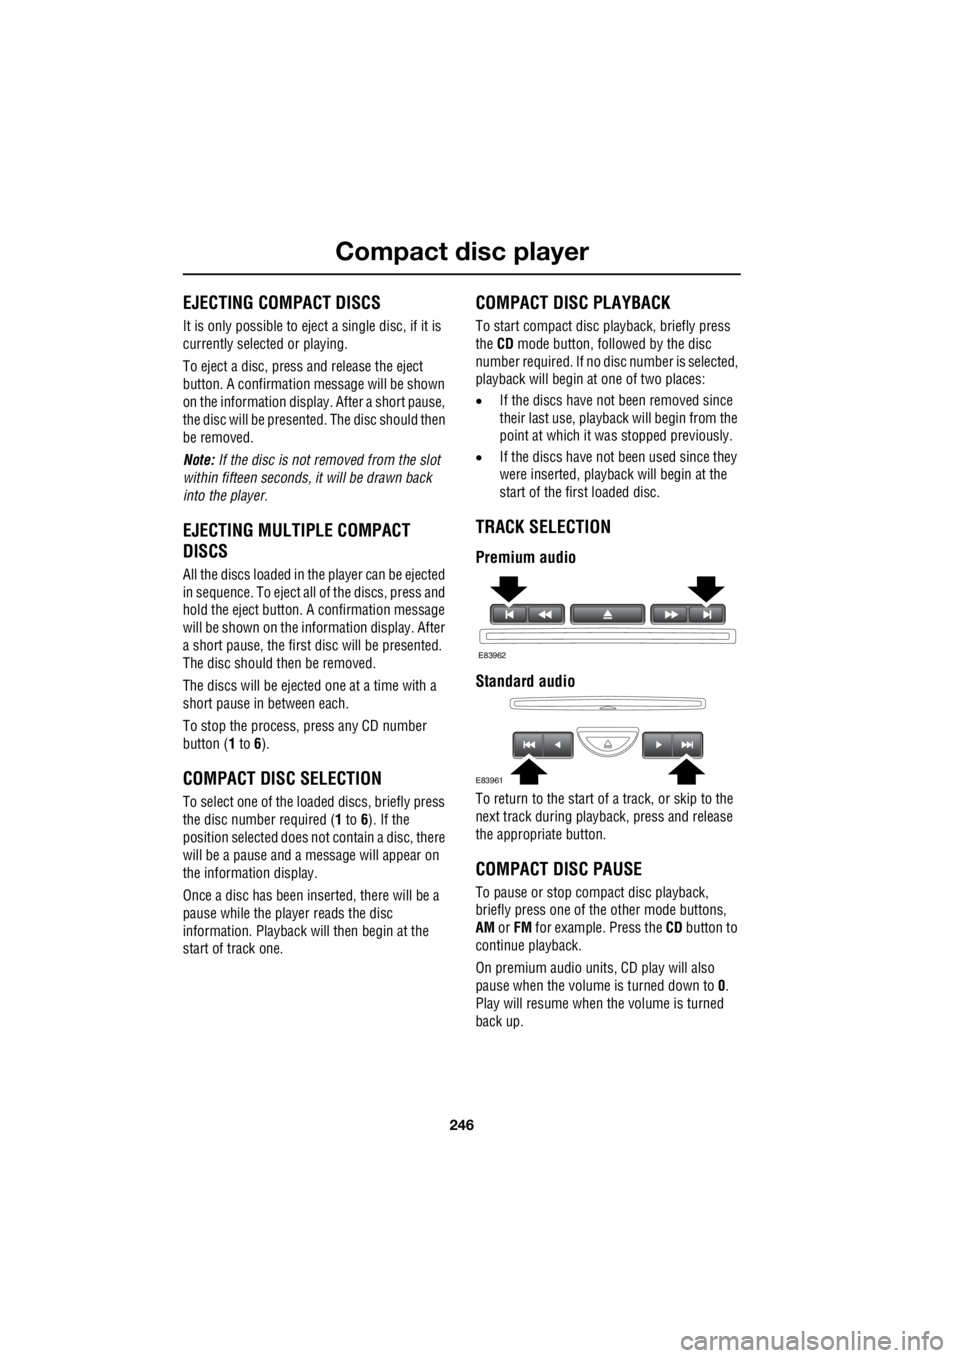
TRACK SELECTION
Premium audio
Standard audio
To return to the start of a track, or skip to the
next track during playba ck, press and release
the appropriate button.
COMPACT DISC PAUSE
To pause or stop compact disc playback,
briefly press one of th e other mode buttons,
AM or FM for example. Press the CD button to
continue playback.
On premium audio units, CD play will also
pause when the volume is turned down to 0.
Play will resume when the volume is turned
back up.
E83962
E83961
Page 2969 of 3229
249
Compact disc player
R
To disable the function, and to continue the
currently playing track, press the SCAN or EXIT
button again.
Note: While in CD scan mode, pressing the
previous track button w ill resume normal play
at the current track. Pressing the next track
button will move to the next track and resume
normal play.
CD Scan - Standard audio
1. Press the MENU button to access the
functions menu.
2. Use the rotary control to select CD Scan.
3. Press the rotary control to enable or
disable the function.
Note: While in CD scan mode, pressing the
previous track button w ill resume normal play
at the current track. Pressing the next track
button will move to the next track and resume
normal play.
MP3 FILE PLAYBACK
Note: Standard audio units do not have the
facility to play MP3 files.
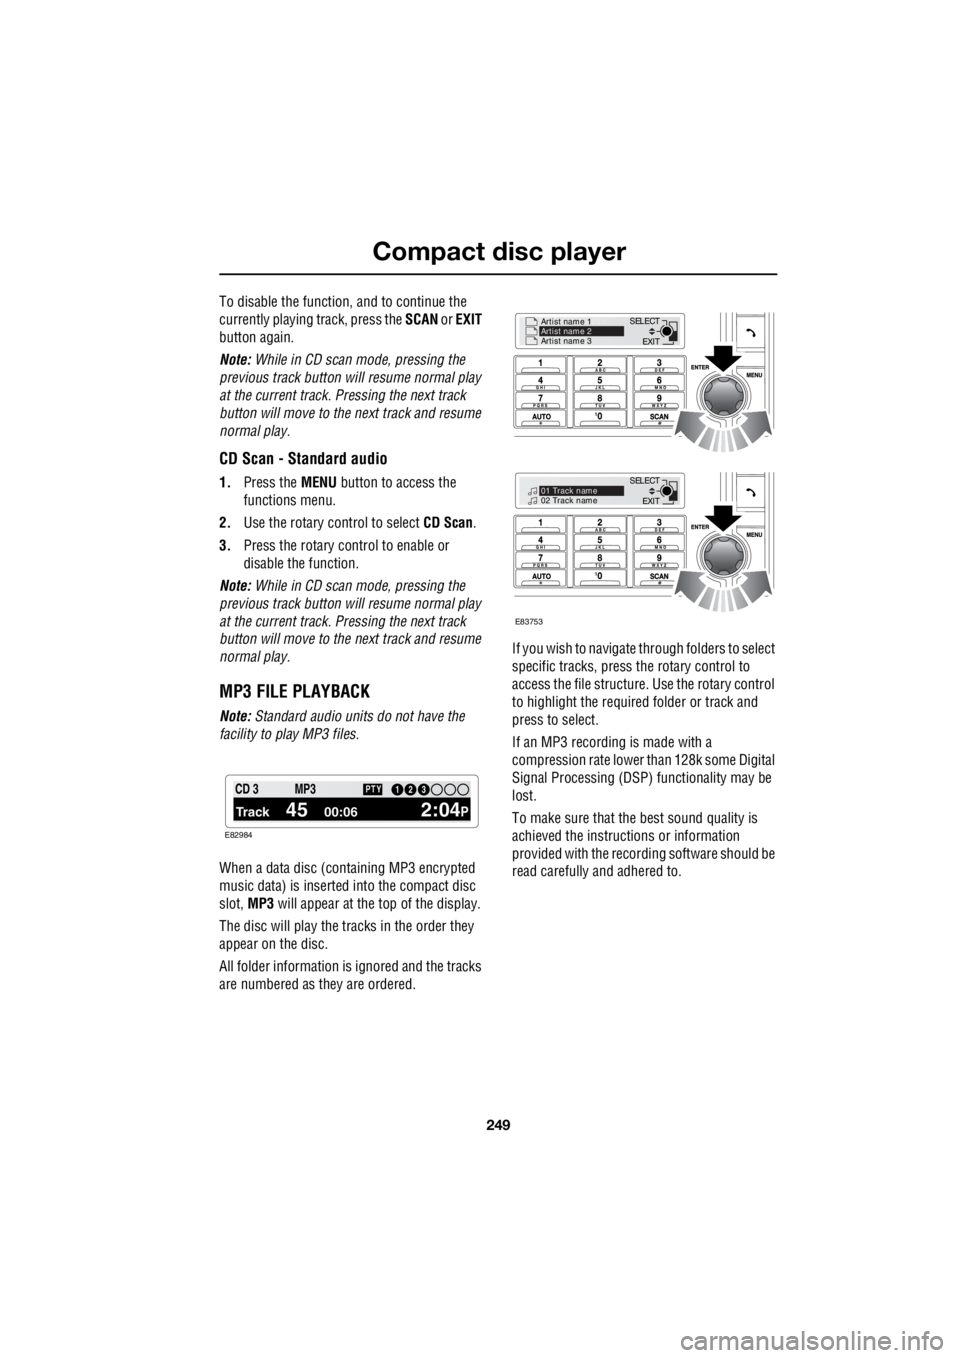
When a data disc (containing MP3 encrypted
music data) is inserted into the compact disc
slot, MP3 will appear at the top of the display.
The disc will play the tracks in the order they
appear on the disc.
All folder information is ignored and the tracks
are numbered as they are ordered. If you wish to navigate through folders to select
specific tracks, press the rotary control to
access the file structure. Use the rotary control
to highlight the required folder or track and
press to select.
If an MP3 recording is made with a
compression rate lower than 128k some Digital
Signal Processing (DSP) functionality may be
lost.
To make sure that the best sound quality is
achieved the instructions or information
provided with the recording software should be
read carefully and adhered to.
1 12 3 4 6CD 3
Track 45 00:06 2:04P
PTY13 2MP3
E82984
EXIT
SELECT
Artist name 1
PTY..
Artist name 2
Artist name 3
EXIT
SELECT
PTY..
01 Track name
02 Track name
E83753
Page 2972 of 3229
Rear passenger controls
252
L
Rear passenger controlsREAR SEAT CONTROLS
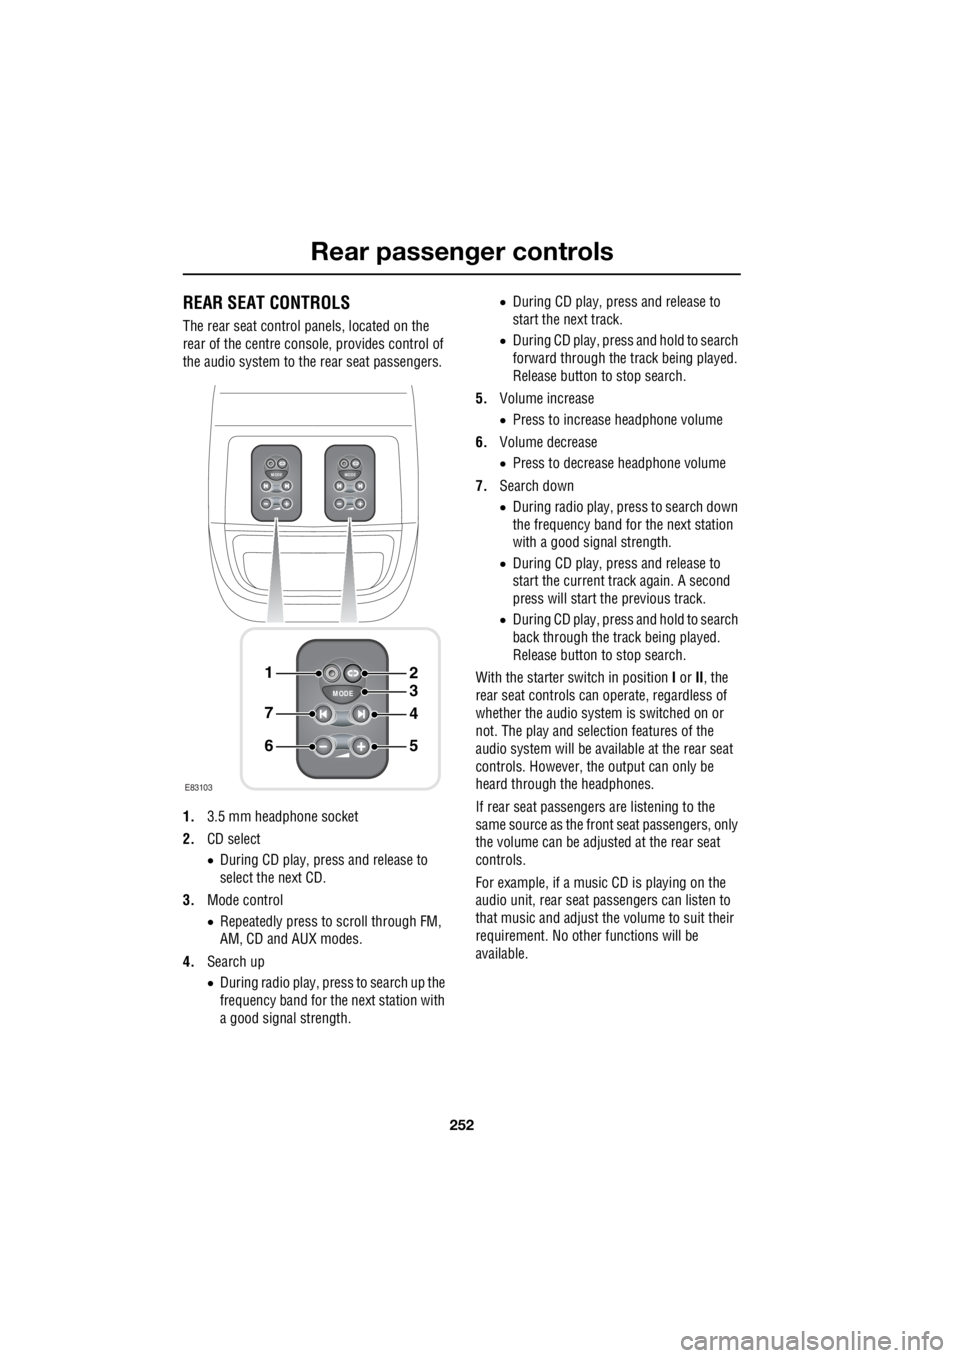
The rear seat control panels, located on the
rear of the centre consol e, provides control of
the audio system to the rear seat passengers.
1. 3.5 mm headphone socket
2. CD select
• During CD play, press and release to
select the next CD.
3. Mode control
• Repeatedly press to scroll through FM,
AM, CD and AUX modes.
4. Search up
• During radio play, press to search up the
frequency band for the next station with
a good signal strength. •
During CD play, press and release to
start the next track.
• During CD play, press and hold to search
forward through the track being played.
Release button to stop search.
5. Volume increase
• Press to increase headphone volume
6. Volume decrease
• Press to decrease headphone volume
7. Search down
• During radio play, press to search down
the frequency band for the next station
with a good signal strength.
• During CD play, press and release to
start the current track again. A second
press will start the previous track.
• During CD play, press and hold to search
back through the track being played.
Release button to stop search.
With the starter switch in position I or II, the
rear seat controls can operate, regardless of
whether the audio system is switched on or
not. The play and selection features of the
audio system will be available at the rear seat
controls. However, the output can only be
heard through the headphones.
If rear seat passengers are listening to the
same source as the front seat passengers, only
the volume can be adjusted at the rear seat
controls.
For example, if a music CD is playing on the
audio unit, rear seat pa ssengers can listen to
that music and adjust the volume to suit their
requirement. No other functions will be
available.
MODE
+
MODE
+
MODE
+
1
7
6
4
3
2
5
E83103
Page 2973 of 3229

253
Rear passenger controls
R
If however, the audio unit is switched to
another source, e.g. radi o, all CD related rear
seat controls become operable. If the audio
source is subsequently switched back to CD,
the rear seat controls will again be limited to
volume control only.
The same logic applie s to radio functions.
Adjustments can be made to other functions of
the audio system.
For example, if a music CD is selected on the
audio unit, radio can be selected and controlled
using the rear seat cont rols. All radio related
rear seat controls become operable.
HEADPHONES
Note: Only headphones compatible with a 3.5
mm jack plug socket can be used. To obtain
optimum sound quality, use headphones with
an impedance of 32 ohms.
Note: When the headphones are not
connected, the rear se at controls remain
operational. It is still possible to select CD,
while the radio is playi ng on the audio unit. CD
play will remain opera tional until the mode
control is pressed again.
Note: The mode in use when the starter key is
removed will resume if the starter switch is
turned on again (position I or II) within two
minutes. If the starter switch is turned off for
longer than two minutes AUX mode will be
selected when the starter switch is next turned
on. For example, if a CD is playing when the key
is removed, play will restart when the starter
switch is next turned to position I, or the engine
is started, whether th e headphones are in use
or not.
Note: Adjusting the volume on the audio unit,
does not alter the headphone volume. The
volume of each controller can be adjusted
independently.
Page 2976 of 3229
Telephone
256
L
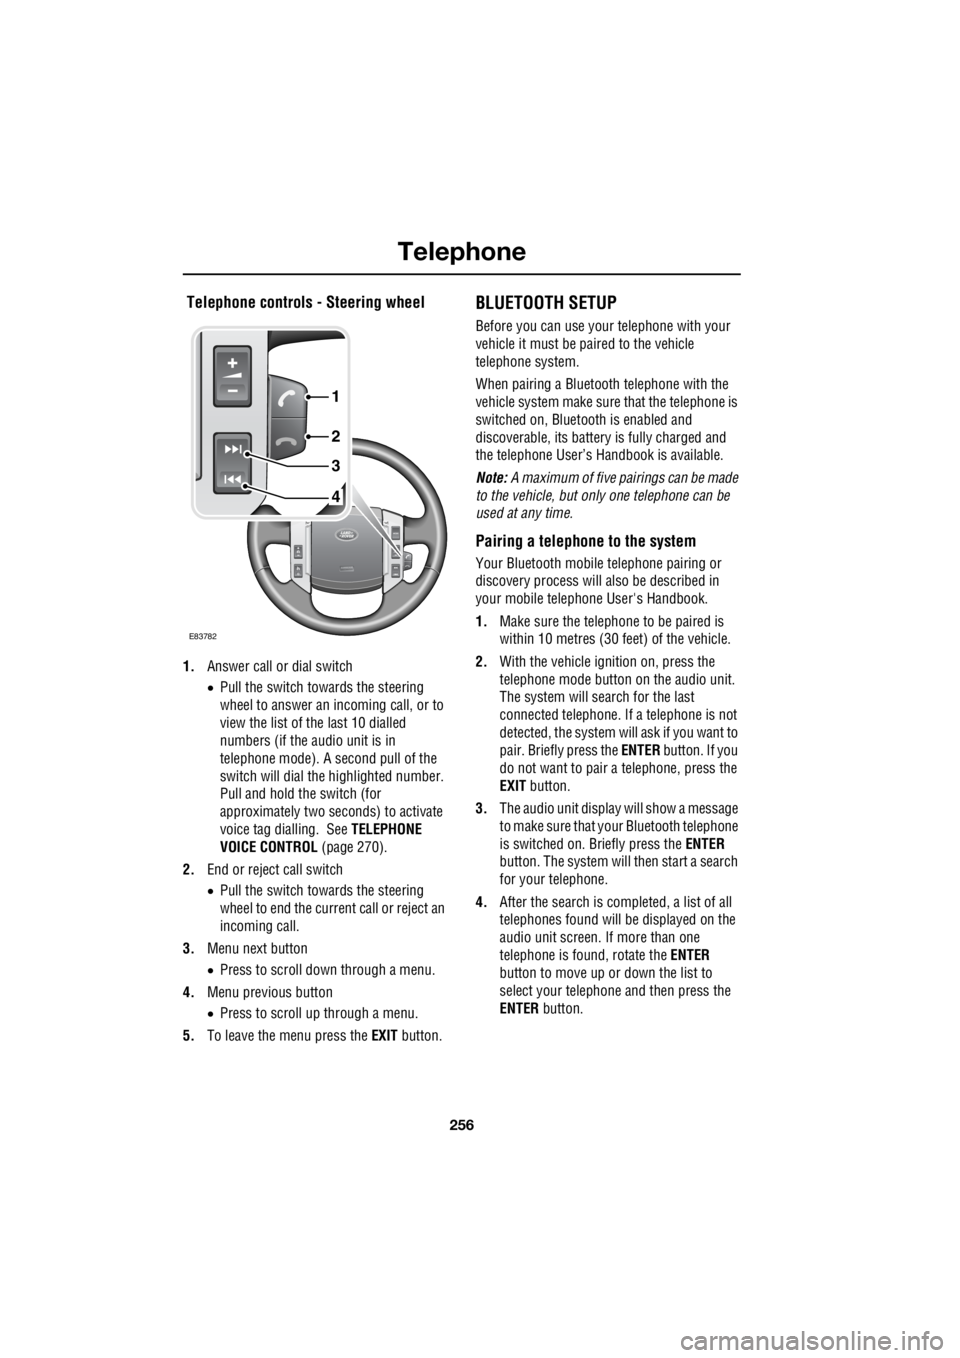
Telephone controls - Steering wheel
1. Answer call or dial switch
• Pull the switch towards the steering
wheel to answer an incoming call, or to
view the list of the last 10 dialled
numbers (if the audio unit is in
telephone mode). A second pull of the
switch will dial th e highlighted number.
Pull and hold the switch (for
approximately two seconds) to activate
voice tag dialling. See TELEPHONE
VOICE CONTROL (page 270).
2. End or reject call switch
• Pull the switch towards the steering
wheel to end the current call or reject an
incoming call.
3. Menu next button
• Press to scroll down through a menu.
4. Menu previous button
• Press to scroll up through a menu.
5. To leave the menu press the EXIT button.
BLUETOOTH SETUP
Before you can use your telephone with your
vehicle it must be paired to the vehicle
telephone system.
When pairing a Bluet ooth telephone with the
vehicle system ma ke sure that the telephone is
switched on, Bluetooth is enabled and
discoverable, its battery is fully charged and
the telephone User’s Handbook is available.
Note: A maximum of five pairings can be made
to the vehicle, but only one telephone can be
used at any time.
Pairing a telephone to the system
Your Bluetooth mobile telephone pairing or
discovery process will al so be described in
your mobile telephone User's Handbook.
1. Make sure the telephone to be paired is
within 10 metres (30 feet) of the vehicle.
2. With the vehicle ignition on, press the
telephone mode button on the audio unit.
The system will search for the last
connected tele phone. If a telephone is not
detected, the system w ill ask if you want to
pair. Briefly press the ENTER button. If you
do not want to pair a telephone, press the
EXIT button.
3. The audio unit display will show a message
to make sure that yo ur Bluetooth telephone
is switched on. Briefly press the ENTER
button. The system will then start a search
for your telephone.
4. After the search is completed, a list of all
telephones found will be displayed on the
audio unit screen. If more than one
telephone is found, rotate the ENTER
button to move up or down the list to
select your telephone and then press the
ENTER button.
4
3
2
1
E83782
Page 2983 of 3229
263
Telephone
R
Note: To cancel a call at any time, press the
EXIT button or operate the end call button on
the steering wheel.
Correcting or deleting numbers
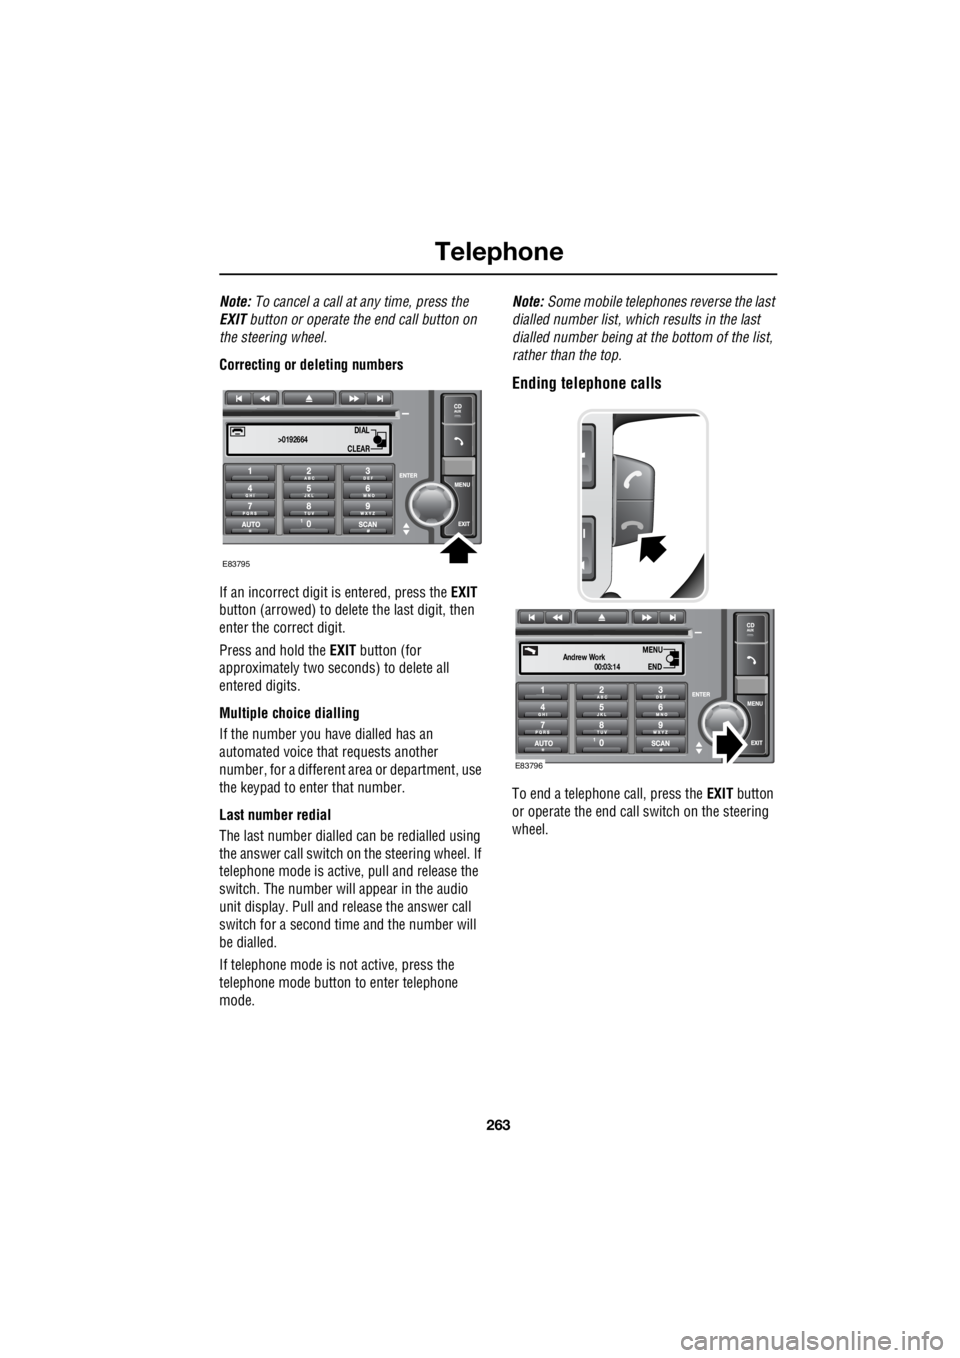
If an incorrect digit is entered, press the EXIT
button (arrowed) to delete the last digit, then
enter the correct digit.
Press and hold the EXIT button (for
approximately two sec onds) to delete all
entered digits.
Multiple choice dialling
If the number you have dialled has an
automated voice that requests another
number, for a different area or department, use
the keypad to enter that number.
Last number redial
The last number dialled can be redialled using
the answer call switch on the steering wheel. If
telephone mode is active , pull and release the
switch. The number will appear in the audio
unit display. Pull and release the answer call
switch for a second time and the number will
be dialled.
If telephone mode is not active, press the
telephone mode button to enter telephone
mode. Note:
Some mobile telephone s reverse the last
dialled number list, whic h results in the last
dialled number being at the bottom of the list,
rather than the top.
Ending telephone calls
To end a telephone call, press the EXIT button
or operate the end call switch on the steering
wheel.
DIAL
CLEAR
>0192664
E83795
00:03:14
Andrew WorkEND
MENU
E83796
Page 2989 of 3229
269
Telephone
R
Quick search
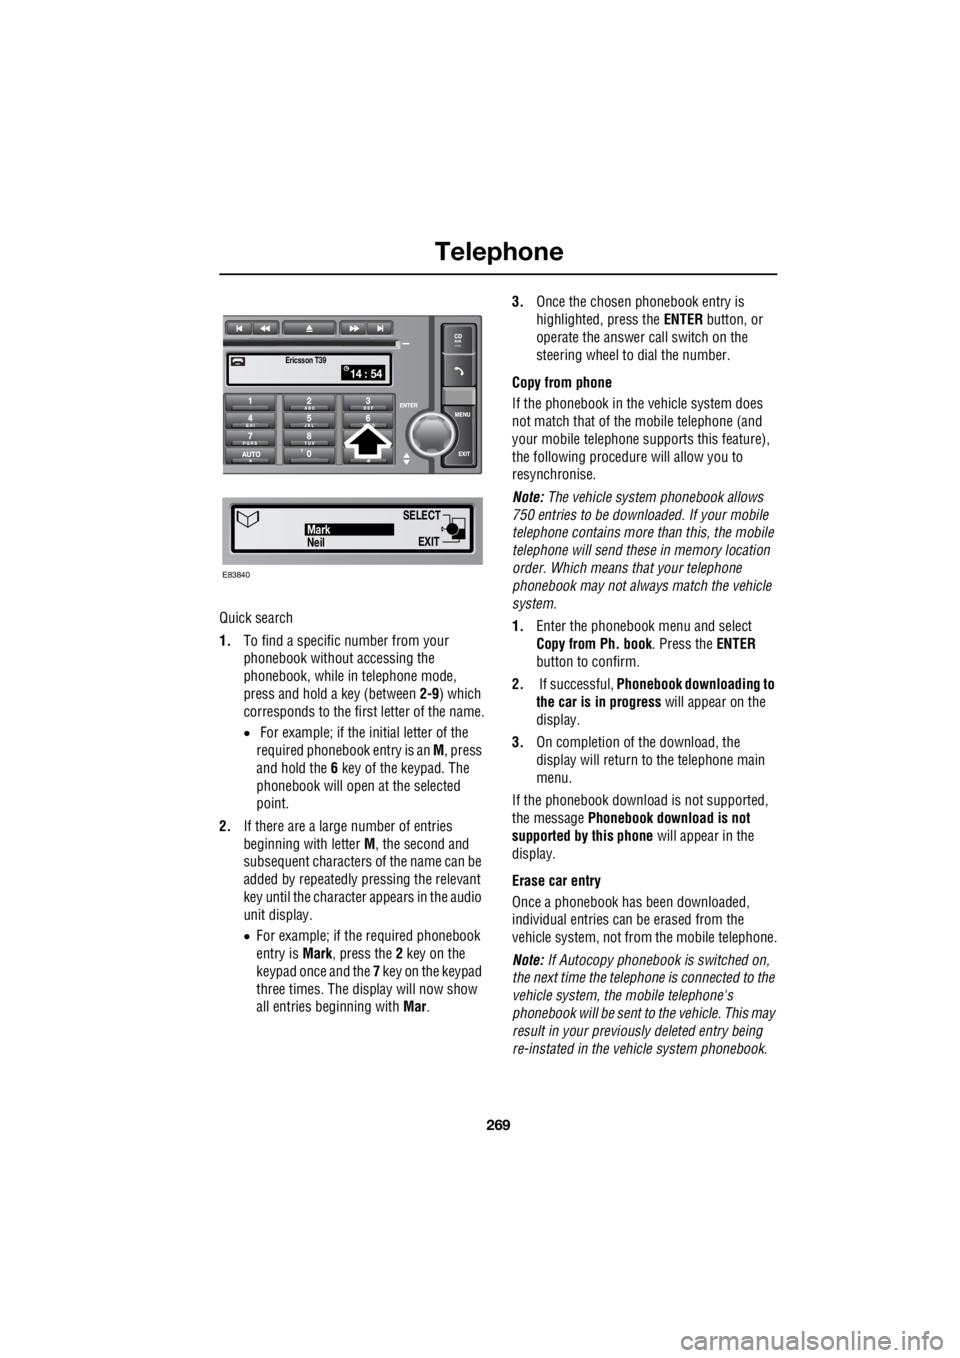
1. To find a specific number from your
phonebook without accessing the
phonebook, while in telephone mode,
press and hold a key (between 2-9) which
corresponds to the first letter of the name.
• For example; if the initial letter of the
required phonebook entry is an M, press
and hold the 6 key of the keypad. The
phonebook will open at the selected
point.
2. If there are a large number of entries
beginning with letter M, the second and
subsequent characters of the name can be
added by repeatedly pressing the relevant
key until the character appears in the audio
unit display.
• For example; if the required phonebook
entry is Mark, press the 2 key on the
keypad once and the 7 key on the keypad
three times. The display will now show
all entries beginning with Mar. 3.
Once the chosen phonebook entry is
highlighted, press the ENTER button, or
operate the answer call switch on the
steering wheel to dial the number.
Copy from phone
If the phonebook in th e vehicle system does
not match that of th e mobile telephone (and
your mobile telephone s upports this feature),
the following procedure will allow you to
resynchronise.
Note: The vehicle system phonebook allows
750 entries to be downloa ded. If your mobile
telephone contains more than this, the mobile
telephone will send these in memory location
order. Which means that your telephone
phonebook may not always match the vehicle
system.
1. Enter the phonebook menu and select
Copy from Ph. book . Press the ENTER
button to confirm.
2. If successful, Phonebook downloading to
the car is in progress will appear on the
display.
3. On completion of the download, the
display will return to the telephone main
menu.
If the phonebook download is not supported,
the message Phonebook download is not
supported by this phone will appear in the
display.
Erase car entry
Once a phonebook has been downloaded,
individual entries can be erased from the
vehicle system, not from the mobile telephone.
Note: If Autocopy phonebook is switched on,
the next time the telephone is connected to the
vehicle system , the mobile telephone's
phonebook will be sent to the vehicle. This may
result in your previous ly deleted entry being
re-instated in the vehicle system phonebook.
14 : 54Ericsson T39
SELECT
EXITNeilMark
E83840