Page 2565 of 5267
38. Install third gear synchronizer hub (1) snap ring
(2).
39. Install 3-4 synchronizer sleeve (3) on hub (2) and
push sleeve to the bottom of the hub.
NOTE: 3-4 synchronizer sleeve (3) and hub (2)
have one small tooth. They must be aligned to
install synchronizer sleeve (3).
40. Install 3-4 synchronizer detents and springs (1)
into synchronizer hub (2) slots. Then push detents
(1) behind synchronizer sleeve (3).
41. Install fourth gear blocker ring (1) on synchronizer
hub (2).
Page 2571 of 5267
59. Install fifth gear friction ring (1) onto hub (2).
60. Install fifth gear blocker ring with teeth pointing
down (1) onto hub (2).
61. Hold fifth gear blocker ring (1) onto hub (2) and
center 5-6 synchronizer sleeve on hub (2).
Page 2580 of 5267

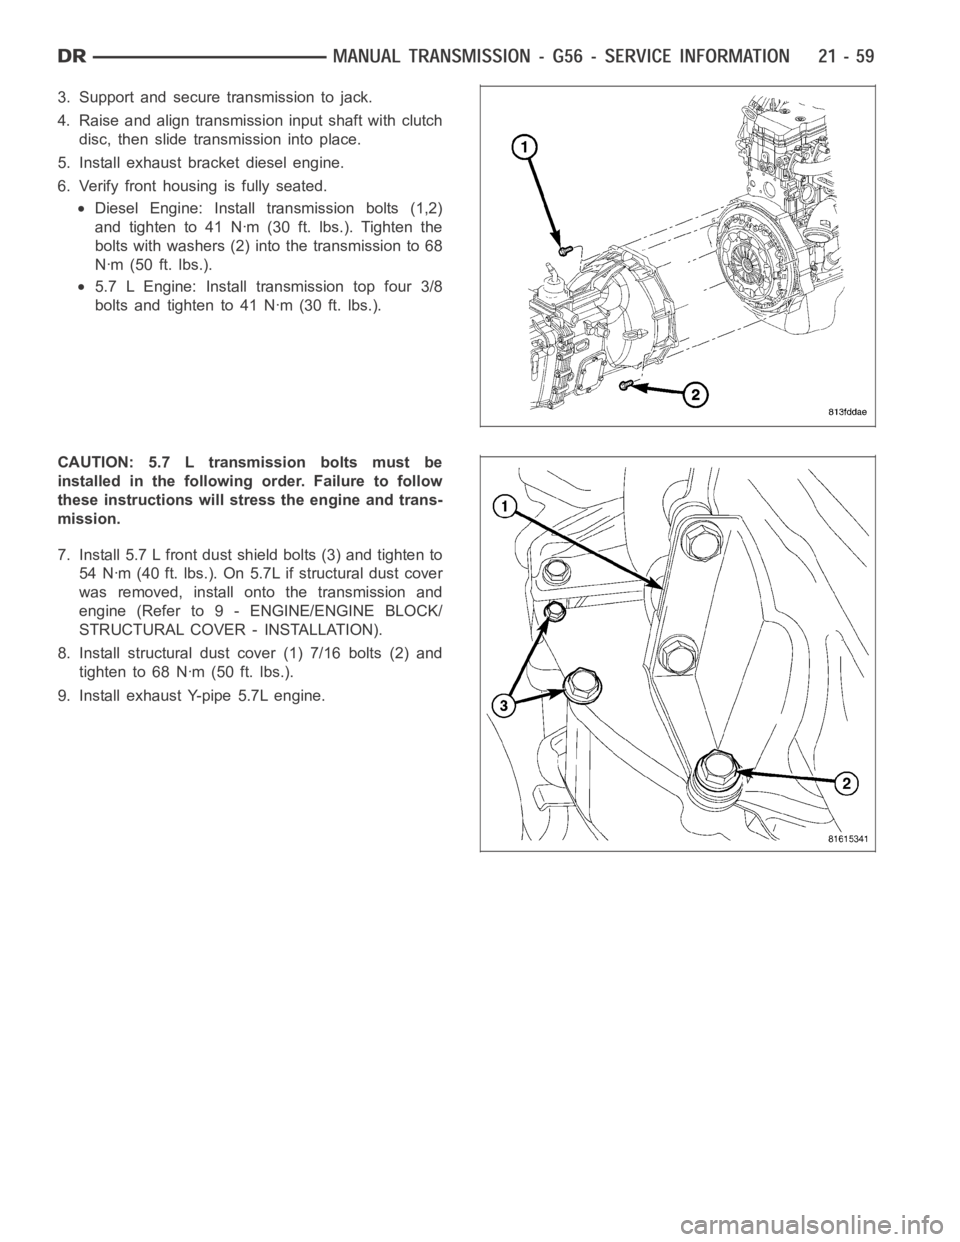
3. Support and secure transmission to jack.
4. Raise and align transmission input shaft with clutch
disc, then slide transmission into place.
5. Install exhaust bracket diesel engine.
6. Verify front housing is fully seated.
Diesel Engine: Install transmission bolts (1,2)
and tighten to 41 Nꞏm (30 ft. lbs.). Tighten the
bolts with washers (2) into the transmission to 68
Nꞏm (50 ft. lbs.).
5.7 L Engine: Install transmission top four 3/8
bolts and tighten to 41 Nꞏm (30 ft. lbs.).
CAUTION: 5.7 L transmission bolts must be
installed in the followingorder. Failure to follow
these instructions will stress the engine and trans-
mission.
7. Install 5.7 L front dust shield bolts (3) and tighten to
54 Nꞏm (40 ft. lbs.). On 5.7L if structural dust cover
was removed, install onto the transmission and
engine (Refer to 9 - ENGINE/ENGINE BLOCK/
STRUCTURAL COVER - INSTALLATION).
8. Install structural dust cover (1) 7/16 bolts (2) and
tighten to 68 Nꞏm (50 ft. lbs.).
9. Install exhaust Y-pipe 5.7L engine.
Page 2594 of 5267
13. Remove starter motor (2), structural dust cover (3)
bolts to clutch housing, dust shield (1) bolt and
suspension crossmember (4).
CAUTION: Do not remove structural dust cover
from engine block. If cover is removed clutch
housing and cover must be aligned with the
engine.
14. Remove exhaust pipe from the exhaust manifolds.
15. Support engine with adjustable jack stand and
wood block.
16. Support and secure transmission (1) to a trans-
mission jack (2) with safety chains.
17. Remove bolts from the rear transmission mount.
18. Remove the rear crossmember (2) and transmis-
sion mount (1).
19. Remove bolts attaching transmission to the
engine.
20. Move transmission rearward until input shaft is
clear of clutch disc and pressure plate. Then
lower jack and remove transmission from under
vehicle.
Page 2600 of 5267
16. Rotate main shift rail (1) clockwise and pull up
and out of the front housing.
17. Remove first gear, reverse gear, reverse bearing,
reverse gear bearing race and reverse synchro-
nizer with Bridge 938 (1), Button 9618-2 (2) and
puller Adapters 9628 (3). Position puller Adapters
9628 (3) under first gear.
Page 2602 of 5267
21. Remove first gear synchronizer blocker ring (1)
from 1-2 synchronizer hub (2).
22. Remove 1-2 synchronizer hub (1) snap ring (2).
23. Remove 1-2 synchronizer sleeve (1) from 1-2 syn-
chronizer hub (2).
Page 2604 of 5267
26. Remove interlock plate bolts (1) and remove inter-
lock plate (2).
27. Remove washers (1) from intermediate plate (2).
28. Remove intermediate plate (1) bolts (2).
Page 2630 of 5267
3. Install center support (1) race retainer screw (2)
andtightento22Nꞏm(16ft.lbs.).
REAR HOUSING
1. Install mainshaft bearing (1) in rear housing with
hammer and driver.
2. Install mainshaft bearing (1) retainer (2). Apply
Mopar
Lock & Seal Adhesive or equivalent to
retainer bolts and tighten to 10 Nꞏm (88 in. lbs.).