2006 DODGE RAM SRT-10 display
[x] Cancel search: displayPage 1237 of 5267
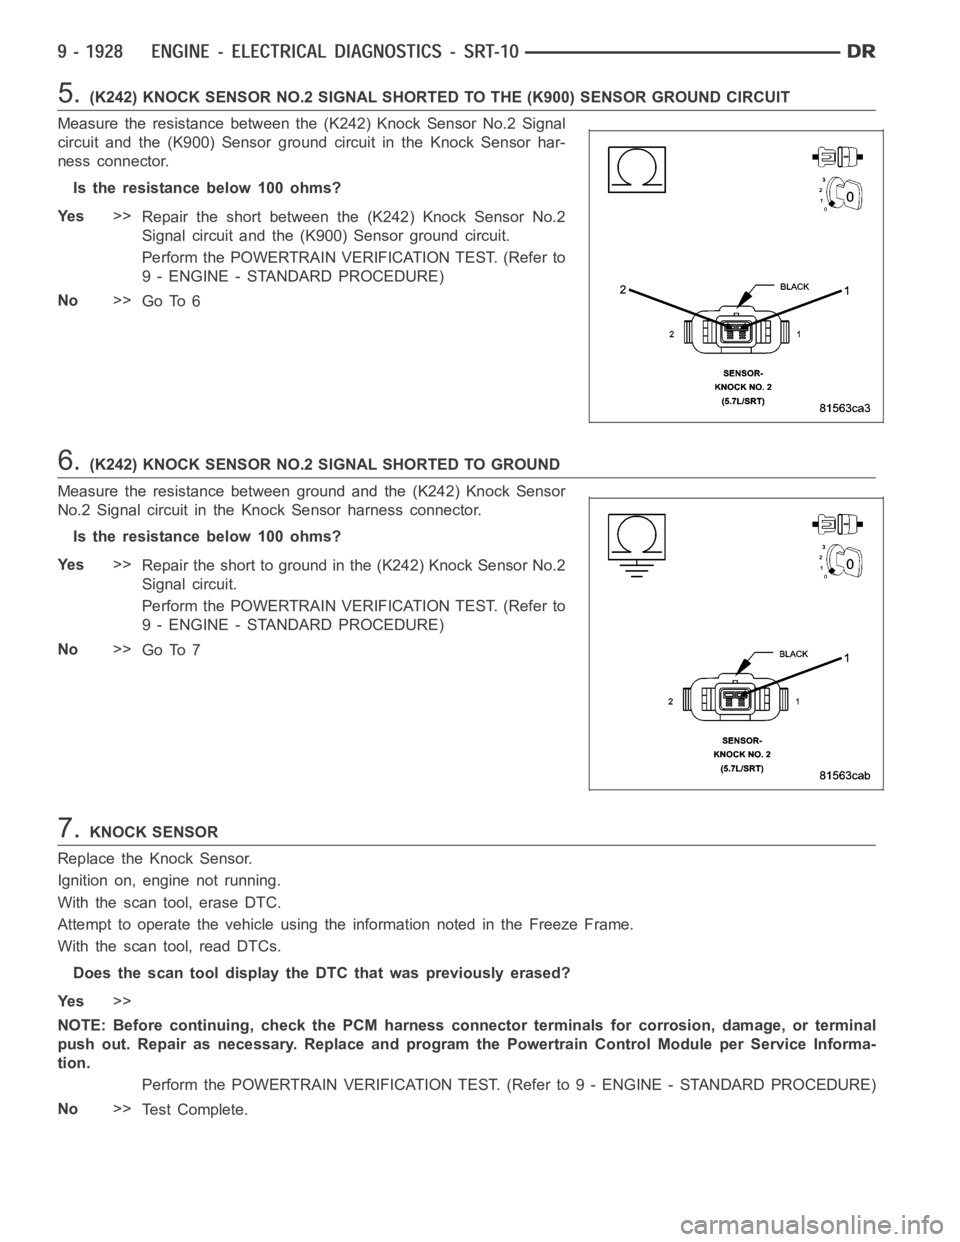
5.(K242) KNOCK SENSOR NO.2 SIGNAL SHORTED TO THE (K900) SENSOR GROUND CIRCUIT
Measure the resistance between the (K242) Knock Sensor No.2 Signal
circuit and the (K900) Sensor ground circuit in the Knock Sensor har-
ness connector.
Istheresistancebelow100ohms?
Ye s>>
Repair the short between the (K242) Knock Sensor No.2
Signal circuit and the (K900) Sensor ground circuit.
Perform the POWERTRAIN VERIFICATION TEST. (Refer to
9 - ENGINE - STANDARD PROCEDURE)
No>>
Go To 6
6.(K242) KNOCK SENSOR NO.2 SIGNAL SHORTED TO GROUND
Measure the resistance between ground and the (K242) Knock Sensor
No.2 Signal circuit in the Knock Sensor harness connector.
Istheresistancebelow100ohms?
Ye s>>
Repair the short to ground in the (K242) Knock Sensor No.2
Signal circuit.
Perform the POWERTRAIN VERIFICATION TEST. (Refer to
9 - ENGINE - STANDARD PROCEDURE)
No>>
Go To 7
7.KNOCK SENSOR
Replace the Knock Sensor.
Ignition on, engine not running.
With the scan tool, erase DTC.
Attempt to operate the vehicle using the information noted in the Freeze Frame.
With the scan tool, read DTCs.
Does the scan tool display the DTC that was previously erased?
Ye s>>
NOTE: Before continuing, check the PCM harness connector terminals for corrosion, damage, or terminal
push out. Repair as necessary. Replace and program the Powertrain ControlModule per Service Informa-
tion.
Perform the POWERTRAIN VERIFICATION TEST. (Refer to 9 - ENGINE - STANDARD PROCEDURE)
No>>
Te s t C o m p l e t e .
Page 1246 of 5267
When Monitored:
With battery voltage greater than 8 volts during engine cranking or greater than 12 volts with engine running,
engine rpm less than 2016, and none of the coils in dwell when checked.
Set Condition:
Peak current is not achieved with battery based dwell plus 1.5 ms of diagnostic offset. It takes less than 3
seconds during cranking or up to 6 seconds while running to set.
Possible Causes
(K343) ASD RELAY OUTPUT CIRCUIT
IGNITION COIL
(K17) IGNITION COIL NO.2 CONTROL CIRCUIT OPEN
(K17) IGNITION COIL NO.2 CONTROL CIRCUIT SHORTED TO GROUND
PCM
Always perform the Pre-Diagnostic Troubleshooting procedure before proceeding. (Refer to 9 - ENGINE -
DIAGNOSIS AND TESTING)
1.GOOD TRIP EQUAL TO ZERO
Ignition on, engine not running.
With the scan tool, read DTCs and record the related Freeze Frame data.
Is the Good Trip Counter displayed and equal to zero?
Ye s>>
Go To 2
No>>
Refer to the INTERMITTENT CONDTION Diagnostic Procedure.
Perform POWERTRAIN VERIFICATION TEST. (Refer to 9 - ENGINE - STANDARD PROCEDURE)
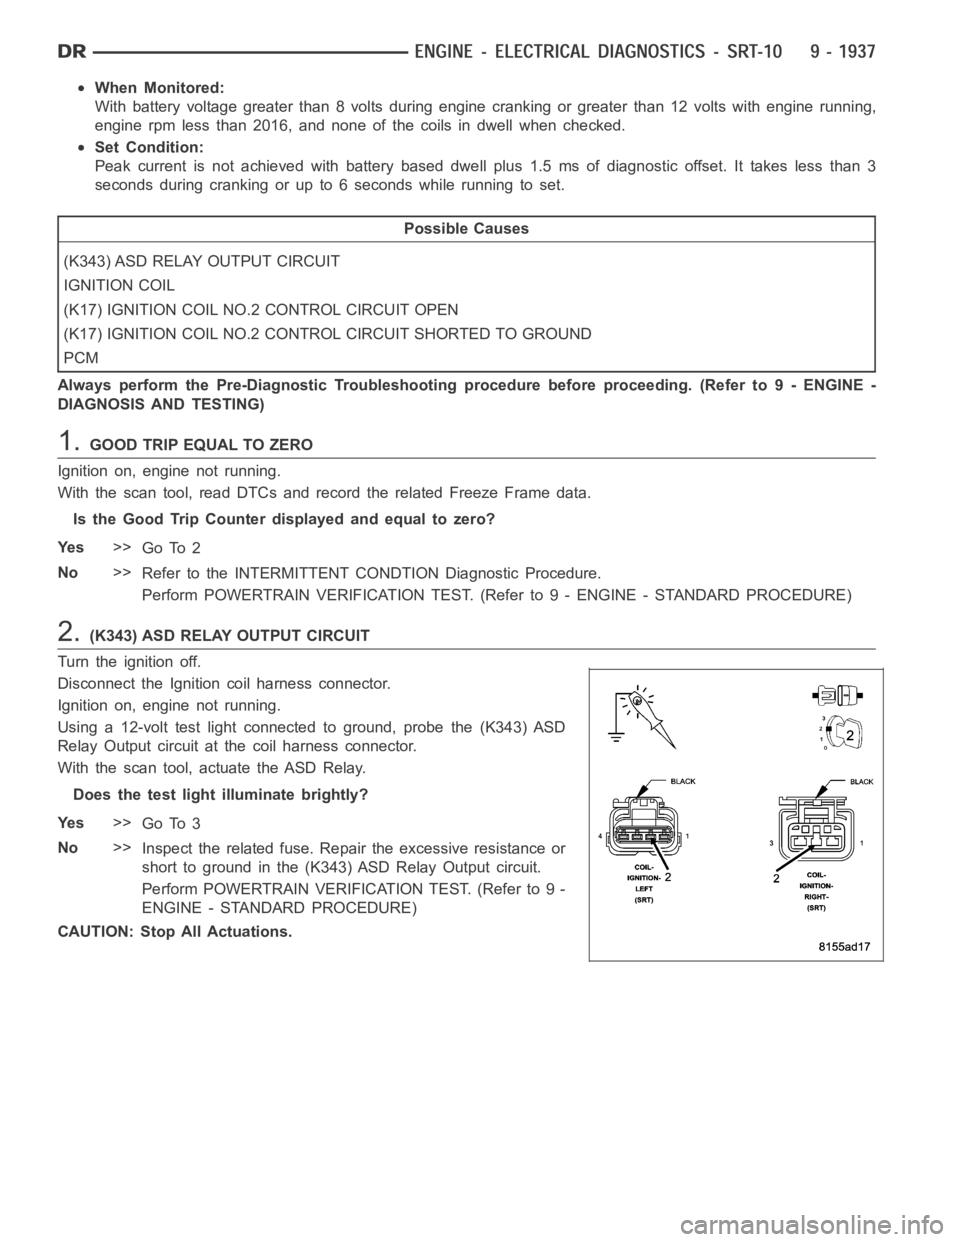
2.(K343) ASD RELAY OUTPUT CIRCUIT
Turn the ignition off.
Disconnect the Ignition coil harness connector.
Ignition on, engine not running.
Using a 12-volt test light connected to ground, probe the (K343) ASD
Relay Output circuit at the coil harness connector.
With the scan tool, actuate the ASD Relay.
Does the test light illuminate brightly?
Ye s>>
Go To 3
No>>
Inspect the related fuse. Repair the excessive resistance or
short to ground in the (K343) ASD Relay Output circuit.
Perform POWERTRAIN VERIFICATION TEST. (Refer to 9 -
ENGINE - STANDARD PROCEDURE)
CAUTION: Stop All Actuations.
Page 1250 of 5267
When Monitored:
With battery voltage greater than 8 volts during engine cranking or greater than 12 volts with engine running,
engine rpm less than 2016, and none of the coils in dwell when checked.
Set Condition:
Peak current is not achieved with battery based dwell plus 1.5 ms of diagnostic offset. It takes less than 3
seconds during cranking or up to 6 seconds while running to set.
Possible Causes
(K343) ASD RELAY OUTPUT CIRCUIT
IGNITION COIL
(K18) IGNITION COIL CONTROL NO.3 CIRCUIT OPEN
(K18) IGNITION COIL CONTROL NO.3 CIRCUIT SHORTED TO GROUND
PCM
Always perform the Pre-Diagnostic Troubleshooting procedure before proceeding. (Refer to 9 - ENGINE -
DIAGNOSIS AND TESTING)
1.GOOD TRIP EQUAL TO ZERO
Ignition on, engine not running.
With the scan tool, read DTCs and record the related Freeze Frame data.
Is the Good Trip Counter displayed and equal to zero?
Ye s>>
Go To 2
No>>
Refer to the INTERMITTENT CONDTION Diagnostic Procedure.
Perform POWERTRAIN VERIFICATION TEST. (Refer to 9 - ENGINE - STANDARD PROCEDURE)
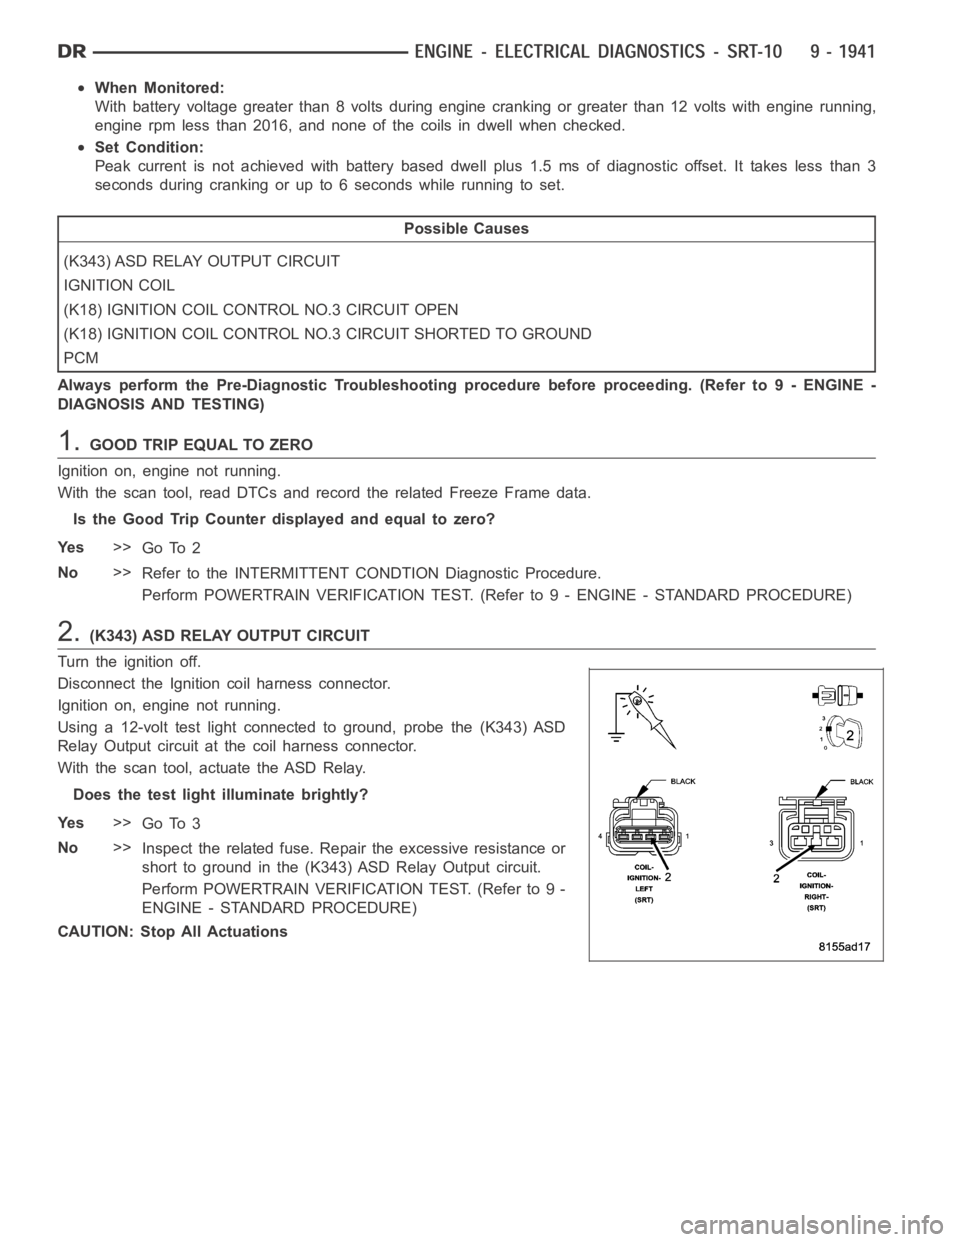
2.(K343) ASD RELAY OUTPUT CIRCUIT
Turn the ignition off.
Disconnect the Ignition coil harness connector.
Ignition on, engine not running.
Using a 12-volt test light connected to ground, probe the (K343) ASD
Relay Output circuit at the coil harness connector.
With the scan tool, actuate the ASD Relay.
Does the test light illuminate brightly?
Ye s>>
Go To 3
No>>
Inspect the related fuse. Repair the excessive resistance or
short to ground in the (K343) ASD Relay Output circuit.
Perform POWERTRAIN VERIFICATION TEST. (Refer to 9 -
ENGINE - STANDARD PROCEDURE)
CAUTION: Stop All Actuations
Page 1254 of 5267
When Monitored:
With battery voltage greater than 8 volts during engine cranking or greater than 12 volts with engine running,
engine rpm less than 2016, and none of the coils in dwell when checked.
Set Condition:
Peak current is not achieved with battery based dwell plus 1.5 ms of diagnostic offset. It takes less than 3
seconds during cranking or up to 6 seconds while running to set.
Possible Causes
(K343) ASD RELAY OUTPUT CIRCUIT
IGNITION COIL
(K133) IGNITION COIL CONTROL NO.4 CIRCUIT OPEN
(K133) IGNITION COIL CONTROL NO.4 CIRCUIT SHORTED TO GROUND
PCM
Always perform the Pre-Diagnostic Troubleshooting procedure before proceeding. (Refer to 9 - ENGINE -
DIAGNOSIS AND TESTING)
1.GOOD TRIP EQUAL TO ZERO
Ignition on, engine not running.
With the scan tool, read DTCs and record the related Freeze Frame data.
Is the Good Trip Counter displayed and equal to zero?
Ye s>>
Go To 2
No>>
Refer to the INTERMITTENT CONDTION Diagnostic Procedure.
Perform POWERTRAIN VERIFICATION TEST. (Refer to 9 - ENGINE - STANDARD PROCEDURE)
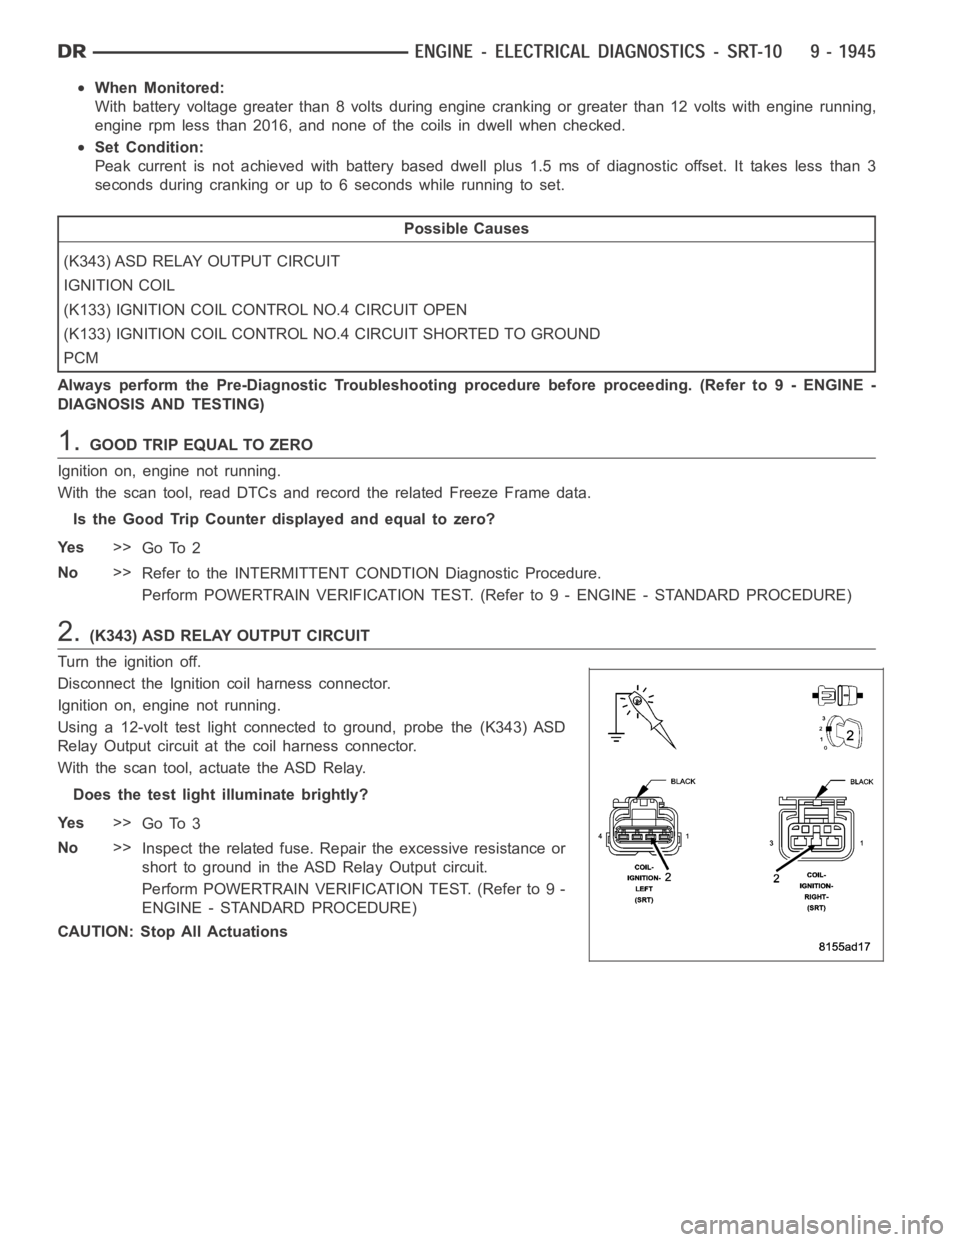
2.(K343) ASD RELAY OUTPUT CIRCUIT
Turn the ignition off.
Disconnect the Ignition coil harness connector.
Ignition on, engine not running.
Using a 12-volt test light connected to ground, probe the (K343) ASD
Relay Output circuit at the coil harness connector.
With the scan tool, actuate the ASD Relay.
Does the test light illuminate brightly?
Ye s>>
Go To 3
No>>
Inspect the related fuse. Repair the excessive resistance or
short to ground in the ASD Relay Output circuit.
Perform POWERTRAIN VERIFICATION TEST. (Refer to 9 -
ENGINE - STANDARD PROCEDURE)
CAUTION: Stop All Actuations
Page 1258 of 5267
When Monitored:
With battery voltage greater than 8 volts during engine cranking or greater than 12 volts with engine running,
engine rpm less than 2016, and none of the coils in dwell when checked.
Set Condition:
Peak current is not achieved with battery based dwell plus 1.5 ms of diagnostic offset. It takes less than 3
seconds during cranking or up to 6 seconds while running to set.
Possible Causes
(K343) ASD RELAY OUTPUT CIRCUIT
IGNITION COIL
(K134) IGNITION COIL CONTROL NO.5 CIRCUIT OPEN
(K134) IGNITION COIL CONTROL NO.5 CIRCUIT SHORTED TO GROUND
PCM
Always perform the Pre-Diagnostic Troubleshooting procedure before proceeding. (Refer to 9 - ENGINE -
DIAGNOSIS AND TESTING)
1.GOOD TRIP EQUAL TO ZERO
Ignition on, engine not running.
With the scan tool, read DTCs and record the related Freeze Frame data.
Is the Good Trip Counter displayed and equal to zero?
Ye s>>
Go To 2
No>>
Refer to the INTERMITTENT CONDTION Diagnostic Procedure.
Perform POWERTRAIN VERIFICATION TEST. (Refer to 9 - ENGINE - STANDARD PROCEDURE)
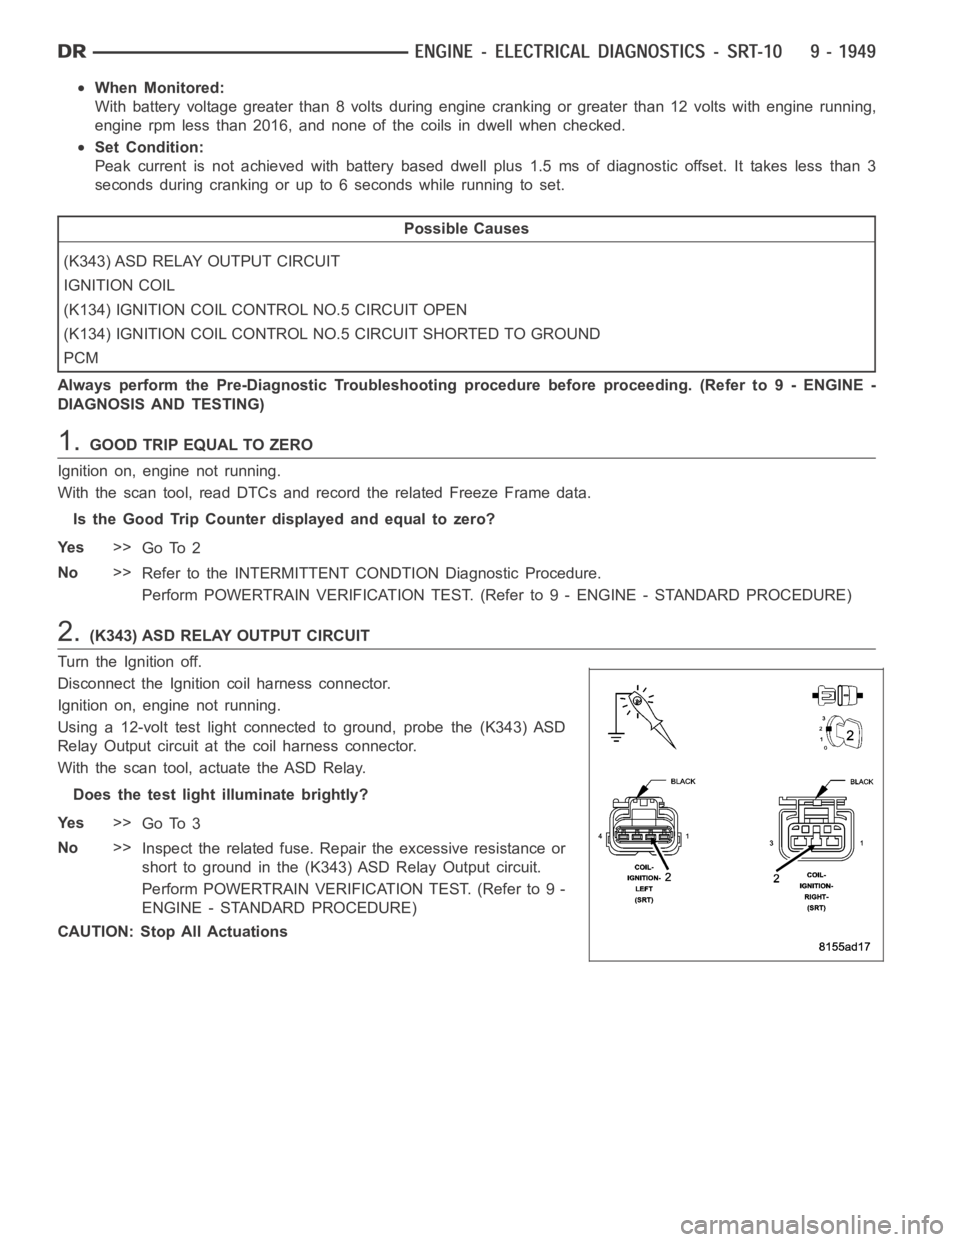
2.(K343) ASD RELAY OUTPUT CIRCUIT
Turn the Ignition off.
Disconnect the Ignition coil harness connector.
Ignition on, engine not running.
Using a 12-volt test light connected to ground, probe the (K343) ASD
Relay Output circuit at the coil harness connector.
With the scan tool, actuate the ASD Relay.
Does the test light illuminate brightly?
Ye s>>
Go To 3
No>>
Inspect the related fuse. Repair the excessive resistance or
short to ground in the (K343) ASD Relay Output circuit.
Perform POWERTRAIN VERIFICATION TEST. (Refer to 9 -
ENGINE - STANDARD PROCEDURE)
CAUTION: Stop All Actuations
Page 1268 of 5267
When Monitored:
With engine temperature greater than 170° F, fuel control in closed loop, engine idling for 2 minutes, no low
fuel, MAP less than 15.7 inches mercury and barometric altitude less than 8,000 feet.
Set Condition:
After having passed the Leak Detection Pump (LDP) test, no air flow throughthe evaporative system is
detected by the EVAP monitor.
Possible Causes
EVAP PURGE HOSE (SOLENOID TO CANISTER)
EVAP PURGE HOSE (CANISTER TO FUEL TANK)
EVAP PURGE SOLENOID VACUUM SUPPLY
EVAP PURGE SOLENOID (LEAKS/STUCK OPEN)
EVAP PURGE SOLENOID
For the Engine circuit diagram (Refer to 8 - ELECTRICAL/ELECTRONIC CONTROL MODULES/ENGINE CON-
TROL MODULE - SCHEMATIC - ELECTRICAL)
Diagnostic Test
1.VEHICLE HISTORY AND SERVICE BULLETIN INVESTIGATION
Ignition on, engine not running.
With a scan tool, read DTCs and record the related Freeze Frame data if any DTC(s) are present.
Whether or not any DTC(s) are present you will want to check the following items which may assist in repairing the
customer’s complaint successfully.
Check the vehicles repair history.
If the vehicle has a repair history that pertains to the customer’s currentcomplaint, review the repair.
Inspect the vehicle for any aftermarket accessories that may have been installed incorrectly.
Check for any service bulletin(s) related to the customer’s complaint or DTC(s).
If a service bulletin applies, follow the instructions per the service bulletin.
Choose the following scenario that best applies.
The service bulletin repaired the customer’s complaint.
Testing complete.
A DTC is present, no service bulletins apply, or the service bulletin didn’t repair the customer’s complaint.
Go To 2
2.GOOD TRIP EQUAL TO ZERO
Check for any related TSBs.
Ignition on, engine not running.
With the scan tool, read DTCs and record the related Freeze Frame data.
Is the Good Trip Counter displayed and equal to zero?
Ye s>>
Go To 3
No>>
Refer to the INTERMITTENT CONDITION Diagnostic Procedure.
Perform POWERTRAIN VERIFICATION TEST. (Refer to 9 - ENGINE - STANDARD PROCEDURE)
Page 1296 of 5267
When Monitored:
Engine Temperature greater than 104 Deg F, MAP vacuum approximately 15
to 16inches of mercury and
Engine RPM between 1400 and 3000 rpm.
Set Condition:
No Vehicle Speed Signal for more than 15 seconds on two consecutive trips.
Possible Causes
(B22) VEHICLE SPEED SIGNAL CIRCUIT SHORTED TO VOLTAGE
(B22) VEHICLE SPEED SIGNAL CIRCUIT OPEN BETWEEN CAB AND PCM
(B22) VEHICLE SPEED SIGNAL CIRCUIT SHORTED TO GROUND
PCM
Always perform the Pre-Diagnostic Troubleshooting procedure before proceeding. (Refer to 9 - ENGINE -
DIAGNOSIS AND TESTING)
1.GOOD TRIP EQUAL TO ZERO
Ignition on, engine not running.
NOTE: With the scan tool check for any related DTCs that may be present in theABS/RWAL Module or TCM,
diagnose any ABS/RWAL Module DTC’s before continuing.
With the scan tool, read DTCs and record the related Freeze Frame data.
Is the Good Trip Counter displayed and equal to zero?
Ye s>>
Go To 2
No>>
Refer to the INTERMITTENT CONDTION Diagnostic Procedure.
Perform POWERTRAIN VERIFICATION TEST. (Refer to 9 - ENGINE - STANDARD PROCEDURE)
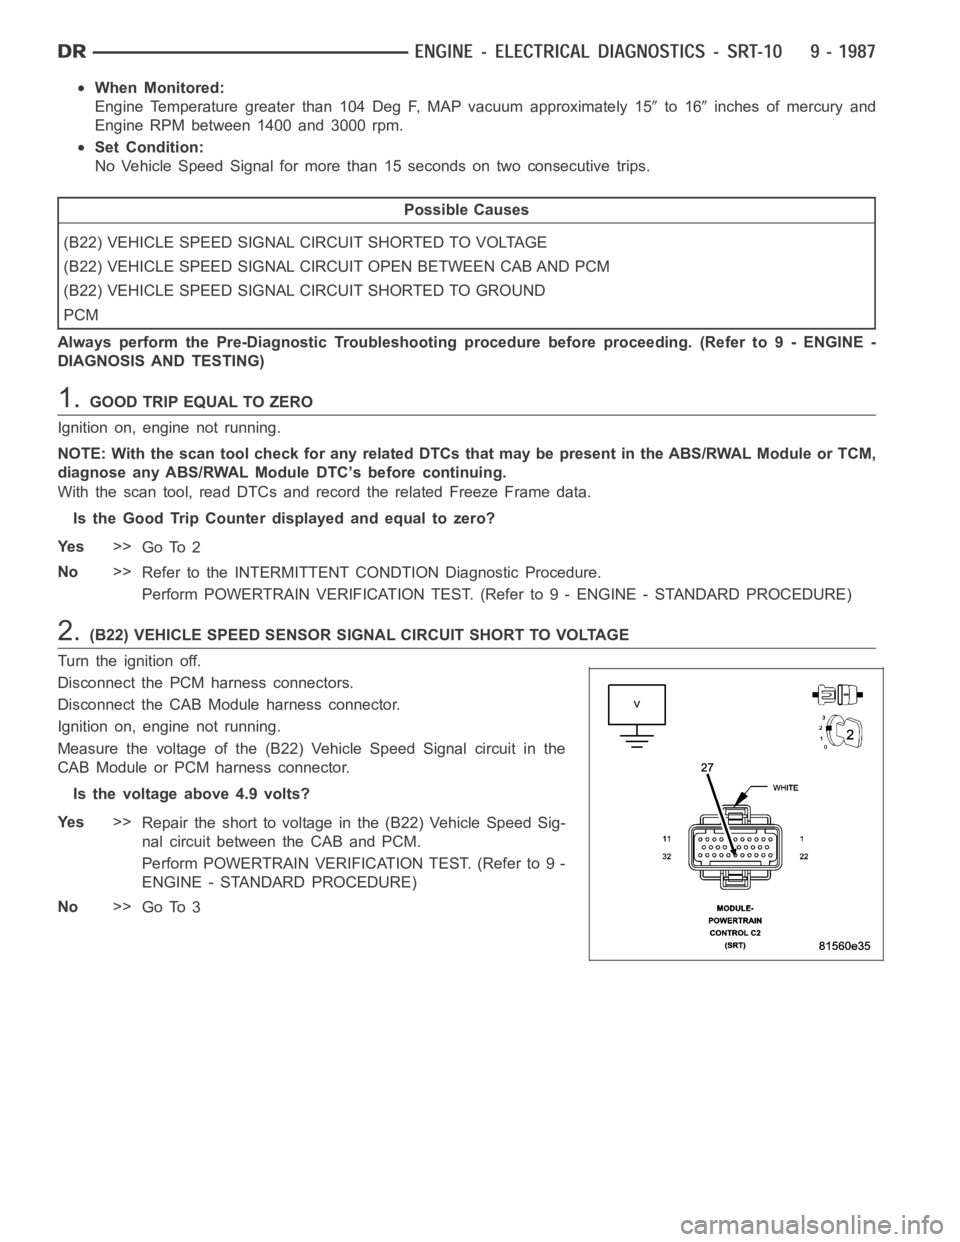
2.(B22) VEHICLE SPEED SENSOR SIGNAL CIRCUIT SHORT TO VOLTAGE
Turn the ignition off.
Disconnect the PCM harness connectors.
Disconnect the CAB Module harness connector.
Ignition on, engine not running.
Measure the voltage of the (B22) Vehicle Speed Signal circuit in the
CAB Module or PCM harness connector.
Is the voltage above 4.9 volts?
Ye s>>
Repair the short to voltage in the (B22) Vehicle Speed Sig-
nal circuit between the CAB and PCM.
Perform POWERTRAIN VERIFICATION TEST. (Refer to 9 -
ENGINE - STANDARD PROCEDURE)
No>>
Go To 3
Page 1299 of 5267
When Monitored:
At power-up and battery voltage greater than 11.5 volts.
Set Condition:
The PCM senses a short to ground or battery voltage on any of the four Idle AirControl (IAC) driver circuits
for 100 ms while the IAC motor is active.
Possible Causes
(K40) IAC #1 DRIVER CIRCUIT SHORTED TO (K60) #2, (K39) #3, OR (K59) #4 IAC DRIVER CIRCUITS
(K60) IAC #2 DRIVER CIRCUIT SHORTED TO (K39) IAC #3 OR (K59) IAC #4
(K39) IAC #3 DRIVER CIRCUIT SHORTED TO (K59) IAC #4 DRIVER CIRCUIT
IAC DRIVER CIRCUIT SHORTED TO VOLTAGE
IAC DRIVER CIRCUIT SHORTED TO GROUND
IAC MOTOR
PCM
Always perform the Pre-Diagnostic Troubleshooting procedure before proceeding. (Refer to 9 - ENGINE -
DIAGNOSIS AND TESTING)
1.GOOD TRIP EQUAL TO ZERO
Ignition on, engine not running.
With the scan tool, read DTCs and record the related Freeze Frame data.
Is the Good Trip Counter displayed and equal to zero?
Ye s>>
Go To 2
No>>
Refer to the INTERMITTENT CONDITIONSymptom (Diagnostic Procedure).
Perform POWERTRAIN VERIFICATION TEST. (Refer to 9 - ENGINE - STANDARD PROCEDURE)
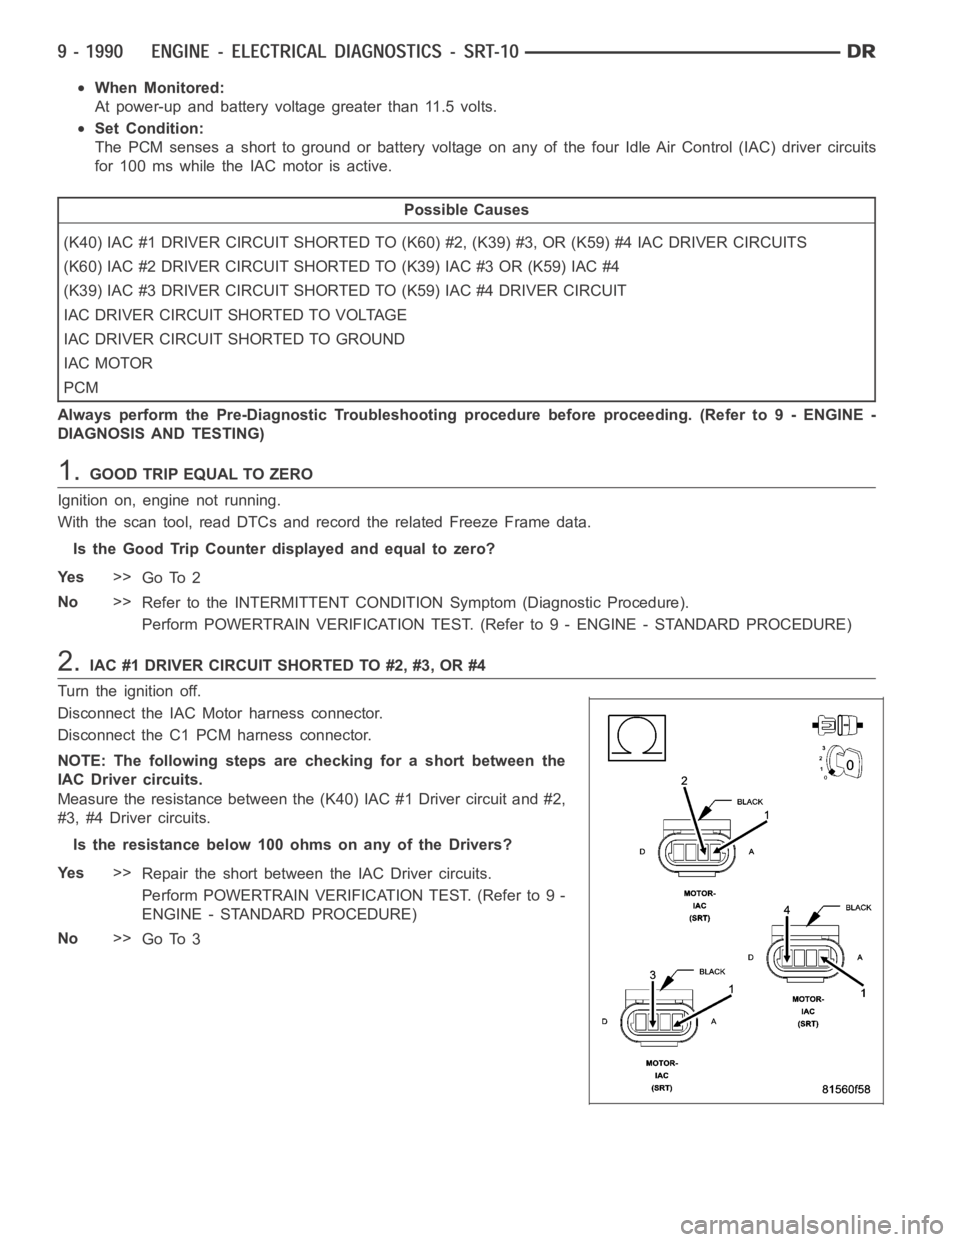
2.IAC #1 DRIVER CIRCUIT SHORTED TO #2, #3, OR #4
Turn the ignition off.
Disconnect the IAC Motor harness connector.
Disconnect the C1 PCM harness connector.
NOTE: The following steps are checking for a short between the
IAC Driver circuits.
Measure the resistance between the (K40) IAC #1 Driver circuit and #2,
#3, #4 Driver circuits.
Istheresistancebelow100ohmsonanyoftheDrivers?
Ye s>>
Repair the short between the IAC Driver circuits.
Perform POWERTRAIN VERIFICATION TEST. (Refer to 9 -
ENGINE - STANDARD PROCEDURE)
No>>
Go To 3