2006 DODGE RAM SRT-10 display
[x] Cancel search: displayPage 1303 of 5267
P0513-INVALID SKREEM KEY
For a complete wiring diagramRefer to Section 8W.
When Monitored:
Ignition on.
Set Condition:
The Gateway detects that the Secret Key message is invalid or missing. One Trip Fault.
Possible Causes
WCM/SKREEM
POWERTRAIN CONTROL MODULE
GATEWAY MODULE
COMMUNICATION PROBLEM
Always perform the Pre-Diagnostic Troubleshooting procedure before proceeding. (Refer to 9 - ENGINE -
DIAGNOSIS AND TESTING).
Diagnostic Test
1.ACTIVE DTC
Ignition on, engine not running.
With the scan tool, read the Gateway Module DTCs.
Is the DTC active at this time?
Ye s>>
Go To 2
No>>
Refer to the INTERMITTENT CONDITION Diagnostic Procedure.
Perform the POWERTRAIN VERIFICATION TEST. (Refer to 9 - ENGINE - STANDARD PROCEDURE)
2.COMMUNICATION (CAN BUS or J1850)
NOTE: For vehicle communication problems, use the scan tool to refer to theNetwork Review Screen. The
screen depicts a high level view of the vehicle network. Fault and problem areas appear in red. Selecting
any of the network components allows access to the source of the problem.
Does the scan tool display a Vehicle Network problem or NO RESPONSE condition?
Ye s>>
Refer to the appropriate BUS Communication test in the Section 8 ELECTRONIC CONTROL MODULE
- ELECTRICAL DIAGNOSTICS.
No>>
Go To 3
3.SKREEM/SKIM TROUBLE CODES SET
With the scan tool, check for SKREEM/SKIM DTCs.
Are any DTCs present in the SKREEM/SKIM?
Ye s>>
Refer to Section 8 - Electrical VEHICLE THEFT SECURITY - ELECTRICAL DIAGNOSTICS and perform
the appropriate Diagnostic Procedure.
No>>
Go To 4
Page 1304 of 5267
4.GATEWAY MODULE
Turn the ignition off.
Replace and program the Gateway Module in accordance with Service Information.
Ignition on, engine not running.
With the scan tool, erase all SKREEM and PCM DTCs.
Attempt to start and idle the engine.
With the scan tool, read the Gateway Module DTCs.
Does the scan tool display this code?
Ye s>>
NOTE: Before continuing, check the PCM harness connector terminals for corrosion, damage, or termi-
nal push out. Repair as necessary. Replace and program the Powertrain Control Module per Service
Information.
Perform SKREEM VERIFICATION. (Refer to 8 - ELECTRICAL/VEHICLE THEFT SECURITY - STAN-
DARD PROCEDURE)
No>>
Te s t C o m p l e t e .
Page 1322 of 5267
When Monitored:
Engine at operating temperature, Engine RPM above 608 rpm’s, and Vehicle Speed above 5 MPH.
Set Condition:
Reverse Gear Lockout Solenoid Control circuit is not in the expected statewhen requested to operate by the
PCM. Note: When Vehicle Speed is less then 5 MPH the PCM provides a ground forthe solenoid which ener-
gizes the solenoid. (Allowing Reverse).
Possible Causes
(A917) FUSED IGNITION SWITCH OUTPUT CIRCUIT
(K333) REVERSE LOCKOUT SOLENOID CONTROL CIRCUIT OPEN
(K333) REVERSE LOCKOUT SOLENOID CONTROL CIRCUIT SHORT TO GROUND
REVERSE LOCKOUT SOLENOID
PCM
Always perform the Pre-Diagnostic Troubleshooting procedure before proceeding. (Refer to 9 - ENGINE -
DIAGNOSIS AND TESTING)
1.GOOD TRIP EQUAL TO ZERO
With the scan tool, read DTCs and record the related Freeze Frame data.
Is the Good Trip Counter displayed and equal to zero?
Ye s>>
Go To 2
No>>
Refer to the INTERMITTENT CONDITION Diagnostic Procedure.
Perform POWERTRAIN VERIFICATION TEST. (Refer to 9 - ENGINE - STANDARD PROCEDURE)
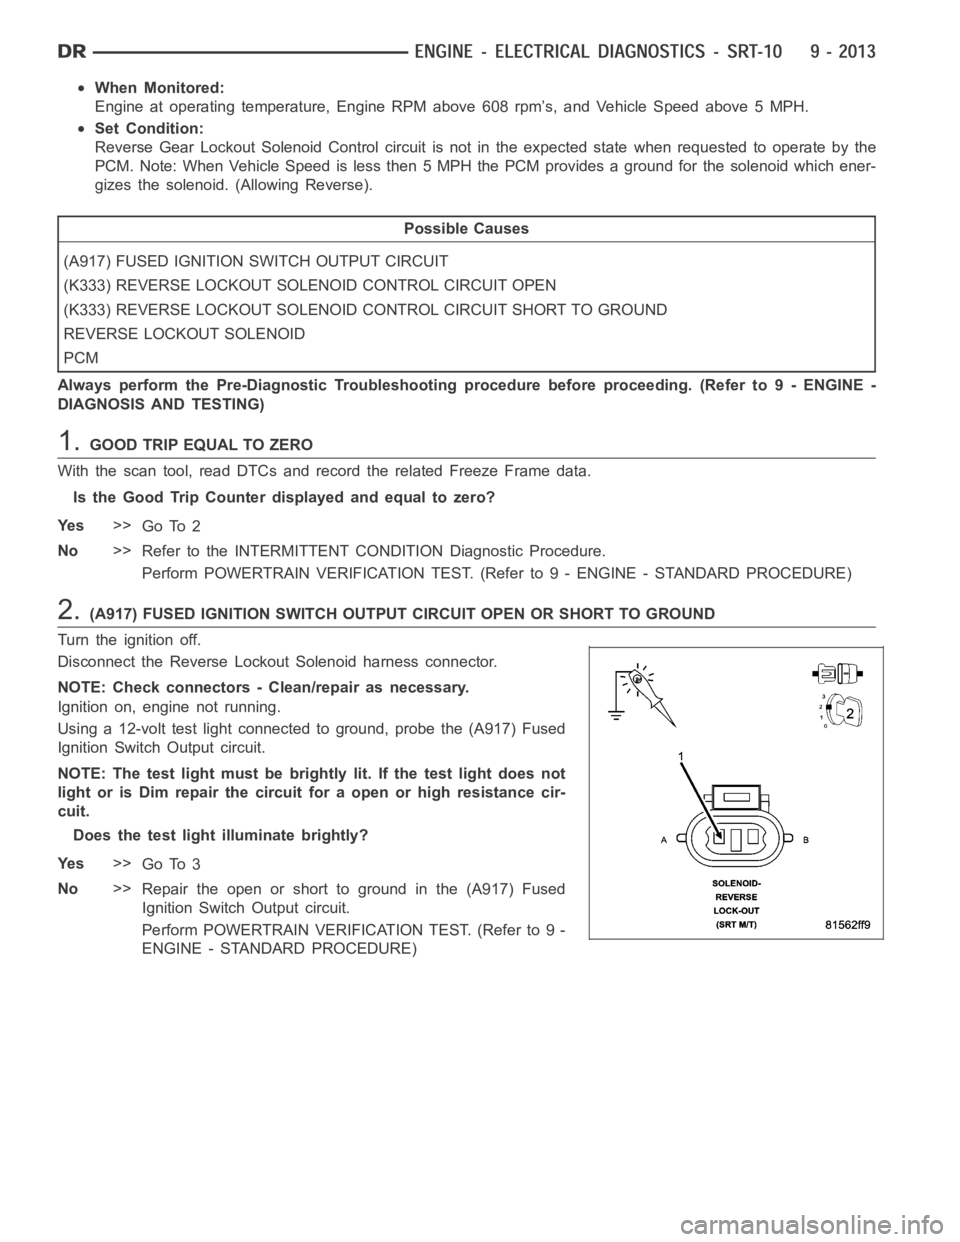
2.(A917) FUSED IGNITION SWITCH OUTPUT CIRCUIT OPEN OR SHORT TO GROUND
Turn the ignition off.
Disconnect the Reverse Lockout Solenoid harness connector.
NOTE: Check connectors - Clean/repair as necessary.
Ignition on, engine not running.
Using a 12-volt test light connected to ground, probe the (A917) Fused
Ignition Switch Output circuit.
NOTE: The test light must be brightly lit. If the test light does not
light or is Dim repair the circuit for a open or high resistance cir-
cuit.
Does the test light illuminate brightly?
Ye s>>
Go To 3
No>>
Repair the open or short to ground in the (A917) Fused
Ignition Switch Output circuit.
Perform POWERTRAIN VERIFICATION TEST. (Refer to 9 -
ENGINE - STANDARD PROCEDURE)
Page 1326 of 5267
When Monitored:
With the engine running, coolant greater than 170°F, open throttle, steady to slightly increasing vehicle speed
greater than 18 mph but less than 55 mph, with a light load on the engine, for aperiod no less than 5 minutes.
Set Condition:
The oxygen sensor signal voltage is switching from below 0.39 of a volt to above 0.6 of a volt and back fewer
times than required.
Possible Causes
EXHAUST LEAK
RESISTANCE IN THE (K41) O2 SENSOR 1/1 SIGNAL CIRCUIT
RESISTANCE IN THE (K900) SENSOR GROUND CIRCUIT
O2 SENSOR
Always perform the Pre-Diagnostic Troubleshooting procedure before proceeding. (Refer to 9 - ENGINE -
DIAGNOSIS AND TESTING)
Diagnostic Test
1.GOOD TRIP EQUAL TO ZERO
Ignition on, engine not running.
With the scan tool, read DTCs and record the related Freeze Frame data.
Is the Good Trip Counter displayed and equal to zero?
Ye s>>
Go To 2
No>>
Refer to the INTERMITTENT CONDITION Diagnostic Procedure.
Perform the POWERTRAIN VERIFICATION TEST. (Refer to 9 - ENGINE - STANDARD PROCEDURE)
2.EXHAUST LEAK
Start the engine.
Inspect the exhaust for leaks between the engine and the appropriate O2 Sensor.
Are there any exhaust leaks?
Ye s>>
Repair or replace the leaking exhaust parts as necessary.
Perform the POWERTRAIN VERIFICATION TEST. (Refer to 9 - ENGINE - STANDARD PROCEDURE)
No>>
Go To 3
3.(K41) O2 SENSOR 1/1 SIGNAL CIRCUIT VOLTAGE DROP
Turn the ignition off.
Backprobe the (K41) O2 Sensor 1/1 Signal circuit at the 1/1 O2 Sensor harness connector and PCM harness con-
nector.
NOTE: Make sure the voltmeter leads are connected for positive polarity, meet the terminals in the connec-
tor, and that there is good terminal to wire connection.
NOTE: Make sure the voltmeter leads are connected for positive polarity
Start the engine.
Allow the engine to idle.
Is the voltage below 0.10 of a volt?
Ye s>>
Go To 4
No>>
Repair the excessive resistance on the (K41) O2 Sensor 1/1 Signal circuit.
Perform the POWERTRAIN VERIFICATION TEST. (Refer to 9 - ENGINE - STANDARD PROCEDURE)
Page 1329 of 5267
When Monitored:
With the engine running, coolant greater than 170°F, open throttle, steady to slightly increasing vehicle speed
greater than 18 mph but less than 55 mph, with a light load on the engine, for aperiod no less than 5 minutes.
Set Condition:
The oxygen sensor signal voltage is switching from below 0.39 of a volt to above 0.6 of a volt and back fewer
times than required.
Possible Causes
EXHAUST LEAK
RESISTANCE IN THE (K43) O2 SENSOR 2/1 SIGNAL CIRCUIT
RESISTANCE IN THE (K900) SENSOR GROUND CIRCUIT
O2 SENSOR
Always perform the Pre-Diagnostic Troubleshooting procedure before proceeding. (Refer to 9 - ENGINE -
DIAGNOSIS AND TESTING)
Diagnostic Test
1.GOOD TRIP EQUAL TO ZERO
Ignition on, engine not running.
With the scan tool, read DTCs and record the related Freeze Frame data.
Is the Good Trip Counter displayed and equal to zero?
Ye s>>
Go To 2
No>>
Refer to the INTERMITTENT CONDITION Diagnostic Procedure.
Perform the POWERTRAIN VERIFICATION TEST. (Refer to 9 - ENGINE - STANDARD PROCEDURE)
2.EXHAUST LEAK
Start the engine.
Inspect the exhaust for leaks between the engine and the appropriate O2 Sensor.
Are there any exhaust leaks?
Ye s>>
Repair or replace the leaking exhaust parts as necessary.
Perform the POWERTRAIN VERIFICATION TEST. (Refer to 9 - ENGINE - STANDARD PROCEDURE)
No>>
Go To 3
3.(K43) O2 SENSOR 2/1 SIGNAL CIRCUIT VOLTAGE DROP
Turn the ignition off.
Backprobe the (K43) O2 Sensor 2/1 Signal circuit at the 2/1 O2 Sensor harness connector and PCM harness con-
nector.
NOTE: Make sure the voltmeter leads are connected for positive polarity, meet the terminals in the connec-
tor, and that there is good terminal to wire connection.
NOTE: Make sure the voltmeter leads are connected for positive polarity
Start the engine.
Allow the engine to idle.
Is the voltage below 0.10 of a volt?
Ye s>>
Go To 4
No>>
Repair the excessive resistance on the (K43) O2 Sensor 2/1 Signal circuit.
Perform the POWERTRAIN VERIFICATION TEST. (Refer to 9 - ENGINE - STANDARD PROCEDURE)
Page 1392 of 5267
When Monitored:
With the engine idling and in drive, if automatic. There must not be a MAP sensor trouble code or a throttle
position sensor trouble code.
Set Condition:
Engine idle is not within 200 rpm above or 100 rpm below target idle for 14 seconds. Three separate failures
are required to set a bad trip. Two bad trips are required to set the code.
Possible Causes
GOOD TRIP EQUAL TO ZERO
VACUUM LEAK
AIR INDUCTION SYSTEM
THROTTLE BODY AND THROTTLE LINKAGE
IAC DRIVER CIRCUIT OPEN
PCM
Always perform the Pre-Diagnostic Troubleshooting procedure before proceeding. (Refer to 9 - ENGINE -
DIAGNOSIS AND TESTING)
1.GOOD TRIP EQUAL TO ZERO
Ignition on, engine not running.
NOTE: All MAP Sensor, IAC, and/or TPS codes present must be diagnosed firstbefore proceeding.
With the scan tool, read DTCs and record the related Freeze Frame data.
Is the Good Trip Counter displayed and equal to zero?
Ye s>>
Go To 2
No>>
Refer to the INTERMITTENT CONDITIONSymptom (Diagnostic Procedure).
Perform POWERTRAIN VERIFICATION TEST. (Refer to 9 - ENGINE - STANDARD PROCEDURE)
2.VACUUM LEAK
Inspect the Intake Manifold for vacuum leaks.
Inspect the Power Brake Booster for any vacuum leaks.
Inspect the PCV system for proper operation or any vacuum leaks.
Were any problems found?
Ye s>>
Repair vacuum leak as necessary.
Perform POWERTRAIN VERIFICATION TEST. (Refer to 9 - ENGINE - STANDARD PROCEDURE)
No>>
Go To 3
3.AIR INDUCTION SYSTEM
Inspect the Air Induction System for the following problems.
Restrictions: Dirty Air Cleaner, Foreign material in the air intake tube,etc.
Leaks: Air Intake tube connection, Air Cleaner housing, etc.
Were any problems found?
Ye s>>
Repair or replace as necessary.
Perform POWERTRAIN VERIFICATION TEST. (Refer to 9 - ENGINE - STANDARD PROCEDURE)
No>>
Go To 4
Page 1399 of 5267
When Monitored:
With engine RPM +/- 64 of target idle and the throttle blade at closed throttle.
Set Condition:
Too small of a difference is seen between barometric pressure with ignition on (engine running) and manifold
vacuum for 8.80 seconds.
Possible Causes
GOOD TRIP EQUAL TO ZERO
MAP SENSOR VACUUM PORT
MAP SENSOR VOLTAGE BELOW 3.19 VOLTS
(F855) 5-VOLT SUPPLY CIRCUIT OPEN
(F855) 5-VOLT SUPPLY CIRCUIT SHORTED TO GROUND
MAP SENSOR
(K1) MAP SENSOR SIGNAL CIRCUIT SHORTED TO GROUND
(K1) MAP SENSOR SIGNAL CIRCUIT SHORTED TO (K900) SENSOR GROUND CIRCUIT
PCM
Always perform the Pre-Diagnostic Troubleshooting procedure before proceeding. (Refer to 9 - ENGINE -
DIAGNOSIS AND TESTING)
1.GOOD TRIP EQUAL TO ZERO
NOTE: If a MAP high or Low DTC set along with P1297, diagnose the High or Low DTC first before con-
tinuing.
Ignition on, engine not running.
With the scan tool, read DTCs and record the related Freeze Frame data.
Is the Good Trip Counter displayed and equal to zero?
Ye s>>
Go To 2
No>>
Refer to the INTERMITTENT CONDITIONSymptom (Diagnostic Procedure).
Perform POWERTRAIN VERIFICATION TEST. (Refer to 9 - ENGINE - STANDARD PROCEDURE)
2.MAP SENSOR VACUUM PORT
Turn the ignition off.
Remove the MAP Sensor.
Inspect the vacuum port, check for restrictions or any foreign materials.
Were any restriction found?
Ye s>>
Repair as necessary.
Perform POWERTRAIN VERIFICATION TEST. (Refer to 9 - ENGINE - STANDARD PROCEDURE)
No>>
Go To 3
3.MAP SENSOR VOLTAGE BELOW 3.19 VOLTS
Install the MAP Sensor.
Ignition on, engine not running.
With the scan tool, read the MAP Sensor voltage.
Is the voltage below 3.19 volts?
Ye s>>
Go To 4
No>>
Refer to the INTERMITTENT CONDITIONSymptom (Diagnostic Procedure).
Perform POWERTRAIN VERIFICATION TEST. (Refer to 9 - ENGINE - STANDARD PROCEDURE)
Page 1404 of 5267
When Monitored:
With ignition key on and battery voltage above 10.4 volts.
Set Condition:
An open or shorted condition is detected in the ASD Relay control circuit.
Possible Causes
GOOD TRIP EQUAL TO ZERO
ASD RELAY
(A14) FUSED B+ OUTPUT CIRCUITS
(K51) ASD RELAY CONTROL CIRCUIT OPEN
(K51) ASD RELAY CONTROL CIRCUIT SHORTED TO GROUND
PCM
Always perform the Pre-Diagnostic Troubleshooting procedure before proceeding. (Refer to 9 - ENGINE -
DIAGNOSIS AND TESTING)
1.GOOD TRIP EQUAL TO ZERO
Ignition on, engine not running.
With the scan tool, read DTCs and record the related Freeze Frame data.
Is the Good Trip Counter displayed and equal to zero?
Ye s>>
Go To 2
No>>
Refer to the INTERMITTENT CONDITIONSymptom (Diagnostic Procedure).
Perform POWERTRAIN VERIFICATION TEST. (Refer to 9 - ENGINE - STANDARD PROCEDURE)
2.ASD RELAY
Turn the ignition off.
Remove the ASD Relay from the PDC.
Measure the resistance between the coil terminals of the ASD Relay.
Is the resistance between 50 and 80 ohms?
Ye s>>
Go To 3
No>>
Replace the ASD Relay.
Perform POWERTRAIN VERIFICATION TEST. (Refer to 9 - ENGINE - STANDARD PROCEDURE)
3.(A14) FUSED B+ OUTPUT CIRCUIT
Using a 12-volt test light connected to ground, probe the (A14) Fused B+ Output circuits in the ASD Relay con-
nector.
Does the test light illuminate brightly?
Ye s>>
Go To 4
No>>
Repair the open or short to ground in the (A14) Fused B+ Output circuits. Inspect the related fuse and
repair as necessary.
Perform POWERTRAIN VERIFICATION TEST. (Refer to 9 - ENGINE - STANDARD PROCEDURE)