Page 1650 of 5267
GAUGE OIL PRESSURE - C-3292
Piston Ring Compressor C-385
Pressure Tester Kit 7700
BLOC-CHEK KIT C-3685
ENGINE SUPPORT FIXTURE 8534
Page 1657 of 5267
CAUTION: Do not lay the cylinder head on its gasket sealing surface, due to the design of the cylinder head
gasket any distortion to the cylinder head sealing surface may prevent thegasket from properly sealing
resulting in leaks.
REMOVAL - RIGHT CYLINDER HEAD
1. Disconnect battery negitive cable.
2. Raise the vehicle on a hoist.
3. Disconnect the exhaust pipe at the right side
exhaust manifold.
4. Drain the engine coolant (Refer to 7 - COOLING -
STANDARD PROCEDURE).
5. Lower the vehicle.
6. Remove the intake manifold (Refer to 9 - ENGINE/
MANIFOLDS/INTAKE MANIFOLD - REMOVAL).
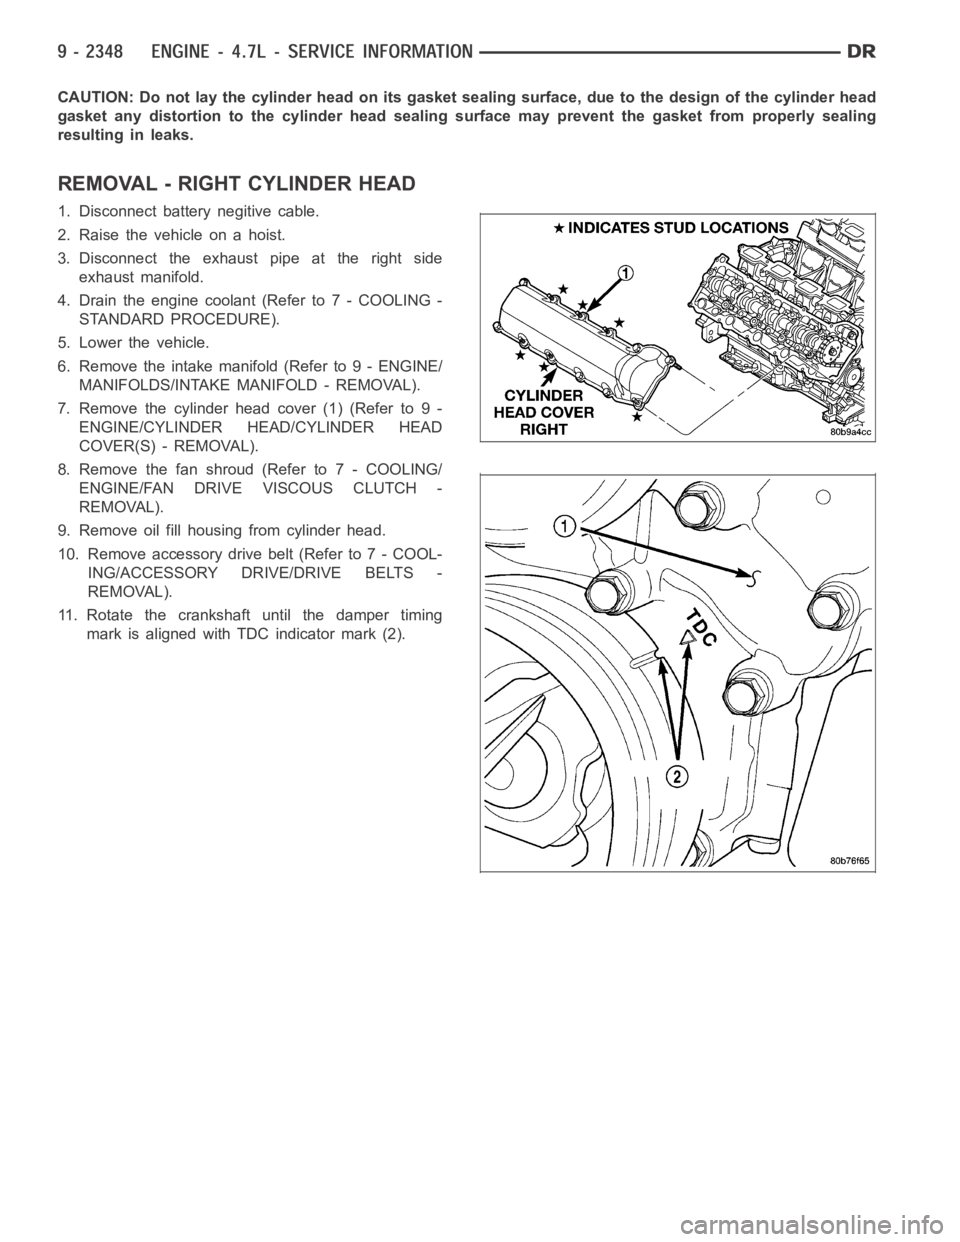
7. Remove the cylinder head cover (1) (Refer to 9 -
ENGINE/CYLINDER HEAD/CYLINDER HEAD
COVER(S) - REMOVAL).
8. Remove the fan shroud (Refer to 7 - COOLING/
ENGINE/FAN DRIVE VISCOUS CLUTCH -
REMOVAL).
9. Remove oil fill housing from cylinder head.
10. Remove accessory drive belt (Refer to 7 - COOL-
ING/ACCESSORY DRIVE/DRIVE BELTS -
REMOVAL).
11. Rotate the crankshaft until the damper timing
mark is aligned with TDC indicator mark (2).
Page 1661 of 5267
4. Lubricate the cylinder head bolt threads with clean engine oil and install the ten M11 bolts.
5. Coat the four M8 cylinder head bolts withMopar
Lock and Seal Adhesivethen install the bolts.
NOTE: The cylinder head bolts are tightened using an angle torque procedure, however, the bolts are not a
torque-to-yield design.
6. Tighten the bolts in sequence using the following steps and torque values:
Step 1: Tighten bolts 1–10, 20 Nꞏm (15 ft. lbs.).
Step 2: Tighten bolts 1–10, 47 Nꞏm (35 ft. lbs.). Tighten bolts 11–14, 25 Nꞏm(18 ft. lbs.).
Step 3: Tighten bolts 1–10, 90 degrees. Tighten bolts 11–14, 30 Nꞏm (22 ft. lbs.).
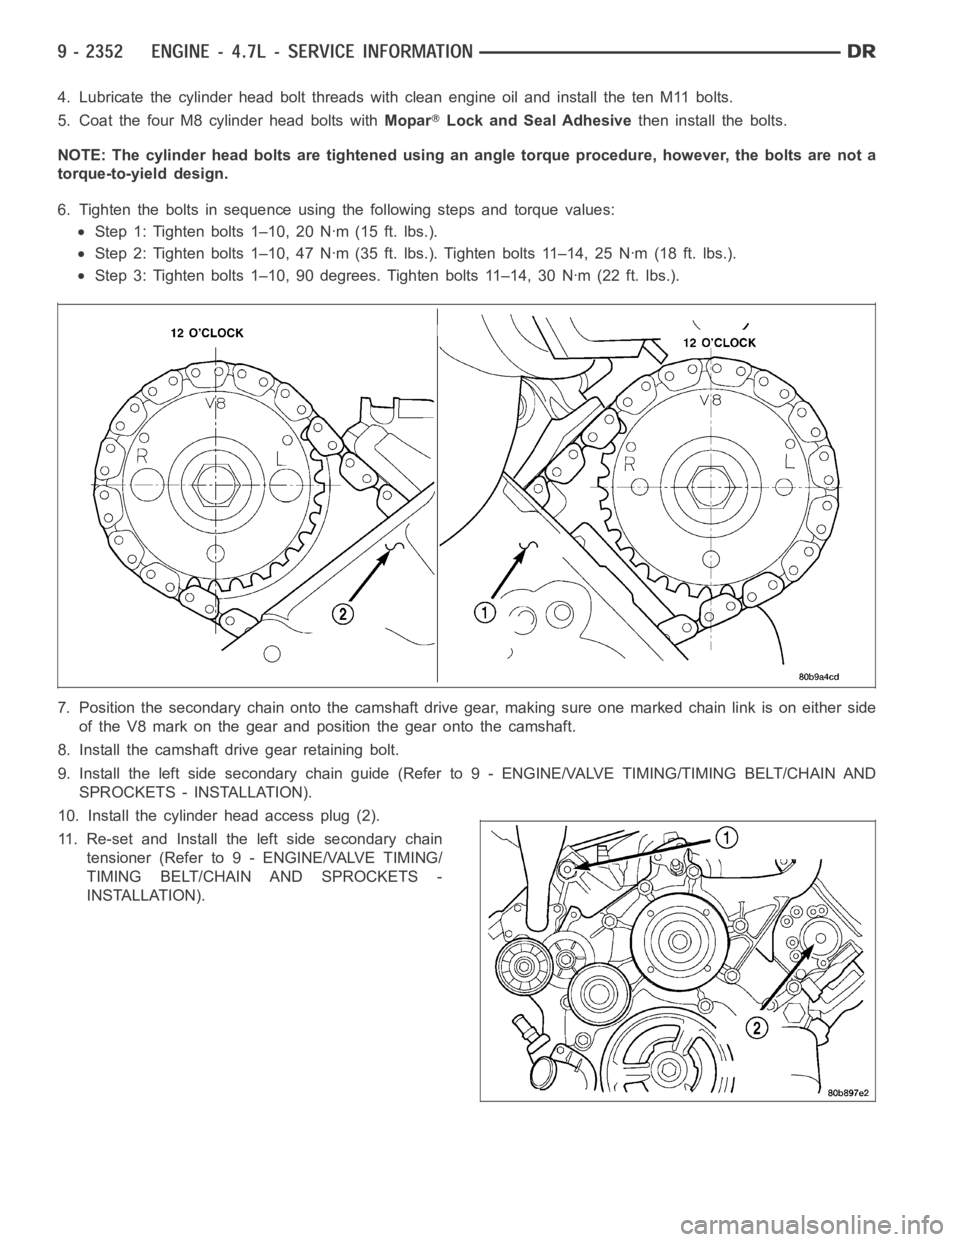
7. Position the secondary chain onto the camshaft drive gear, making sure one marked chain link is on either side
of the V8 mark on the gear and position the gear onto the camshaft.
8. Install the camshaft drive gear retaining bolt.
9. Install the left side secondary chain guide (Refer to 9 - ENGINE/VALVE TIMING/TIMING BELT/CHAIN AND
SPROCKETS - INSTALLATION).
10. Install the cylinder head access plug (2).
11. Re-set and Install the left side secondary chain
tensioner (Refer to 9 - ENGINE/VALVE TIMING/
TIMING BELT/CHAIN AND SPROCKETS -
INSTALLATION).
Page 1663 of 5267
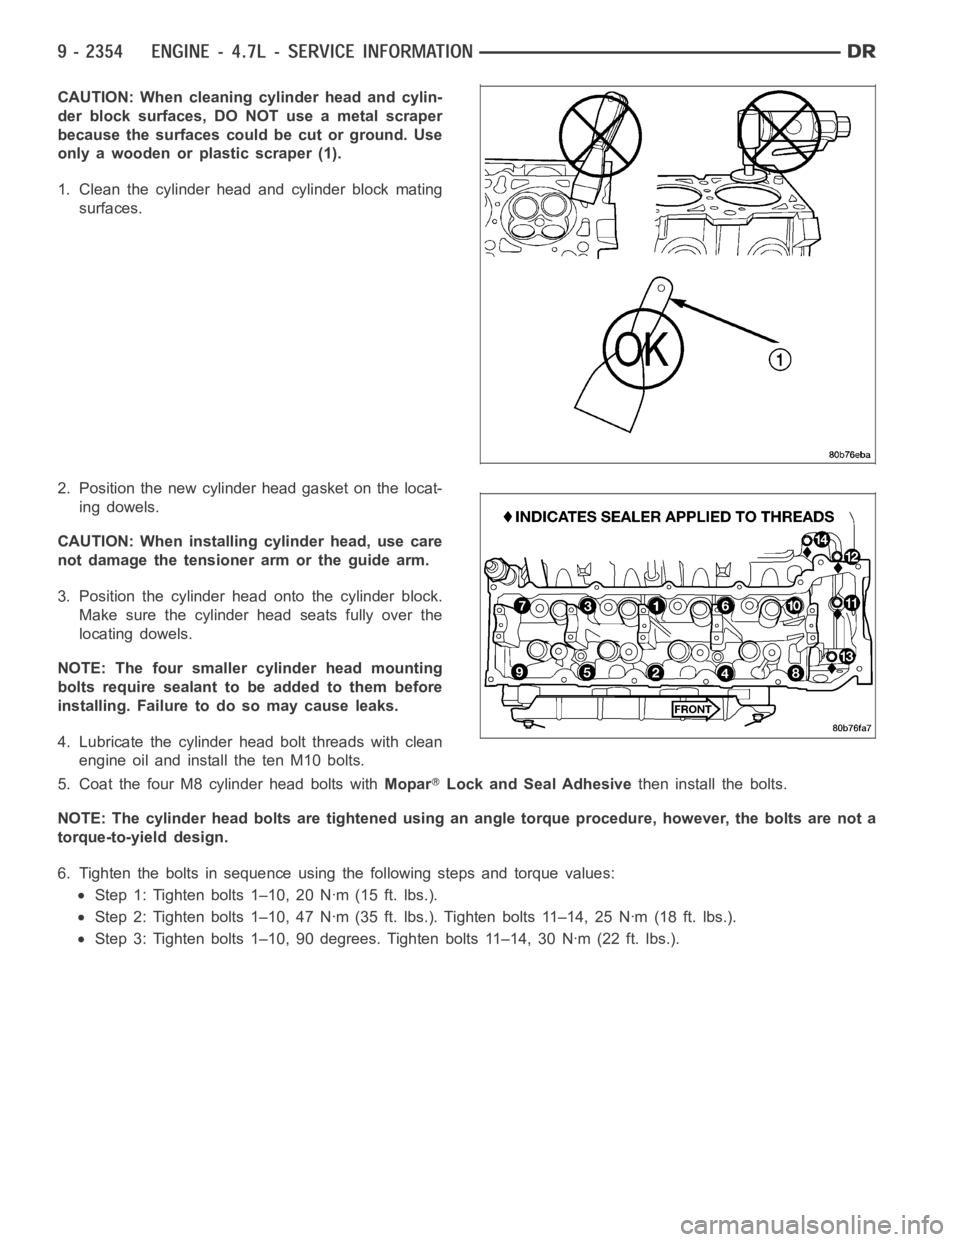
CAUTION: When cleaning cylinder head and cylin-
der block surfaces, DO NOT use a metal scraper
because the surfaces could be cut or ground. Use
only a wooden or plastic scraper (1).
1. Clean the cylinder head and cylinder block mating
surfaces.
2. Position the new cylinder head gasket on the locat-
ing dowels.
CAUTION: When installing cylinder head, use care
not damage the tensioner arm or the guide arm.
3. Position the cylinder head onto the cylinder block.
Make sure the cylinder head seats fully over the
locating dowels.
NOTE: The four smaller cylinder head mounting
bolts require sealant to be added to them before
installing. Failure to do so may cause leaks.
4. Lubricate the cylinder head bolt threads with clean
engine oil and install the ten M10 bolts.
5. Coat the four M8 cylinder head bolts withMopar
Lock and Seal Adhesivethen install the bolts.
NOTE: The cylinder head bolts are tightened using an angle torque procedure, however, the bolts are not a
torque-to-yield design.
6. Tighten the bolts in sequence using the following steps and torque values:
Step 1: Tighten bolts 1–10, 20 Nꞏm (15 ft. lbs.).
Step 2: Tighten bolts 1–10, 47 Nꞏm (35 ft. lbs.). Tighten bolts 11–14, 25 Nꞏm(18 ft. lbs.).
Step 3: Tighten bolts 1–10, 90 degrees. Tighten bolts 11–14, 30 Nꞏm (22 ft. lbs.).
Page 1665 of 5267
12. Remove Special Tool 8515 (6).
13. Install the timing chain cover (Refer to 9 -
ENGINE/VALVE TIMING/TIMING BELT / CHAIN
COVER(S) - INSTALLATION).
14. Install the crankshaft damper (Refer to 9 -
ENGINE/ENGINE BLOCK/VIBRATION DAMPER -
INSTALLATION).
15. Install accessory drive belt (Refer to 7 - COOL-
ING/ACCESSORY DRIVE/DRIVE BELTS -
INSTALLATION).
16. Install the fan shroud.
17. Install the cylinder head cover (1) (Refer to 9 -
ENGINE/CYLINDER HEAD/CYLINDER HEAD
COVER(S) - INSTALLATION).
18. Install the intake manifold (Refer to 9 - ENGINE/
MANIFOLDS/INTAKE MANIFOLD - INSTALLA-
TION).
19. Install oil fill housing onto cylinder head.
20. Refill the cooling system (Refer to 7 - COOLING -
STANDARD PROCEDURE).
21. Raise the vehicle.
22. Install the exhaust pipe onto the right exhaust
manifold.
23. Lower the vehicle.
24. Reconnect battery negitive cable.
25. Start the engine and check for leaks.
Page 1666 of 5267
CAMSHAFT - LEFT
DESCRIPTION
The camshafts consist of powdered metal steel lobes which are sinter-bonded to a steel tube. A steel post or nose
piece is friction-welded to the steel camshaft tube. Five bearing journals are machined into the camshaft, four on the
steel tube and one on the steel nose piece. Camshaft end play is controlled by two thrust walls that border the nose
piece journal. Engine oil enters the hollow camshafts at the third journaland lubricates every intake lobe rocker
throughadrilledpassageintheintakelobe.
REMOVAL
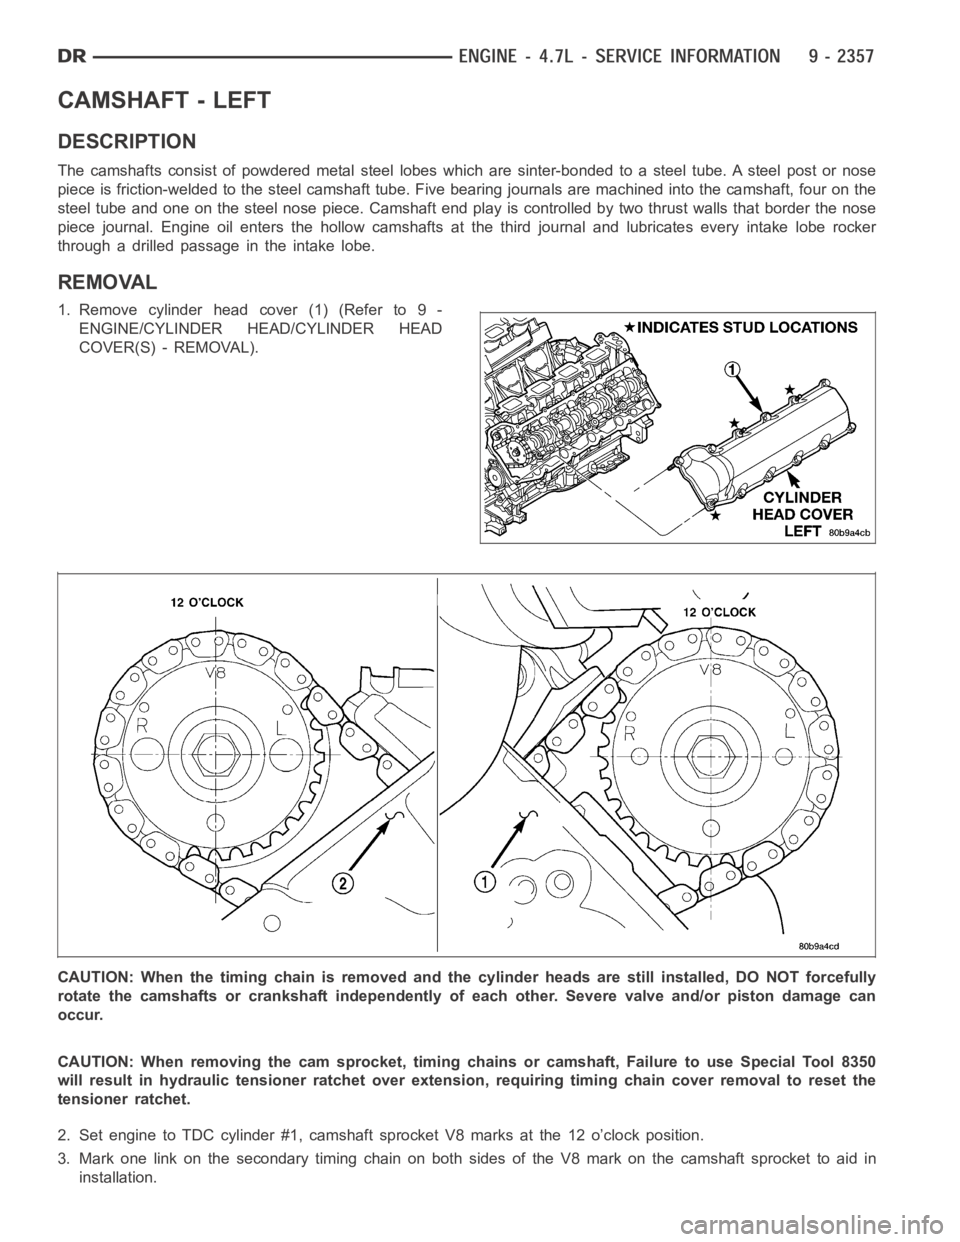
1. Remove cylinder head cover (1) (Refer to 9 -
ENGINE/CYLINDER HEAD/CYLINDER HEAD
COVER(S) - REMOVAL).
CAUTION: When the timing chain is removed and the cylinder heads are still installed, DO NOT forcefully
rotate the camshafts or crankshaft independently of each other. Severe valve and/or piston damage can
occur.
CAUTION: When removing the cam sprocket, timing chains or camshaft, Failure to use Special Tool 8350
will result in hydraulic tensioner ratchet over extension, requiring timing chain cover removal to reset the
tensioner ratchet.
2. Set engine to TDC cylinder #1, camshaft sprocket V8 marks at the 12 o’clock position.
3. Mark one link on the secondary timing chain on both sides of the V8 mark on the camshaft sprocket to aid in
installation.
Page 1668 of 5267
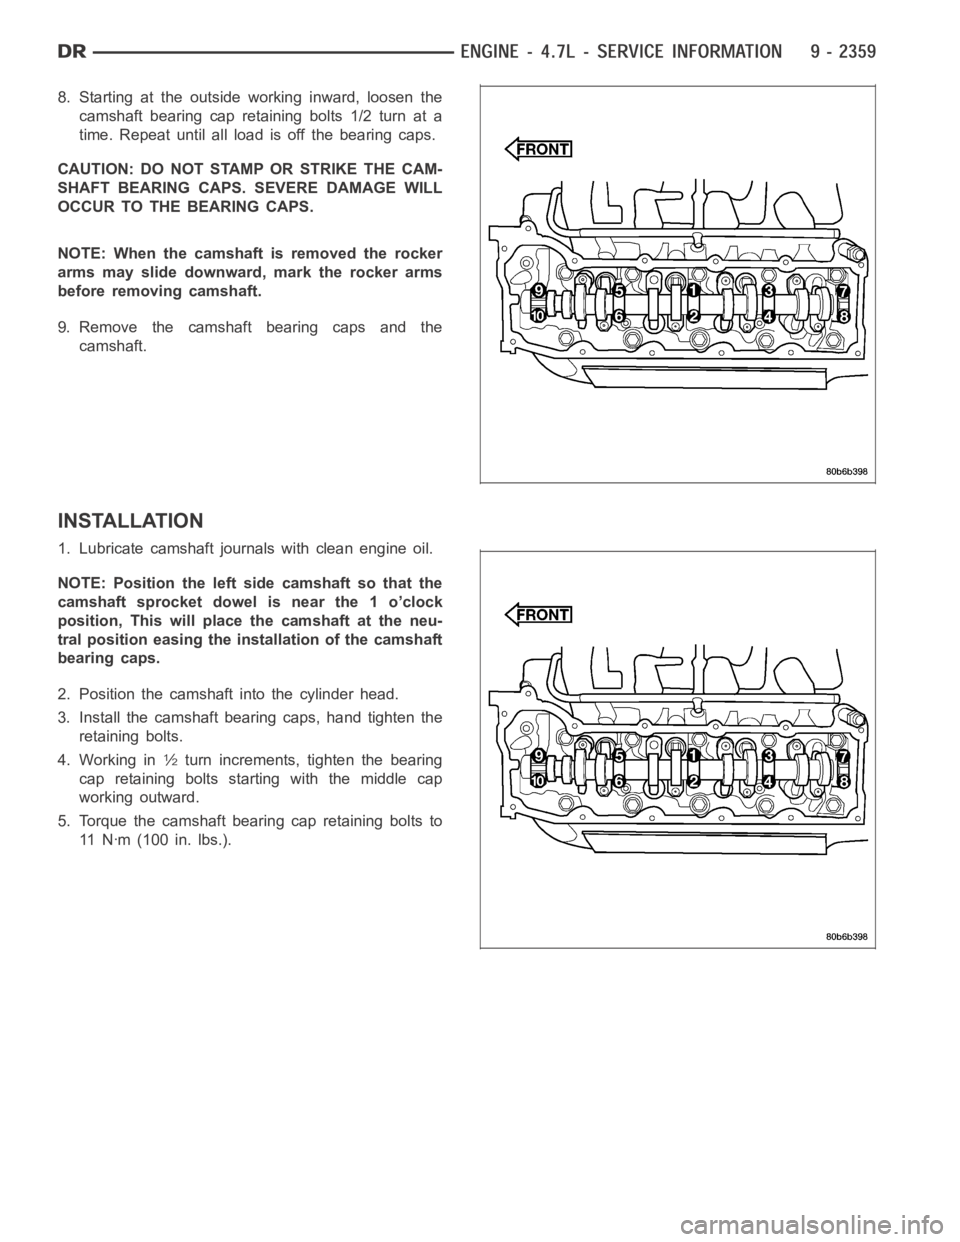
8. Starting at the outside working inward, loosen the
camshaft bearing cap retaining bolts 1/2 turn at a
time. Repeat until all load is off the bearing caps.
CAUTION: DO NOT STAMP OR STRIKE THE CAM-
SHAFT BEARING CAPS. SEVERE DAMAGE WILL
OCCUR TO THE BEARING CAPS.
NOTE: When the camshaft is removed the rocker
arms may slide downward, mark the rocker arms
before removing camshaft.
9. Remove the camshaft bearing caps and the
camshaft.
INSTALLATION
1. Lubricate camshaft journals with clean engine oil.
NOTE: Position the left side camshaft so that the
camshaft sprocket dowel is near the 1 o’clock
position, This will place the camshaft at the neu-
tral position easing the installation of the camshaft
bearing caps.
2. Position the camshaft into the cylinder head.
3. Install the camshaft bearing caps, hand tighten the
retaining bolts.
4. Working in
1⁄2turn increments, tighten the bearing
cap retaining bolts starting with the middle cap
working outward.
5. Torque the camshaft bearing cap retaining bolts to
11 N ꞏm ( 1 0 0 i n . l b s . ) .
Page 1669 of 5267
6. Position the camshaft drive gear into the timing chain aligning the V8 mark between the two marked chain links
(Two links marked during removal) (1).
NOTE: When gripping the camshaft, place the pli-
ers on the tube portion of the camshaft only. Do
not grip the lobes or the sprocket areas.
7. Using the adjustable pliers (1), rotate the camshaft
until the camshaft sprocket dowel (2) is aligned
with the slot in the camshaft sprocket. Install the
sprocket onto the camshaft.
CAUTION: Remove excess oil from camshaft
sprocket bolt. Failure to do so can cause bolt
over-torque resulting in bolt failure.
8. Remove excess oil from bolt, then install the cam-
shaft sprocket retaining bolt and hand tighten.