2006 DODGE RAM SRT-10 light
[x] Cancel search: lightPage 1382 of 5267
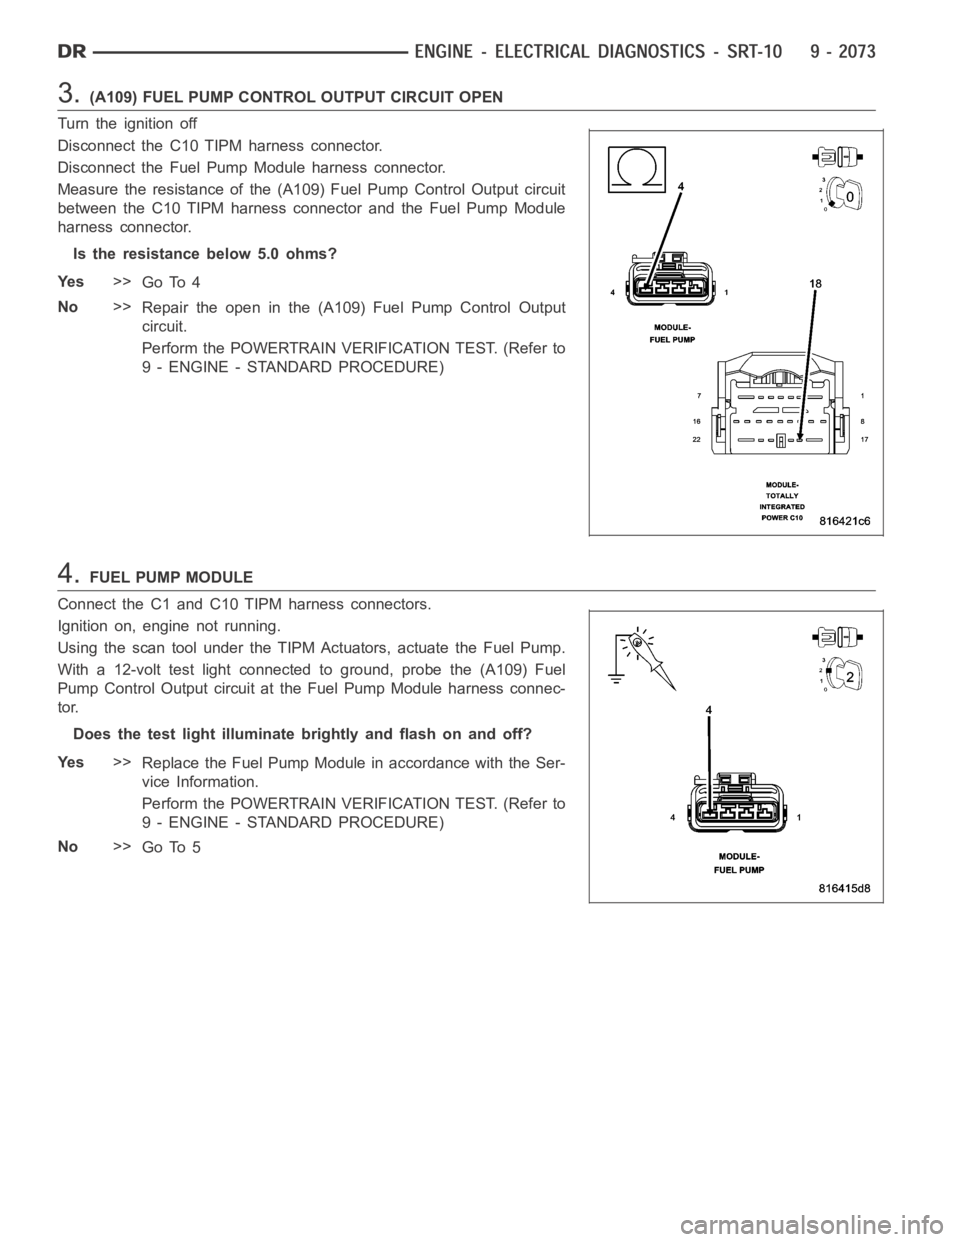
3.(A109) FUEL PUMP CONTROL OUTPUT CIRCUIT OPEN
Turn the ignition off
Disconnect the C10 TIPM harness connector.
Disconnect the Fuel Pump Module harness connector.
Measure the resistance of the (A109) Fuel Pump Control Output circuit
between the C10 TIPM harness connector and the Fuel Pump Module
harness connector.
Is the resistance below 5.0 ohms?
Ye s>>
Go To 4
No>>
Repair the open in the (A109) Fuel Pump Control Output
circuit.
Perform the POWERTRAIN VERIFICATION TEST. (Refer to
9 - ENGINE - STANDARD PROCEDURE)
4.FUEL PUMP MODULE
Connect the C1 and C10 TIPM harness connectors.
Ignition on, engine not running.
Using the scan tool under the TIPM Actuators, actuate the Fuel Pump.
With a 12-volt test light connected to ground, probe the (A109) Fuel
Pump Control Output circuit at the Fuel Pump Module harness connec-
tor.
Does the test light illuminate brightly and flash on and off?
Ye s>>
Replace the Fuel Pump Module in accordance with the Ser-
vice Information.
Perform the POWERTRAIN VERIFICATION TEST. (Refer to
9 - ENGINE - STANDARD PROCEDURE)
No>>
Go To 5
Page 1386 of 5267
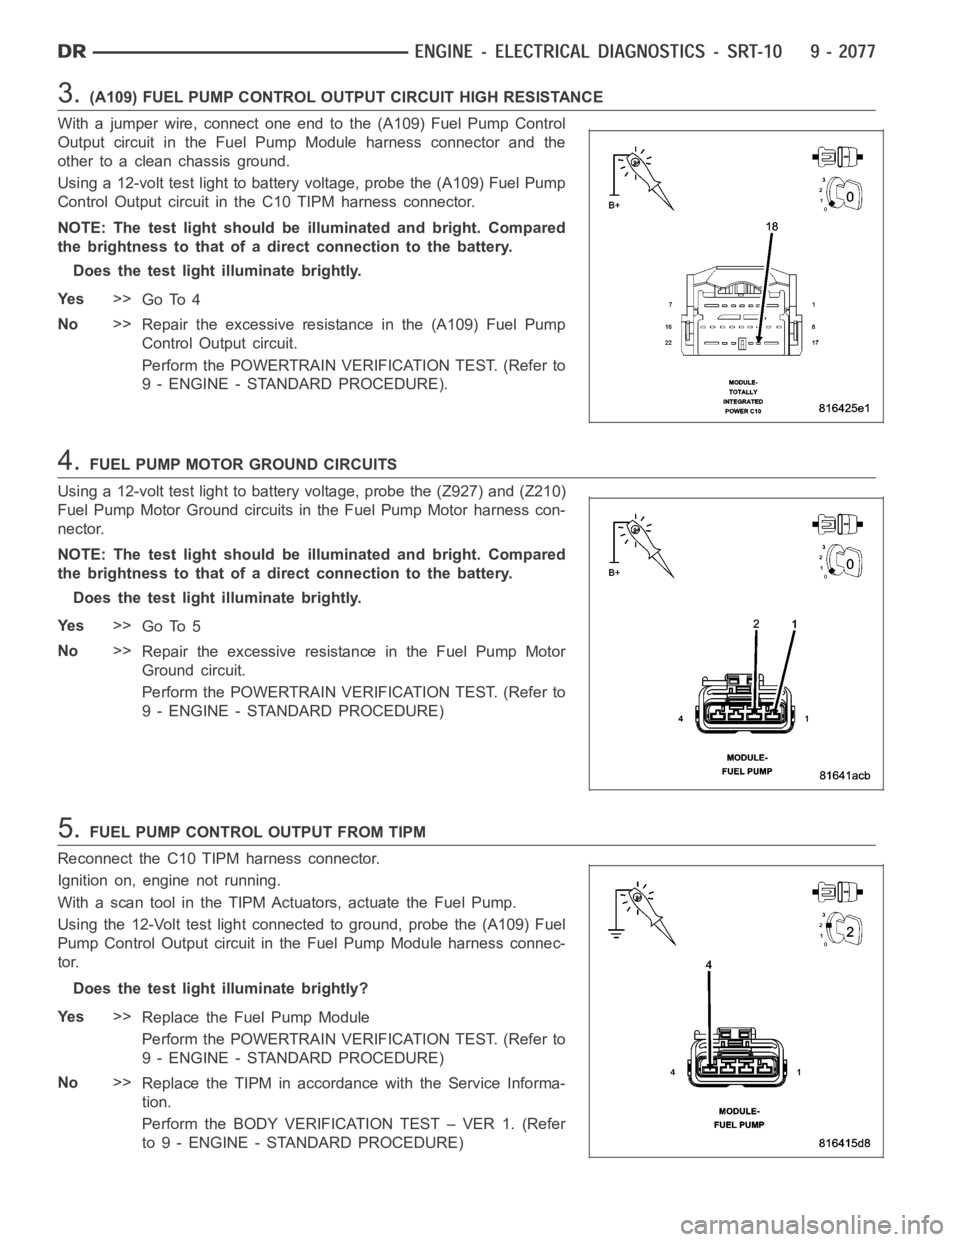
3.(A109) FUEL PUMP CONTROL OUTPUT CIRCUIT HIGH RESISTANCE
With a jumper wire, connect one end to the (A109) Fuel Pump Control
Output circuit in the Fuel Pump Module harness connector and the
other to a clean chassis ground.
Using a 12-volt test light to battery voltage, probe the (A109) Fuel Pump
Control Output circuit in the C10 TIPM harness connector.
NOTE: The test light should be illuminated and bright. Compared
the brightness to that of a direct connection to the battery.
Does the test light illuminate brightly.
Ye s>>
Go To 4
No>>
Repair the excessive resistance in the (A109) Fuel Pump
Control Output circuit.
Perform the POWERTRAIN VERIFICATION TEST. (Refer to
9 - ENGINE - STANDARD PROCEDURE).
4.FUEL PUMP MOTOR GROUND CIRCUITS
Using a 12-volt test light to battery voltage, probe the (Z927) and (Z210)
Fuel Pump Motor Ground circuits in the Fuel Pump Motor harness con-
nector.
NOTE: The test light should be illuminated and bright. Compared
the brightness to that of a direct connection to the battery.
Does the test light illuminate brightly.
Ye s>>
Go To 5
No>>
Repair the excessive resistance in the Fuel Pump Motor
Ground circuit.
Perform the POWERTRAIN VERIFICATION TEST. (Refer to
9 - ENGINE - STANDARD PROCEDURE)
5.FUEL PUMP CONTROL OUTPUT FROM TIPM
Reconnect the C10 TIPM harness connector.
Ignition on, engine not running.
With a scan tool in the TIPM Actuators, actuate the Fuel Pump.
Using the 12-Volt test light connected to ground, probe the (A109) Fuel
Pump Control Output circuit in the Fuel Pump Module harness connec-
tor.
Does the test light illuminate brightly?
Ye s>>
Replace the Fuel Pump Module
Perform the POWERTRAIN VERIFICATION TEST. (Refer to
9 - ENGINE - STANDARD PROCEDURE)
No>>
Replace the TIPM in accordance with the Service Informa-
tion.
Perform the BODY VERIFICATION TEST – VER 1. (Refer
to 9 - ENGINE - STANDARD PROCEDURE)
Page 1389 of 5267
When Monitored:
With the ignition on and battery voltage above 10.4 volts.
Set Condition:
An open or shorted condition is detected in the Fuel Pump Relay Control circuit.
Possible Causes
FUEL PUMP RELAY OPERATION
FUEL PUMP RELAY
FUSED IGNITION SWITCH OUTPUT CIRCUIT
(K31) FUEL PUMP RELAY CONTROL CIRCUIT OPEN
(K31) FUEL PUMP RELAY CONTROL CIRCUIT SHORTED TO GROUND
PCM
Always perform the Pre-Diagnostic Troubleshooting procedure before proceeding. (Refer to 9 - ENGINE -
DIAGNOSIS AND TESTING)
1.FUEL PUMP RELAY OPERATION
Ignition on, engine not running.
With the scan tool, read DTCs and record the related Freeze Frame data.
With the scan tool, actuate the Fuel Pump Relay.
Is the Fuel Pump Relay clicking?
Ye s>>
Refer to the INTERMITTENT CONDITIONSymptom (Diagnostic Procedure).
Perform POWERTRAIN VERIFICATION TEST. (Refer to 9 - ENGINE - STANDARD PROCEDURE)
No>>
Go To 2
2.FUEL PUMP RELAY
Turn the ignition off.
Remove the Fuel Pump Relay.
NOTE: Check connectors - Clean/repair as necessary.
Measure the resistance between the coil terminals of the Fuel Pump Relay.
Is the resistance between 50 and 90 ohms?
Ye s>>
Go To 3
No>>
Replace the Fuel Pump Relay.
Perform POWERTRAIN VERIFICATION TEST. (Refer to 9 - ENGINE - STANDARD PROCEDURE)
3.FUSED IGNITION SWITCH CIRCUIT OPEN
Ignition on, engine not running.
Using a 12-volt test light connected to ground, probe the Fused Ignition Switch Output circuit in the Fuel Pump
Relay connector.
Does the test light illuminate brightly?
Ye s>>
Go To 4
No>>
Repair the open or short to ground in the Fused Ignition Switch Output circuit. Inspect the related fuse
and repair as necessary.
Perform POWERTRAIN VERIFICATION TEST. (Refer to 9 - ENGINE - STANDARD PROCEDURE)
Page 1404 of 5267
When Monitored:
With ignition key on and battery voltage above 10.4 volts.
Set Condition:
An open or shorted condition is detected in the ASD Relay control circuit.
Possible Causes
GOOD TRIP EQUAL TO ZERO
ASD RELAY
(A14) FUSED B+ OUTPUT CIRCUITS
(K51) ASD RELAY CONTROL CIRCUIT OPEN
(K51) ASD RELAY CONTROL CIRCUIT SHORTED TO GROUND
PCM
Always perform the Pre-Diagnostic Troubleshooting procedure before proceeding. (Refer to 9 - ENGINE -
DIAGNOSIS AND TESTING)
1.GOOD TRIP EQUAL TO ZERO
Ignition on, engine not running.
With the scan tool, read DTCs and record the related Freeze Frame data.
Is the Good Trip Counter displayed and equal to zero?
Ye s>>
Go To 2
No>>
Refer to the INTERMITTENT CONDITIONSymptom (Diagnostic Procedure).
Perform POWERTRAIN VERIFICATION TEST. (Refer to 9 - ENGINE - STANDARD PROCEDURE)
2.ASD RELAY
Turn the ignition off.
Remove the ASD Relay from the PDC.
Measure the resistance between the coil terminals of the ASD Relay.
Is the resistance between 50 and 80 ohms?
Ye s>>
Go To 3
No>>
Replace the ASD Relay.
Perform POWERTRAIN VERIFICATION TEST. (Refer to 9 - ENGINE - STANDARD PROCEDURE)
3.(A14) FUSED B+ OUTPUT CIRCUIT
Using a 12-volt test light connected to ground, probe the (A14) Fused B+ Output circuits in the ASD Relay con-
nector.
Does the test light illuminate brightly?
Ye s>>
Go To 4
No>>
Repair the open or short to ground in the (A14) Fused B+ Output circuits. Inspect the related fuse and
repair as necessary.
Perform POWERTRAIN VERIFICATION TEST. (Refer to 9 - ENGINE - STANDARD PROCEDURE)
Page 1408 of 5267
4.ASD RELAY
Install a substitute relay for the ASD Relay.
Attempt to startthe vehicle.
Did the engine start?
Ye s>>
Replace the ASD Relay.
Perform POWERTRAIN VERIFICATION TEST VER - 2.
No>>
Go To 5
5.(A14) FUSED B+ CIRCUITS
Turn the ignition off.
Remove the ASD Relay from the PDC.
Using a 12-volt test light, probe the (A14) Fused B+ circuits at the ASD Relay connector in the PDC.
Does the test light illuminate brightly?
Ye s>>
Go To 6
No>>
Repair the open or short to ground in the (A14) Fused B+ circuits. Inspect the related fuse and repair
as necessary.
Perform POWERTRAIN VERIFICATION TEST. (Refer to 9 - ENGINE - STANDARD PROCEDURE)
6.(K342) ASD RELAY OUTPUT CIRCUIT OPEN
Disconnect the PCM harness connectors.
Measure the resistance of the (K342) ASD Relay Output circuit from the ASD Relay cavity in the PDC to the PCM
harness connector.
Is the resistance below 5.0 ohms?
Ye s>>
Go To 7
No>>
Repair the open in the (K342)ASD Relay Output circuit.
Perform POWERTRAIN VERIFICATION TEST. (Refer to 9 - ENGINE - STANDARD PROCEDURE)
7.PCM
NOTE: Before continuing, check the PCM harness connector terminals for corrosion, damage, or terminal
push out. Repair as necessary.
Using the schematics as a guide, inspect the wire harness and connectors. Pay particular attention to all Power and
Ground circuits.
If there are no possible causes remaining, view repair.
Repair
Replace and program the Powertrain Control Module per Service Information.
Perform POWERTRAIN VERIFICATION TEST. (Refer to 9 - ENGINE - STANDARD PROCEDURE)
Page 1432 of 5267
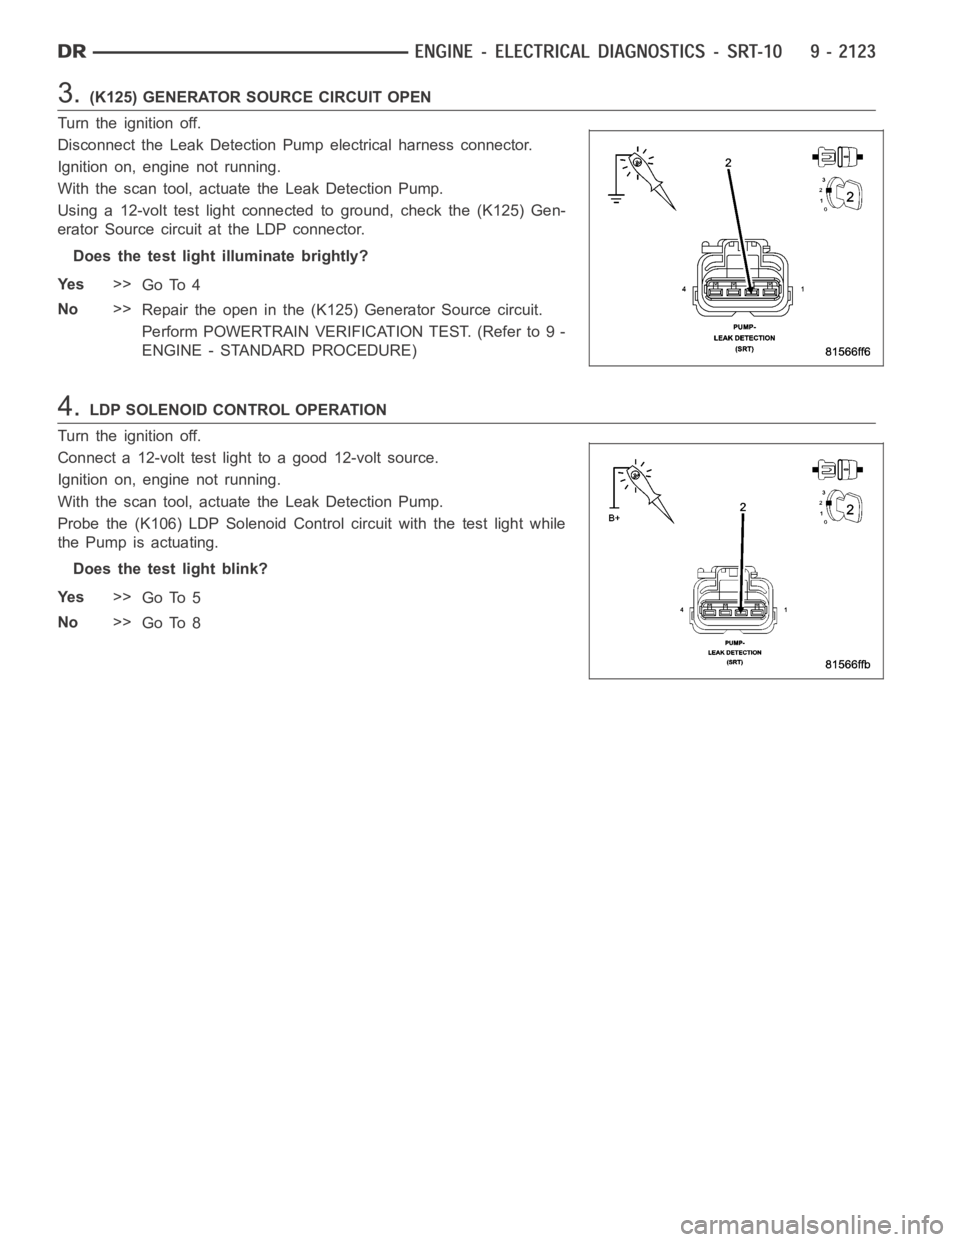
3.(K125) GENERATOR SOURCE CIRCUIT OPEN
Turn the ignition off.
Disconnect the Leak Detection Pump electrical harness connector.
Ignition on, engine not running.
With the scan tool, actuate the Leak Detection Pump.
Using a 12-volt test light connected to ground, check the (K125) Gen-
erator Source circuit at the LDP connector.
Does the test light illuminate brightly?
Ye s>>
Go To 4
No>>
Repair the open in the (K125) Generator Source circuit.
Perform POWERTRAIN VERIFICATION TEST. (Refer to 9 -
ENGINE - STANDARD PROCEDURE)
4.LDP SOLENOID CONTROL OPERATION
Turn the ignition off.
Connect a 12-volt test light to a good 12-volt source.
Ignition on, engine not running.
With the scan tool, actuate the Leak Detection Pump.
Probe the (K106) LDP Solenoid Control circuit with the test light while
the Pump is actuating.
Does the test light blink?
Ye s>>
Go To 5
No>>
Go To 8
Page 1436 of 5267
When Monitored:
Ignition on and engine running.
Set Condition:
An open or shorted condition in the Hydraulic Fan Solenoid control circuitis detected by the Powertrain Control
Module.
Possible Causes
RADIATOR FAN INOP
(K342) FUSED ASD RELAY OUTPUT CIRCUIT
(C240) COOLING FAN CONTROL CIRCUIT OPEN
(C240) COOLING FAN CONTROL CIRCUIT SHORTED TO GROUND
HYDRAULIC FAN
PCM
Always perform the Pre-Diagnostic Troubleshooting procedure before proceeding. (Refer to 9 - ENGINE -
DIAGNOSIS AND TESTING)
1.RADIATOR FAN INOP
Ignition on, engine not running.
With the scan tool, perform the Hydraulic Fan Solenoid Test found under Engine Test and Systems Test.
Does the Radiator Fan operate properly?
Ye s>>
Refer to the INTERMITTENT CONDITIONSymptom (Diagnostic Procedure).
Perform POWERTRAIN VERIFICATION TEST. (Refer to 9 - ENGINE - STANDARD PROCEDURE)
No>>
Go To 2
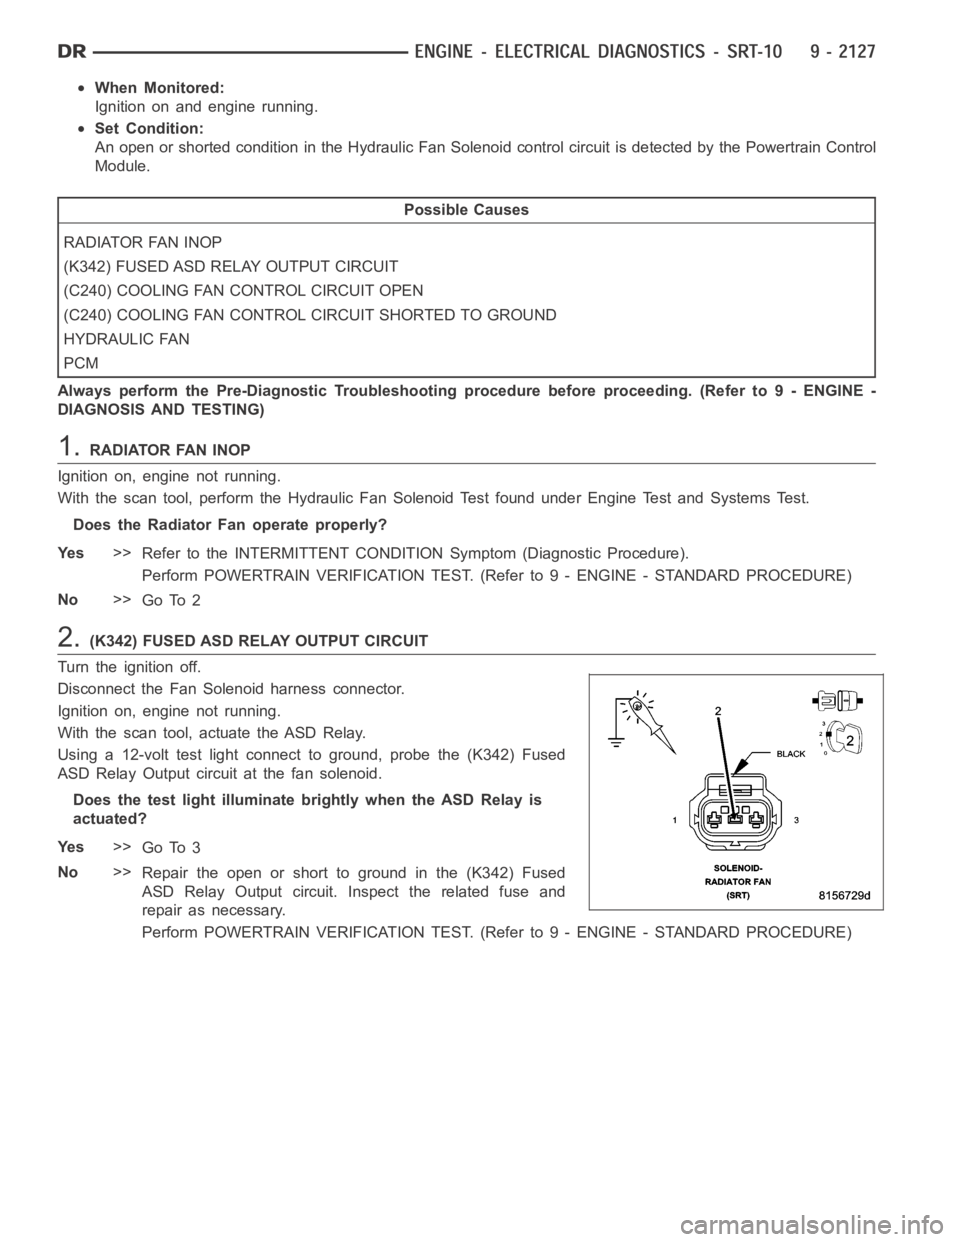
2.(K342) FUSED ASD RELAY OUTPUT CIRCUIT
Turn the ignition off.
Disconnect the Fan Solenoid harness connector.
Ignition on, engine not running.
With the scan tool, actuate the ASD Relay.
Using a 12-volt test light connect to ground, probe the (K342) Fused
ASD Relay Output circuit at the fan solenoid.
Does the test light illuminate brightly when the ASD Relay is
actuated?
Ye s>>
Go To 3
No>>
Repair the open or short to ground in the (K342) Fused
ASD Relay Output circuit. Inspect the related fuse and
repair as necessary.
Perform POWERTRAIN VERIFICATION TEST. (Refer to 9 - ENGINE - STANDARD PROCEDURE)
Page 1440 of 5267
When Monitored:
With the ignition key on and the engine speed greater than 0 RPM.
Set Condition:
When the PCM regulates the generator field and there are no detected field problems, but the voltage output
does not decrease.
Possible Causes
(K20) GENERATOR FIELD CONTROL CIRCUIT SHORTED TO GROUND
GENERATOR FIELD COIL SHORTED TO GROUND
BATTERY TEMPERATURE SENSOR
PCM
Always perform the Pre-Diagnostic Troubleshooting procedure before proceeding. (Refer to 9 - ENGINE -
DIAGNOSIS AND TESTING)
Diagnostic Test
1.CHARGING SYSTEM OPERATION
NOTE: Battery must be fully charged and be capable of passing a load test.
NOTE: Generator Belt tension and condition must be checked before continuing.
Ignition on, engine not running.
With the scan tool, read DTCs and the related Freeze Frame data then clear theDTCs.
With scan tool, actuate the Generator Field Driver.
With a 12-volt test light connected to ground, backprobe the (K20) Gen Field Control circuit in the back of Generator
Field harness connector.
Does the test light illuminate brightly and flash?
Ye s>>
Go To 2
No>>
Refer to the INTERMITTENT CONDITION Diagnostic Procedure.
Perform the POWERTRAIN VERIFICATION TEST. (Refer to 9 - ENGINE - STANDARD PROCEDURE)
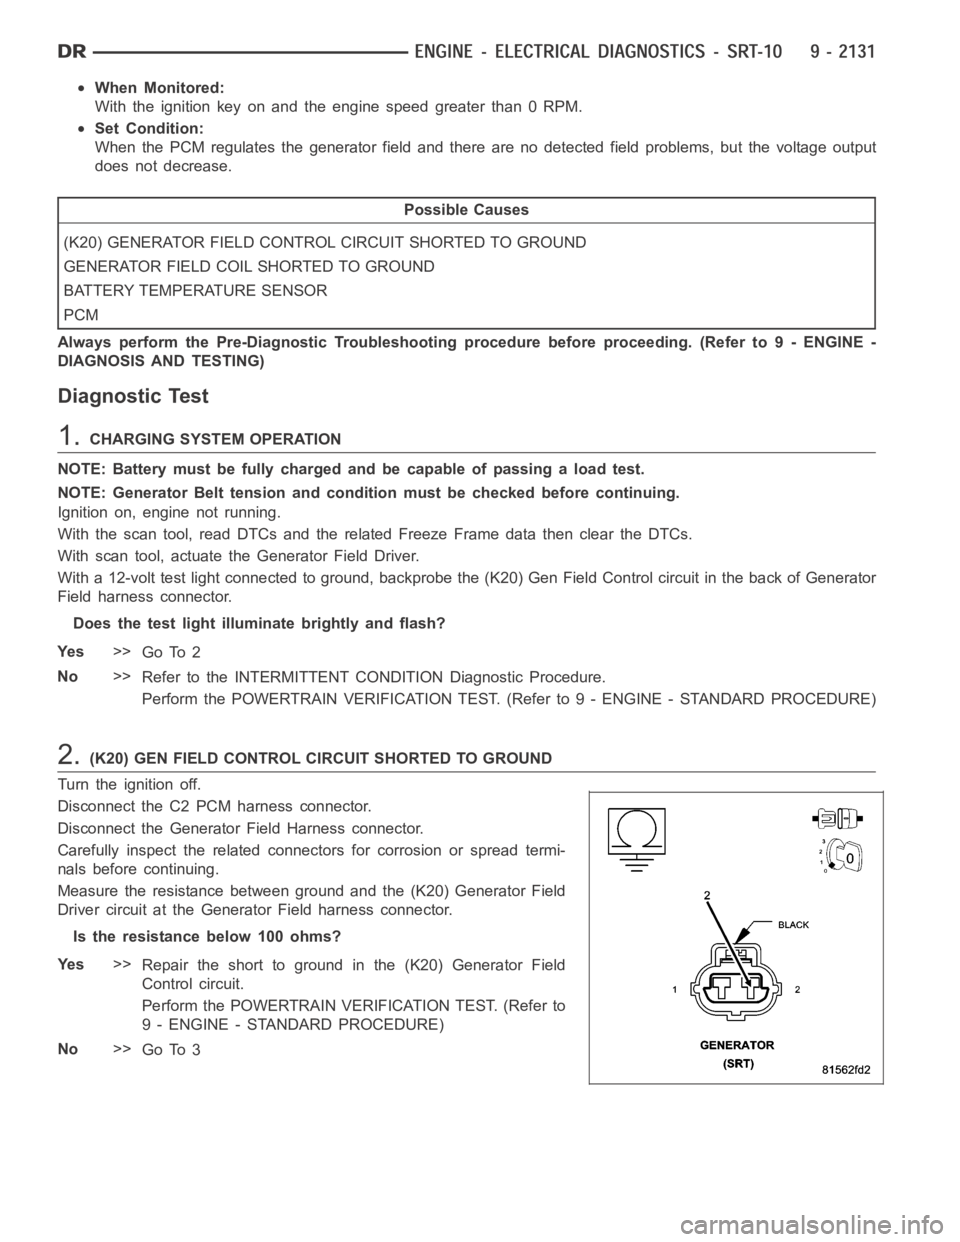
2.(K20) GEN FIELD CONTROL CIRCUIT SHORTED TO GROUND
Turn the ignition off.
Disconnect the C2 PCM harness connector.
Disconnect the Generator Field Harness connector.
Carefully inspect the related connectors for corrosion or spread termi-
nals before continuing.
Measure the resistance between ground and the (K20) Generator Field
Driver circuit at the Generator Field harness connector.
Istheresistancebelow100ohms?
Ye s>>
Repair the short to ground in the (K20) Generator Field
Control circuit.
Perform the POWERTRAIN VERIFICATION TEST. (Refer to
9 - ENGINE - STANDARD PROCEDURE)
No>>
Go To 3