2006 DODGE RAM SRT-10 engine
[x] Cancel search: enginePage 3875 of 5267
After the fluid has been checked, seat the dipstick fully to seal out water and dirt.
The transmission has a dipstick to check oil level. It is located on the right side of the engine. Be sure to wipe all
dirt from dipstick handle before removing.
Fluid level is checked with the engine running at curb idle speed, the transmissioninNEUTRALandthetransmis-
sion fluid at normal operating temperature.The engine should be running at idle speed for at least one minute,
with the vehicle on level ground.
The transmission fluid level can be checked two ways.
PROCEDURE ONE
1. Transmission fluid must be at normal operating
temperature for accurate fluid level check. Drive
vehicle if necessary to bring fluid temperature up to
normal hot operating temperature of 82°C (180°F).
2. Position vehicle on level surface.
3. Start and run engine at curb idle speed.
4. Apply parking brakes.
5. Shift transmission momentarily into all gear ranges.
Then shift transmission back to NEUTRAL.
6. Clean top of filler tube and dipstick to keep dirt from entering tube.
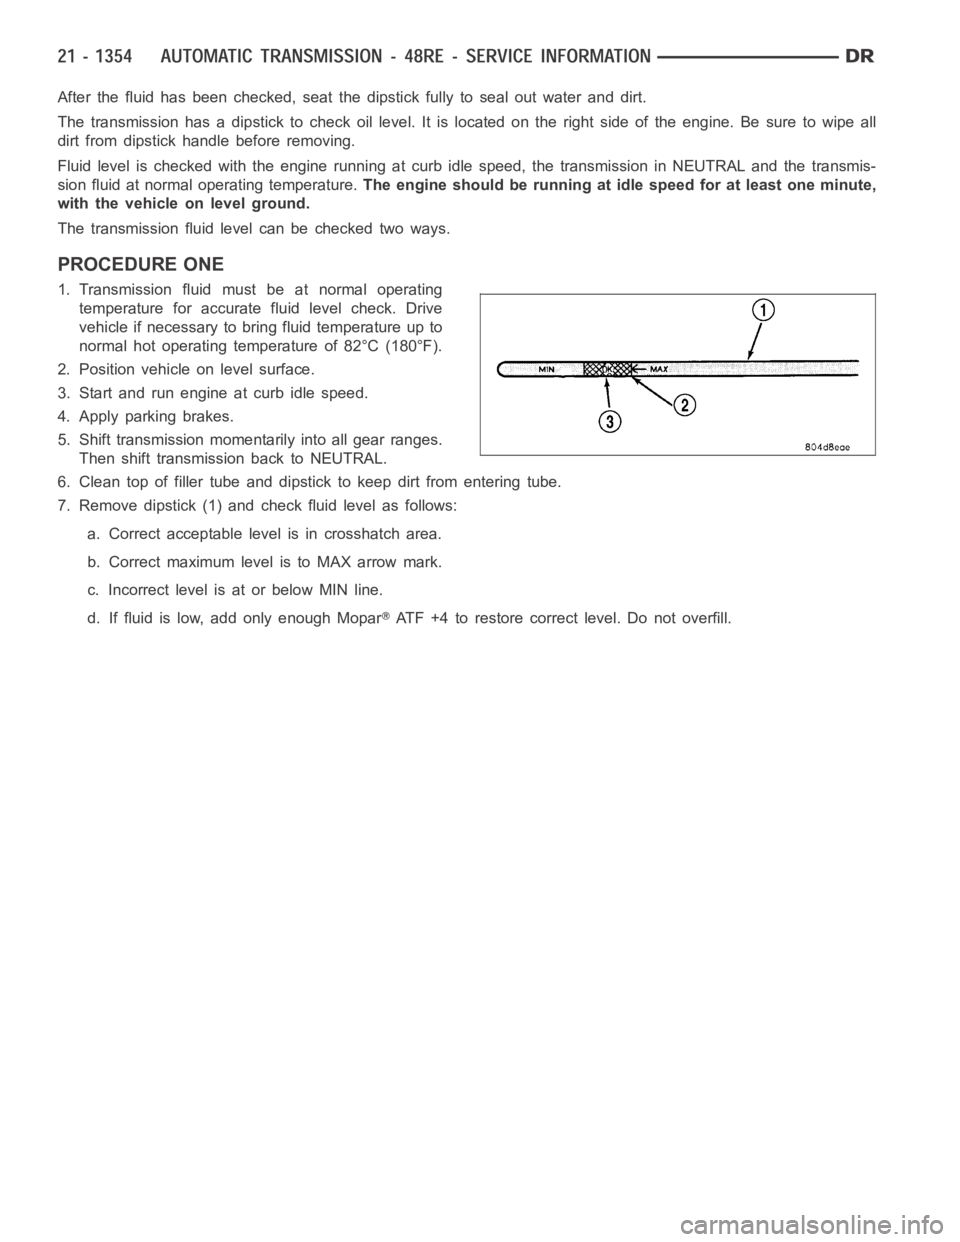
7. Remove dipstick (1) and check fluid level as follows:
a. Correct acceptable level is in crosshatch area.
b. Correct maximum level is to MAX arrow mark.
c. Incorrect level is at or below MIN line.
d. If fluid is low, add only enough Mopar
ATF +4 to restore correct level. Do not overfill.
Page 3876 of 5267

PROCEDURE TWO
1. Start engine and apply parking brake.
2. Shift the transmission into DRIVE for approximately 2 seconds.
3. Shift the transmission into REVERSE for approximately 2 seconds.
4. Shift the transmission into PARK.
5. Hook up DRB
scan tool and select engine.
6. Select sensors.
7. Read the transmission temperature value.
8. Compare the fluid temperature value with the chart.
9. Adjust transmission fluid level shown on the dipstick according to the chart.
NOTE: After adding any fluid to the transmission, wait a minimum of 2 minutes for the oil to fully drain from
the fill tube into the transmission before rechecking the fluid level.
10. Check transmission for leaks.
FLUID AND FILTER REPLACEMENT
For proper service intervals (Refer to LUBRICATION & MAINTENANCE/MAINTENANCE SCHEDULES - DESCRIP-
TION). The service fluid fill after a filter change is approximately 3.8 liters (4.0 quarts).
Page 3878 of 5267
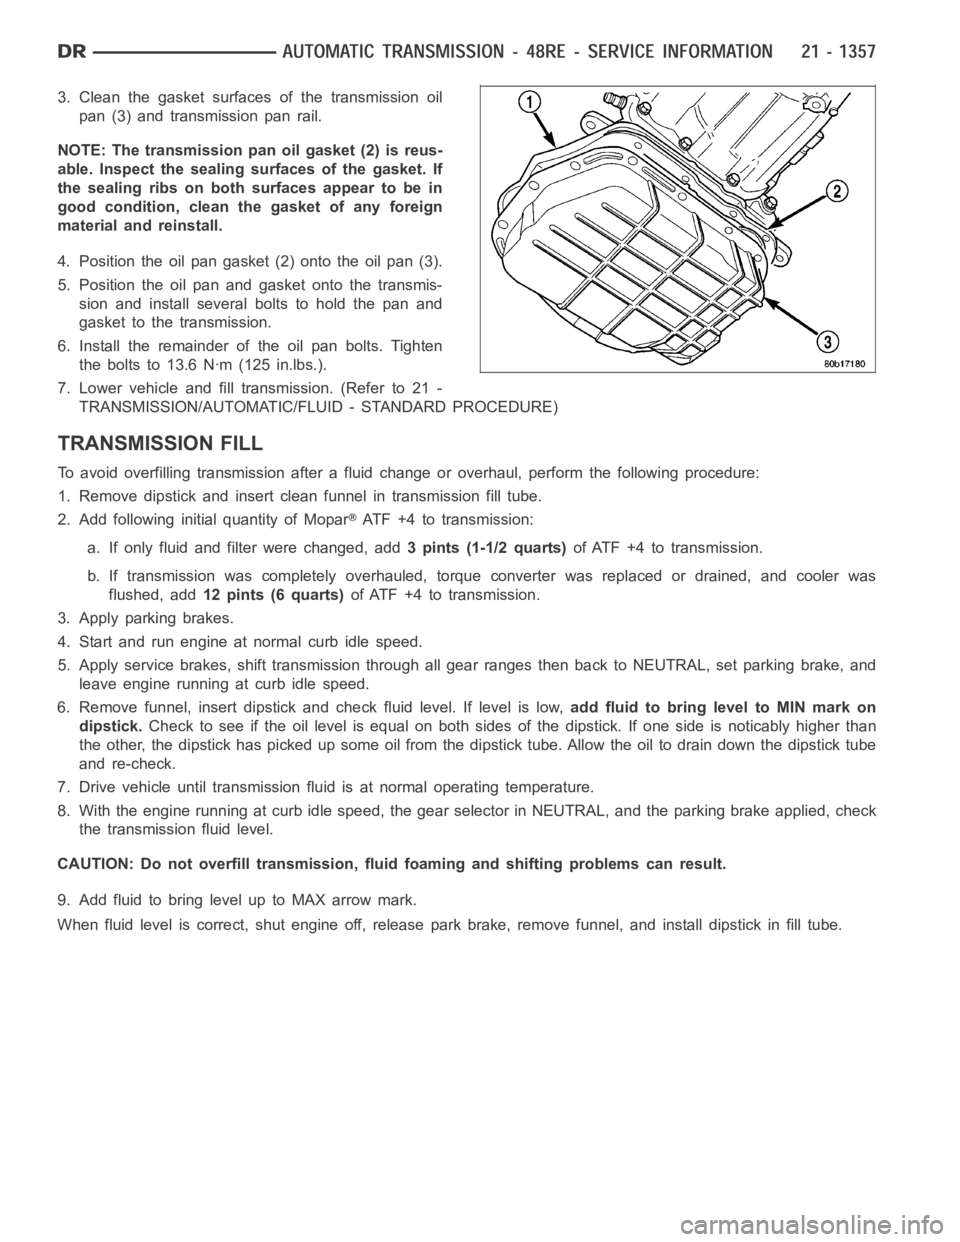
3. Clean the gasket surfaces of the transmission oil
pan (3) and transmission pan rail.
NOTE: The transmission pan oil gasket (2) is reus-
able. Inspect the sealing surfaces of the gasket. If
the sealing ribs on both surfaces appear to be in
good condition, clean the gasket of any foreign
material and reinstall.
4. Position the oil pan gasket (2) onto the oil pan (3).
5. Position the oil pan and gasket onto the transmis-
sion and install several bolts to hold the pan and
gasket to the transmission.
6. Install the remainder of the oil pan bolts. Tighten
the bolts to 13.6 Nꞏm (125 in.lbs.).
7. Lower vehicle and fill transmission. (Refer to 21 -
TRANSMISSION/AUTOMATIC/FLUID - STANDARD PROCEDURE)
TRANSMISSION FILL
To avoid overfilling transmission after a fluid change or overhaul, perform the following procedure:
1. Remove dipstick and insert clean funnel in transmission fill tube.
2. Add following initial quantity of Mopar
ATF+4totransmission:
a. If only fluid and filter were changed, add3 pints (1-1/2 quarts)of ATF +4 to transmission.
b. If transmission was completely overhauled, torque converter was replaced or drained, and cooler was
flushed, add12 pints (6 quarts)of ATF +4 to transmission.
3. Apply parking brakes.
4. Start and run engine at normal curb idle speed.
5. Apply service brakes, shift transmission through all gear ranges then back to NEUTRAL, set parking brake, and
leave engine running at curb idle speed.
6. Remove funnel, insert dipstick andcheck fluid level. If level is low,add fluid to bring level to MIN mark on
dipstick.Check to see if the oil level is equal on both sides of the dipstick. If one side is noticably higher than
the other, the dipstick has picked up some oil from the dipstick tube. Allowthe oil to drain down the dipstick tube
and re-check.
7. Drive vehicle until transmission fluid is at normal operating temperature.
8. With the engine running at curb idle speed, the gear selector in NEUTRAL,and the parking brake applied, check
the transmission fluid level.
CAUTION: Do not overfill transmission, fluid foaming and shifting problems can result.
9. Add fluid to bring level up to MAX arrow mark.
When fluid level is correct, shut engine off, release park brake, remove funnel, and install dipstick in fill tube.
Page 3884 of 5267
SERVO-FRONT
DESCRIPTION
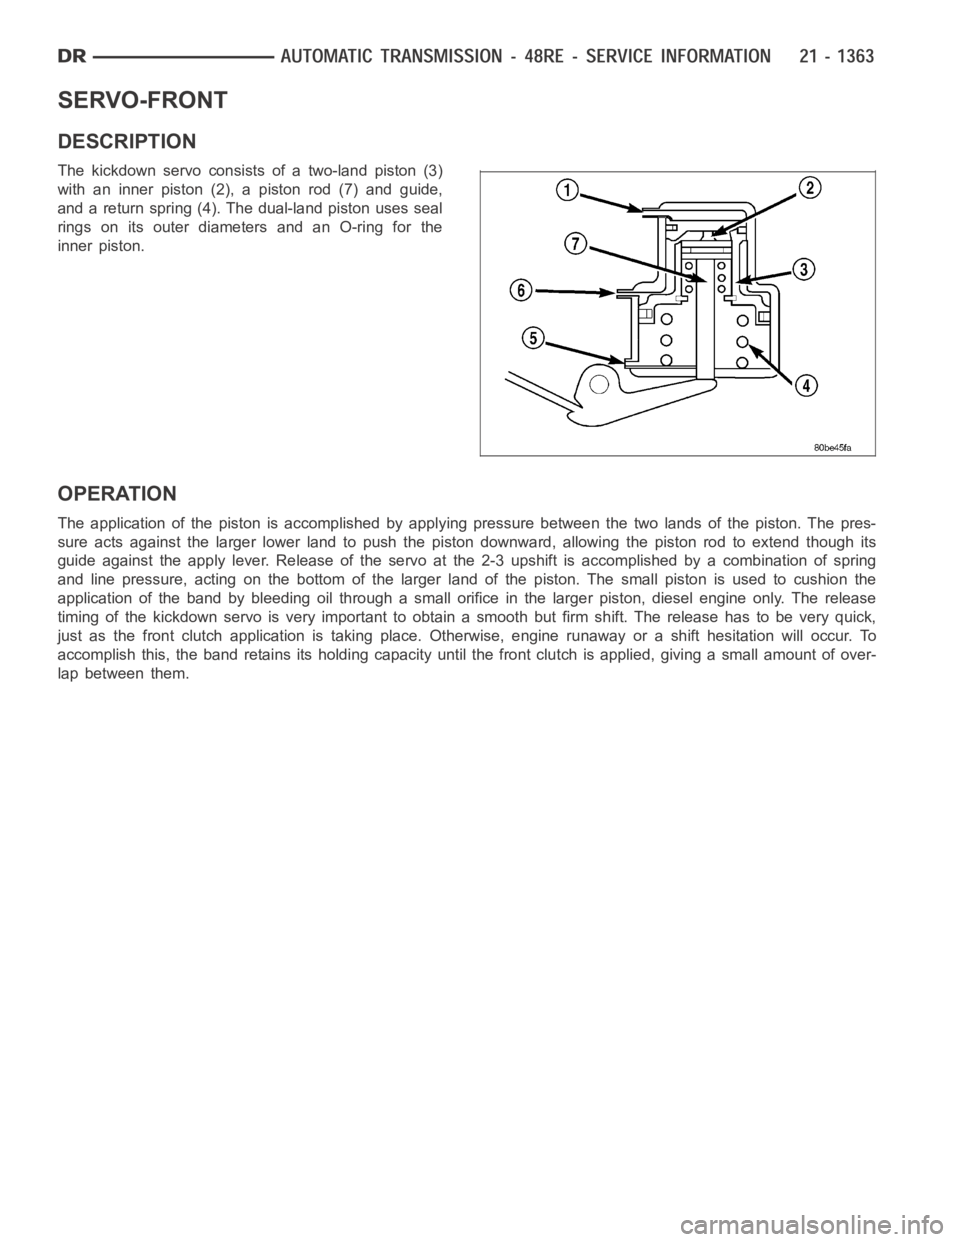
The kickdown servo consists of a two-land piston (3)
with an inner piston (2), a piston rod (7) and guide,
and a return spring (4). The dual-land piston uses seal
rings on its outer diameters and an O-ring for the
inner piston.
OPERATION
The application of the piston is accomplished by applying pressure between the two lands of the piston. The pres-
sure acts against the larger lower land to push the piston downward, allowing the piston rod to extend though its
guide against the apply lever. Release of the servo at the 2-3 upshift is accomplished by a combination of spring
and line pressure, acting on the bottom of the larger land of the piston. Thesmallpistonisusedtocushionthe
application of the band by bleeding oil through a small orifice in the larger piston, diesel engine only. The release
timing of the kickdown servo is very important to obtain a smooth but firm shift. The release has to be very quick,
just as the front clutch application is taking place. Otherwise, engine runaway or a shift hesitation will occur. To
accomplish this, the band retains itsholding capacity until the front clutch is applied, giving a small amount of over-
lap between them.
Page 3887 of 5267
CABLE-GEARSHIFT
DIAGNOSIS AND TESTING - GEARSHIFT CABLE
1. Engine starts must be possible with shift lever in PARK or NEUTRAL positions only. Engine starts must not be
possible in any other gear position.
2. With the shift lever in the:
a. PARK position - Apply upward force on the shift arm and remove pressure. Engine starts must be possible.
b. PARK position - Apply downward force on the shift arm and remove pressure. Engine starts must be pos-
sible.
c. NEUTRAL position - Normal position. Engine starts must be possible.
d. NEUTRAL position - Engine running and brakes applied, apply upward forceontheshiftarm.Transmission
shall not be able to shift from neutral to reverse.
REMOVAL
1. Shift transmission into PARK.
2. Raise vehicle.
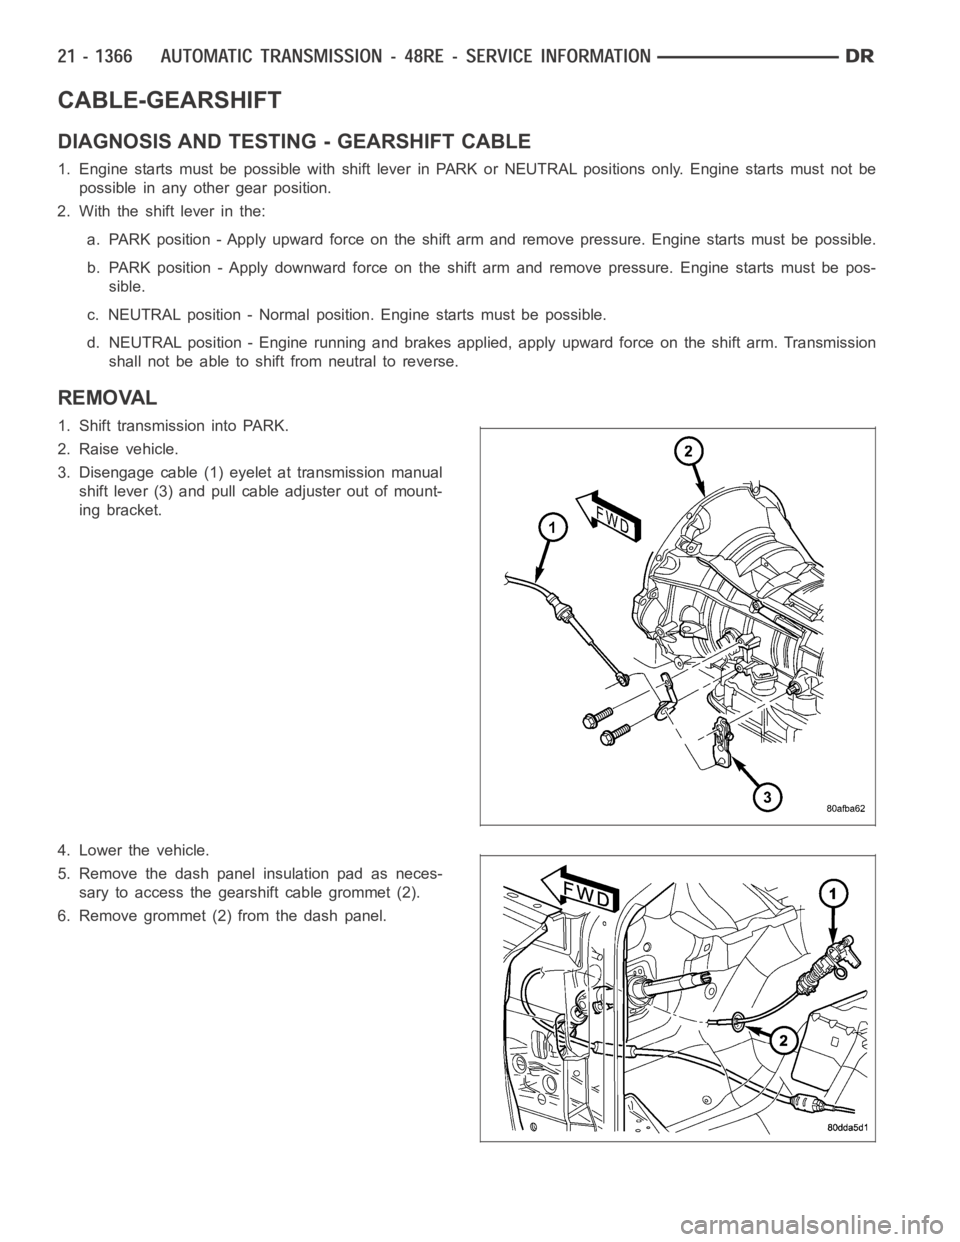
3. Disengage cable (1) eyelet at transmission manual
shift lever (3) and pull cable adjuster out of mount-
ing bracket.
4. Lower the vehicle.
5. Remove the dash panel insulation pad as neces-
sary to access the gearshift cable grommet (2).
6. Remove grommet (2) from the dash panel.
Page 3889 of 5267
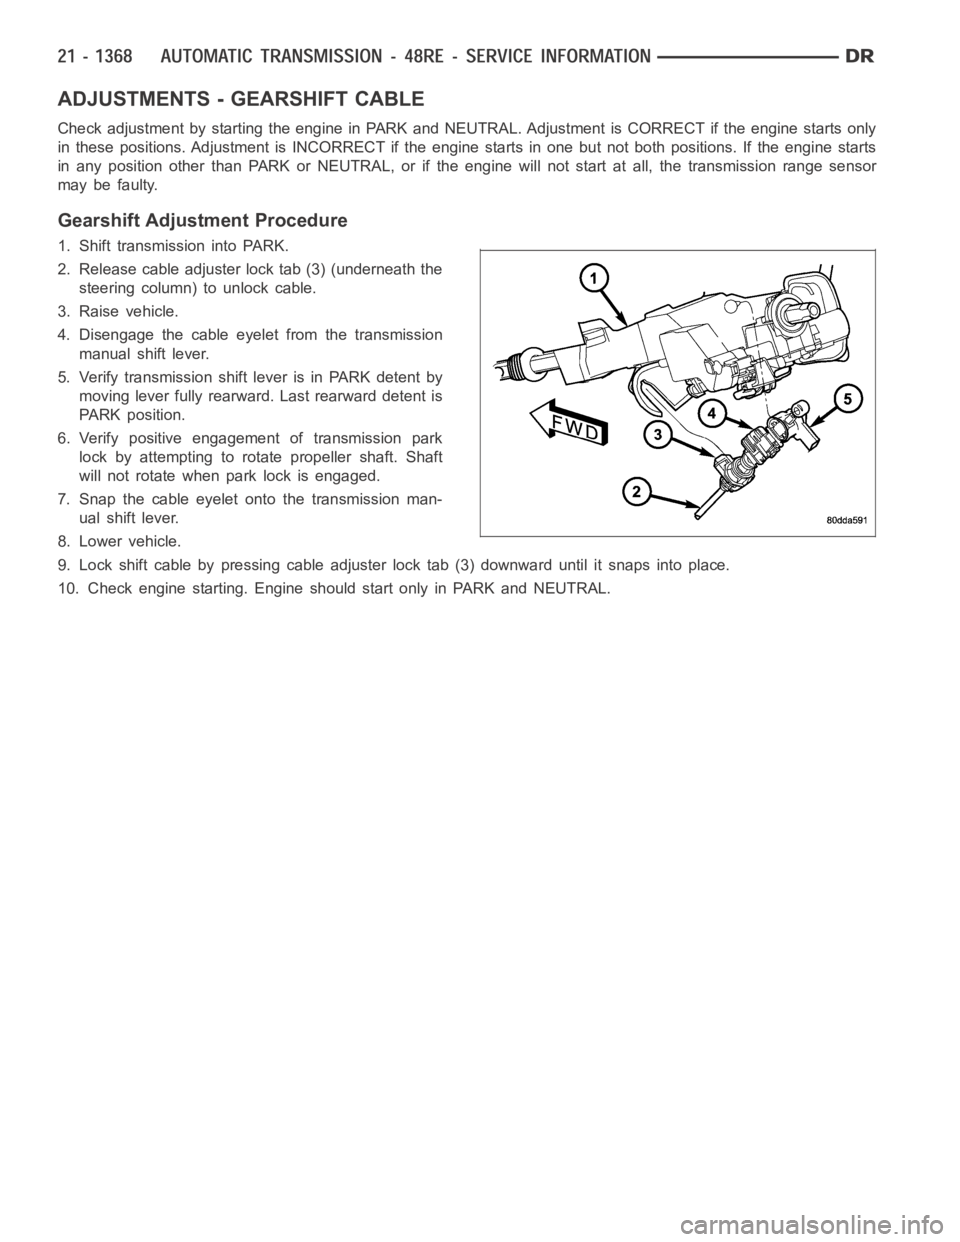
ADJUSTMENTS - GEARSHIFT CABLE
Check adjustment by starting the engine in PARK and NEUTRAL. Adjustment isCORRECT if the engine starts only
in these positions. Adjustment is INCORRECT if the engine starts in one butnot both positions. If the engine starts
in any position other than PARK or NEUTRAL, or if the engine will not start atall, the transmission range sensor
may be faulty.
Gearshift Adjustment Procedure
1. Shift transmission into PARK.
2. Release cable adjuster lock tab (3) (underneath the
steering column) to unlock cable.
3. Raise vehicle.
4. Disengage the cable eyelet from the transmission
manual shift lever.
5. Verify transmission shift lever is in PARK detent by
moving lever fully rearward. Last rearward detent is
PARK position.
6. Verify positive engagement of transmission park
lock by attempting to rotate propeller shaft. Shaft
will not rotate when park lock is engaged.
7. Snap the cable eyelet onto the transmission man-
ual shift lever.
8. Lower vehicle.
9. Lock shift cable by pressing cable adjuster lock tab (3) downward until it snaps into place.
10. Check engine starting. Engine should start only in PARK and NEUTRAL.
Page 3898 of 5267
CLUTCH-OVERDRIVE
DESCRIPTION
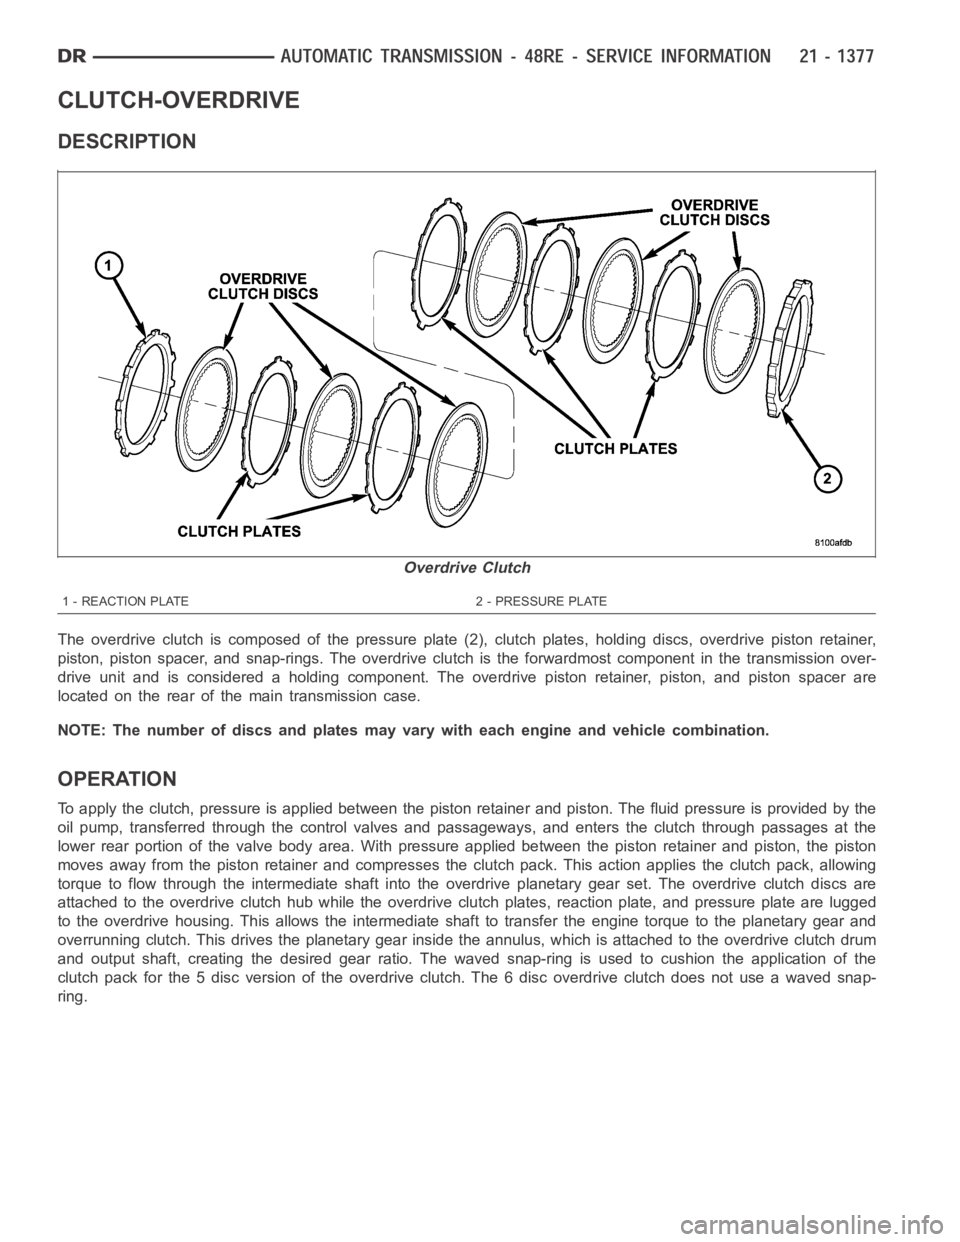
The overdrive clutch is composed of the pressure plate (2), clutch plates,holding discs, overdrive piston retainer,
piston, piston spacer, and snap-rings. The overdrive clutch is the forwardmost component in the transmission over-
drive unit and is considered a holding component. The overdrive piston retainer, piston, and piston spacer are
located on the rear of the main transmission case.
NOTE: The number of discs and plates may vary with each engine and vehicle combination.
OPERATION
To apply the clutch, pressure is applied between the piston retainer and piston. The fluid pressure is provided by the
oil pump, transferred through the control valves and passageways, and enters the clutch through passages at the
lower rear portion of the valve body area. With pressure applied between the piston retainer and piston, the piston
moves away from the piston retainer and compresses the clutch pack. This action applies the clutch pack, allowing
torque to flow through the intermediate shaft into the overdrive planetary gear set. The overdrive clutch discs are
attached to the overdrive clutch hub while the overdrive clutch plates, reaction plate, and pressure plate are lugged
to the overdrive housing. This allows the intermediate shaft to transfer the engine torque to the planetary gear and
overrunning clutch. This drives the planetary gear inside the annulus, which is attached to the overdrive clutch drum
and output shaft, creating the desired gear ratio. The waved snap-ring is used to cushion the application of the
clutch pack for the 5 disc version of the overdrive clutch. The 6 disc overdrive clutch does not use a waved snap-
ring.
Overdrive Clutch
1 - REACTION PLATE 2 - PRESSURE PLATE
Page 3937 of 5267
CLUTCH-REAR
DESCRIPTION
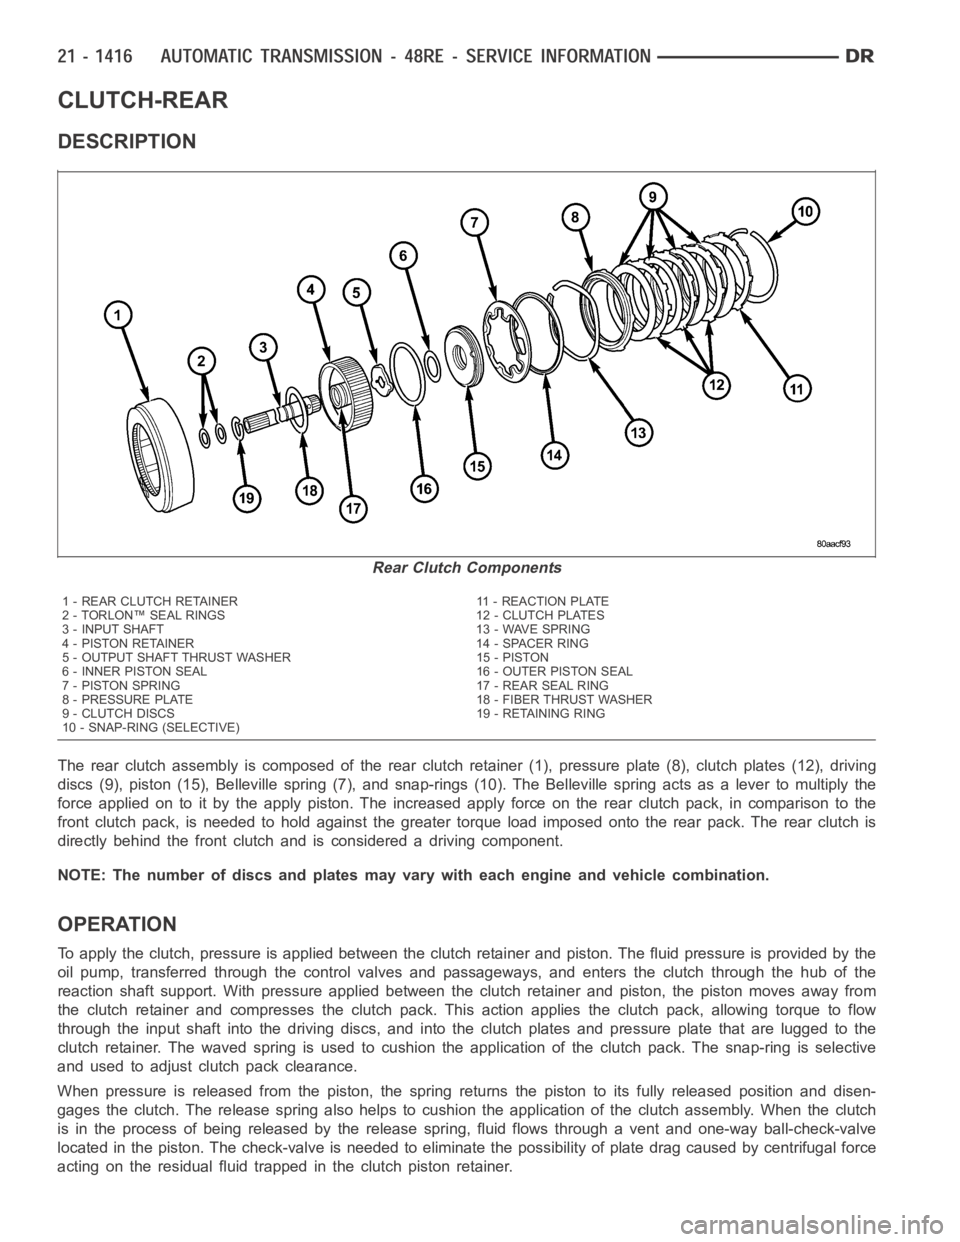
The rear clutch assembly is composed of the rear clutch retainer (1), pressure plate (8), clutch plates (12), driving
discs (9), piston (15), Belleville spring (7), and snap-rings (10). The Belleville spring acts as a lever to multiply the
force applied on to it by the apply piston. The increased apply force on the rear clutch pack, in comparison to the
front clutch pack, is needed to hold against the greater torque load imposed onto the rear pack. The rear clutch is
directly behind the front clutch and is considered a driving component.
NOTE: The number of discs and plates may vary with each engine and vehicle combination.
OPERATION
To apply the clutch, pressure is applied between the clutch retainer and piston. The fluid pressure is provided by the
oil pump, transferred through the control valves and passageways, and enters the clutch through the hub of the
reaction shaft support. With pressure applied between the clutch retainer and piston, the piston moves away from
the clutch retainer and compresses the clutch pack. This action applies the clutch pack, allowing torque to flow
through the input shaft into the driving discs, and into the clutch plates and pressure plate that are lugged to the
clutch retainer. The waved spring is used to cushion the application of theclutch pack. The snap-ring is selective
and used to adjust clutch pack clearance.
When pressure is released from the piston, the spring returns the piston toits fully released position and disen-
gages the clutch. The release spring also helps to cushion the applicationof the clutch assembly. When the clutch
is in the process of being released by the release spring, fluid flows through a vent and one-way ball-check-valve
located in the piston. The check-valve is needed to eliminate the possibility of plate drag caused by centrifugal force
acting on the residual fluid trapped in the clutch piston retainer.
Rear Clutch Components
1 - REAR CLUTCH RETAINER 11 - REACTION PLATE
2 - TORLON™ SEAL RINGS 12 - CLUTCH PLATES
3 - INPUT SHAFT 13 - WAVE SPRING
4 - PISTON RETAINER 14 - SPACER RING
5 - OUTPUT SHAFT THRUST WASHER 15 - PISTON
6 - INNER PISTON SEAL 16 - OUTER PISTON SEAL
7 - PISTON SPRING 17 - REAR SEAL RING
8 - PRESSURE PLATE 18 - FIBER THRUST WASHER
9 - CLUTCH DISCS 19 - RETAINING RING
10 - SNAP-RING (SELECTIVE)