Page 2452 of 5267

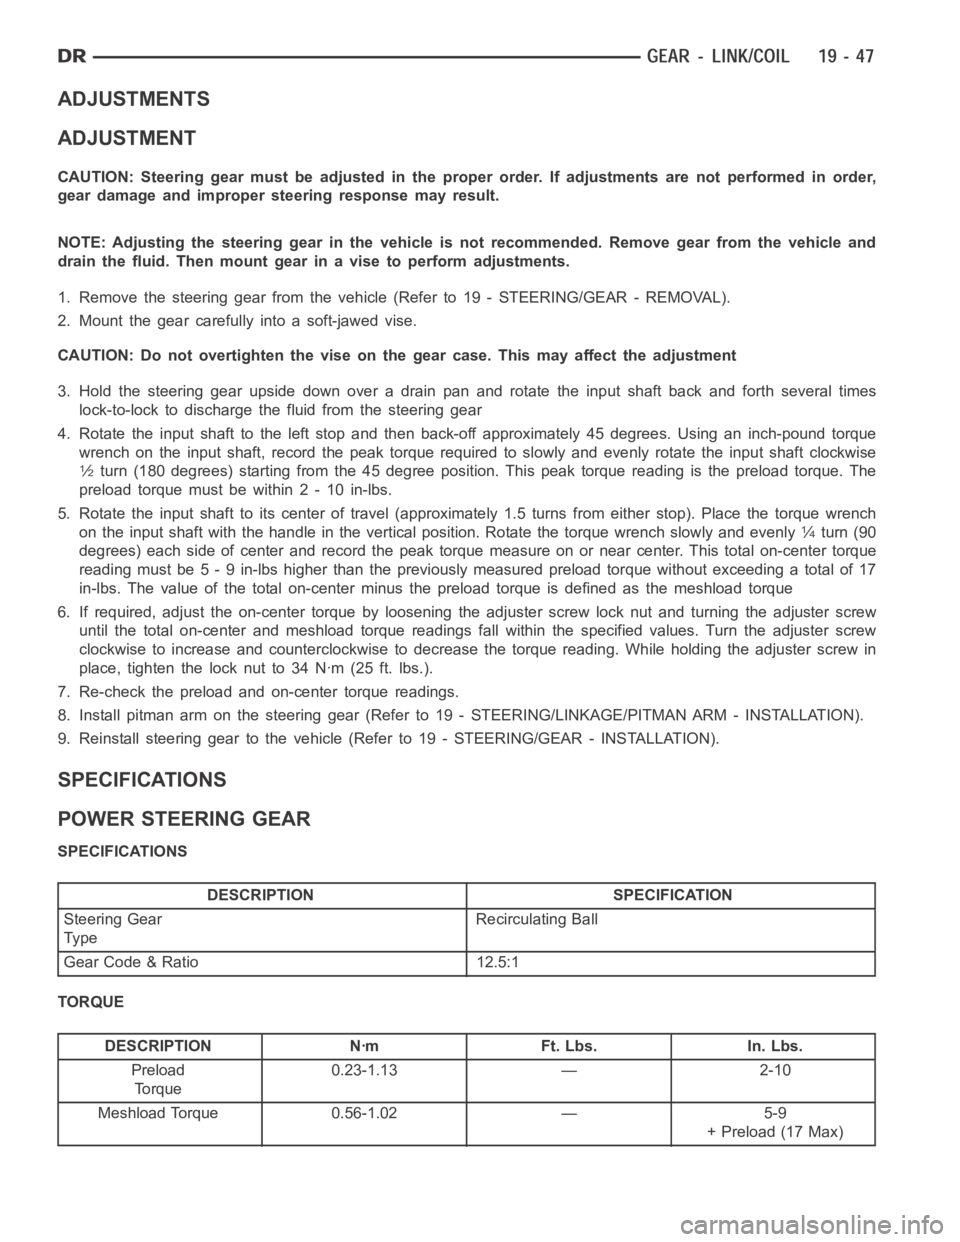
ADJUSTMENTS
ADJUSTMENT
CAUTION: Steering gear must be adjusted in the proper order. If adjustments are not performed in order,
gear damage and improper steering response may result.
NOTE: Adjusting the steering gear in the vehicle is not recommended. Remove gear from the vehicle and
drain the fluid. Then mount gear in a vise to perform adjustments.
1. Remove the steering gear from the vehicle(Referto19-STEERING/GEAR-REMOVAL).
2. Mount the gear carefully into a soft-jawed vise.
CAUTION: Do not overtighten the vise on the gear case. This may affect the adjustment
3. Hold the steering gear upside down over a drain pan and rotate the input shaft back and forth several times
lock-to-lock to discharge the fluid from the steering gear
4. Rotate the input shaft to the left stop and then back-off approximately 45 degrees. Using an inch-pound torque
wrench on the input shaft, record the peak torque required to slowly and evenly rotate the input shaft clockwise
1⁄2turn (180 degrees) starting from the 45 degree position. This peak torque reading is the preload torque. The
preload torque must be within 2 - 10 in-lbs.
5. Rotate the input shaft to its center of travel (approximately 1.5 turns from either stop). Place the torque wrench
on the input shaft with the handle in the vertical position. Rotate the torque wrench slowly and evenly
1⁄4turn (90
degrees) each side of center and record the peak torque measure on or near center. This total on-center torque
reading must be 5 - 9 in-lbs higher than the previously measured preload torque without exceeding a total of 17
in-lbs. The value of the total on-center minus the preload torque is defined as the meshload torque
6. If required, adjust the on-center torque by loosening the adjuster screw lock nut and turning the adjuster screw
until the total on-center and meshload torque readings fall within the specified values. Turn the adjuster screw
clockwise to increase and counterclockwise to decrease the torque reading. While holding the adjuster screw in
place, tighten the lock nut to 34 Nꞏm (25 ft. lbs.).
7. Re-check the preload and on-center torque readings.
8. Install pitman arm on the steering gear (Refer to 19 - STEERING/LINKAGE/PITMAN ARM - INSTALLATION).
9. Reinstall steering gear to the vehicle (Refer to 19 - STEERING/GEAR - INSTALLATION).
SPECIFICATIONS
POWER STEERING GEAR
SPECIFICATIONS
DESCRIPTION SPECIFICATION
Steering Gear
Ty peRecirculating Ball
Gear Code & Ratio 12.5:1
TORQUE
DESCRIPTION Nꞏm Ft. Lbs. In. Lbs.
Preload
To r q u e0.23-1.13 — 2-10
Meshload Torque 0.56-1.02 — 5-9
+ Preload (17 Max)
Page 2453 of 5267
TORQUE
DESCRIPTION Nꞏm Ft. Lbs. In. Lbs.
Steering Gear Mounting
Frame Bolts196 145 —
Steering Coupler to Gear
Shaft49 36 —
Power Steering Line
Pressure32 23 —
Power Steering Line
Return54 40 —
Power Steering Line
Pressure Line To Pump37 27 —
Steering Gear
Adjustment Screw Locknut34 25 —
Steering Gear
Pitman Shaft Nut305 225 —
Steering Gear
Pitman Shaft Cover Bolts68 50 —
Steering Gear
Valve Housing to Gear
Bolts54 40 —
Steering Gear
Retainer Ring Screw2.26 — 20
Steering Gear
Retainer Ring97 72 —
Page 2454 of 5267
SPECIAL TOOLS
POWER STEERING GEAR
PITMAN ARM REMOVAL TOOL - 9615
HANDLE C-4171
INPUT SHAFT SEAL INSTALLER - 8987
PULLER, SLIDE HAMMER - C-3752
SEAL REMOVER ADAPTER - 8990
PITMAN SHAFT SEAL INSTALLER - 8989
RETAINER RING WRENCH - 8988
PITMAN SHAFT SEAL PROTECTOR - 8993
Page 2456 of 5267

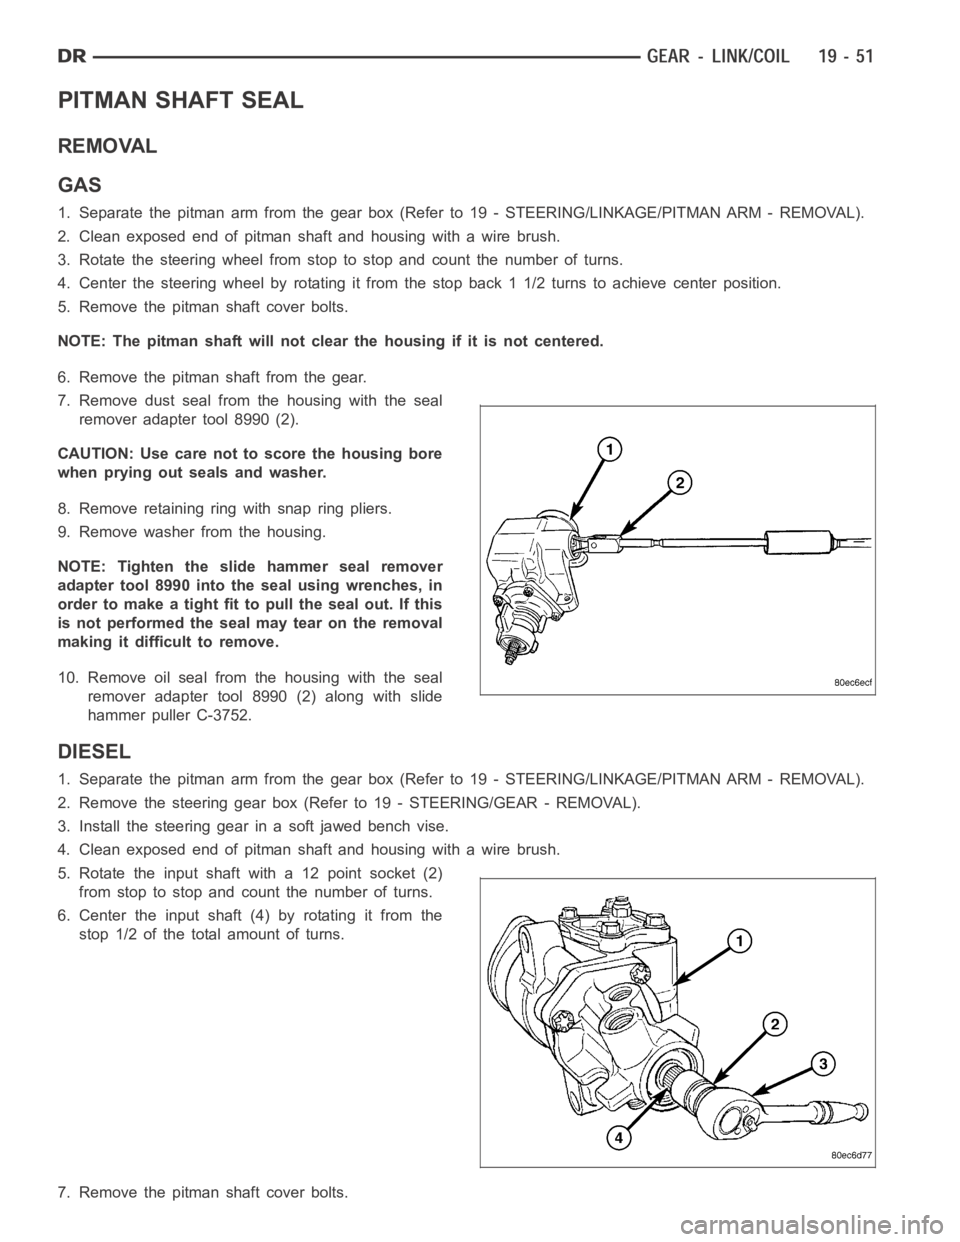
PITMAN SHAFT SEAL
REMOVAL
GAS
1. Separate the pitman arm from the gearbox (Refer to 19 - STEERING/LINKAGE/PITMAN ARM - REMOVAL).
2. Clean exposed end of pitman shaft and housing with a wire brush.
3. Rotate the steering wheel from stop to stop and count the number of turns.
4. Center the steering wheel by rotating it from the stop back 1 1/2 turns to achieve center position.
5. Remove the pitman shaft cover bolts.
NOTE: The pitman shaft will not clear the housing if it is not centered.
6. Remove the pitman shaft from the gear.
7. Remove dust seal from the housing with the seal
remover adapter tool 8990 (2).
CAUTION: Use care not to score the housing bore
when prying out seals and washer.
8. Remove retaining ring with snap ring pliers.
9. Remove washer from the housing.
NOTE: Tighten the slide hammer seal remover
adapter tool 8990 into the seal using wrenches, in
order to make a tight fit to pull the seal out. If this
is not performed the seal may tear on the removal
making it difficult to remove.
10. Remove oil seal from the housing with the seal
remover adapter tool 8990 (2) along with slide
hammer puller C-3752.
DIESEL
1. Separate the pitman arm from the gearbox (Refer to 19 - STEERING/LINKAGE/PITMAN ARM - REMOVAL).
2. Remove the steering gear box (Refer to 19 - STEERING/GEAR - REMOVAL).
3. Install the steering gear in a soft jawed bench vise.
4. Clean exposed end of pitman shaft and housing with a wire brush.
5. Rotate the input shaft with a 12 point socket (2)
from stop to stop and count the number of turns.
6. Center the input shaft (4) by rotating it from the
stop 1/2 of the total amount of turns.
7. Remove the pitman shaft cover bolts.
Page 2458 of 5267

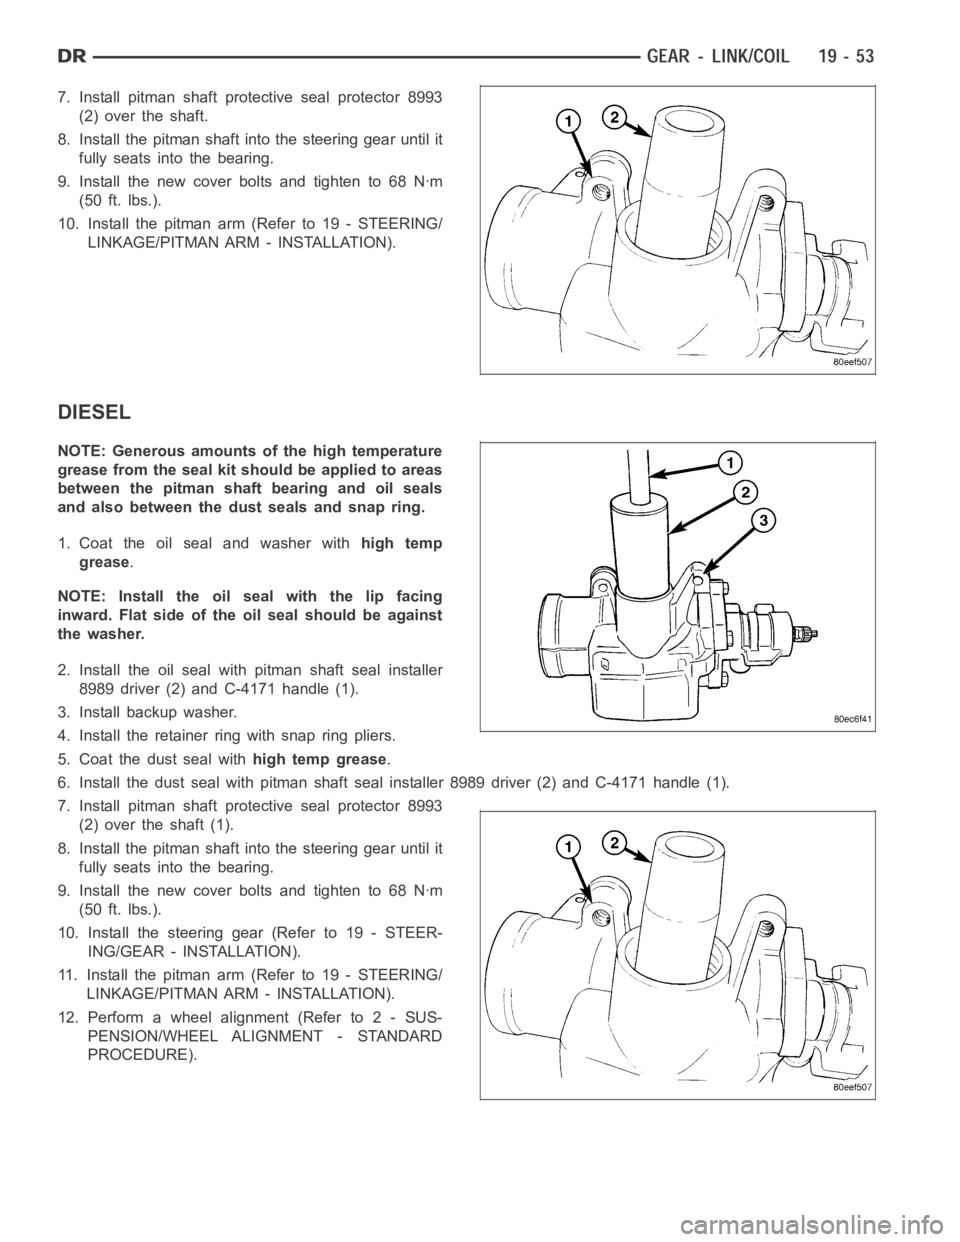
7. Install pitman shaft protective seal protector 8993
(2)overtheshaft.
8. Install the pitman shaft into the steering gear until it
fully seats into the bearing.
9. Install the new cover bolts and tighten to 68 Nꞏm
(50 ft. lbs.).
10. Install the pitman arm (Refer to 19 - STEERING/
LINKAGE/PITMAN ARM - INSTALLATION).
DIESEL
NOTE: Generous amounts of the high temperature
grease from the seal kit should be applied to areas
between the pitman shaft bearing and oil seals
and also between the dust seals and snap ring.
1. Coat the oil seal and washer withhigh temp
grease.
NOTE: Install the oil seal with the lip facing
inward. Flat side of the oil seal should be against
the washer.
2. Install the oil seal with pitman shaft seal installer
8989 driver (2) and C-4171 handle (1).
3. Install backup washer.
4. Install the retainer ring with snap ring pliers.
5. Coat the dust seal withhigh temp grease.
6. Install the dust seal with pitman shaft seal installer 8989 driver (2) andC-4171handle(1).
7. Install pitman shaft protective seal protector 8993
(2)overtheshaft(1).
8. Install the pitman shaft into the steering gear until it
fully seats into the bearing.
9. Install the new cover bolts and tighten to 68 Nꞏm
(50 ft. lbs.).
10. Install the steering gear (Refer to 19 - STEER-
ING/GEAR - INSTALLATION).
11. Install the pitman arm (Refer to 19 - STEERING/
LINKAGE/PITMAN ARM - INSTALLATION).
12. Perform a wheel alignment (Refer to 2 - SUS-
PENSION/WHEEL ALIGNMENT - STANDARD
PROCEDURE).
Page 2459 of 5267
STEERING GEAR INPUT SHAFT SEAL
REMOVAL
1. Remove the steering gear from the vehicle(Referto19-STEERING/GEAR-REMOVAL).
CAUTION: Do not overtighten the vise on the gear case. This may affect the adjustment
2. Mount the steering gear upside down over a drain pan in a soft jawed vise.
3. Place a drain pan under the gear and rotate the input shaft back and forth several times lock-to-lock to discharge
the fluid from the steering gear
4. Drain all the remaining fluid from the gear.
5. Rotate the input shaft (4) from stop to stop and
count the number of turns using a 12 point socket
(2).
NOTE: The pitman shaft will not clear the housing
if it is not centered.
6. Center the input shaft (4) by rotating it from the
stop back 1 1/2 turns to achieve center position.
7. Remove the pitman shaft (Refer to 19 - STEERING/GEAR/PITMAN SHAFT - REMOVA L ) .
8. Remove the four bolts securing the valve housing
(1).
9. Remove the valve housing (1) from the steering
gear (3).
Page 2460 of 5267
10. Remove the valve housing (1) and wormshaft
assembly from the steering gear housing and
place the valve housing in a soft jawed vise.
11. Remove the retainer ring (3) set screw (1) from
the valve housing.
12. Using special tool retainer ring wrench 8988 (1) to
remove the steering gear worm thrust bearing
retainer ring.
Page 2462 of 5267
16. Using slide hammer puller C-3752 (1) with seal
remover adapter 8990 (1) remove the oil seal.
INSTALLATION
1. Inspect the piston teflon seals for damage. Replace
if needed.
NOTE: To replace the teflon seals, use a pick to
remove the teflon o-ring and the rubber o-ring
underneath. Install a new rubber o-ring in the pis-
ton seal grove and a new teflon o-ring over the top
of it.
2. Install the valve into the valve housing (1).
3. Threadtheretainerringintothevalvehousing(1).
Tightento97Nꞏm(72ft.lbs.).
NOTE: It is very important to make sure to com-
pensate for the added length of the torque wrench
when torquing to proper specifications.
4. Install the retainer ring set screw. Tighten to 2.26
Nꞏm (20 in. lbs.)
5. Clean the steering gear housing.
CAUTION: Valve assembly must be centered to the
housing (1).
6. Install the valve assembly (2) into the steering
gear. Tighten the new bolts to 54 Nꞏm (40 ft. lbs.)