Page 1148 of 5135
I35383
LHD Models:
MAX. COOL MAX. HOT
1
2
3
4
5
MAX HOTMAX COOL
I36141
LHD Models:
MAX. COOL MAX. HOT
MAX HOTMAX COOL
±
DIAGNOSTICS AIR CONDITIONING SYSTEM
05±1135
AVENSIS REPAIR MANUAL (RM1018E)
2INSPECT AIRMIX NO.2 DAMPER SERVO SUB±ASSY
(a)Remove the air mix damper servo sub±assy.
(b)Connect the positive (+) lead from the battery to terminal
MAX HOT and negative (±) lead to terminal MAX COOL,
then check that the lever turns to ºHOTº side smoothly.
(c)Connect the positive (+) lead from the battery to terminal MAX COOL and negative (±) lead to terminal MAX HOT,
then check that the lever turns to ºCOOLº side smoothly.
NGREPLACE AIRMIX NO.2 DAMPER SERVO SUB±ASSY
OK
3CHECK HARNESS AND CONNECTOR(AIRMIX DAMPER NO.2 SERVO SUB±ASSY ± A/C AMPLIFIER)
(a)Check for an open or short circuit in harness and connector between air mix d\
amper control servomotor
and A/C amplifier (See page 01±32).
NG REPAIR OR REPLACE HARNESS ORCONNECTOR
OK
REPLACE AIR CONDITIONING AMPLIFIER
Page 1149 of 5135
4(V)
1
0
100%
TPI terminal voltage
Damper opening angle
I35378
A23
Air Mix Control Servo Motor (Driver Side) A/C Control Assembly
M
MAX
HOT4P±L
A15 AMDH12
MAX
COOL5B
A15 AMDC11
PT 3GR
A16 TPD8
VZ 2Y±B
A16 S5±22
GND 1Y±R
A15 SG±214
± DIAGNOSTICSAIR CONDITIONING SYSTEM
05±1129
AVENSIS REPAIR MANUAL (RM1018E)
DTC 36 AIR MIX DAMPER POSITION SENSOR
CIRCUIT (DRIVER SIDE)
CIRCUIT DESCRIPTION
This sensor detects the position of the air mix damper and
sends the appropriate signals to the A/C amplifier. The position
sensor is built in the air mix damper servo sub±assy.
DTC No.Detection ItemTrouble Area
36Short to ground or power source circuit in air mix damper posi-
tion sensor circuit.
�Air mix damper servo sub±assy (Air mix damper position
sensor)
�Harness or connector between air mix damper servo sub±
assy (air mix damper position sensor) and A/C amplifier assy
�A/C amplifier assy
WIRING DIAGRAM
05A80±02
Page 1153 of 5135
TPM terminal voltage
(V)
4
1
0 100%
Damper opening angle
I35378
A25
Air Vent Mode Control Servo Motor A/C Control Assembly
M
FACE 5L±B
A15 AOF4
DEF 4LG±B
A15 AOD3
PT 3GR±R
A16 TPM19
VZ 2BR±W
A16 S5±314
GND 1G±W
A15 SG±315 05±1126
± DIAGNOSTICSAIR CONDITIONING SYSTEM
AVENSIS REPAIR MANUAL (RM1018E)
DTC 33 AIR OUTLET DAMPER POSITION SENSOR
CIRCUIT
CIRCUIT DESCRIPTION
This sensor detects the position of the mode damper and sends
the appropriate signals to the A/C amplifier. The position sensor
is built in the mode damper servo sub±assy.
DTC No.Detection ItemTrouble Area
33Short to ground or power source circuit in mode damper posi-
tion sensor circuit.
�Mode damper servo sub±assy (mode damper position sen-
sor)
�Harness or connector between mode damper servo sub±
assy (mode damper position sensor) and A/C amplifier assy
�A/C amplifier assy
WIRING DIAGRAM
05A7X±02
Page 1156 of 5135

4
1
0
100%Damper opening angle TPP terminal voltage (V)
I35377
A24
Air Mix Control Servo Motor (Front Passenger Side) A/C Control Assembly
MA15 AMPH W
(*1)
W
(*2) W
(*2)5
IQ1 MAX 4 (*1)
HOT 5 (*2)
A15 AMPC Y
(*1)
Y
(*2) Y
(*2)4
IQ1 MAX 5 (*1)
COOL 4 (*2)2
1
A16 TPP V
(*1)
V
(*2) V
(*2)3
IQ1 PT20
3
A16 S5±1 R
(*1)
R
(*2) R
(*2)1
IQ1 VZ 2 (*1)
1 (*2)1
A15 SG±1 P
(*1)
P
(*2) P
(*2)2
IQ1 GND
1 (*1)
2 (*2)13
*1: LHD
*2: RHD 05±1122
± DIAGNOSTICSAIR CONDITIONING SYSTEM
AVENSIS REPAIR MANUAL (RM1018E)
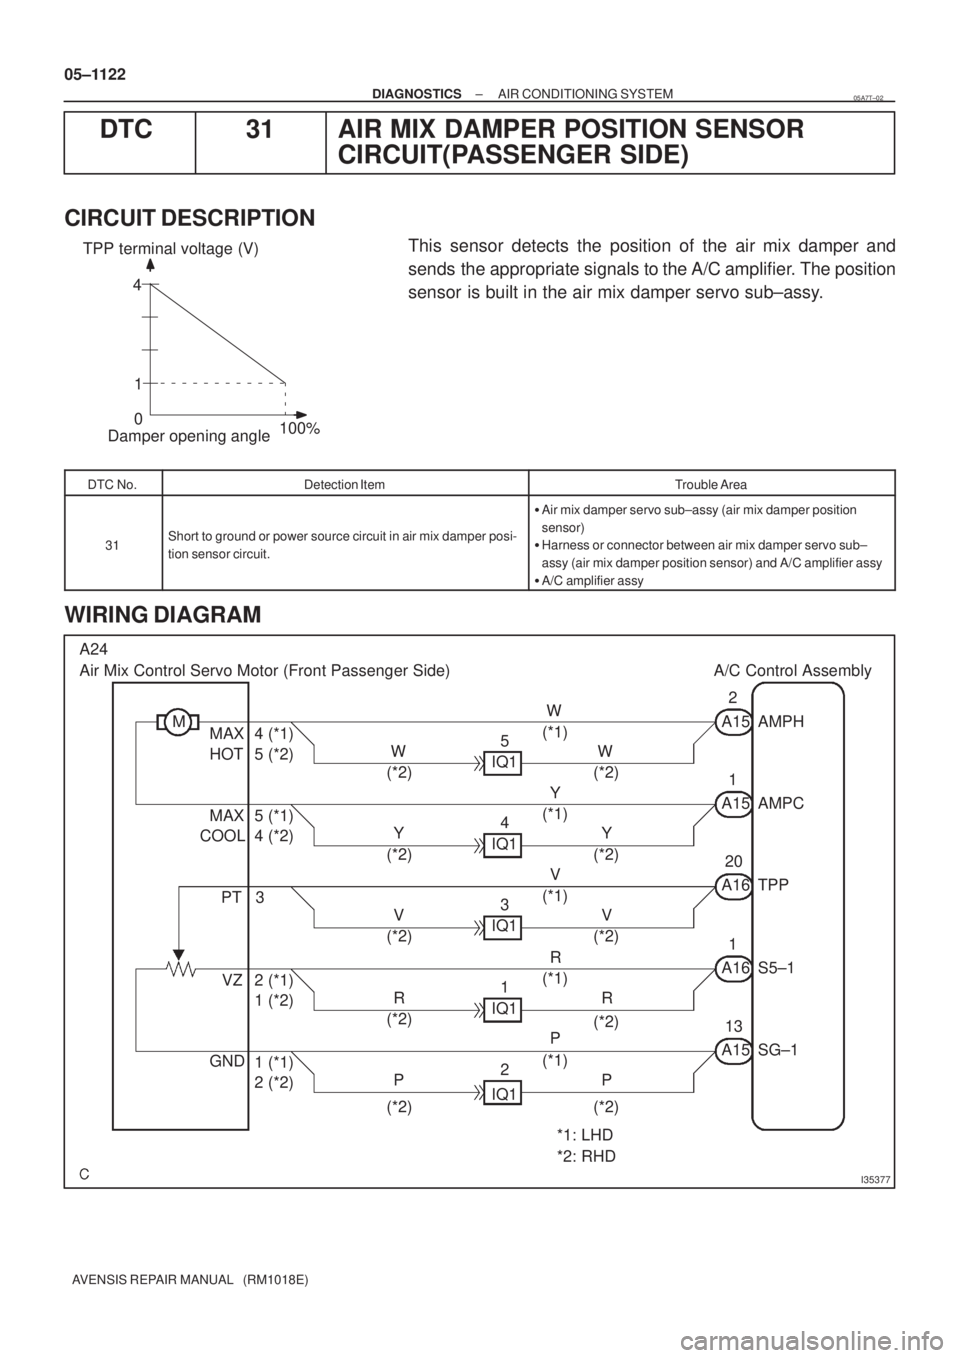
DTC 31 AIR MIX DAMPER POSITION SENSOR
CIRCUIT(PASSENGER SIDE)
CIRCUIT DESCRIPTION
This sensor detects the position of the air mix damper and
sends the appropriate signals to the A/C amplifier. The position
sensor is built in the air mix damper servo sub±assy.
DTC No.Detection ItemTrouble Area
31Short to ground or power source circuit in air mix damper posi-
tion sensor circuit.
�Air mix damper servo sub±assy (air mix damper position
sensor)
�Harness or connector between air mix damper servo sub±
assy (air mix damper position sensor) and A/C amplifier assy
�A/C amplifier assy
WIRING DIAGRAM
05A7T±02
Page 1180 of 5135

050TM±13
05±1100
±
DIAGNOSTICS AIR CONDITIONING SYSTEM
AVENSIS REPAIR MANUAL (RM1018E)
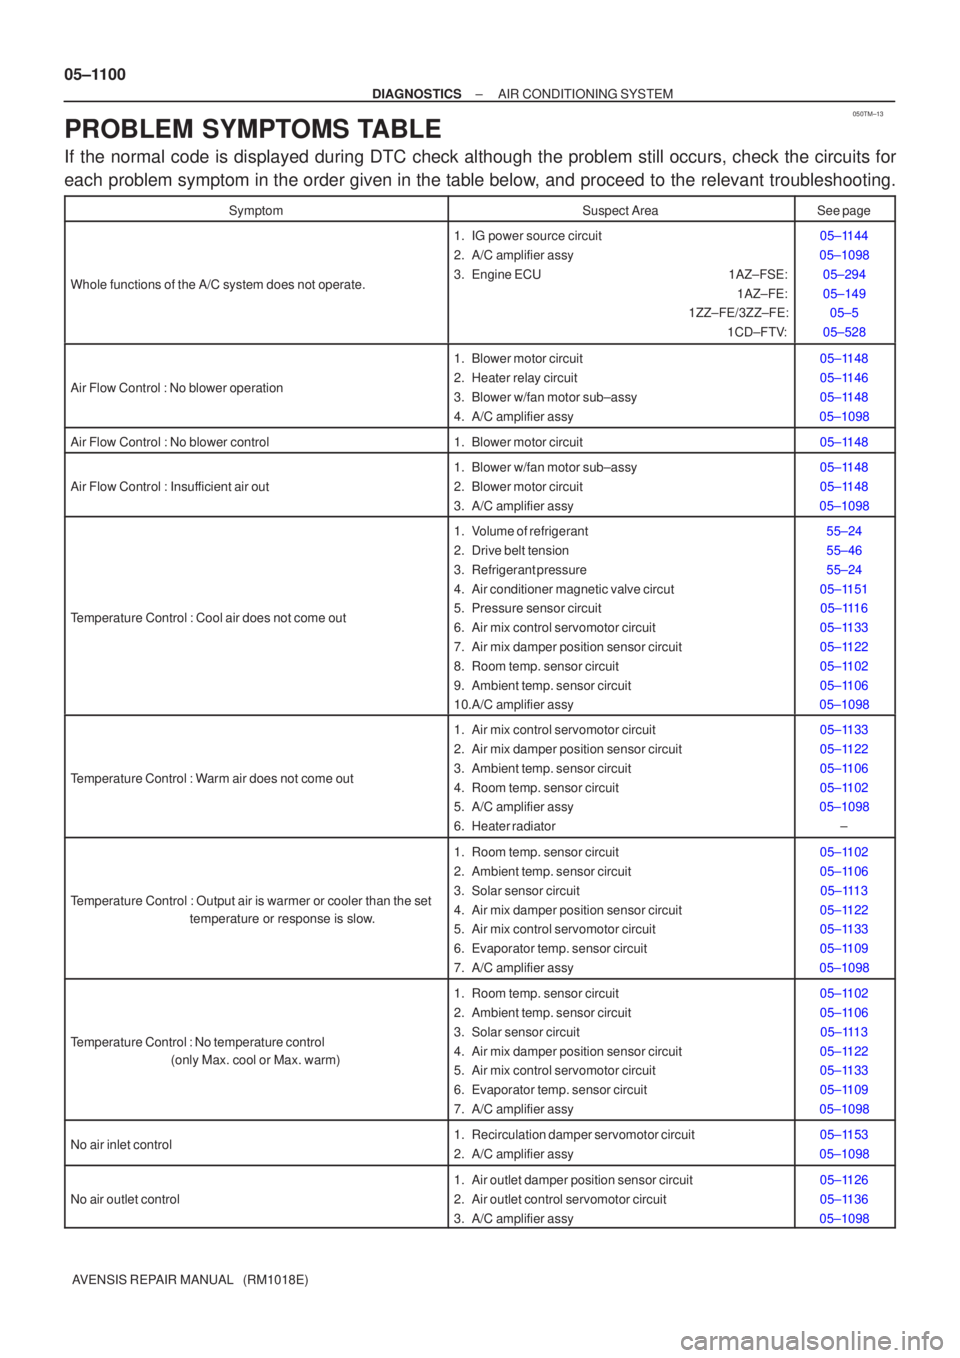
PROBLEM SYMPTOMS TABLE
If the normal code is displayed during DTC check although the problem still occurs, check the circuits for
each problem symptom in the order given in the table below, and proceed to the relevant troubleshooting.
SymptomSuspect AreaSee page
Whole functions of the A/C system does not operate.
1. IG power source circuit
2. A/C amplifier assy
3. Engine ECU 1AZ±FSE: 1AZ±FE:
1ZZ±FE/3ZZ±FE:
1CD±FTV:05±1144
05±1098 05±294
05±149 05±5
05±528
Air Flow Control : No blower operation
1. Blower motor circuit
2. Heater relay circuit
3. Blower w/fan motor sub±assy
4. A/C amplifier assy05±1148
05±1146
05±1148
05±1098
Air Flow Control : No blower control1. Blower motor circuit05±1148
Air Flow Control : Insufficient air out
1. Blower w/fan motor sub±assy
2. Blower motor circuit
3. A/C amplifier assy05±1148
05±1148
05±1098
Temperature Control : Cool air does not come out
1. Volume of refrigerant
2. Drive belt tension
3. Refrigerant pressure
4. Air conditioner magnetic valve circut
5. Pressure sensor circuit
6. Air mix control servomotor circuit
7. Air mix damper position sensor circuit
8. Room temp. sensor circuit
9. Ambient temp. sensor circuit
10.A/C amplifier assy55±24
55±46
55±24
05±1151 05±1116
05±1133
05±1122
05±1102
05±1106
05±1098
Temperature Control : Warm air does not come out
1. Air mix control servomotor circuit
2. Air mix damper position sensor circuit
3. Ambient temp. sensor circuit
4. Room temp. sensor circuit
5. A/C amplifier assy
6. Heater radiator05±1133
05±1122
05±1106
05±1102
05±1098
±
Temperature Control : Output air is warmer or cooler than the set
temperature or response is slow.
1. Room temp. sensor circuit
2. Ambient temp. sensor circuit
3. Solar sensor circuit
4. Air mix damper position sensor circuit
5. Air mix control servomotor circuit
6. Evaporator temp. sensor circuit
7. A/C amplifier assy05±1102
05±110605±1113
05±1122
05±1133
05±1109
05±1098
Temperature Control : No temperature control (only Max. cool or Max. warm)
1. Room temp. sensor circuit
2. Ambient temp. sensor circuit
3. Solar sensor circuit
4. Air mix damper position sensor circuit
5. Air mix control servomotor circuit
6. Evaporator temp. sensor circuit
7. A/C amplifier assy05±1102
05±1106
05±1113
05±1122
05±1133
05±1109
05±1098
No air inlet control1. Recirculation damper servomotor circuit
2. A/C amplifier assy05±1153
05±1098
No air outlet control
1. Air outlet damper position sensor circuit
2. Air outlet control servomotor circuit
3. A/C amplifier assy05±1126
05±1136
05±1098
Page 1185 of 5135
I35353
Recirculation Damper Servo Sub±assy
Mode Damper Servo Sub±assy
Evaporator Temp. Sensor
Evaporator
Airmix Damper Servo Sub±assy
Airmix No.2 Damper
Servo Sub±assy
Blower Motor ControlBlower w/ Fan Motor
Sub±assy
± DIAGNOSTICSAIR CONDITIONING SYSTEM
05±1097
AVENSIS REPAIR MANUAL (RM1018E)
Page 1191 of 5135

05C7W±01
05±1166
± DIAGNOSTICSCOMBUSTION TYPE POWER HEATER SYSTEM
AVENSIS REPAIR MANUAL (RM1018E)
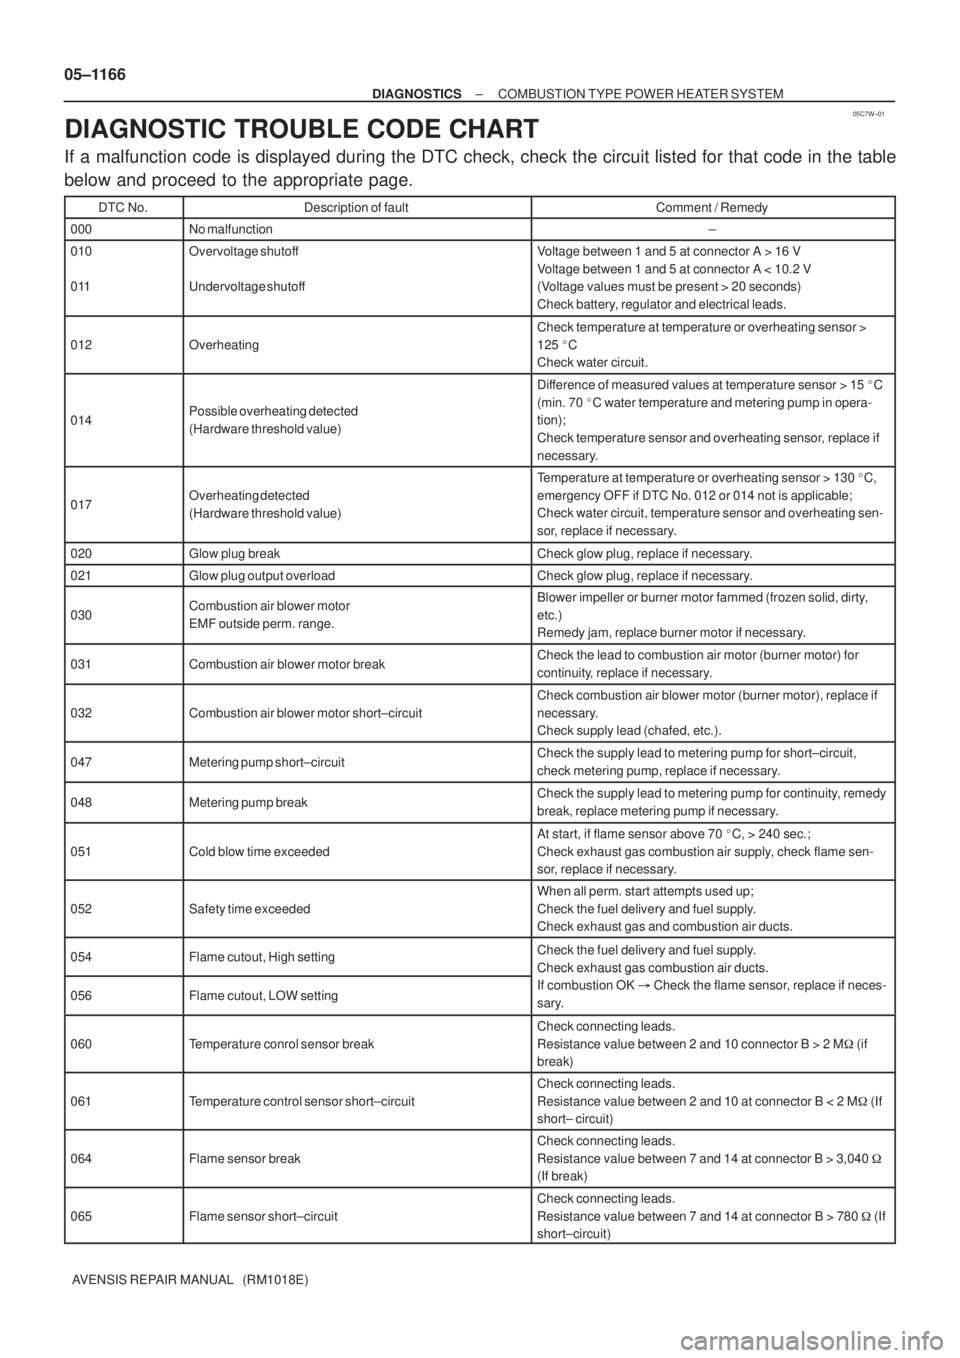
DIAGNOSTIC TROUBLE CODE CHART
If a malfunction code is displayed during the DTC check, check the circuit listed for that code in the table
below and proceed to the appropriate page.
DTC No.Description of faultComment / Remedy
000No malfunction±
010
011Overvoltage shutoff
Undervoltage shutoffVoltage between 1 and 5 at connector A > 16 V
Voltage between 1 and 5 at connector A < 10.2 V
(Voltage values must be present > 20 seconds)
Check battery, regulator and electrical leads.
012Overheating
Check temperature at temperature or overheating sensor >
125 �C
Check water circuit.
014Possible overheating detected
(Hardware threshold value)
Difference of measured values at temperature sensor > 15 �C
(min. 70 �C water temperature and metering pump in opera-
tion);
Check temperature sensor and overheating sensor, replace if
necessary.
017Overheating detected
(Hardware threshold value)
Temperature at temperature or overheating sensor > 130 �C,
emergency OFF if DTC No. 012 or 014 not is applicable;
Check water circuit, temperature sensor and overheating sen-
sor, replace if necessary.
020Glow plug breakCheck glow plug, replace if necessary.
021Glow plug output overloadCheck glow plug, replace if necessary.
030Combustion air blower motor
EMF outside perm. range.Blower impeller or burner motor fammed (frozen solid, dirty,
etc.)
Remedy jam, replace burner motor if necessary.
031Combustion air blower motor breakCheck the lead to combustion air motor (burner motor) for
continuity, replace if necessary.
032Combustion air blower motor short±circuit
Check combustion air blower motor (burner motor), replace if
necessary.
Check supply lead (chafed, etc.).
047Metering pump short±circuitCheck the supply lead to metering pump for short±circuit,
check metering pump, replace if necessary.
048Metering pump breakCheck the supply lead to metering pump for continuity, remedy
break, replace metering pump if necessary.
051Cold blow time exceeded
At start, if flame sensor above 70 �C, > 240 sec.;
Check exhaust gas combustion air supply, check flame sen-
sor, replace if necessary.
052Safety time exceeded
When all perm. start attempts used up;
Check the fuel delivery and fuel supply.
Check exhaust gas and combustion air ducts.
054Flame cutout, High settingCheck the fuel delivery and fuel supply.
Check exhaust gas combustion air ducts.
056Flame cutout, LOW setting
Check exhaust gas combustion air ducts.
If combustion OK � Check the flame sensor, replace if neces-
sary.
060Temperature conrol sensor break
Check connecting leads.
Resistance value between 2 and 10 connector B > 2 M� (if
break)
061Temperature control sensor short±circuit
Check connecting leads.
Resistance value between 2 and 10 at connector B < 2 M� (If
short± circuit)
064Flame sensor break
Check connecting leads.
Resistance value between 7 and 14 at connector B > 3,040 �
(If break)
065Flame sensor short±circuit
Check connecting leads.
Resistance value between 7 and 14 at connector B > 780 � (If
short±circuit)
Page 1194 of 5135
I35431
Buner Motor
Glow Plug
Surface Sensor
Temp.Control Sensor
Flame Sensor13
Power
Heater
ECU
Connector BTerminal L
of AlternatorBattery
Metering Pump
Fuse (20 A)
Vehicle Side SW 14
9
12
5
6
3
4
1
2BR
G
L±Y
L B±R
Y
L±WR
1
2
3
4 5
6
7
8W±B Connector A
IG
R±G
R±L (*1)
R±Y (*2)
R±B
W±R (*1)
Y±R (*2)
*1: TMC Made
*2: TMUK Made
± DIAGNOSTICSCOMBUSTION TYPE POWER HEATER SYSTEM
05±1165
AVENSIS REPAIR MANUAL (RM1018E)
2. DESCRIPTION OF DISPLAY AND BUTTONS
(a) AF: Current Value Malfunction (Blinking at current failure)
Diag: DTC (Example: 064 Flame sensor break)
Memory Clear button: Deletion of faulty memory (Press both buttons together for longer than 2 sec.)
> Button: Scroll up of faulty memory (The past 5 codes can be stored.)
< Button: Scroll down of faulty memory (The past 5 codes can be stored.)
3. FAULTY MEMORY
(a) The ECU is able to store upto 5 pieces of faulty memory. If it is full, the new data is written over F5.
4. WIRING DIAGRAM