2005 NISSAN NAVARA tow
[x] Cancel search: towPage 1761 of 3171

IP-2
PRECAUTIONS
PRECAUTIONS
PFP:00001
Precautions for Supplemental Restraint System (SRS) “AIR BAG” and “SEAT
BELT PRE-TENSIONER”
EIS00DZ8
The Supplemental Restraint System such as “AIR BAG” and “SEAT BELT PRE-TENSIONER”, used along
with a front seat belt, helps to reduce the risk or severity of injury to the driver and front passenger for certain
types of collision. Information necessary to service the system safely is included in the SRS and SB section of
this Service Manual.
WARNING:
lTo avoid rendering the SRS inoperative, which could increase the risk of personal injury or death
in the event of a collision which would result in air bag inflation, all maintenance must be per-
formed by an authorized NISSAN/INFINITI dealer.
lImproper maintenance, including incorrect removal and installation of the SRS, can lead to per-
sonal injury caused by unintentional activation of the system. For removal of Spiral Cable and Air
Bag Module, see the SRS section.
lDo not use electrical test equipment on any circuit related to the SRS unless instructed to in this
Service Manual. SRS wiring harnesses can be identified by yellow and/or orange harnesses or
harness connectors.
Precautions for SRS “AIR BAG” and “SEAT BELT PRE-TENSIONER” ServiceEIS00DZ4
lDo not use electrical test equipment to check SRS circuits unless instructed to in this Service Manual.
lBefore servicing the SRS, turn ignition switch OFF, disconnect both battery cables and wait at least 3 min-
utes.
For approximately 3 minutes after the cables are removed, it is still possible for the air bag and seat belt
pre-tensioner to deploy. Therefore, do not work on any SRS connectors or wires until at least 3 minutes
have passed.
lThe air bag diagnosis sensor unit must always be installed with the arrow marks “Ü” pointing toward the
front of the vehicle for proper operation. Also check the air bag diagnosis sensor unit for cracks, deformi-
ties or rust before installation and replace as required.
lThe spiral cable must be aligned with the neutral position since its rotations are limited. Do not attempt to
turn steering wheel or column after removal of steering gear.
lHandle air bag module carefully. Always place driver and front passenger air bag modules with the pad
side facing upward and seat mounted front side air bag module standing with the stud bolt side facing
down.
lConduct self-diagnosis to check entire SRS for proper function after replacing any components.
lAfter air bag inflates, the front instrument panel assembly should be replaced if damaged.
Page 2111 of 3171
LT-28
HEADLAMP -CONVENTIONAL TYPE-
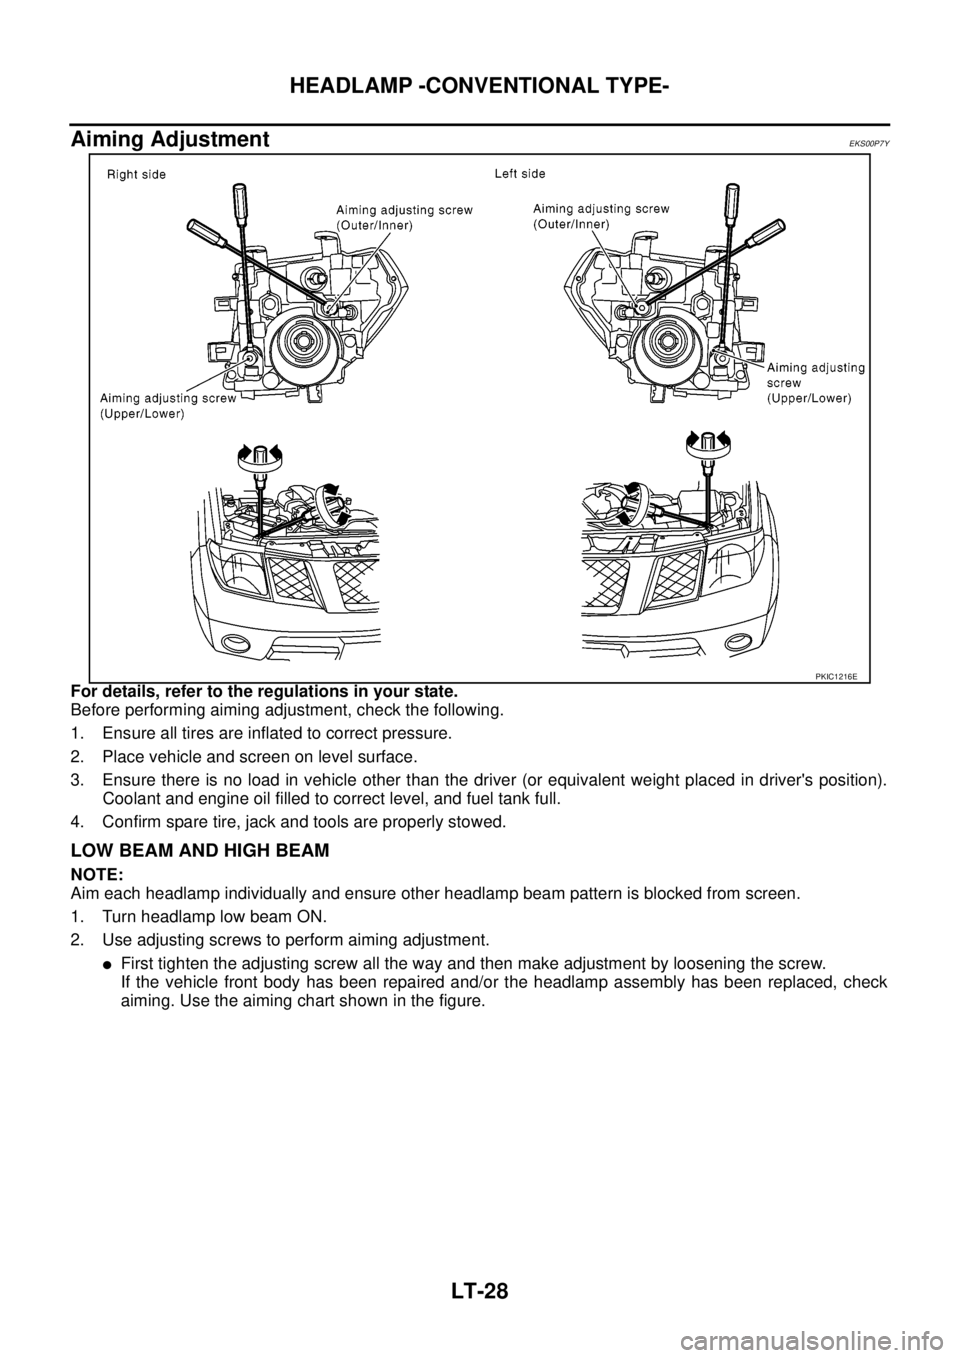
Aiming Adjustment
EKS00P7Y
For details, refer to the regulations in your state.
Before performing aiming adjustment, check the following.
1. Ensure all tires are inflated to correct pressure.
2. Place vehicle and screen on level surface.
3. Ensure there is no load in vehicle other than the driver (or equivalent weight placed in driver's position).
Coolant and engine oil filled to correct level, and fuel tank full.
4. Confirm spare tire, jack and tools are properly stowed.
LOW BEAM AND HIGH BEAM
NOTE:
Aim each headlamp individually and ensure other headlamp beam pattern is blocked from screen.
1. Turn headlamp low beam ON.
2. Use adjusting screws to perform aiming adjustment.
lFirst tighten the adjusting screw all the way and then make adjustment by loosening the screw.
If the vehicle front body has been repaired and/or the headlamp assembly has been replaced, check
aiming. Use the aiming chart shown in the figure.
PKIC1216E
Page 2195 of 3171
LT-112
LIGHTING AND TURN SIGNAL SWITCH
LIGHTING AND TURN SIGNAL SWITCH
PFP:25540
Removal and InstallationEKS00P8N
REMOVAL
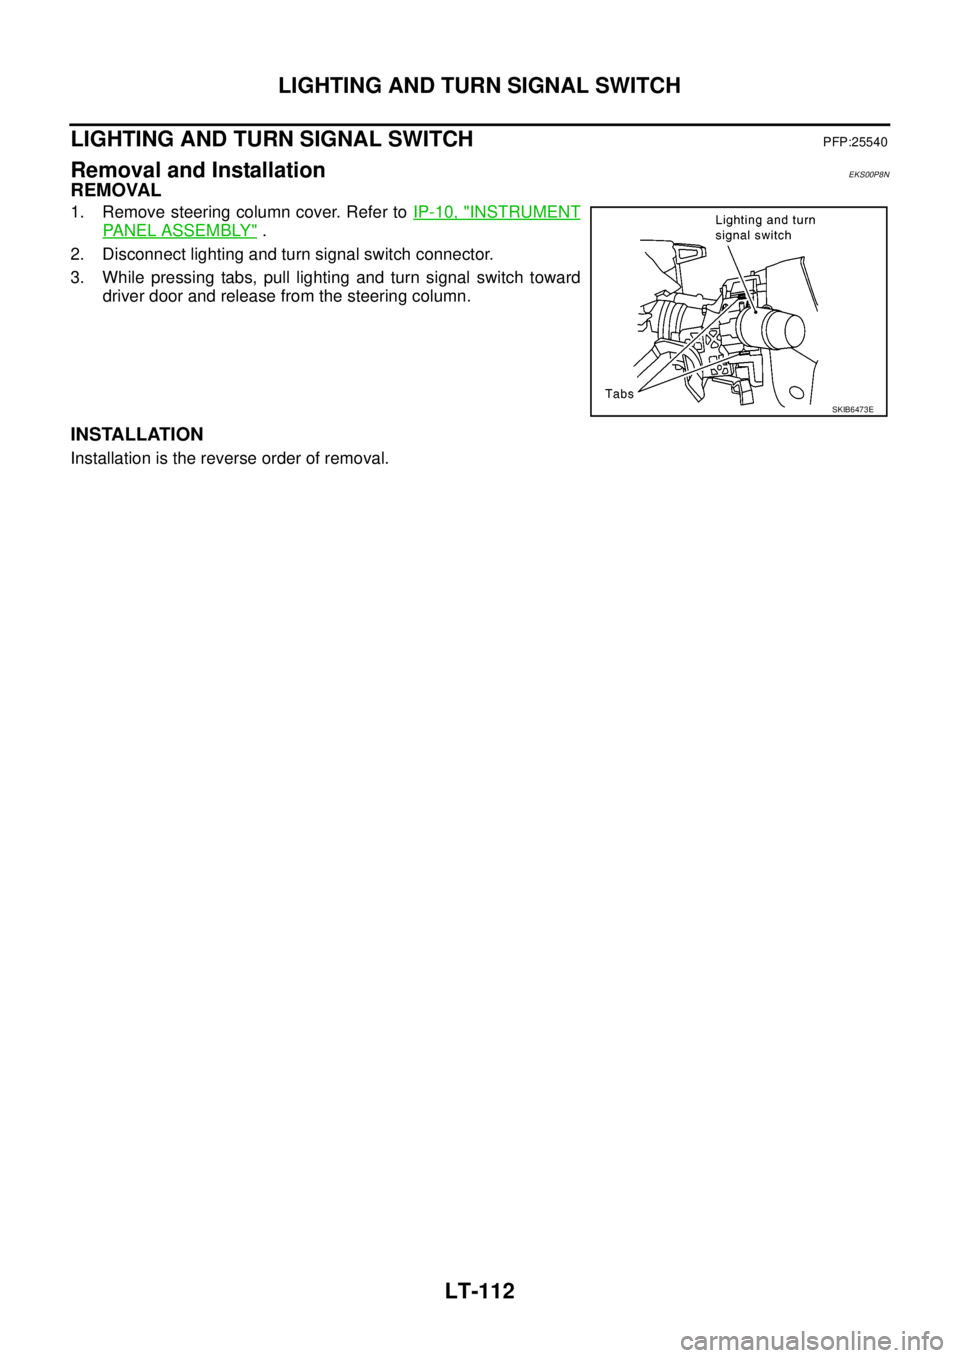
1. Remove steering column cover. Refer toIP-10, "INSTRUMENT
PANEL ASSEMBLY".
2. Disconnect lighting and turn signal switch connector.
3. While pressing tabs, pull lighting and turn signal switch toward
driver door and release from the steering column.
INSTALLATION
Installation is the reverse order of removal.
SKIB6473E
Page 2280 of 3171
DESCRIPTION
MA-5
C
D
E
F
G
H
I
J
K
MA
B
MA
DESCRIPTIONPFP:00000
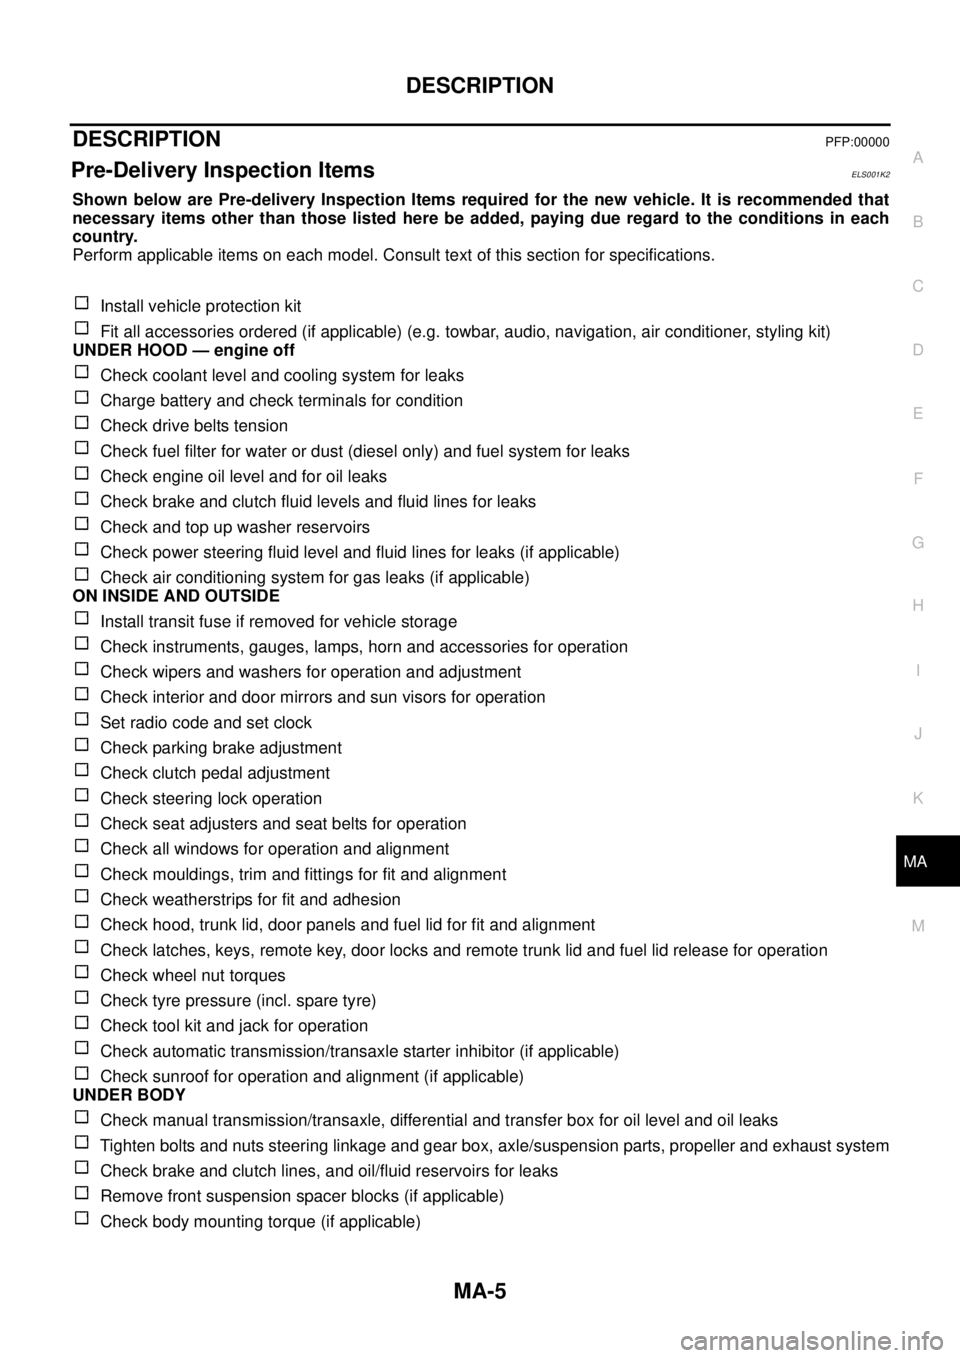
Pre-Delivery Inspection ItemsELS001K2
Shown below are Pre-delivery Inspection Items required for the new vehicle. It is recommended that
necessary items other than those listed here be added, paying due regard to the conditions in each
country.
Perform applicable items on each model. Consult text of this section for specifications.
Install vehicle protection kit
Fit all accessories ordered (if applicable) (e.g. towbar, audio, navigation, air conditioner, styling kit)
UNDER HOOD — engine off
Check coolant level and cooling system for leaks
Charge battery and check terminals for condition
Check drive belts tension
Check fuel filter for water or dust (diesel only) and fuel system for leaks
Check engine oil level and for oil leaks
Check brake and clutch fluid levels and fluid lines for leaks
Check and top up washer reservoirs
Check power steering fluid level and fluid lines for leaks (if applicable)
Check air conditioning system for gas leaks (if applicable)
ON INSIDE AND OUTSIDE
Install transit fuse if removed for vehicle storage
Check instruments, gauges, lamps, horn and accessories for operation
Check wipers and washers for operation and adjustment
Check interior and door mirrors and sun visors for operation
Set radio code and set clock
Check parking brake adjustment
Check clutch pedal adjustment
Check steering lock operation
Check seat adjusters and seat belts for operation
Check all windows for operation and alignment
Check mouldings, trim and fittings for fit and alignment
Check weatherstrips for fit and adhesion
Check hood, trunk lid, door panels and fuel lid for fit and alignment
Check latches, keys, remote key, door locks and remote trunk lid and fuel lid release for operation
Check wheel nut torques
Check tyre pressure (incl. spare tyre)
Check tool kit and jack for operation
Check automatic transmission/transaxle starter inhibitor (if applicable)
Check sunroof for operation and alignment (if applicable)
UNDER BODY
Check manual transmission/transaxle, differential and transfer box for oil level and oil leaks
Tighten bolts and nuts steering linkage and gear box, axle/suspension parts, propeller and exhaust system
Check brake and clutch lines, and oil/fluid reservoirs for leaks
Remove front suspension spacer blocks (if applicable)
Check body mounting torque (if applicable)
Page 2285 of 3171
MA-10
PERIODIC MAINTENANCE
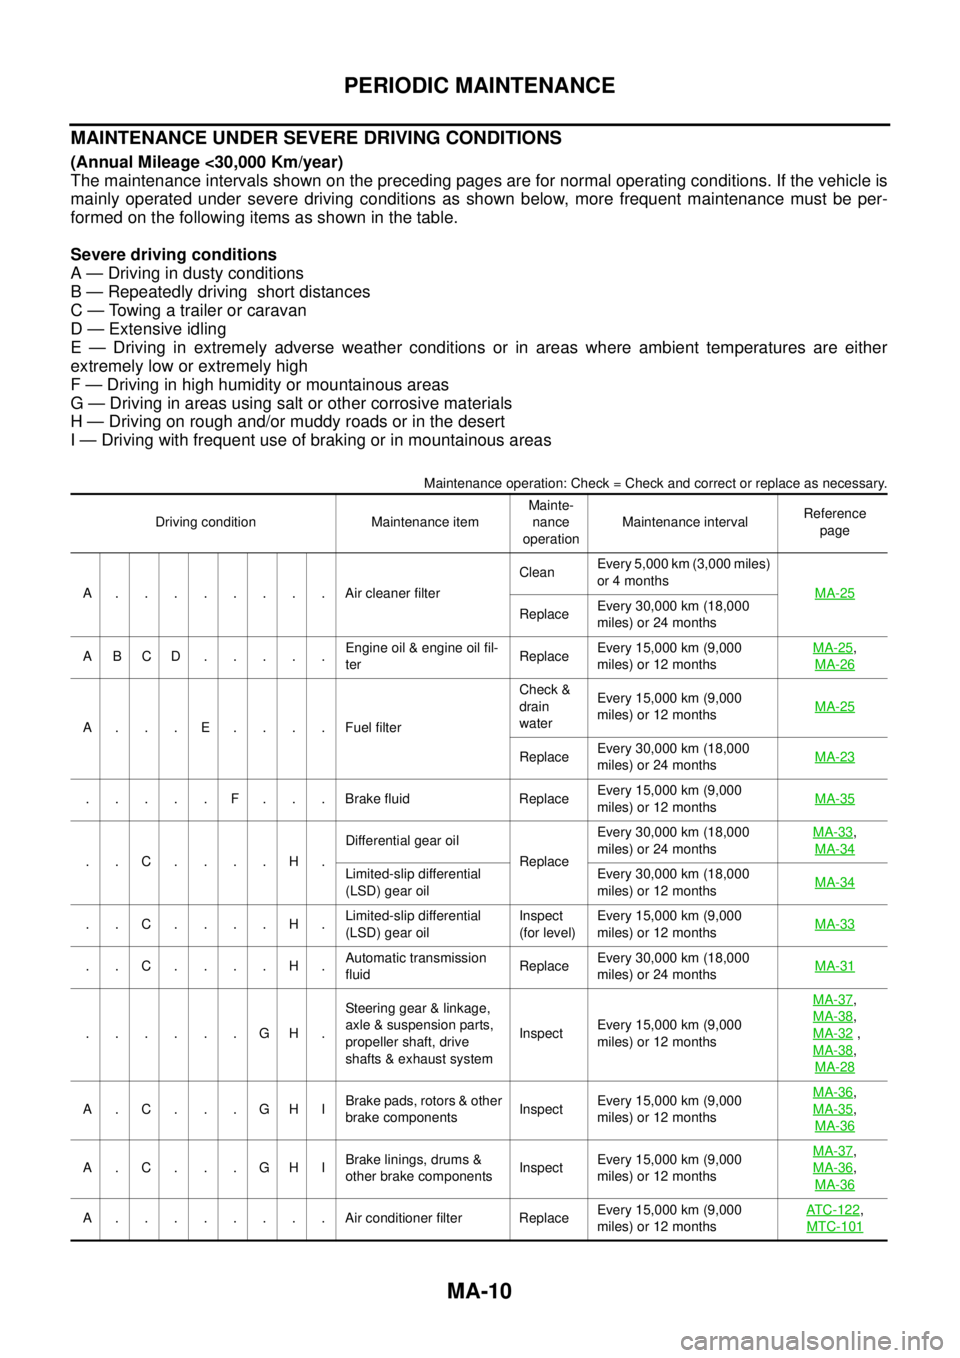
MAINTENANCE UNDER SEVERE DRIVING CONDITIONS
(Annual Mileage <30,000 Km/year)
The maintenance intervals shown on the preceding pages are for normal operating conditions. If the vehicle is
mainly operated under severe driving conditions as shown below, more frequent maintenance must be per-
formed on the following items as shown in the table.
Severe driving conditions
A — Driving in dusty conditions
B — Repeatedly driving short distances
C — Towing a trailer or caravan
D — Extensive idling
E — Driving in extremely adverse weather conditions or in areas where ambient temperatures are either
extremely low or extremely high
F — Driving in high humidity or mountainous areas
G — Driving in areas using salt or other corrosive materials
H — Driving on rough and/or muddy roads or in the desert
I — Driving with frequent use of braking or in mountainous areas
Maintenance operation: Check = Check and correct or replace as necessary.
Driving condition Maintenance itemMainte-
nance
operationMaintenance intervalReference
page
A........AircleanerfilterCleanEvery 5,000 km (3,000 miles)
or 4 months
MA-25
ReplaceEvery 30,000 km (18,000
miles) or 24 months
ABCD.....Engine oil & engine oil fil-
terReplaceEvery 15,000 km (9,000
miles) or 12 monthsMA-25
,
MA-26
A . . . E . . . . Fuel filterCheck &
drain
waterEvery 15,000 km (9,000
miles) or 12 monthsMA-25
ReplaceEvery 30,000 km (18,000
miles) or 24 monthsMA-23
. . . . . F . . . Brake fluid ReplaceEvery 15,000 km (9,000
miles) or 12 monthsMA-35
..C....H.Differential gear oil
ReplaceEvery 30,000 km (18,000
miles) or 24 monthsMA-33
,
MA-34
Limited-slip differential
(LSD) gear oilEvery 30,000 km (18,000
miles) or 12 monthsMA-34
..C....H.Limited-slip differential
(LSD) gear oilInspect
(for level)Every 15,000 km (9,000
miles) or 12 monthsMA-33
..C....H.Automatic transmission
fluidReplaceEvery 30,000 km (18,000
miles) or 24 monthsMA-31
......GH.Steering gear & linkage,
axle & suspension parts,
propeller shaft, drive
shafts & exhaust systemInspectEvery 15,000 km (9,000
miles) or 12 monthsMA-37
,
MA-38
,
MA-32
,
MA-38
,
MA-28
A.C. . .GHIBrake pads, rotors & other
brake componentsInspectEvery 15,000 km (9,000
miles) or 12 monthsMA-36
,
MA-35
,
MA-36
A.C. . .GHIBrake linings, drums &
other brake componentsInspectEvery 15,000 km (9,000
miles) or 12 monthsMA-37
,
MA-36
,
MA-36
A . . . . . . . . Air conditioner filter ReplaceEvery 15,000 km (9,000
miles) or 12 monthsAT C - 1 2 2,
MTC-101
Page 2288 of 3171
PERIODIC MAINTENANCE
MA-13
C
D
E
F
G
H
I
J
K
MA
B
MA
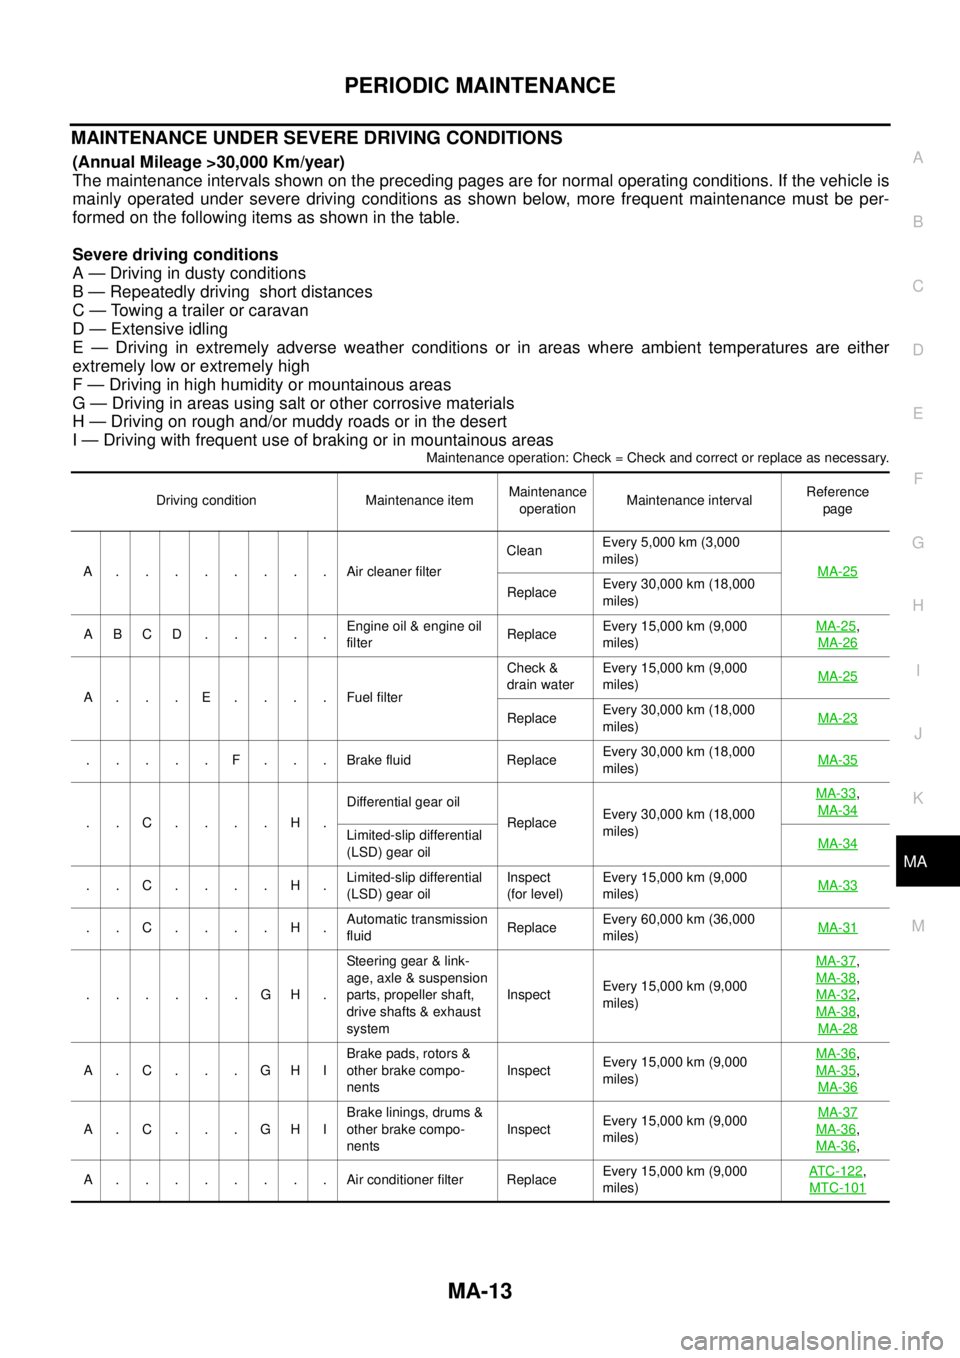
MAINTENANCE UNDER SEVERE DRIVING CONDITIONS
(Annual Mileage >30,000 Km/year)
The maintenance intervals shown on the preceding pages are for normal operating conditions. If the vehicle is
mainly operated under severe driving conditions as shown below, more frequent maintenance must be per-
formed on the following items as shown in the table.
Severe driving conditions
A — Driving in dusty conditions
B — Repeatedly driving short distances
C — Towing a trailer or caravan
D — Extensive idling
E — Driving in extremely adverse weather conditions or in areas where ambient temperatures are either
extremely low or extremely high
F — Driving in high humidity or mountainous areas
G — Driving in areas using salt or other corrosive materials
H — Driving on rough and/or muddy roads or in the desert
I — Driving with frequent use of braking or in mountainous areas
Maintenance operation: Check = Check and correct or replace as necessary.
Driving condition Maintenance itemMaintenance
operationMaintenance intervalReference
page
A........Aircleaner filterCleanEvery 5,000 km (3,000
miles)
MA-25
ReplaceEvery 30,000 km (18,000
miles)
ABCD.....Engine oil & engine oil
filterReplaceEvery 15,000 km (9,000
miles)MA-25
,
MA-26
A...E....FuelfilterCheck &
drain waterEvery 15,000 km (9,000
miles)MA-25
ReplaceEvery 30,000 km (18,000
miles)MA-23
.....F...Brakefluid ReplaceEvery 30,000 km (18,000
miles)MA-35
..C....H.Differential gear oil
ReplaceEvery 30,000 km (18,000
miles)MA-33
,
MA-34
Limited-slip differential
(LSD) gear oilMA-34
..C....H.Limited-slip differential
(LSD) gear oilInspect
(for level)Every 15,000 km (9,000
miles)MA-33
..C....H.Automatic transmission
fluidReplaceEvery 60,000 km (36,000
miles)MA-31
......GH.Steering gear & link-
age, axle & suspension
parts, propeller shaft,
drive shafts & exhaust
systemInspectEvery 15,000 km (9,000
miles)MA-37
,
MA-38
,
MA-32
,
MA-38
,
MA-28
A.C...GHIBrake pads, rotors &
other brake compo-
nentsInspectEvery 15,000 km (9,000
miles)MA-36
,
MA-35
,
MA-36
A.C...GHIBrake linings, drums &
other brake compo-
nentsInspectEvery 15,000 km (9,000
miles)MA-37MA-36,
MA-36
,
A........Airconditioner filter ReplaceEvery 15,000 km (9,000
miles)ATC-122
,
MTC-101
Page 2307 of 3171
MA-32
CHASSIS AND BODY MAINTENANCE
Changing Transfer Fluid
ELS001IR
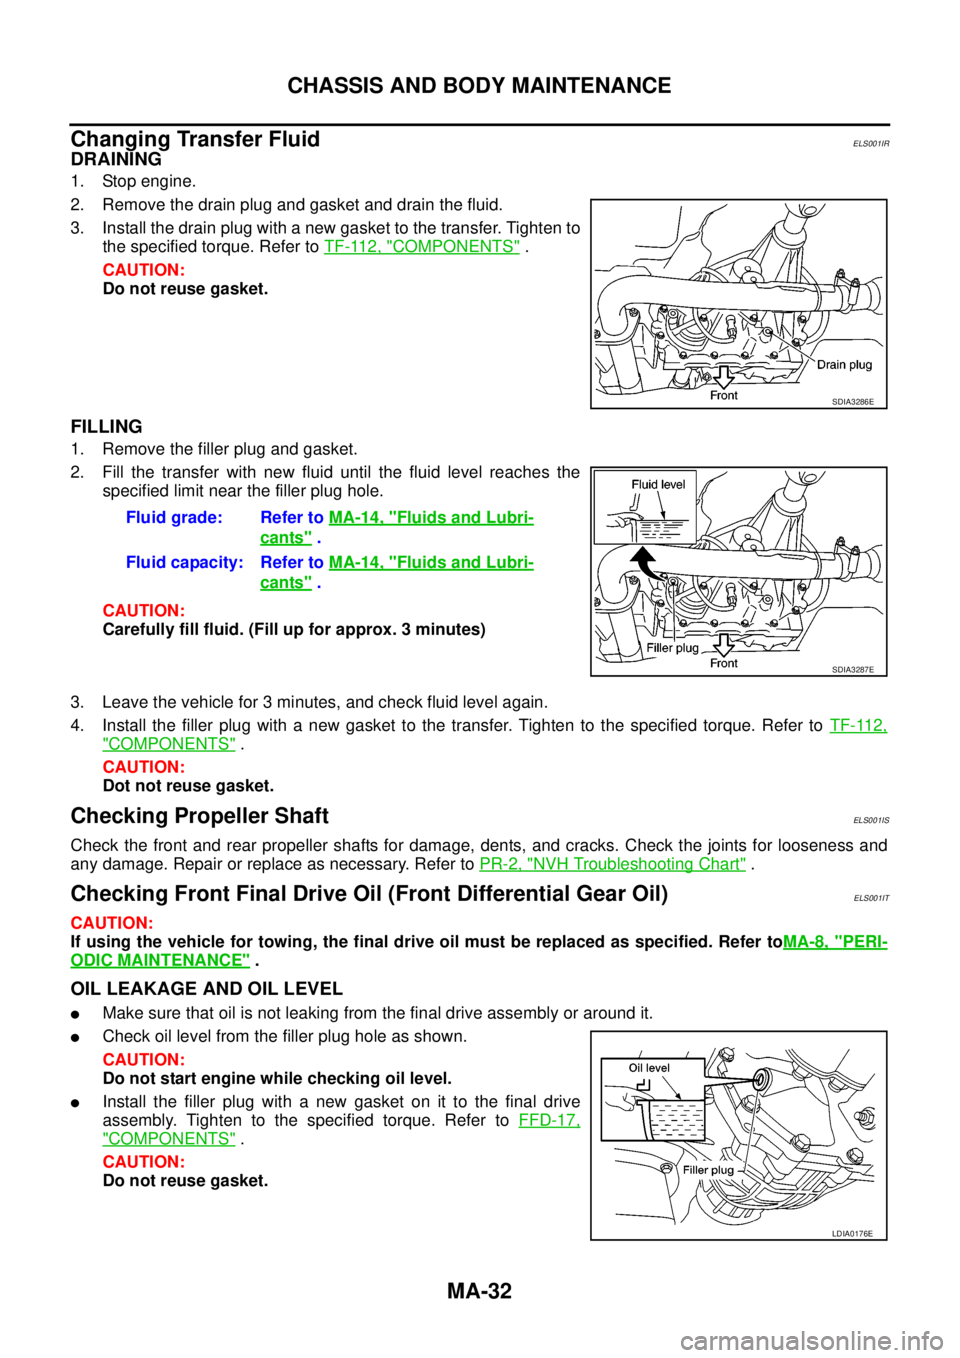
DRAINING
1. Stop engine.
2. Remove the drain plug and gasket and drain the fluid.
3. Install the drain plug with a new gasket to the transfer. Tighten to
the specified torque. Refer toTF-112, "
COMPONENTS".
CAUTION:
Do not reuse gasket.
FILLING
1. Remove the filler plug and gasket.
2. Fill the transfer with new fluid until the fluid level reaches the
specified limit near the filler plug hole.
CAUTION:
Carefully fill fluid. (Fill up for approx. 3 minutes)
3. Leave the vehicle for 3 minutes, and check fluid level again.
4. Install the filler plug with a new gasket to the transfer. Tighten to the specified torque. Refer toTF-112,
"COMPONENTS".
CAUTION:
Dot not reuse gasket.
Checking Propeller ShaftELS001IS
Check the front and rear propeller shafts for damage, dents, and cracks. Check the joints for looseness and
any damage. Repair or replace as necessary. Refer toPR-2, "
NVH Troubleshooting Chart".
Checking Front Final Drive Oil (Front Differential Gear Oil)ELS001IT
CAUTION:
If using the vehicle for towing, the final drive oil must be replaced as specified. Refer toMA-8, "
PERI-
ODIC MAINTENANCE".
OIL LEAKAGE AND OIL LEVEL
lMake sure that oil is not leaking from the final drive assembly or around it.
lCheck oil level from the filler plug hole as shown.
CAUTION:
Do not start engine while checking oil level.
lInstall the filler plug with a new gasket on it to the final drive
assembly. Tighten to the specified torque. Refer toFFD-17,
"COMPONENTS".
CAUTION:
Do not reuse gasket.
SDIA3286E
Fluid grade: Refer toMA-14, "Fluids and Lubri-
cants".
Fluid capacity: Refer toMA-14, "
Fluids and Lubri-
cants".
SDIA3287E
LDIA0176E
Page 2308 of 3171
CHASSIS AND BODY MAINTENANCE
MA-33
C
D
E
F
G
H
I
J
K
MA
B
MA
Changing Front Final Drive Oil (Front Differential Gear Oil)ELS001IU
CAUTION:
If using the vehicle for towing, the final drive oil must be replaced as specified. Refer toMA-8, "
PERI-
ODIC MAINTENANCE".
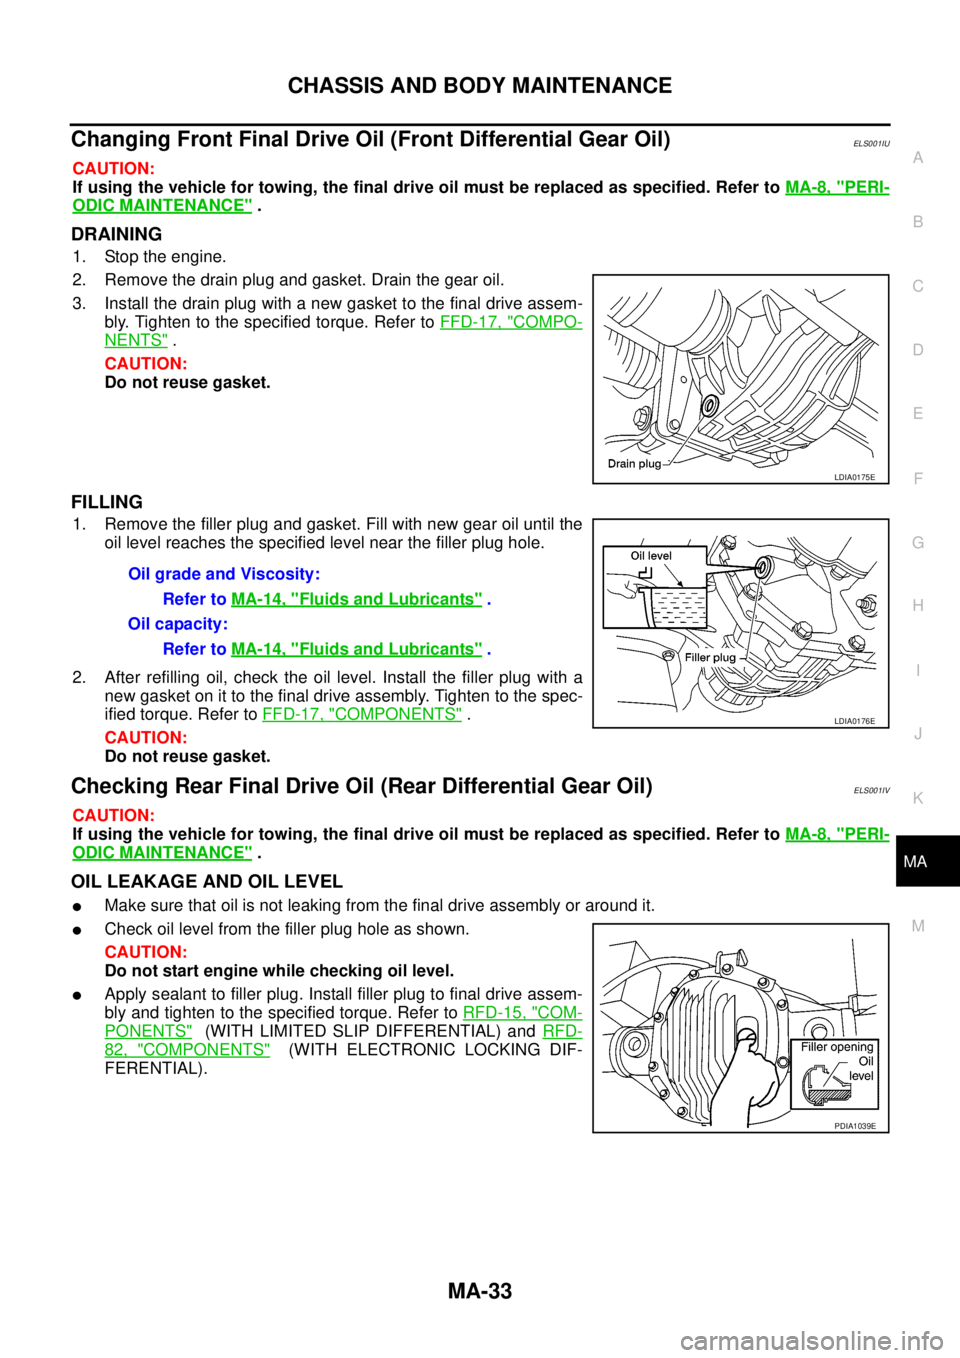
DRAINING
1. Stop the engine.
2. Remove the drain plug and gasket. Drain the gear oil.
3. Install the drain plug with a new gasket to the final drive assem-
bly. Tighten to the specified torque. Refer toFFD-17, "
COMPO-
NENTS".
CAUTION:
Do not reuse gasket.
FILLING
1. Remove the filler plug and gasket. Fill with new gear oil until the
oil level reaches the specified level near the filler plug hole.
2. After refilling oil, check the oil level. Install the filler plug with a
new gasket on it to the final drive assembly. Tighten to the spec-
ified torque. Refer toFFD-17, "
COMPONENTS".
CAUTION:
Do not reuse gasket.
Checking Rear Final Drive Oil (Rear Differential Gear Oil)ELS001IV
CAUTION:
If using the vehicle for towing, the final drive oil must be replaced as specified. Refer toMA-8, "
PERI-
ODIC MAINTENANCE".
OIL LEAKAGE AND OIL LEVEL
lMake sure that oil is not leaking from the final drive assembly or around it.
lCheck oil level from the filler plug hole as shown.
CAUTION:
Do not start engine while checking oil level.
lApply sealant to filler plug. Install filler plug to final drive assem-
bly and tighten to the specified torque. Refer toRFD-15, "
COM-
PONENTS"(WITH LIMITED SLIP DIFFERENTIAL) andRFD-
82, "COMPONENTS"(WITH ELECTRONIC LOCKING DIF-
FERENTIAL).
LDIA0175E
OilgradeandViscosity:
Refer toMA-14, "
Fluids and Lubricants".
Oil capacity:
Refer toMA-14, "
Fluids and Lubricants".
LDIA0176E
PDIA1039E