Page 790 of 3171
BR-4
PREPARATION
PREPARATION
PFP:00002
Special Service ToolsEFS005SE
Commercial Service ToolsEFS005TE
Tool number
Tool nameDescription
GG94310000
Flare nut torque wrench
a:10 mm (0.39 in)Installing brake tube and hose
KV991V0010
Brake fluid pressure testerBrake fluid pressure measurement
NT406
ZZA0752D
Tool nameDescription
Power toolRemoving front caliper assembly, tyres
PBIC0190E
PBIC0191E
Page 795 of 3171
BRAKE PEDAL
BR-9
C
D
E
G
H
I
J
K
L
MA
B
BR
INSPECTION AFTER REMOVAL
lCheck brake pedal upper rivet for deformation.
lMake sure that the lapping length of sub-bracket and slide plate
is at least 4 mm (0.16 in).
lCheck brake pedal for bend, damage, and cracks on the welded
parts.
lReplace brake pedal assembly if any non-standard condition is
detected.
lCheck clevis pin and plastic stopper for damage and deforma-
tion. Replace clevis pin if there are.
INSTALLATION
Installation is in the reverse order of the removal. Tightening torques for brake pedal assembly mounting nut
and bolt are referred toBR-8, "
COMPONENTS". Tightening torque for lock nut (A) is referred to Refer toBR-
7, "ADJUSTMENT".
lAfter installing the brake pedal assembly to the vehicle, adjust the brake pedal. Refer toBR-6, "Inspection
and Adjustment".
SFIA2866E
SBR997
Page 797 of 3171

BRAKE FLUID
BR-11
C
D
E
G
H
I
J
K
L
MA
B
BR
Bleeding Brake SystemEFS005SK
CAUTION:
lWhile bleeding, pay attention to master cylinder fluid level.
lBefore working, disconnect electrical connector of ABS actuator and electric unit (control unit) or
the battery cable from the negative terminal.
LHD MODEL
1. Connect a vinyl tube to the rear right bleed valve.
2. Fully depress brake pedal 4 to 5 times.
3. With brake pedal depressed, loosen bleed valve to let the air out, and then tighten it immediately.
4. Repeat steps 3, 4 until no more air comes out.
5. Tighten bleed valve to specified torque. Refer toBR-24, "
Components"(front disc brake),BR-30, "Com-
ponents"(rear drum brake).
6. From the steps 1 to 5 above, with master cylinder reservoir tank filled at least half way, bleed air from the
front left, rear left, and front right brake, in that order.
RHD MODEL
1. Connect a vinyl tube to the rear left bleed valve.
2. Fully depress brake pedal 4 to 5 times.
3. With brake pedal depressed, loosen bleed valve to let the air out, and then tighten it immediately.
4. Repeat steps 3, 4 until no more air comes out.
5. Tighten bleed valve to specified torque. Refer toBR-24, "
Components"(front disc brake),BR-30, "Com-
ponents"(rear drum brake).
6. From the steps 1 to 5 above, with master cylinder reservoir tank filled at least half way, bleed air from the
front right, rear right, and front left brake, in that order.
Page 799 of 3171

BRAKE TUBE AND HOSE
BR-13
C
D
E
G
H
I
J
K
L
MA
B
BR
CAUTION:
lAll brake tubes and hoses must be free from excessive bending, twisting and pulling.
lMake sure that there is no interference with other parts when turning steering both clockwise and
counterclockwise.
lBrake tube and hose is an important safety part. Always disassemble the parts and retighten their
fittings, if a brake fluid leak is detected. Replace applicable part with a new one, if damaged part is
detected.
lBe careful not to splash brake fluid on painted areas; it may cause paint damage. If brake fluid is
splashed on painted surfaces of body, immediately wipe off them and wash it away with water.
lDo not bend or twist brake hose sharply, or strongly pull it.
lCover the open end of brake tube and hoses when disconnecting to prevent entrance of dirt.
lRefill with new brake fluid “DOT 3” or “DOT 4”.
lNever reuse drained brake fluid.
Removal and Installation of Front Brake Tube and Brake HoseEFS005SM
REMOVAL
1. Drain brake fluid. Refer toBR-10, "Drain and Refill".
2. Using a flare nut wrench, disconnect brake tube from brake hose.
3. Remove union bolt and remove brake hose from caliper assembly.
4. Remove lock plate and remove brake hose from vehicle.
INSTALLATION
1. Assemble the union bolt and copper washers to the brake hose.
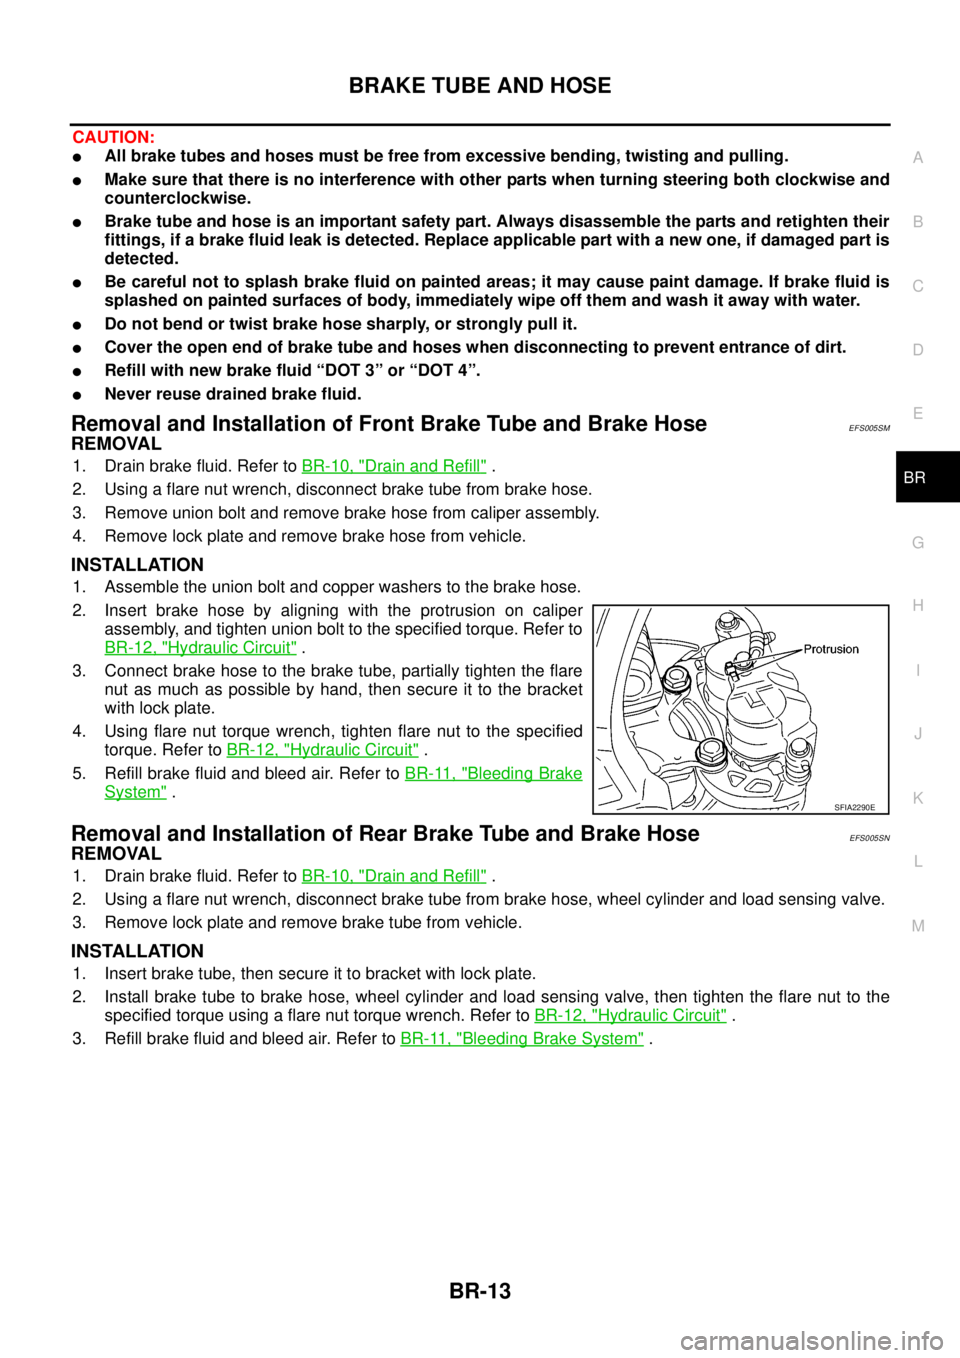
2. Insert brake hose by aligning with the protrusion on caliper
assembly, and tighten union bolt to the specified torque. Refer to
BR-12, "
Hydraulic Circuit".
3. Connect brake hose to the brake tube, partially tighten the flare
nut as much as possible by hand, then secure it to the bracket
with lock plate.
4. Using flare nut torque wrench, tighten flare nut to the specified
torque. Refer toBR-12, "
Hydraulic Circuit".
5. Refill brake fluid and bleed air. Refer toBR-11, "
Bleeding Brake
System".
Removal and Installation of Rear Brake Tube and Brake HoseEFS005SN
REMOVAL
1. Drain brake fluid. Refer toBR-10, "Drain and Refill".
2. Using a flare nut wrench, disconnect brake tube from brake hose, wheel cylinder and load sensing valve.
3. Remove lock plate and remove brake tube from vehicle.
INSTALLATION
1. Insert brake tube, then secure it to bracket with lock plate.
2. Install brake tube to brake hose, wheel cylinder and load sensing valve, then tighten the flare nut to the
specified torque using a flare nut torque wrench. Refer toBR-12, "
Hydraulic Circuit".
3. Refill brake fluid and bleed air. Refer toBR-11, "
Bleeding Brake System".
SFIA2290E
Page 801 of 3171

LOAD SENSING VALVE
BR-15
C
D
E
G
H
I
J
K
L
MA
B
BR
LOAD SENSING VALVEPFP:46400
Removal and InstallationEFS006A7
CAUTION:
lAlways use a flare nut wrench to remove brake tube. Be careful not to damage flare nut and brake
tube. Also, use flare nut torque wrench for brake tube installation and tightening to the specified
torque. Refer toBR-12, "
Hydraulic Circuit".
lRefill with new brake fluid “DOT 3” or “DOT 4”.
lNever reuse drained brake fluid.
REMOVAL
1. Drain brake fluid.
2. Cover brake line connections/openings to protect them from foreign material such as dust or dirt.
3. Using a flare nut wrench, remove flare nut on brake tube from load sensing valve.
4. Remove mounting bolts to remove load sensing valve.
INSTALLATION
lCarefully performing the following, install in the reverse order of removal.
lAfter installing load sensing valve to vehicle, perform the following: bleed air from brake line. Refer toBR-
11 , "Bleeding Brake System", and check mounting length “L” of sensor spring.
1. Torsion member 2. Load sensing valve bracket 3. Load sensing valve
4. Stopper 5. Sensor spring 6. Rear axle tube
Refer to GI section for symbol marks in the figure.
SFIA3190E
Page 807 of 3171

BRAKE BOOSTER
BR-21
C
D
E
G
H
I
J
K
L
MA
B
BR
INSTALLATION
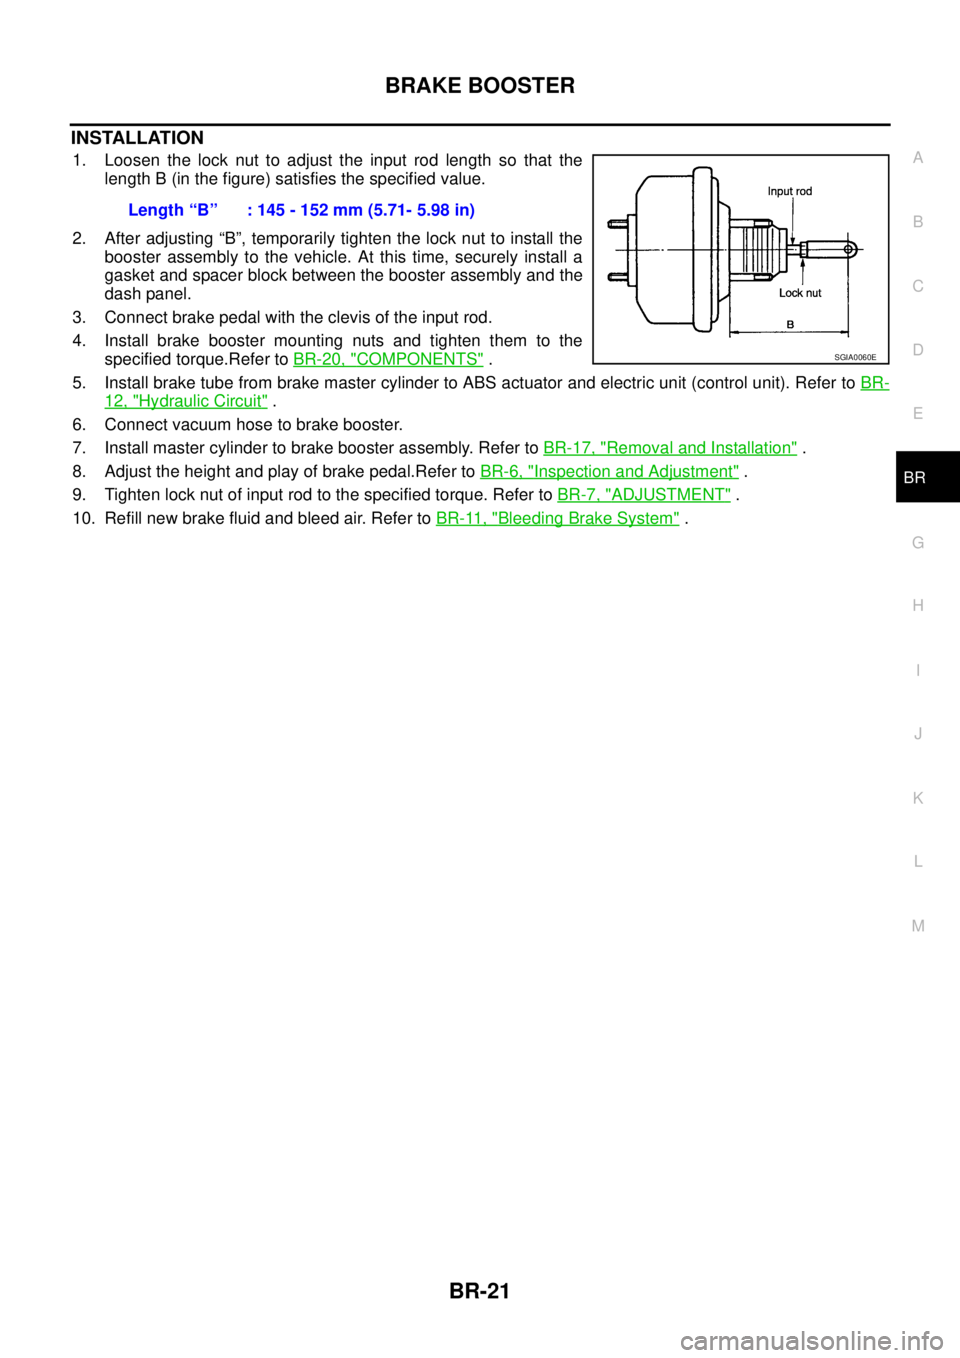
1. Loosen the lock nut to adjust the input rod length so that the
length B (in the figure) satisfies the specified value.
2. After adjusting “B”, temporarily tighten the lock nut to install the
booster assembly to the vehicle. At this time, securely install a
gasket and spacer block between the booster assembly and the
dash panel.
3. Connect brake pedal with the clevis of the input rod.
4. Install brake booster mounting nuts and tighten them to the
specified torque.Refer toBR-20, "
COMPONENTS".
5. Install brake tube from brake master cylinder to ABS actuator and electric unit (control unit). Refer toBR-
12, "Hydraulic Circuit".
6. Connect vacuum hose to brake booster.
7. Install master cylinder to brake booster assembly. Refer toBR-17, "
Removal and Installation".
8. Adjust the height and play of brake pedal.Refer toBR-6, "
Inspection and Adjustment".
9. Tighten lock nut of input rod to the specified torque. Refer toBR-7, "
ADJUSTMENT".
10. Refill new brake fluid and bleed air. Refer toBR-11, "
Bleeding Brake System". Length“B” :145-152mm(5.71-5.98in)
SGIA0060E
Page 810 of 3171
BR-24
FRONT DISC BRAKE
FRONT DISC BRAKE
PFP:41000
On-Board InspectionEFS005SY
PAD WEAR INSPECTION
lCheck pad thickness from a inspection hole on cylinder body.
Check using a scale if necessary.
ComponentsEFS005SZ
Standard thickness : 11.0 mm (0.43 in)
Repair limit thickness : 2.0 mm (0.08 in)
MAA0439D
1. Union bolt 2. Copper washer 3. Brake hose
4. Cap 5. Bleed valve 6. Sliding pin bolt
7. Cylinder body 8. Piston seal 9. Piston
10. Piston boot 11. Sliding pin 12. Sliding pin boot
13. Bushing 14. Torque member mounting bolt 15. Torque member
16. Inner shim 17. Inner pad 18. Pad wear sensor (RH side)
19. Pad retainer 20. Outer pad 21. Outer shim
1: Rubber grease 2: PBC (Poly Butyl Cuprysil) grease
or silicone-based grease3: Polyglycol ether based lubricant
SFIA3168E
Page 811 of 3171

FRONT DISC BRAKE
BR-25
C
D
E
G
H
I
J
K
L
MA
B
BR
WARNING:
Clean dust on caliper and brake pad with a vacuum dust collector to minimize the hazard of air- borne
particles or other materials.
CAUTION:
lWhile removing cylinder body, do not depress brake pedal because piston will pop out.
lIt is not necessary to remove bolts on torque member and brake hose except for disassembly or
replacement of caliper assembly. In this case, hang cylinder body with a wire so as not to stretch
brake hose.
lDo not damage piston boot.
lIf any shim is subject to serious corrosion, replace it with a new one.
lAlways replace shim as a set when replacing brake pad.
lKeep rotor out of brake fluid.
Removal and Installation of Brake PadEFS005T0
REMOVAL
1. Remove tyre from vehicle.
2. Remove lower sliding pin bolt.
3. Hang cylinder body with a wire. Remove pad assembly and pad retainer from torque member.
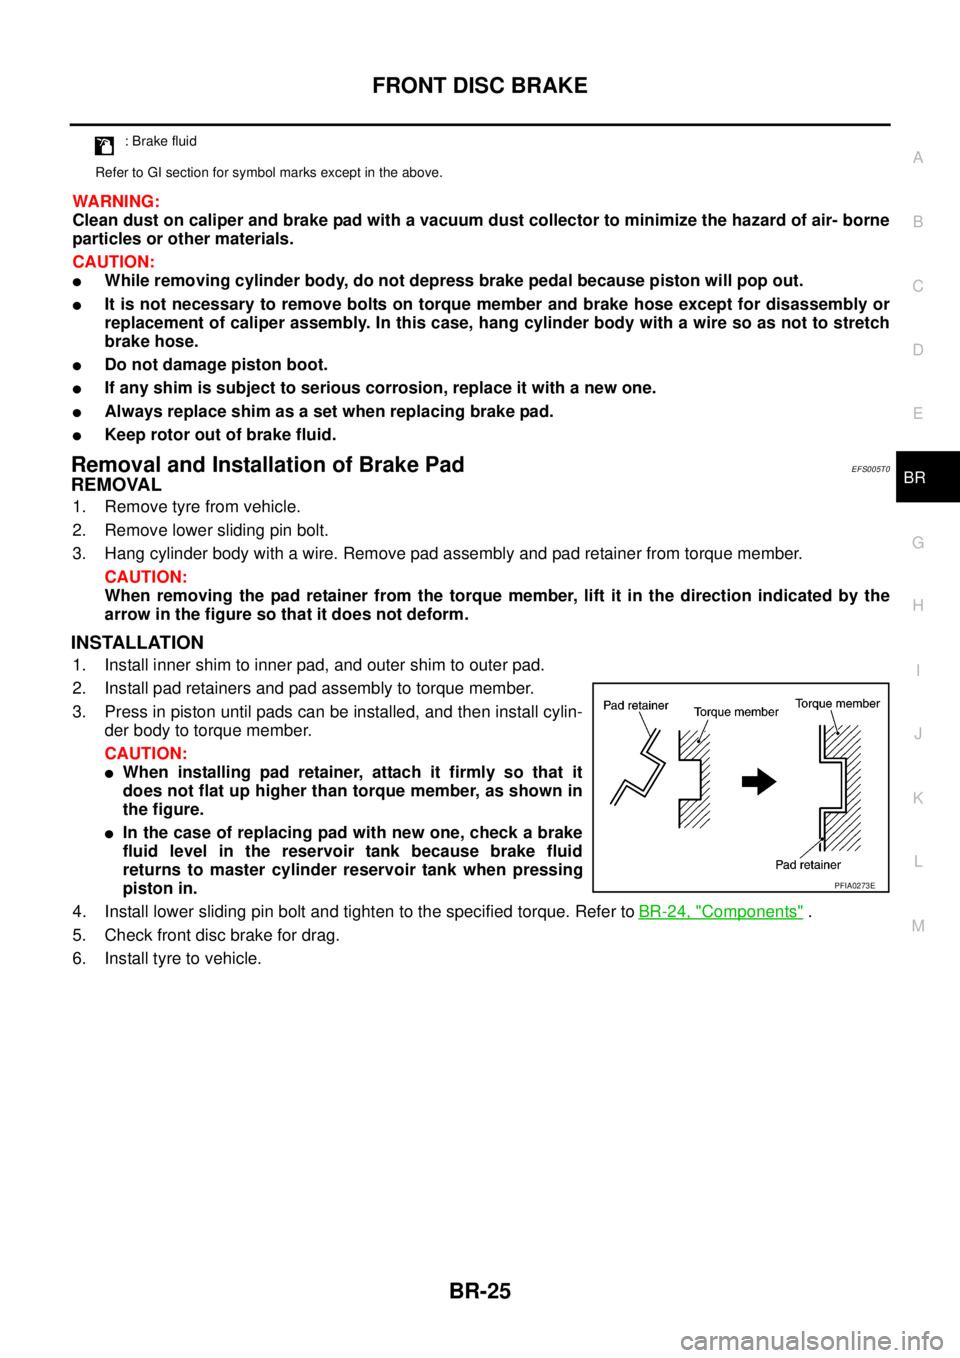
CAUTION:
When removing the pad retainer from the torque member, lift it in the direction indicated by the
arrow in the figure so that it does not deform.
INSTALLATION
1. Install inner shim to inner pad, and outer shim to outer pad.
2. Install pad retainers and pad assembly to torque member.
3. Press in piston until pads can be installed, and then install cylin-
der body to torque member.
CAUTION:
lWhen installing pad retainer, attach it firmly so that it
does not flat up higher than torque member, as shown in
the figure.
lIn the case of replacing pad with new one, check a brake
fluid level in the reservoir tank because brake fluid
returns to master cylinder reservoir tank when pressing
piston in.
4. Install lower sliding pin bolt and tighten to the specified torque. Refer toBR-24, "
Components".
5. Check front disc brake for drag.
6. Install tyre to vehicle.
: Brake fluid
Refer to GI section for symbol marks except in the above.
PFIA0273E