Page 632 of 3371

AUDIO
AV-45
C
D
E
F
G
H
I
J
L
MA
B
AV
Revision: August 20072004 QX56
Removal and Installation for Audio UnitEKS007KV
1. Remove cluster lid C. Refer to IP-12, "Cluster Lid C" .
2. Disconnect the negative battery cable.
3. Using power tool, remove the four audio unit screws.
4. Pull out audio unit and disconnect connectors.
5. Installation is in the reverse order of removal.
Removal and Installation for AV SwitchEKS007KW
1. Remove cluster lid C. Refer to IP-12, "Cluster Lid C" .
2. Remove the four AV switch screws.
3. Carefully remove the AV switch.
4. Installation is in the reverse order of removal.
Removal and Installation of Front Door SpeakerEKS007KX
1. Remove door finisher. Refer to EI-31, "DOOR FINISHER" .
2. Remove the four front door speaker screws.
3. Disconnect connector and remove the speaker.
4. Installation is in the reverse order of removal.
Removal and Installation of Rear Door SpeakerEKS007KY
1. Remove door finisher. Refer to EI-31, "DOOR FINISHER" .
2. Remove the three rear speaker screws and remove speaker.
3. Disconnect connector.
4. Installation is in the reverse order of removal.
WKIA1490E
WKIA1798E
Front door speaker
screws: 3.5 N·m (0.36 kg-m, 31 in-lb)
WKIA1498E
Rear speaker screws : 3.5 N·m (0.36 kg-m, 31 in-lb)
WKIA1492E
Page 633 of 3371

AV-46
AUDIO
Revision: August 20072004 QX56
Removal and Installation of Front TweeterEKS007KZ
1. Remove tweeter grille. Refer to IP-10, "INSTRUMENT PANEL ASSEMBLY" .
2. Remove tweeter fasteners.
3. Disconnect connector and remove tweeter.
4. Installation is in the reverse order of removal.
Removal and Installation of Rear Door TweeterEKS007L0
1. Remove door finisher. Refer to EI-31, "DOOR FINISHER" .
2. Remove screws and remove tweeter.
3. Installation is in the reverse order of removal.
Removal and Installation of Center SpeakerEKS007L1
1. Remove cluster lid D. Refer to IP-12, "Cluster Lid D" .
2. Remove the screws and remove the center speaker.
3. Installation is in the reverse order of removal.
Removal and Installation of SubwooferEKS007L2
1. Remove front seat LH. Refer to SE-96, "Components" .
2. Remove the subwoofer bolts.
3. Disconnect the connector and remove the subwoofer.
4. Installation is in the reverse order of removal.
Removal and Installation of BOSE Speaker Amp.EKS007L3
1. Remove BCM. Refer to BCS-19, "Removal and Installation of BCM" .
WKIA1494E
WKIA1799E
Subwoofer mounting
bolts: 3.5 N·m (0.36 kg-m, 31 in-lb)
WKIA1496E
Page 634 of 3371

AUDIO
AV-47
C
D
E
F
G
H
I
J
L
MA
B
AV
Revision: August 20072004 QX56
2. Remove BOSE speaker amp. bracket screws and slide BOSE
speaker amp. down.
3. Disconnect connectors and remove BOSE speaker amp.
4. Installation is in the reverse order of removal.
Removal and Installation of Rear Audio Remote Control UnitEKS007L4
1. Carefully remove the rear audio remote control unit from the rear
roof console assembly.
CAUTION:
Wrap removal tool with clean shop cloth to prevent damage
to the headliner.
2. Disconnect connector and remove the rear audio control unit.
3. Installation is in the reverse order of removal.
Removal and Installation of Steering Wheel Audio Control SwitchesEKS007L5
1. Remove steering wheel. Refer to PS-8, "Removal and Installation" .
2. Remove steering wheel rear cover screws and remove steering wheel rear cover.
3. Remove steering wheel switch assembly screws and steering
wheel switches.
4. Installation is in the reverse order of removal.BOSE speaker amp.
mounting screws: 3.5 N·m (0.36 kg-m, 31 in-lb)
WKIA1605E
WKIA1201E
WKIA1226E
Page 647 of 3371
AV-60
DVD ENTERTAINMENT SYSTEM
Revision: August 20072004 QX56
2. Remove the screws and DVD player.
3. Installation is in reverse order of removal.
Removal and Installation of Video MonitorEKS007LH
1. Remove rear roof console assembly. Refer to EI-37, "HEADLINING" .
2. Disconnect the video monitor connector.
3. Remove the video housing screws.
4. Remove the video monitor and housing.
5. Remove the video monitor hinge screws and remove the video
monitor.
6. Installation is in reverse order of removal.
WKIA1503E
WKIA1502E
WKIA1219E
Page 678 of 3371

NAVIGATION SYSTEM
AV-91
C
D
E
F
G
H
I
J
L
MA
B
AV
Revision: August 20072004 QX56
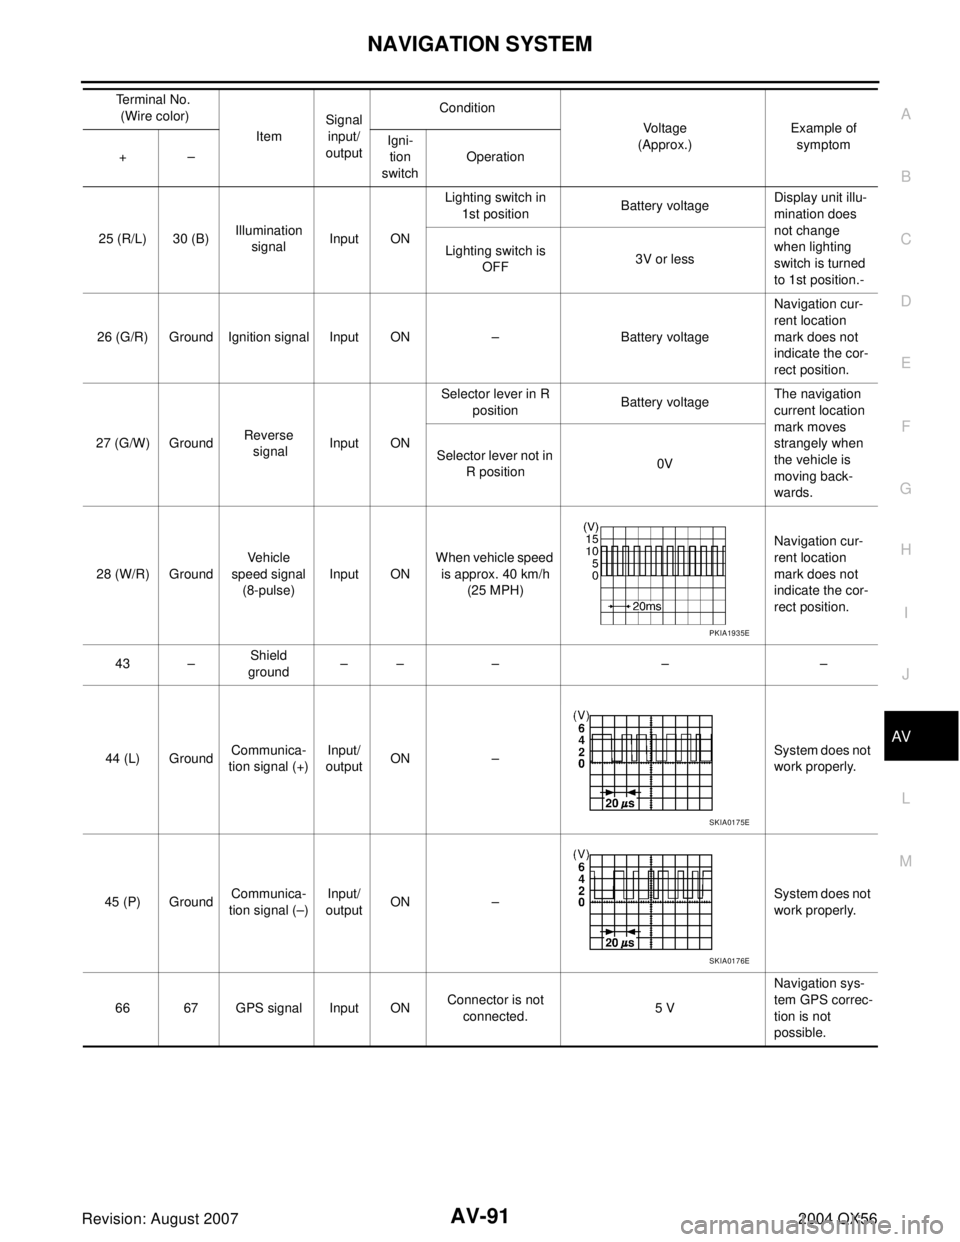
25 (R/L) 30 (B)Illumination
signalInput ONLighting switch in
1st positionBattery voltageDisplay unit illu-
mination does
not change
when lighting
switch is turned
to 1st position.- Lighting switch is
OFF3V or less
26 (G/R) Ground Ignition signal Input ON – Battery voltageNavigation cur-
rent location
mark does not
indicate the cor-
rect position.
27 (G/W) GroundReverse
signalInput ONSelector lever in R
positionBattery voltageThe navigation
current location
mark moves
strangely when
the vehicle is
moving back-
wards. Selector lever not in
R position0V
28 (W/R) GroundVehicle
speed signal
(8-pulse)Input ONWhen vehicle speed
is approx. 40 km/h
(25 MPH)Navigation cur-
rent location
mark does not
indicate the cor-
rect position.
43 –Shield
ground–– – – –
44 (L) GroundCommunica-
tion signal (+)Input/
outputON –System does not
work properly.
45 (P) GroundCommunica-
tion signal (–)Input/
outputON –System does not
work properly.
66 67 GPS signal Input ONConnector is not
connected.5 VNavigation sys-
tem GPS correc-
tion is not
possible. Te r m i n a l N o .
(Wire color)
ItemSignal
input/
outputCondition
Vo l ta g e
(Approx.)Example of
symptom
+–Igni-
tion
switchOperation
PKIA1935E
SKIA0175E
SKIA0176E
Page 679 of 3371

AV-92
NAVIGATION SYSTEM
Revision: August 20072004 QX56
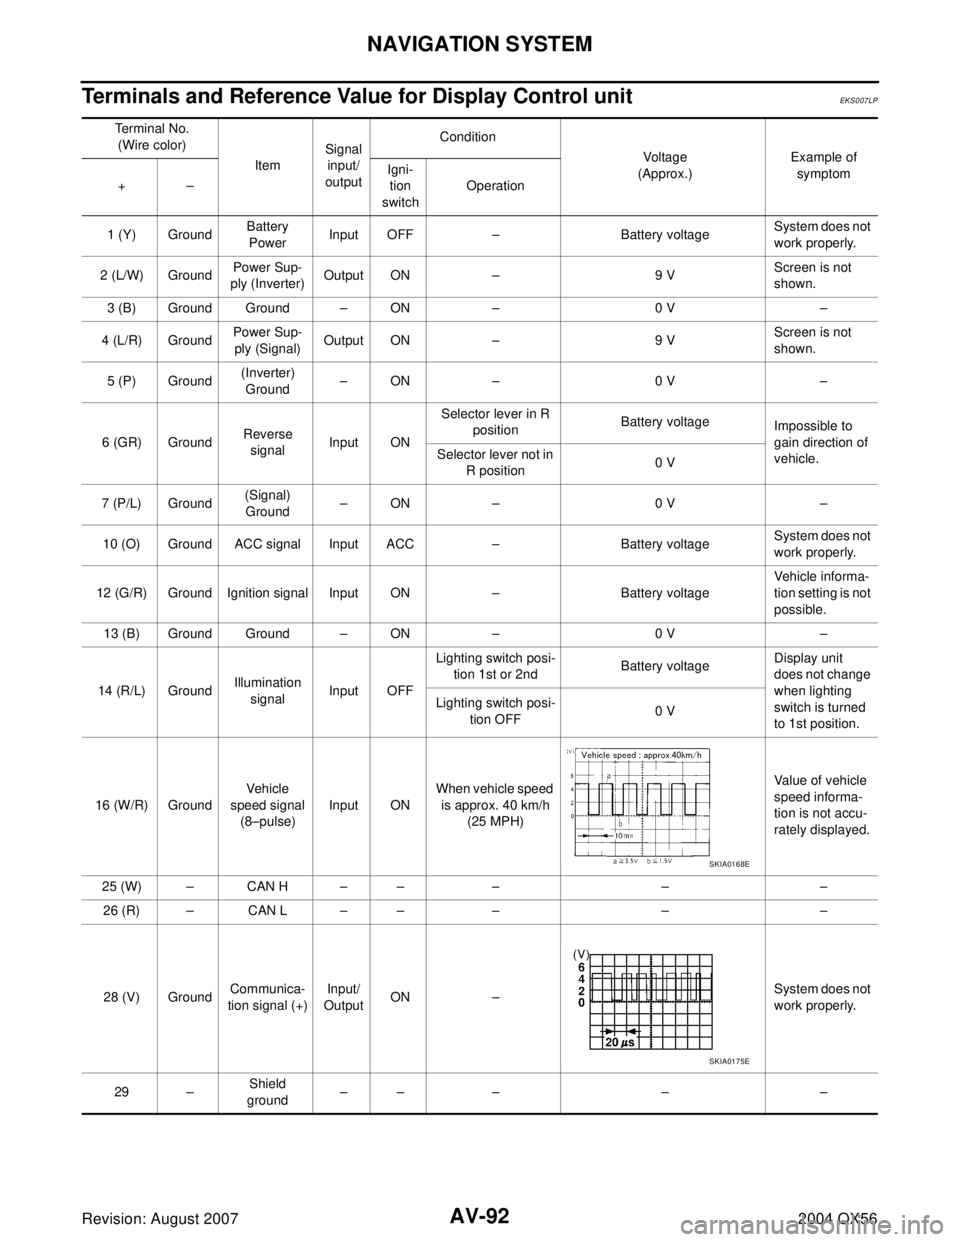
Terminals and Reference Value for Display Control unitEKS007LP
Terminal No.
(Wire color)
ItemSignal
input/
outputCondition
Voltage
(Approx.)Example of
symptom
+–Igni-
tion
switchOperation
1 (Y) GroundBattery
PowerInput OFF – Battery voltageSystem does not
work properly.
2 (L/W) GroundPower Sup-
ply (Inverter) Output ON – 9 VScreen is not
shown.
3 (B) Ground Ground – ON – 0 V –
4 (L/R) GroundPower Sup-
ply (Signal) Output ON – 9 VScreen is not
shown.
5 (P) Ground(Inverter)
Ground –ON – 0 V –
6 (GR) GroundReverse
signalInput ONSelector lever in R
positionBattery voltage
Impossible to
gain direction of
vehicle. Selector lever not in
R position0 V
7 (P/L) Ground(Signal)
Ground –ON – 0 V –
10 (O) Ground ACC signal Input ACC – Battery voltageSystem does not
work properly.
12 (G/R) Ground Ignition signal Input ON – Battery voltageVehicle informa-
tion setting is not
possible.
13 (B) Ground Ground – ON – 0 V –
14 (R/L) GroundIllumination
signalInput OFFLighting switch posi-
tion 1st or 2ndBattery voltageDisplay unit
does not change
when lighting
switch is turned
to 1st position. Lighting switch posi-
tion OFF0 V
16 (W/R) GroundVehicle
speed signal
(8–pulse)Input ONWhen vehicle speed
is approx. 40 km/h
(25 MPH)Value of vehicle
speed informa-
tion is not accu-
rately displayed.
25 (W) – CAN H – – – – –
26 (R) – CAN L – – – – –
28 (V) GroundCommunica-
tion signal (+)Input/
OutputON –System does not
work properly.
29 –Shield
ground–– – – –
SKIA0168E
SKIA0175E
Page 688 of 3371

NAVIGATION SYSTEM
AV-101
C
D
E
F
G
H
I
J
L
MA
B
AV
Revision: August 20072004 QX56
On Board Self-Diagnosis FunctionEKS007LT
DESCRIPTION
�Diagnosis function consists of the self-diagnosis mode performed automatically and the CONFIRMATION/
ADJUSTMENT mode operated manually.
�Self-diagnosis mode checks for connections between the units constituting this system, analyzes each
individual unit at the same time, and displays the results on the LCD screen.
�CONFIRMATION/ADJUSTMENT mode is used to perform trouble diagnosis that require operation and
judgment by an operator (trouble that cannot be automatically judged by the system), to check/change the
set value, and to display the History of Errors of the navigation system.
DIAGNOSIS ITEM
NOTE:
Make the status that is set by D/N function be shown.
Self-Diagnosis Mode (DCU)EKS007LU
OPERATION PROCEDURE
1. Start the engine.
2. Turn the audio system off.
Mode Description
Self-diagnosis (DCU) Display control unit diagnosis.
Self-diagnosis (NAVI)
�NAVI Control unit diagnosis (DVD-ROM drive) will not be diagnosed
when no map DVD-ROM is in it.
�Analyzes connection between the NAVI control unit and the GPS
antenna and operation of each unit.
CONFIRMATION/
ADJUSTMENTDisplay diagnosisIn display control unit mode, color tone and shading of the screen can be
checked by the display of a color bar and a gray scale.
Vehicle signalsIn display control unit mode, analyzes the following vehicle signals: Vehi-
cle speed signal, light signal
NOTE , ignition switch signal, and reverse sig-
nal.
Auto Climate Control A/C self-diagnosis of A/C system.
NavigationDisplay diagnosisIn NAVI C/U mode, color tone and shading of the screen can be checked
by the display of a color bar and a gray scale.
Vehicle signalsIn NAVI C/U mode, analyzes the following vehicle signals: Vehicle speed
signal, light signal, ignition switch signal, and reverse signal.
History of ErrorsDiagnosis results previously stored in the memory (before turning ignition
switch ON) are displayed in this mode. Time and location when/where the
errors occurred are also displayed.
Naviga-
tionDisplay Lon-
gitude & Lat-
itudeDisplay the map. Use the joystick to adjust position. Longitude and latitude
will be displayed.
Speed Cali-
brationUnder ordinary conditions, the navigation system distance measuring
function will automatically compensate for minute decreases in wheel and
tire diameter caused by tire wear or low-pressure. Speed calibration imme-
diately restores system accuracy in cases such as when distance calibra-
tion is needed because of the use of tire chains in inclement weather.
Angle
adjustmentCorrects difference between actual turning angle of a vehicle and turning
angle of the car mark on the display.
Initialize
LocationThis mode is for initializing the current location. Use when the vehicle is
transported a long distance on a trailer, etc.
CAN DIAG SUPPORT MONITOR Display status of CAN communication.
Page 695 of 3371

AV-108
NAVIGATION SYSTEM
Revision: August 20072004 QX56
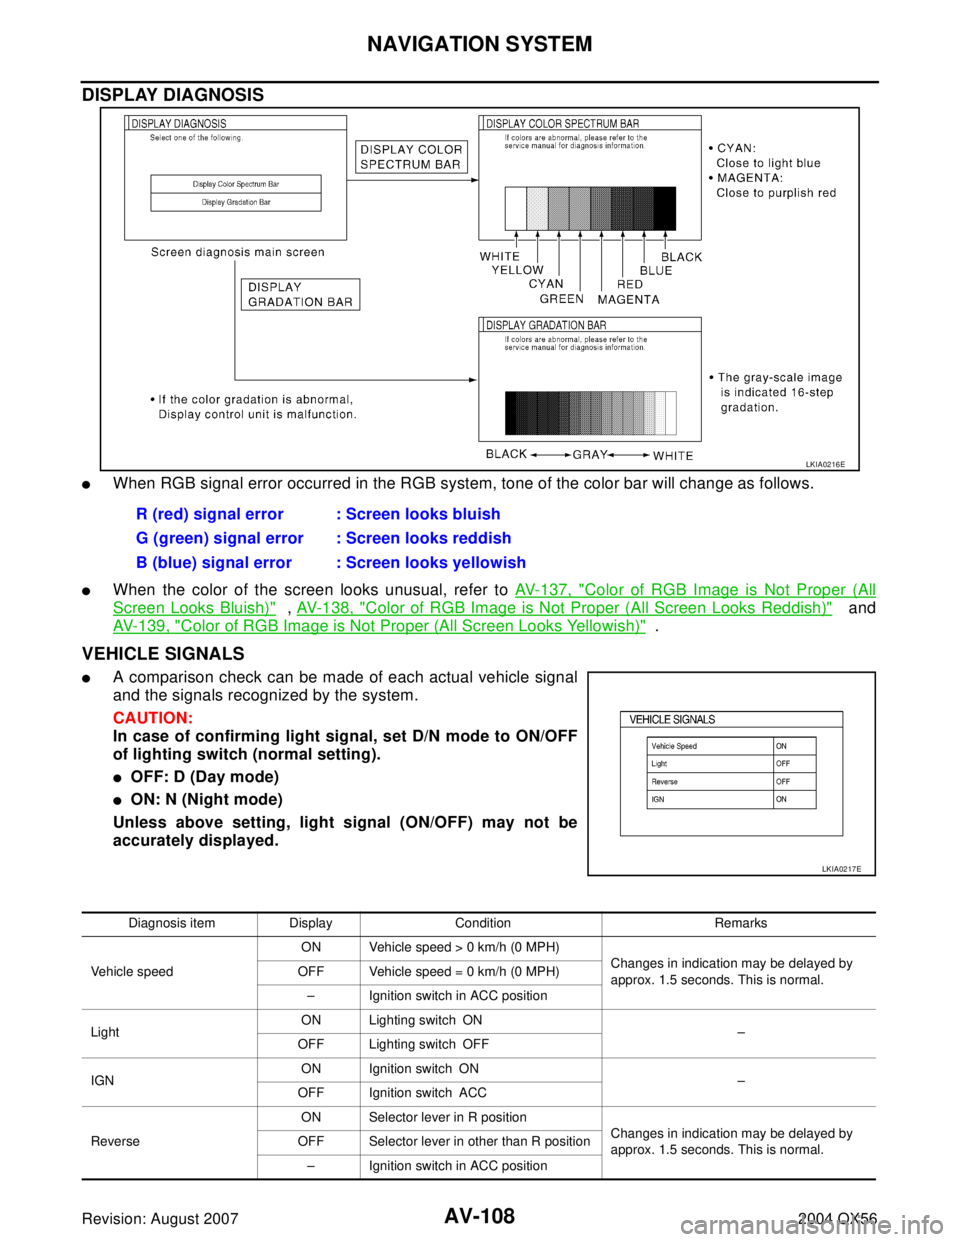
DISPLAY DIAGNOSIS
�When RGB signal error occurred in the RGB system, tone of the color bar will change as follows.
�When the color of the screen looks unusual, refer to AV-137, "Color of RGB Image is Not Proper (All
Screen Looks Bluish)" , AV-138, "Color of RGB Image is Not Proper (All Screen Looks Reddish)" and
AV- 1 3 9 , "
Color of RGB Image is Not Proper (All Screen Looks Yellowish)" .
VEHICLE SIGNALS
�A comparison check can be made of each actual vehicle signal
and the signals recognized by the system.
CAUTION:
In case of confirming light signal, set D/N mode to ON/OFF
of lighting switch (normal setting).
�OFF: D (Day mode)
�ON: N (Night mode)
Unless above setting, light signal (ON/OFF) may not be
accurately displayed.
LKIA0216E
R (red) signal error : Screen looks bluish
G (green) signal error : Screen looks reddish
B (blue) signal error : Screen looks yellowish
LKIA0217E
Diagnosis item Display Condition Remarks
Vehicle speedON Vehicle speed > 0 km/h (0 MPH)
Changes in indication may be delayed by
approx. 1.5 seconds. This is normal. OFF Vehicle speed = 0 km/h (0 MPH)
– Ignition switch in ACC position
LightON Lighting switch ON
–
OFF Lighting switch OFF
IGNON Ignition switch ON
–
OFF Ignition switch ACC
ReverseON Selector lever in R position
Changes in indication may be delayed by
approx. 1.5 seconds. This is normal. OFF Selector lever in other than R position
– Ignition switch in ACC position