Page 1051 of 3371
![INFINITI QX56 2004 Factory Service Manual BRC-38
[VDC/TCS/ABS]
TROUBLE DIAGNOSIS FOR SELF-DIAGNOSTIC ITEMS
Revision: August 20072004 QX56
TROUBLE DIAGNOSIS FOR SELF-DIAGNOSTIC ITEMSPFP:00000
Wheel Sensor System InspectionEFS003QY
INSPECTION P INFINITI QX56 2004 Factory Service Manual BRC-38
[VDC/TCS/ABS]
TROUBLE DIAGNOSIS FOR SELF-DIAGNOSTIC ITEMS
Revision: August 20072004 QX56
TROUBLE DIAGNOSIS FOR SELF-DIAGNOSTIC ITEMSPFP:00000
Wheel Sensor System InspectionEFS003QY
INSPECTION P](/manual-img/42/57034/w960_57034-1050.png)
BRC-38
[VDC/TCS/ABS]
TROUBLE DIAGNOSIS FOR SELF-DIAGNOSTIC ITEMS
Revision: August 20072004 QX56
TROUBLE DIAGNOSIS FOR SELF-DIAGNOSTIC ITEMSPFP:00000
Wheel Sensor System InspectionEFS003QY
INSPECTION PROCEDURE
1. CONNECTOR INSPECTION
Disconnect the ABS actuator and electric unit (control unit) connector E125 and wheel sensor of malfunction-
ing code.
Check the terminals for deformation, disconnection, looseness or damage.
OK or NG
OK >> GO TO 2.
NG >> Repair or replace as necessary.
2. CHECK WHEEL SENSOR OUTPUT SIGNAL
1. Connect ABS active wheel sensor tester (J-45741) to wheel sensor using appropriate adapter.
2. Turn on the ABS active wheel sensor tester power switch.
NOTE:
The green POWER indicator should illuminate. If the POWER indicator does not illuminate, replace the
battery in the ABS active wheel sensor tester before proceeding.
3. Spin the wheel of the vehicle by hand and observe the red SENSOR indicator on the ABS active wheel
sensor tester. The red SENSOR indicator should flash on and off to indicate an output signal.
NOTE:
If the red SENSOR indicator illuminates but does not flash, reverse the polarity of the tester leads and
retest.
Does the ABS active wheel sensor tester detect a signal?
Yes >> GO TO 3.
No >> Replace the wheel sensor. Refer to BRC-64, "
Removal and Installation" .
3. CHECK TIRES
Check for inflation pressure, wear and size of each tire.
Are tire pressure and size correct and is tire wear within specifications?
Yes >> GO TO 4.
No >> Adjust tire pressure or replace tire(s).
4. CHECK WHEEL BEARINGS
Check wheel bearing axial end play. Refer to FAX-5, "
WHEEL BEARING INSPECTION" or RAX-5, "WHEEL
BEARING INSPECTION" .
OK or NG
OK >> GO TO 5.
NG >> Repair or replace as necessary. Refer to FAX-5, "
WHEEL BEARING INSPECTION" or RAX-5,
"WHEEL BEARING INSPECTION" .
5. CHECK WIRING HARNESS FOR SHORT CIRCUIT
1. Disconnect ABS actuator and electric unit (control unit) connec-
tor and wheel sensor connector of malfunction code No.
2. Check resistance between wheel sensor harness connector ter-
minals and ground.
OK or NG
OK >> GO TO 6.
NG >> Repair the circuit.Continuity should not exist.
WFIA0192E
Page 1077 of 3371
![INFINITI QX56 2004 Factory Service Manual BRC-64
[VDC/TCS/ABS]
WHEEL SENSORS
Revision: August 20072004 QX56
WHEEL SENSORSPFP:47910
Removal and InstallationEFS003RO
REMOVAL
1. Remove wheel sensor mounting screw.
�When removing the front wheel INFINITI QX56 2004 Factory Service Manual BRC-64
[VDC/TCS/ABS]
WHEEL SENSORS
Revision: August 20072004 QX56
WHEEL SENSORSPFP:47910
Removal and InstallationEFS003RO
REMOVAL
1. Remove wheel sensor mounting screw.
�When removing the front wheel](/manual-img/42/57034/w960_57034-1076.png)
BRC-64
[VDC/TCS/ABS]
WHEEL SENSORS
Revision: August 20072004 QX56
WHEEL SENSORSPFP:47910
Removal and InstallationEFS003RO
REMOVAL
1. Remove wheel sensor mounting screw.
�When removing the front wheel sensor, first remove the disc rotor to gain access to the front wheel sen-
sor mounting bolt. Refer to BR-22, "
Removal and Installation of Brake Caliper and Disc Rotor" .
�When removing the rear wheel sensor, first remove the rear hub and bearing assembly to gain access
to the rear wheel sensor mounting bolt. Refer to RAX-5, "
Removal and Installation" .
2. Pull out the sensor, being careful to turn it as little as possible.
CAUTION:
�Do not pull on the sensor harness.
3. Disconnect wheel sensor harness electrical connector, then remove harness from mounts.
INSTALLATION
Installation is in the reverse order of removal. Tighten wheel sensor bolt to the specified torque.
CAUTION:
Installation should be performed while paying attention to the following.
�Inspect wheel sensor O-ring, replace sensor assembly if damaged.
�Before installing wheel sensor, make sure no foreign materials (such as iron fragments) are
adhered to the pick-up part of the sensor, to the inside of the sensor mounting hole or on the rotor
mounting surface.
�Apply a coat of suitable grease to the wheel sensor O-ring and mounting hole.
WFIA0240E
Page 1080 of 3371
ACTUATOR AND ELECTRIC UNIT (ASSEMBLY)
BRC-67
[VDC/TCS/ABS]
C
D
E
G
H
I
J
K
L
MA
B
BRC
Revision: August 20072004 QX56
INSTALLATION
Installation is in the reverse order of removal.
CAUTION:
To install, use a flare nut wrench (commercial service tool).
�Always tighten brake tubes to specification when installing. Refer to BR-12, "BRAKE PIPING AND
HOSE" .
�Never reuse drained brake fluid.
�After installation of the ABS actuator and electric unit (control unit), refill brake system with new
brake fluid. Then bleed the air from the system. Refer to BR-11, "
Bleeding Brake System" .
�After installation of ABS actuator, adjust steering angle sensor. Refer to BRC-62, "Adjustment of
Steering Angle Sensor Neutral Position" .
�After installation of ABS actuator, calibrate the decel G sensor. Refer to BRC-62, "Calibration of
Decel G Sensor" .
Page 1082 of 3371
G SENSOR
BRC-69
[VDC/TCS/ABS]
C
D
E
G
H
I
J
K
L
MA
B
BRC
Revision: August 20072004 QX56
G SENSORPFP:47930
Removal and InstallationEF S0 03 RS
REMOVAL
1. Remove center console. Refer to IP-10, "INSTRUMENT PANEL ASSEMBLY" .
2. Remove yaw rate/side/decel G sensor attaching nuts.
CAUTION:
�Do not use power tools to remove or install yaw rate/side/
decel G sensor.
�Do not drop or strike the yaw rate/side/decel G sensor.
3. Disconnect harness connector and remove the yaw rate/side/
decel G sensor.
INSTALLATION
Installation is in the reverse order of removal.
CAUTION:
�Do not drop or strike the yaw rate/side/decel G sensor.
�After installation, calibrate the decel G sensor. Refer to BRC-62, "Calibration of Decel G Sensor" .
WFIA0230E
Page 1095 of 3371

CO-12Revision: August 2007
RADIATOR
2004 QX56
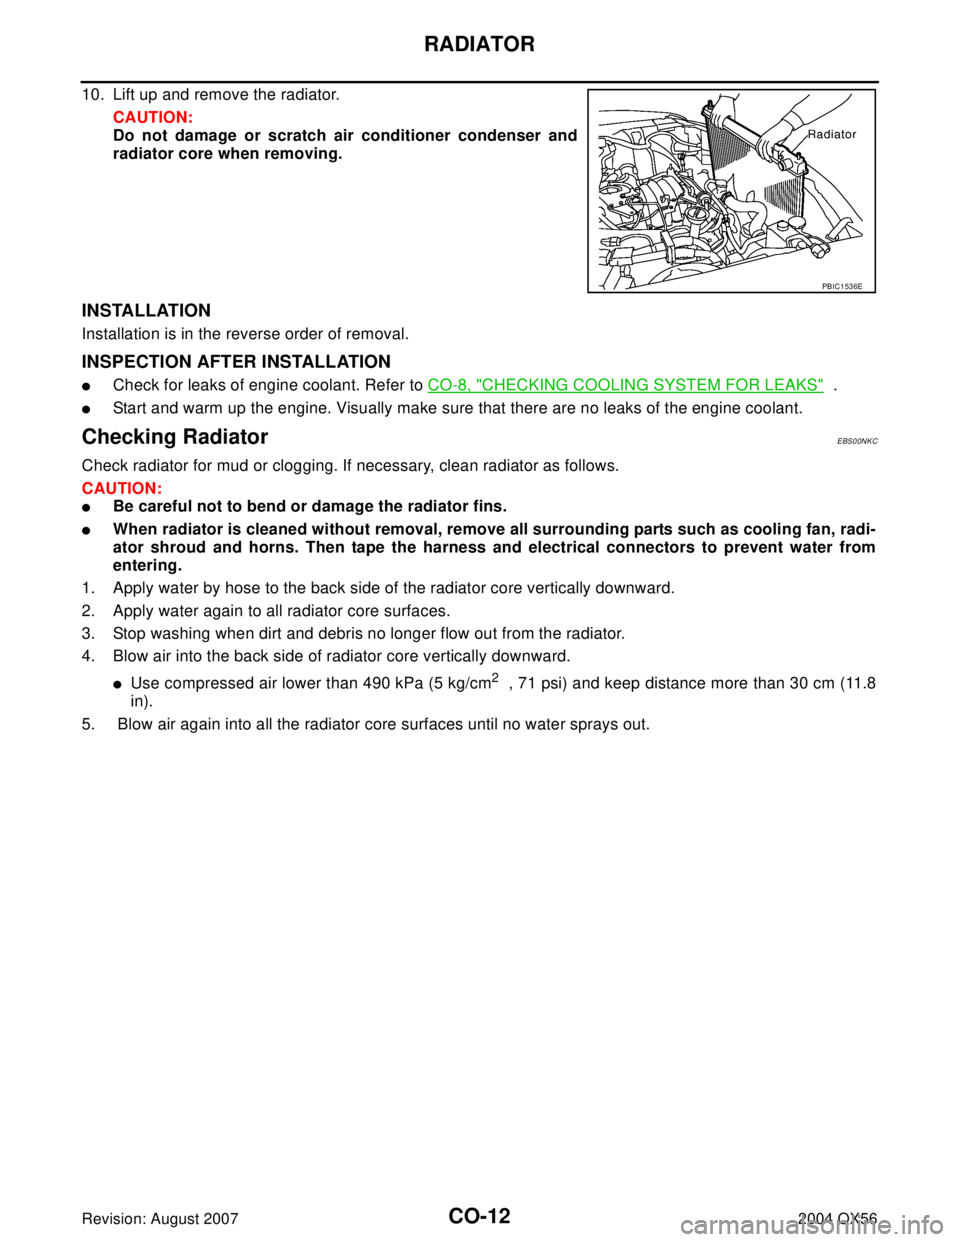
10. Lift up and remove the radiator.
CAUTION:
Do not damage or scratch air conditioner condenser and
radiator core when removing.
INSTALLATION
Installation is in the reverse order of removal.
INSPECTION AFTER INSTALLATION
�Check for leaks of engine coolant. Refer to CO-8, "CHECKING COOLING SYSTEM FOR LEAKS" .
�Start and warm up the engine. Visually make sure that there are no leaks of the engine coolant.
Checking RadiatorEBS00NKC
Check radiator for mud or clogging. If necessary, clean radiator as follows.
CAUTION:
�Be careful not to bend or damage the radiator fins.
�When radiator is cleaned without removal, remove all surrounding parts such as cooling fan, radi-
ator shroud and horns. Then tape the harness and electrical connectors to prevent water from
entering.
1. Apply water by hose to the back side of the radiator core vertically downward.
2. Apply water again to all radiator core surfaces.
3. Stop washing when dirt and debris no longer flow out from the radiator.
4. Blow air into the back side of radiator core vertically downward.
�Use compressed air lower than 490 kPa (5 kg/cm2 , 71 psi) and keep distance more than 30 cm (11.8
in).
5. Blow air again into all the radiator core surfaces until no water sprays out.
PBIC1536E
Page 1096 of 3371

ENGINE COOLING FAN
CO-13
C
D
E
F
G
H
I
J
K
L
MA
CO
Revision: August 20072004 QX56
ENGINE COOLING FANPFP:21140
Removal and Installation (Crankshaft Driven Type)EBS00I51
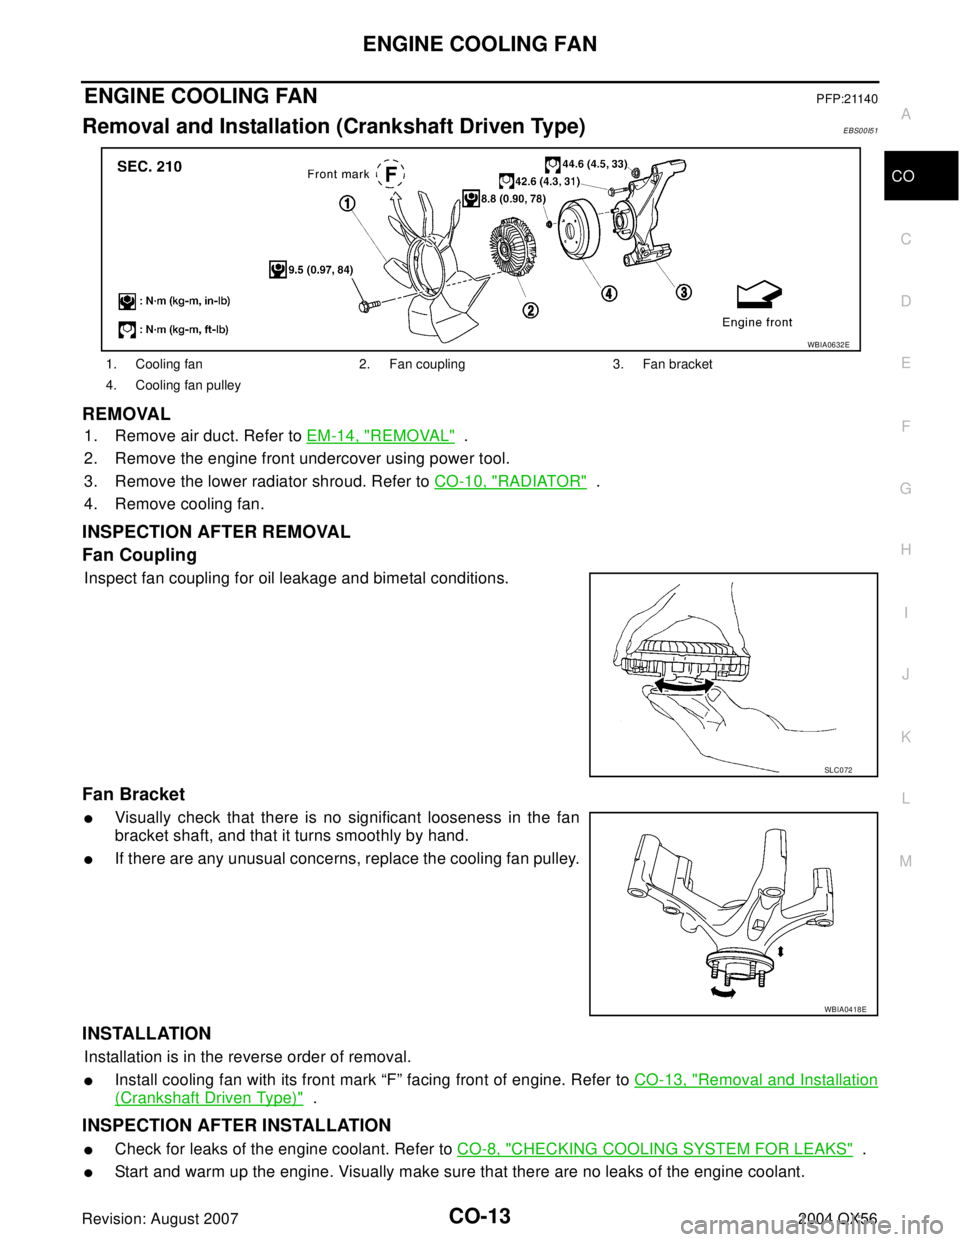
REMOVAL
1. Remove air duct. Refer to EM-14, "REMOVAL" .
2. Remove the engine front undercover using power tool.
3. Remove the lower radiator shroud. Refer to CO-10, "
RADIATOR" .
4. Remove cooling fan.
INSPECTION AFTER REMOVAL
Fan Coupling
Inspect fan coupling for oil leakage and bimetal conditions.
Fan Bracket
�Visually check that there is no significant looseness in the fan
bracket shaft, and that it turns smoothly by hand.
�If there are any unusual concerns, replace the cooling fan pulley.
INSTALLATION
Installation is in the reverse order of removal.
�Install cooling fan with its front mark “F” facing front of engine. Refer to CO-13, "Removal and Installation
(Crankshaft Driven Type)" .
INSPECTION AFTER INSTALLATION
�Check for leaks of the engine coolant. Refer to CO-8, "CHECKING COOLING SYSTEM FOR LEAKS" .
�Start and warm up the engine. Visually make sure that there are no leaks of the engine coolant.
1. Cooling fan 2. Fan coupling 3. Fan bracket
4. Cooling fan pulley
WBIA0632E
SL C0 72
WBIA0418E
Page 1097 of 3371
CO-14Revision: August 2007
ENGINE COOLING FAN
2004 QX56
Removal and Installation (Motor Driven Type)EBS00I52
REMOVAL
1. Remove front bumper. Refer to EI-13, "FRONT BUMPER" .
2. Disconnect harness connector from fan motor.
3. Remove fan grille and motor bolt and remove the fan grille and
motor assembly.
INSTALLATION
Installation is in the reverse order of removal.
�Cooling fan is controlled by ECM. For details, refer to EC-410, "Cooling Fan Operation" .
WBIA0518E
Page 1098 of 3371

WATER PUMP
CO-15
C
D
E
F
G
H
I
J
K
L
MA
CO
Revision: August 20072004 QX56
WATER P UM PPFP:21020
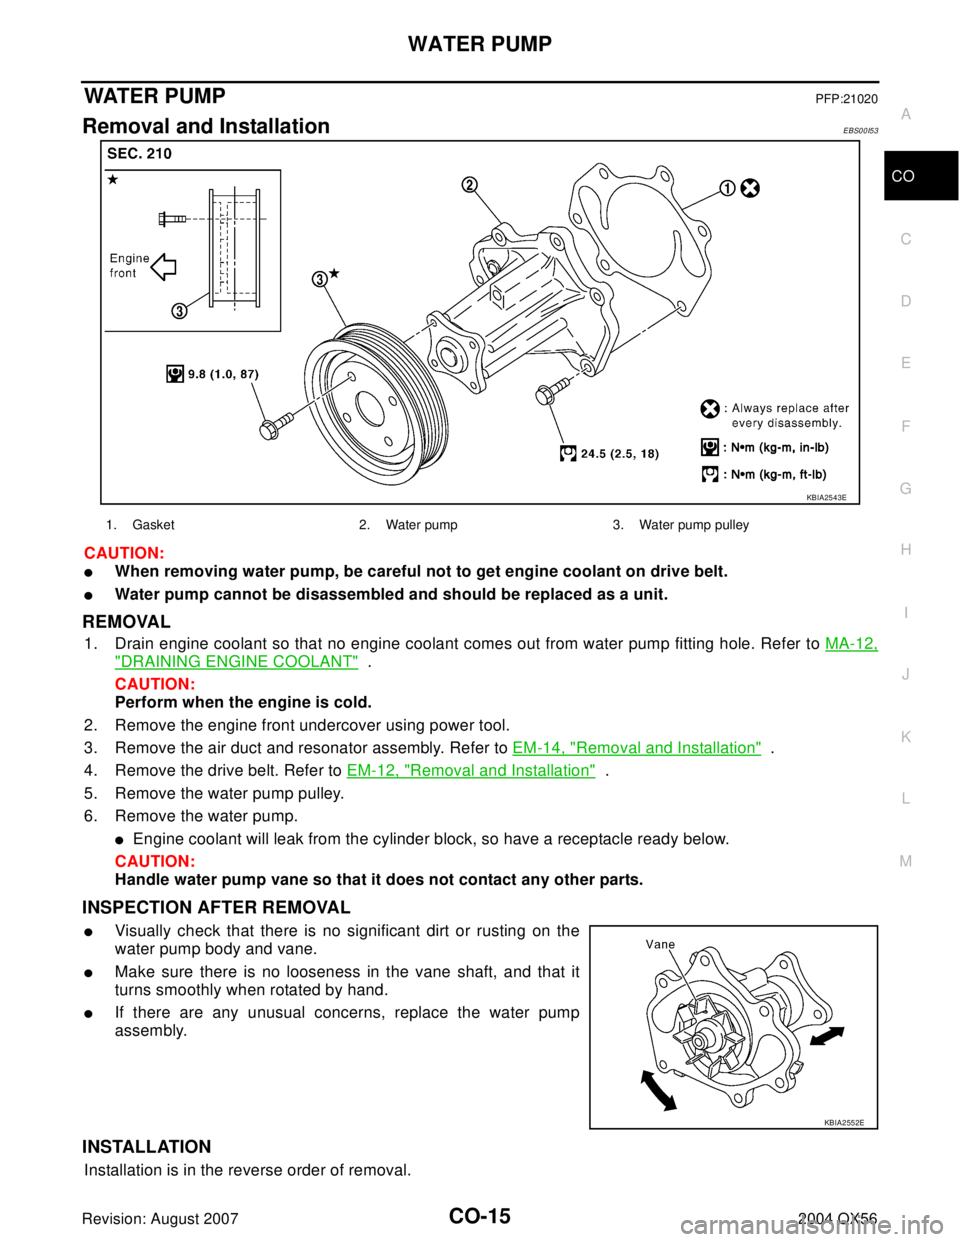
Removal and InstallationEBS00I53
CAUTION:
�When removing water pump, be careful not to get engine coolant on drive belt.
�Water pump cannot be disassembled and should be replaced as a unit.
REMOVAL
1. Drain engine coolant so that no engine coolant comes out from water pump fitting hole. Refer to MA-12,
"DRAINING ENGINE COOLANT" .
CAUTION:
Perform when the engine is cold.
2. Remove the engine front undercover using power tool.
3. Remove the air duct and resonator assembly. Refer to EM-14, "
Removal and Installation" .
4. Remove the drive belt. Refer to EM-12, "
Removal and Installation" .
5. Remove the water pump pulley.
6. Remove the water pump.
�Engine coolant will leak from the cylinder block, so have a receptacle ready below.
CAUTION:
Handle water pump vane so that it does not contact any other parts.
INSPECTION AFTER REMOVAL
�Visually check that there is no significant dirt or rusting on the
water pump body and vane.
�Make sure there is no looseness in the vane shaft, and that it
turns smoothly when rotated by hand.
�If there are any unusual concerns, replace the water pump
assembly.
INSTALLATION
Installation is in the reverse order of removal.
KBIA2543E
1. Gasket 2. Water pump 3. Water pump pulley
KBIA2552E