Page 1864 of 3371
FENDER PROTECTOR
EI-23
C
D
E
F
G
H
J
K
L
MA
B
EI
Revision: August 20072004 QX56
FENDER PROTECTORPFP:63840
Removal and InstallationEIS002XC
FRONT
1. Remove screws.
2. Remove plastic clips.
3. Remove front fender protector.
4. Remove clips and spring nuts from fender protector.
Installation is in the reverse order of removal.
1. Fender protector LH 2. Plastic clip 3. Spring nut
4. Screw 5. Clip 6. Grommet
7. Spring nut - early production 8. Nut - late production
WIIA0740E
Page 1865 of 3371
EI-24
LICENSE LAMP FINISHER
Revision: August 20072004 QX56
LICENSE LAMP FINISHERPFP:84810
Removal and InstallationEIS00300
1. Remove back door trim. Refer to EI-41, "BACK DOOR TRIM" .
2. Disconnect electrical harnesses from connectors.
3. Remove harnesses with bulbs from license lamps.
4. Remove nuts and screws from license lamp finisher.
5. Release clips and remove license lamp finisher.
Installation is in the reverse order of removal.
1. Rubber seal 2. Plastic clip 3. Nut
4. License lamp finisher 5. License plate fastener 6. Screw
7. Fastener 8. Rubber seal
WIIA0270E
Page 1866 of 3371
RUNNING BOARDS
EI-25
C
D
E
F
G
H
J
K
L
MA
B
EI
Revision: August 20072004 QX56
RUNNING BOARDSPFP:96110
Removal and InstallationEIS002XD
1. Remove bolts and remove running board from running board brackets.
2. Remove nuts and remove step pad from running board.
3. Remove nuts and bolts and remove running board brackets.
4. Remove screws and remove front and rear mud guards.
Installation is in the reverse order of removal.
1. Running board bracket 2. Front mud guard LH 3. Running board
4. Step pad 5. Rear mud guard LH
WIIA0265E
Page 1867 of 3371
EI-26
REAR SPOILER
Revision: August 20072004 QX56
REAR SPOILERPFP:96030
Removal and InstallationEIS002XE
1. Remove back door trim. Refer to EI-41, "BACK DOOR TRIM" .
2. Disconnect harness to high-mount stop lamp.
3. Disconnect washer tube.
4. Remove nuts, release clips and remove rear air spoiler.
5. Remove nuts and remove high-mount stop lamp.
Installation is in the reverse order of removal.
1. Grommet 2. Plastic clip 3. Nut
4. Rear air spoiler 5. High-mount stop lamp
LIIA1328E
Page 1868 of 3371
ROOF RACK
EI-27
C
D
E
F
G
H
J
K
L
MA
B
EI
Revision: August 20072004 QX56
ROOF RACKPFP:73155
Removal and InstallationEIS002XF
1. Remove screws, raise tie down hooks and remove finisher covers.
2. Remove bolts and remove front crossbar and gasket.
3. Remove screws, raise tie down hooks and remove slide rail covers.
4. Remove sliding crossbar.
5. Remove bolts and remove slide rails.
Installation is in the reverse order of removal.
�To install finisher covers and slide rail covers, rotate tie hooks to the 50 degrees up position and slip cover
over tie down. Press down until clip is engaged. Rotate tie down hook to the down position. Install screws.
1. Sliding crossbar 2. Finisher cover 3. Front crossbar
4. Gasket 5. Slide rail 6. Slide rail cover
LIIA1031E
Page 1869 of 3371
EI-28
DOOR OUTSIDE MOLDING
Revision: August 20072004 QX56
DOOR OUTSIDE MOLDINGPFP:82820
Removal and InstallationEIS002XG
FRONT DOOR OUTSIDE MOLDING
Removal and Installation
1. Open windows fully.
2. Remove door mirror. Refer to GW-100, "
Door Mirror Assembly" .
3. Remove molding.
�Remove hole cover and remove screw.
�Lift molding from rear side.
�Disconnect clips from flange.
Installation is in the reverse order of removal.
LIIA1035E
Page 1873 of 3371
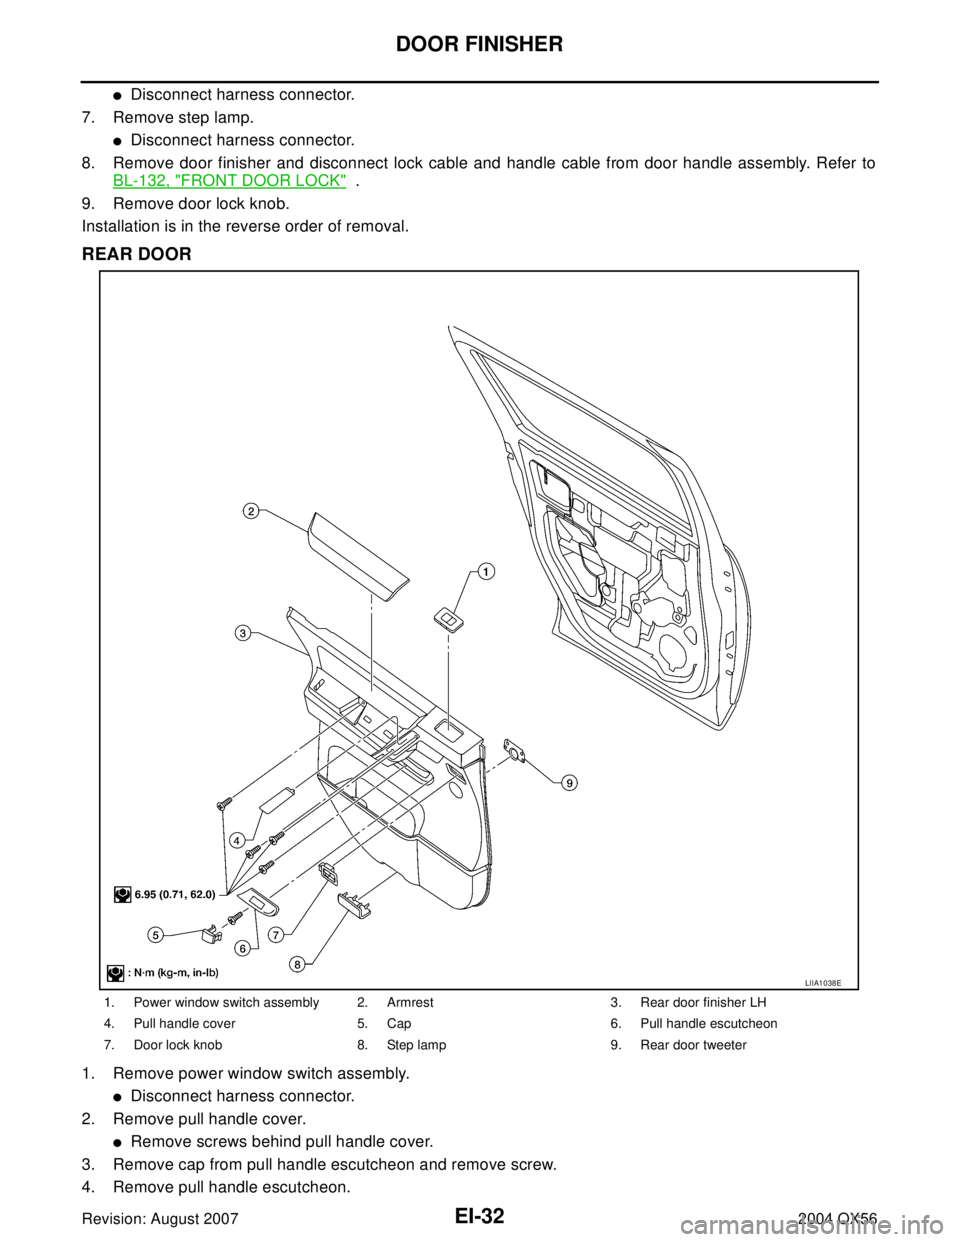
EI-32
DOOR FINISHER
Revision: August 20072004 QX56
�Disconnect harness connector.
7. Remove step lamp.
�Disconnect harness connector.
8. Remove door finisher and disconnect lock cable and handle cable from door handle assembly. Refer to
BL-132, "
FRONT DOOR LOCK" .
9. Remove door lock knob.
Installation is in the reverse order of removal.
REAR DOOR
1. Remove power window switch assembly.
�Disconnect harness connector.
2. Remove pull handle cover.
�Remove screws behind pull handle cover.
3. Remove cap from pull handle escutcheon and remove screw.
4. Remove pull handle escutcheon.
1. Power window switch assembly 2. Armrest 3. Rear door finisher LH
4. Pull handle cover 5. Cap 6. Pull handle escutcheon
7. Door lock knob 8. Step lamp 9. Rear door tweeter
LIIA1038E
Page 1874 of 3371
DOOR FINISHER
EI-33
C
D
E
F
G
H
J
K
L
MA
B
EI
Revision: August 20072004 QX56
�Remove screws behind pull handle escutcheon.
5. Remove armrest.
�Remove screws behind armrest.
6. Remove step lamp.
�Disconnect harness connector.
7. Remove door finisher and disconnect lock cable and handle cable from door handle assembly. Refer to
BL-135, "
REAR DOOR LOCK" .
8. Remove door lock knob.
9. Remove rear door tweeter. Refer to AV-46, "
Removal and Installation of Rear Door Tweeter" .
Installation is in the reverse order of removal.