Page 1876 of 3371

BODY SIDE TRIM
EI-35
C
D
E
F
G
H
J
K
L
MA
B
EI
Revision: August 20072004 QX56
Installation is in the reverse order of removal.
CENTER PILLAR LOWER FINISHER
Removal and Installation
1. Remove front and rear door welts.
2. Remove seat belt anchor. Refer to SB-3, "
Removal and Installation of Front Seat Belt" .
�On RH side, disconnect seat belt tension sensor.
3. Remove front and rear kicking plates. Refer to EI-35, "
KICKING PLATES" .
4. Remove center pillar lower finisher.
Installation is in the reverse order of removal.
CENTER PILLAR UPPER FINISHER
Removal and Installation
1. Remove center pillar lower finisher. Refer to EI-35, "CENTER PILLAR LOWER FINISHER" .
2. Remove assist grip.
3. Remove center pillar upper finisher.
Installation is in the reverse order of removal.
FRONT PILLAR FINISHER
Removal and Installation
1. Remove assist grip.
2. Remove front pillar finisher.
Installation is in the reverse order of removal.
KICKING PLATES
Removal and Installation
Release clips and remove front and/or rear kicking plates.
Installation is in the reverse order of removal.
MUDGUARD FINISHERS
Removal and Installation
Release clips and remove front and/or rear mudguard finishers.
Installation is in the reverse order of removal.
DOOR PARTING SEALS
Removal and Installation
1. Open front and/or rear doors fully.
2. Release clips and remove parting seals.
Installation is in the reverse order of removal.
Page 1877 of 3371

EI-36
FLOOR TRIM
Revision: August 20072004 QX56
FLOOR TRIMPFP:74902
Removal and InstallationEIS002XK
1. Remove front seats. Refer to SE-96, "FRONT SEAT" .
�Remove subwoofer. Refer to AV- 4 6 , "Removal and Installation of Subwoofer" .
�Remove navigation display control unit. Refer to AV- 1 5 8 , "Removal and Installation of Display Control
Unit" .
2. Remove second row seats. Refer to SE-103, "
Second Row Outboard" and SE-103, "Second Row Cen-
ter" , if equipped.
3. Remove third row rear seat. Refer to SE-103, "
Third Row" .
4. Remove lower seat belt anchors. Refer to SB-3, "
SEAT BELTS" .
5. Remove lower body side trim. Refer to EI-34, "
BODY SIDE TRIM" .
6. Remove luggage lower side finishers (left / right). Refer to EI-39, "
LUGGAGE FLOOR TRIM" .
7. Remove kicking plates. Refer to EI-34, "
BODY SIDE TRIM" .
8. Remove center console. Refer to IP-10, "
INSTRUMENT PANEL ASSEMBLY" .
9. Remove rear console, if equipped. Refer to IP-17, "
Rear Console" .
10. Remove rear lower finisher. Refer to EI-39, "
LUGGAGE FLOOR TRIM" .
11. Remove carpet.
12. Remove floor mat hooks from front carpet.
Installation is in the reverse order of removal.
1. Inspection hole cover 2. Seal 3. Carpet
4. Floor mat hook 5. Plastic clip
WIIA0267E
Page 1879 of 3371

EI-38
HEADLINING
Revision: August 20072004 QX56
CAUTION:
Disconnect both terminals from battery in advance.
1. Remove body side trim. Refer to EI-34, "
BODY SIDE TRIM" .
2. Remove luggage floor trim. Refer to EI-39, "
LUGGAGE FLOOR TRIM" .
3. Remove sunvisor assemblies.
4. Remove sunvisor clips.
5. Remove sunroof welt (if equipped).
6. Remove front roof console.
�Disconnect harnesses.
7. Remove rear roof console.
�Disconnect harnesses.
8. Remove assist grips.
9. Remove lamp assembly from rear roof finisher.
�Disconnect harness.
10. Remove rear roof finisher.
11. Remove headlining.
�Remove clips from rear of headlining.
�Disconnect harnesses.
12. Remove rear air control.
�Disconnect harness.
13. Remove rear audio control assembly.
�Disconnect harness.
14. Remove lamp assemblies.
�Disconnect harnesses.
15. Remove air vents.
16. Remove the front roof console bracket.
17. Remove rear roof console front bracket.
18. Remove assist grip brackets from roof.
Installation is in the reverse order of removal.
1. Headlining (without sunroof) 2. Assist grip bracket 3. Assist grip
4. Sunvisor assembly LH 5. Cap LH 6. Sunvisor holder
7. Front roof console 8. Sunglass bin 9. Sunroof welt
10. Cap RH 11. Sunvisor assembly RH 12. Rear roof console bracket
13. Rear storage bin or DVD display 14. Rear air control 15. Rear audio control assembly
16. Rear roof console 17. Rear roof console finisher 18. Rear storage bin
19. Air vent 20. Lamp assembly 21. Plastic clip
22. Headlining (with sunroof) 23. Rear lamp lens 24. Rear lamp
25. Rear roof finisher 26. Plastic clip 27. Metal clip
Page 1881 of 3371

EI-40
LUGGAGE FLOOR TRIM
Revision: August 20072004 QX56
REMOVAL
1. Remove 2nd and 3rd row seat belts. Refer to SB-3, "SEAT BELTS" .
2. Remove third row seat belt buckles.
3. Remove third row seat assembly. Refer to SE-103, "
Third Row" .
4. Remove back door weatherstrip. Refer to EI-41, "
BACK DOOR TRIM" .
5. Remove rear luggage room lamp. Refer to EI-37, "
HEADLINING" .
�Disconnect harness from lamp.
6. Remove rear upper finisher. Refer to EI-37, "
HEADLINING" .
7. Remove rear door kicking plates. Refer to EI-34, "
BODY SIDE TRIM" .
8. Remove rear lower finisher.
9. Disconnect door open/close link. Refer to BL-136, "
BACK DOOR LOCK" .
10. Remove cargo net hooks.
11. Remove luggage side lower finishers LH/RH.
�Disconnect power point, RH side.
12. Remove coat hooks.
13. Remove luggage side upper finishers LH/RH.
�Disconnect harness to door open/close switch, LH side.
14. Remove tie down hooks LH/RH.
15. Remove floor side finishers LH/RH.
16. Remove luggage floor board.
17. Remove storage box.
18. Remove front luggage floor bracket.
19. Remove rear luggage box bracket.
INSTALLATION
Installation is in the reverse order of removal.
1. Rear lower finisher cap 2. Rear lower finisher 3. Cap upper seat belt finisher RH
4. Luggage side finisher RH 5. Metal clip 6. Plastic clip
7. Luggage side finisher lower RH 8. Luggage floor board 9. Latch luggage floor board
10. Leak check cap 11. Cup holder 12. Tie down hook
13. Floor side finisher RH 14. Power point assembly 15. Cargo net hook
16. Rear luggage box bracket 17. Front luggage floor bracket 18. Storage box
19. Floor side finisher LH 20. Luggage side finisher upper LH 21. Luggage side finisher lower LH
22. Lid luggage side lower 23. Coat hook 24. Cap lower seat belt finisher
25. Back door open/close switch 26. Cap luggage side upper 27. Cap upper seat belt finisher LH
Page 1882 of 3371
BACK DOOR TRIM
EI-41
C
D
E
F
G
H
J
K
L
MA
B
EI
Revision: August 20072004 QX56
BACK DOOR TRIMPFP:90900
Removal and InstallationEIS002XN
1. Disconnect door open/close link. Refer to BL-136, "BACK DOOR LOCK" .
2. Open back door glass.
3. Remove inside weatherstrip around back door glass.
4. Remove assist handle.
5. Release clips and remove back door lower finisher.
6. Release clips and remove back door upper finisher.
7. Release clips and remove back door side finishers LH and RH.
Installation is in the reverse order of removal.
1. Back door upper finisher 2. Back door glass weatherstrip 3. Back door side finisher RH
4. Back door lower finisher 5. Back door bumper 6. Back door pull handle
7. Back door mask 8. Back door side finisher LH
WIIA0619E
Page 1894 of 3371
ENGINE ROOM COVER
EM-11
C
D
E
F
G
H
I
J
K
L
MA
EM
Revision: August 20072004 QX56
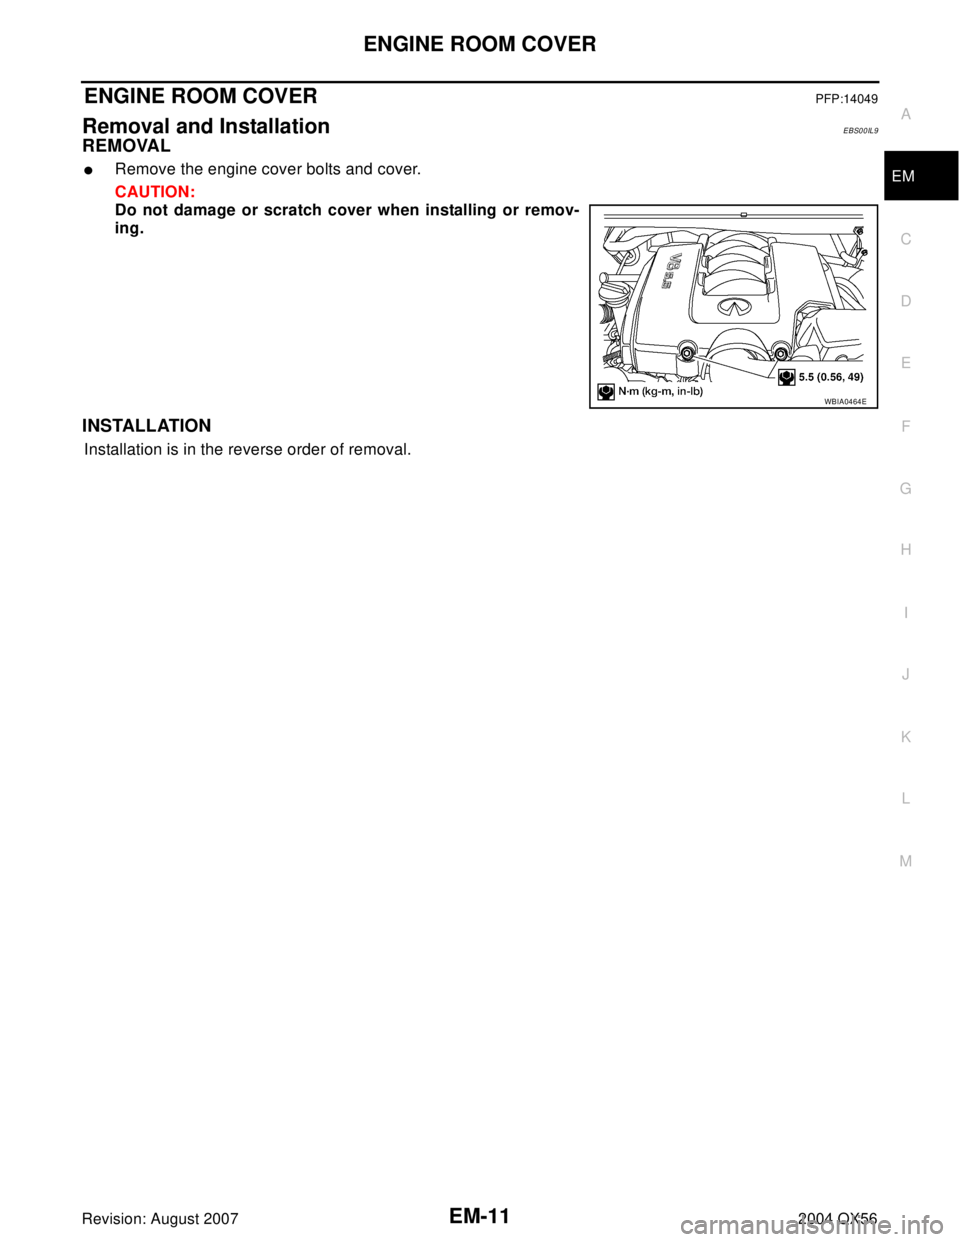
ENGINE ROOM COVERPFP:14049
Removal and InstallationEBS00IL9
REMOVAL
�Remove the engine cover bolts and cover.
CAUTION:
Do not damage or scratch cover when installing or remov-
ing.
INSTALLATION
Installation is in the reverse order of removal.
WBIA0464E
Page 1896 of 3371
DRIVE BELTS
EM-13
C
D
E
F
G
H
I
J
K
L
MA
EM
Revision: August 20072004 QX56
INSTALLATION
Installation is in the reverse order of removal.
CAUTION:
Make sure belt is securely installed around all pulleys.
�Rotate the crankshaft pulley several turns clockwise to equalize belt tension between pulleys.
�Make sure belt tension is within the allowable working range, using the indicator notch on the auto ten-
sioner. Refer to EM-12, "
Checking Drive Belts" .
Drive Belt Auto Tensioner and Idler PulleyEBS00ILD
REMOVAL
1. Remove the air duct and resonator assembly. Refer to EM-14, "Removal and Installation" .
2. Remove the drive belt. Refer to EM-12, "
Checking Drive Belts" .
3. Remove the auto tensioner and idler pulley using power tool.
INSTALLATION
Installation is in the reverse order of removal.
WBIA0607E
1. Auto tensioner 2. Idler pulley
Page 1897 of 3371
EM-14Revision: August 2007
AIR CLEANER AND AIR DUCT
2004 QX56
AIR CLEANER AND AIR DUCTPFP:16500
Removal and InstallationEBS00ILE
REMOVAL
1. Remove the engine room cover using power tool. Refer to EM-14, "REMOVAL" .
2. Disconnect the harness connector from the air cleaner case (upper).
3. Remove the air duct and resonator assembly and air cleaner case.
�Add marks as necessary for easier installation.
INSTALLATION
Installation is in the reverse order of removal.
CHANGING AIR CLEANER FILTER
1. Remove the air duct and resonator assembly and air cleaner case (upper).
2. Remove the air cleaner filter from the air cleaner case.
3. Installation is in the reverse order of removal.
1. Air cleaner case (upper) 2. Air cleaner filter 3. Air cleaner case (lower)
4. Air duct and resonator assembly
WBIA0465E