Page 3585 of 4323
BO45S±01
BO±24
± BODYREAR DOOR
3577 Author�: Date�:
2005 SEQUOIA (RM1146U)
REASSEMBLY
Reassembly is in the reverse order of disassembly (See page BO±24).
Page 3591 of 4323
H16683
H16684
5 Clips BO±30
± BODYBACK DOOR
3583 Author�: Date�:
2005 SEQUOIA (RM1146U)
(c) Using a screwdriver, remove the back door lock protector.
HINT:
Tape the screwdriver tip before use.
(d) Remove the 3 bolts and back door lock.
Torque: 8.0 N´m (82 kgf´cm, 71 in.´lbf)
19. REMOVE OUTSIDE GARNISH
(a) Remove the 2 service hole plugs.
(b) Remove the 2 nuts.
(c) Using a screwdriver, remove the outside garnish.
HINT:
Tape the screwdriver tip before use.
(d) Remove the 2 screws and outside handle from the out-
side garnish.
(e) Remove the nut and key cylinder from the outside gar-
nish.
(f) Remove the 4 screws and licence plate light assembly
from the outside garnish.
20. w/ Rear spoiler:
REMOVE REAR SPOILER (See page BO±174)
21. w/ o Rear spoiler:
REMOVE HIGH MOUNT STOP LIGHT
Page 3593 of 4323
BO45W±02
BO±32
± BODYBACK DOOR
3585 Author�: Date�:
2005 SEQUOIA (RM1146U)
REASSEMBLY
Reassembly is in the reverse order of disassembly (See page BO±26).
PERFORM INITIALIZATION (See page IN±20)
Back door power window control system needs initialization when disconnecting the cable from the negative
battery terminal.
Page 3606 of 4323

BO467±02
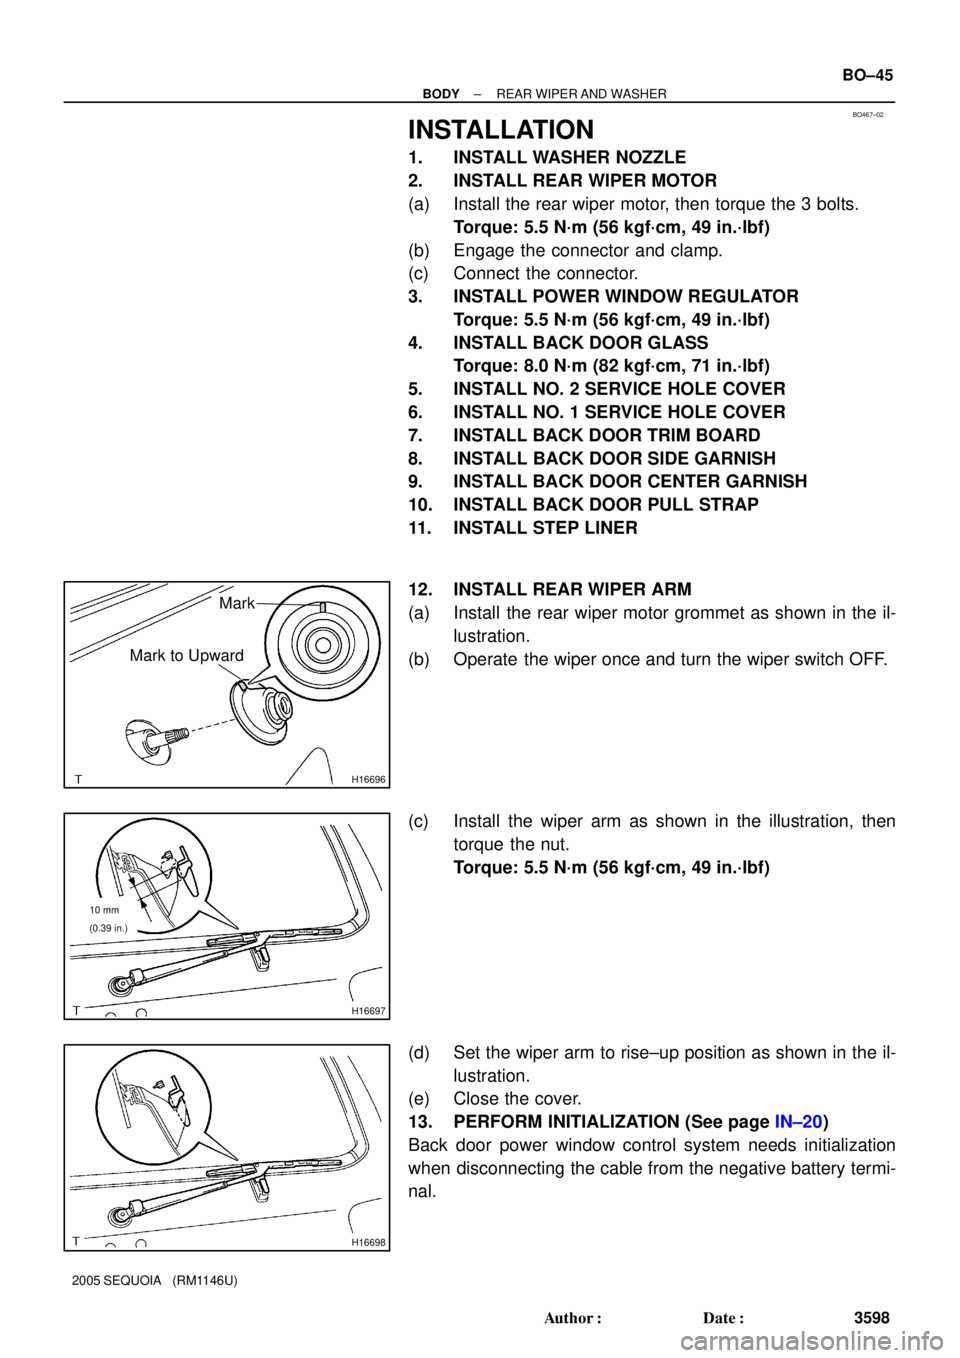
H16696
Mark
Mark to Upward
H16697
10 mm
(0.39 in.)
H16698
± BODYREAR WIPER AND WASHER
BO±45
3598 Author�: Date�:
2005 SEQUOIA (RM1146U)
INSTALLATION
1. INSTALL WASHER NOZZLE
2. INSTALL REAR WIPER MOTOR
(a) Install the rear wiper motor, then torque the 3 bolts.
Torque: 5.5 N´m (56 kgf´cm, 49 in.´lbf)
(b) Engage the connector and clamp.
(c) Connect the connector.
3. INSTALL POWER WINDOW REGULATOR
Torque: 5.5 N´m (56 kgf´cm, 49 in.´lbf)
4. INSTALL BACK DOOR GLASS
Torque: 8.0 N´m (82 kgf´cm, 71 in.´lbf)
5. INSTALL NO. 2 SERVICE HOLE COVER
6. INSTALL NO. 1 SERVICE HOLE COVER
7. INSTALL BACK DOOR TRIM BOARD
8. INSTALL BACK DOOR SIDE GARNISH
9. INSTALL BACK DOOR CENTER GARNISH
10. INSTALL BACK DOOR PULL STRAP
11. INSTALL STEP LINER
12. INSTALL REAR WIPER ARM
(a) Install the rear wiper motor grommet as shown in the il-
lustration.
(b) Operate the wiper once and turn the wiper switch OFF.
(c) Install the wiper arm as shown in the illustration, then
torque the nut.
Torque: 5.5 N´m (56 kgf´cm, 49 in.´lbf)
(d) Set the wiper arm to rise±up position as shown in the il-
lustration.
(e) Close the cover.
13. PERFORM INITIALIZATION (See page IN±20)
Back door power window control system needs initialization
when disconnecting the cable from the negative battery termi-
nal.
Page 3614 of 4323
BO46D±01
N18625
N18626
± BODYROOF DRIP SIDE MOULDING
BO±53
3606 Author�: Date�:
2005 SEQUOIA (RM1146U)
REMOVAL
1. w/ Roof rack:
REMOVE ROOF RACK (See page BO±173)
2. REMOVE ENDS OF ROOF DRIP SIDE MOULDING
(a) Apply protective tape to the outer surface to keep the sur-
face from being scratched.
(b) Using a heat light, heat the moulding to 20 ± 30 °C (68 ±
86 °F)
NOTICE:
Do not heat the moulding excessively.
(c) Using a scraper, pull off the roof drip side moulding from
the front and rear ends.
HINT:
Tape the scraper tip before use.
3. REMOVE ROOF DRIP SIDE MOULDING
(a) Pull off the moulding by cutting the adhesive with a knife
at the front and rear ends.
(b) Remove the moulding.
NOTICE:
Do not damage the body with the knife.
Page 3617 of 4323
BO±56
± BODYROOF DRIP SIDE MOULDING
3609 Author�: Date�:
2005 SEQUOIA (RM1146U)
(b) Lift the moulding release sheet from the face of moulding.
NOTICE:
When the moulding release sheet is removed, make sure
that no dirt or dust can get onto the coated area.
(c) Install the moulding.
NOTICE:
�Make sure that the body and moulding are heated to
a proper temperature.
�Do not depress the adhesive coated parts excessive-
ly but just hold them down with your thumb.
�Scrape off any overflowing adhesive with a plastic
spatula and clean the surface with a dry rag.
�Take care not to drive the vehicle during the time de-
scribed in the table below.
TemperatureMinimum time prior to driving the vehicle
35 °C (95 °F)1.5 hours
20 °C (68 °F)5 hours
5°C (41° F)24 hours
6. w/ Roof rack:
INSTALL ROOF RACK (See page BO±173)
Torque: 11 N´m (115kgf´cm, 8 ft´lbf)
Page 3620 of 4323
BO46H±01
± BODYROOF DRIP SIDE FINISH MOULDING
BO±59
3612 Author�: Date�:
2005 SEQUOIA (RM1146U)
INSTALLATION
Installation is in the reverse order of removal (See page BO±58).
Page 3635 of 4323
H16746
a ± a
15 mm (0.59 in.)22 mm (0.87 in.)
c ± c
15 mm (0.59 in.)
b ± ba
bc a
bcPrimer G Primer G
Primer G
BO±74
± BODYQUARTER WINDOW GLASS
3627 Author�: Date�:
2005 SEQUOIA (RM1146U)
5. COAT CONTACT SURFACE OF GLASS WITH PRIMER
ºGº
(a) Using a brush or sponge, coat the edge of the glass and
the contact surface with Primer G as shown in the illustra-
tion on the following page.
(b) When the primer is coated wrongly to the area other than
the specified, wipe it off with a clean shop rag before the
primer dries.
NOTICE:
�Let the primer coating dry for 3 minutes or more.
�Do not keep any of the opened Primer G for later use.
6. APPLY ADHESIVE
(a) Cut off the tip of the cartridge nozzle.
Part No. 08850±00801 or equivalent.
HINT:
After cutting off the tip, use all adhesive within the time de-
scribed in the table below.
TemperatureTackfree time
35 °C (95 °F)15 minutes
20 °C (68 °F)100 minutes
5 °C (41 °F)8 hours
(b) Load the cartridge into the sealer gun.