Page 2728 of 3051
NLC045
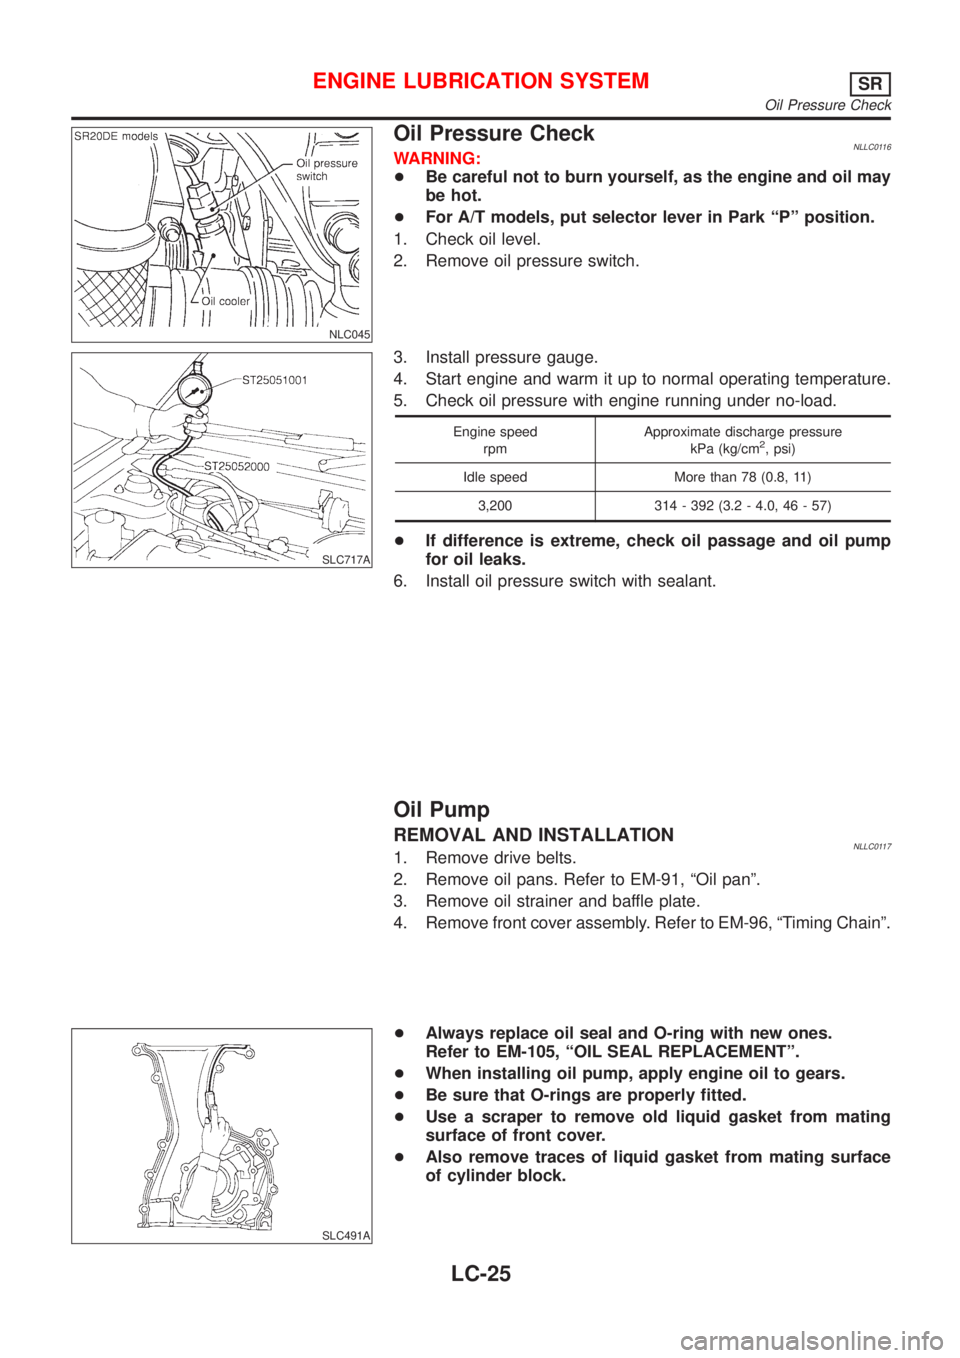
Oil Pressure CheckNLLC0116WARNING:
+Be careful not to burn yourself, as the engine and oil may
be hot.
+For A/T models, put selector lever in Park ªPº position.
1. Check oil level.
2. Remove oil pressure switch.
SLC717A
3. Install pressure gauge.
4. Start engine and warm it up to normal operating temperature.
5. Check oil pressure with engine running under no-load.
Engine speed
rpmApproximate discharge pressure
kPa (kg/cm2, psi)
Idle speed More than 78 (0.8, 11)
3,200 314 - 392 (3.2 - 4.0, 46 - 57)
+If difference is extreme, check oil passage and oil pump
for oil leaks.
6. Install oil pressure switch with sealant.
Oil Pump
REMOVAL AND INSTALLATIONNLLC01171. Remove drive belts.
2. Remove oil pans. Refer to EM-91, ªOil panº.
3. Remove oil strainer and baffle plate.
4. Remove front cover assembly. Refer to EM-96, ªTiming Chainº.
SLC491A
+Always replace oil seal and O-ring with new ones.
Refer to EM-105, ªOIL SEAL REPLACEMENTº.
+When installing oil pump, apply engine oil to gears.
+Be sure that O-rings are properly fitted.
+Use a scraper to remove old liquid gasket from mating
surface of front cover.
+Also remove traces of liquid gasket from mating surface
of cylinder block.
ENGINE LUBRICATION SYSTEMSR
Oil Pressure Check
LC-25
Page 2731 of 3051
NMA039
Changing Engine OilNLLC0125WARNING:
+Be careful not to burn yourself, as the engine oil is hot.
+Prolonged and repeated contact with used engine oil may
cause skin cancer; try to avoid direct skin contact with
used oil. If skin contact is made, wash thoroughly with
soap or hand cleaner as soon as possible.
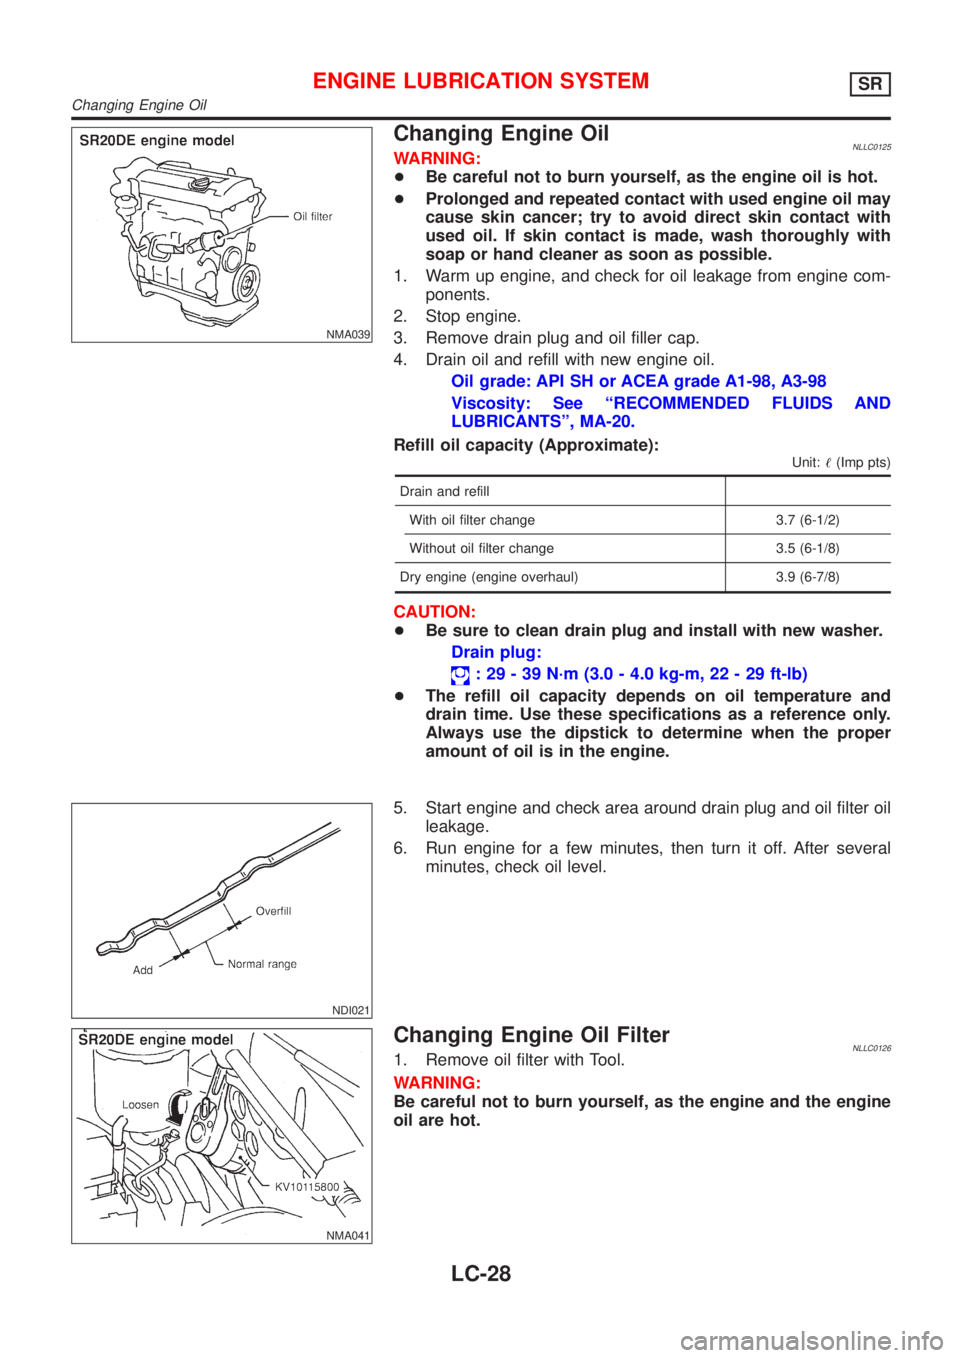
1. Warm up engine, and check for oil leakage from engine com-
ponents.
2. Stop engine.
3. Remove drain plug and oil filler cap.
4. Drain oil and refill with new engine oil.
Oil grade: API SH or ACEA grade A1-98, A3-98
Viscosity: See ªRECOMMENDED FLUIDS AND
LUBRICANTSº, MA-20.
Refill oil capacity (Approximate):
Unit:!(Imp pts)
Drain and refill
With oil filter change 3.7 (6-1/2)
Without oil filter change 3.5 (6-1/8)
Dry engine (engine overhaul) 3.9 (6-7/8)
CAUTION:
+Be sure to clean drain plug and install with new washer.
Drain plug:
: 29 - 39 N´m (3.0 - 4.0 kg-m, 22 - 29 ft-lb)
+The refill oil capacity depends on oil temperature and
drain time. Use these specifications as a reference only.
Always use the dipstick to determine when the proper
amount of oil is in the engine.
NDI021
5. Start engine and check area around drain plug and oil filter oil
leakage.
6. Run engine for a few minutes, then turn it off. After several
minutes, check oil level.
NMA041
Changing Engine Oil FilterNLLC01261. Remove oil filter with Tool.
WARNING:
Be careful not to burn yourself, as the engine and the engine
oil are hot.
ENGINE LUBRICATION SYSTEMSR
Changing Engine Oil
LC-28
Page 2735 of 3051
Cooling CircuitNLLC0132
NLC087
System CheckNLLC0133WARNING:
Never remove the radiator cap when the engine is hot. Serious
burns could occur from high pressure coolant escaping from
the radiator.
Wrap a thick cloth around the cap. Slowly turn it a quarter turn
to allow built-up pressure to escape. Carefully remove the cap
by turning it all the way.
CHECKING COOLING SYSTEM HOSESNLLC0133S01Check hoses for the following:
+Improper attachment
+Leaks
+Cracks
+Damage
+Chafing
+Deterioration
SLC546AA
CHECKING COOLING SYSTEM FOR LEAKSNLLC0133S02To check for leakage, apply pressure to the cooling system with a
tester.
Testing pressure:
157 kPa (1.6 kg/cm
2, 23 psi)
CAUTION:
Higher pressure than specified may cause radiator damage.
ENGINE COOLING SYSTEMSR
Cooling Circuit
LC-32
Page 2741 of 3051
Changing Engine Coolant=NLLC0108WARNING:
To avoid the danger of being scalded, never change the cool-
ant when the engine is hot.
Ð DRAINING ENGINE COOLANT ÐNLLC0108S011. Set air conditioning system as follows to prevent coolant from
remaining in the system.
a. Turn ignition switch ªONº and set temperature controller to
maximum hot position.
b. Wait 10 seconds before turning ignition switch OFF.
SMA033D
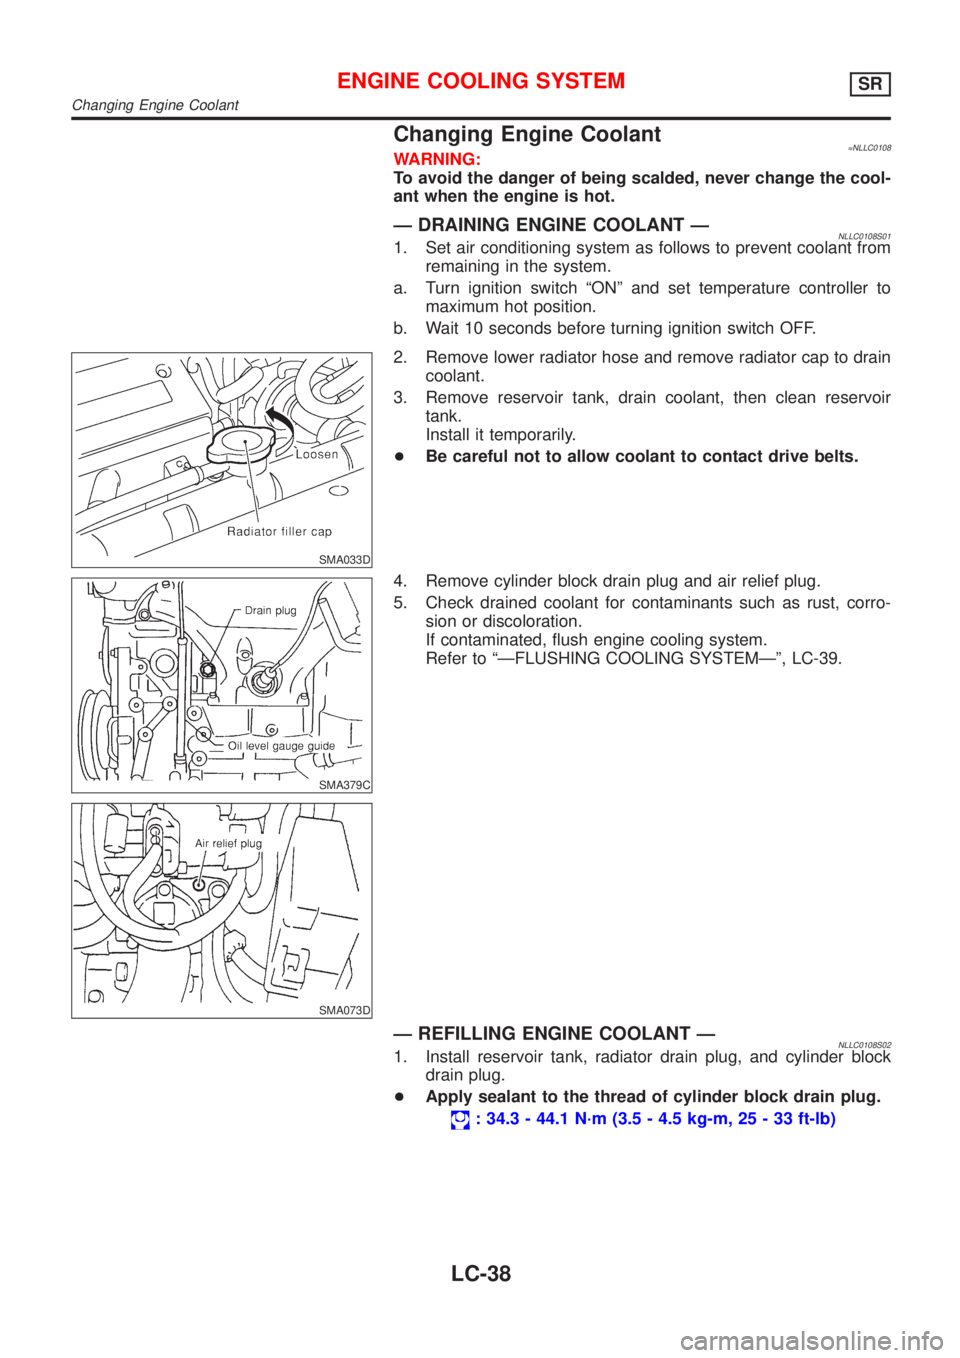
2. Remove lower radiator hose and remove radiator cap to drain
coolant.
3. Remove reservoir tank, drain coolant, then clean reservoir
tank.
Install it temporarily.
+Be careful not to allow coolant to contact drive belts.
SMA379C
SMA073D
4. Remove cylinder block drain plug and air relief plug.
5. Check drained coolant for contaminants such as rust, corro-
sion or discoloration.
If contaminated, flush engine cooling system.
Refer to ªÐFLUSHING COOLING SYSTEMк, LC-39.
Ð REFILLING ENGINE COOLANT ÐNLLC0108S021. Install reservoir tank, radiator drain plug, and cylinder block
drain plug.
+Apply sealant to the thread of cylinder block drain plug.
: 34.3 - 44.1 N´m (3.5 - 4.5 kg-m, 25 - 33 ft-lb)
ENGINE COOLING SYSTEMSR
Changing Engine Coolant
LC-38
Page 2747 of 3051
SLC283B
JLC284B
SLC926-A
Oil Pressure CheckNLLC0042WARNING:
+Be careful not to burn yourself, as the engine and oil may
be hot.
+Oil pressure check should be done in ªNeutral positionº.
1. Check oil level.
2. Remove exhaust front tube.
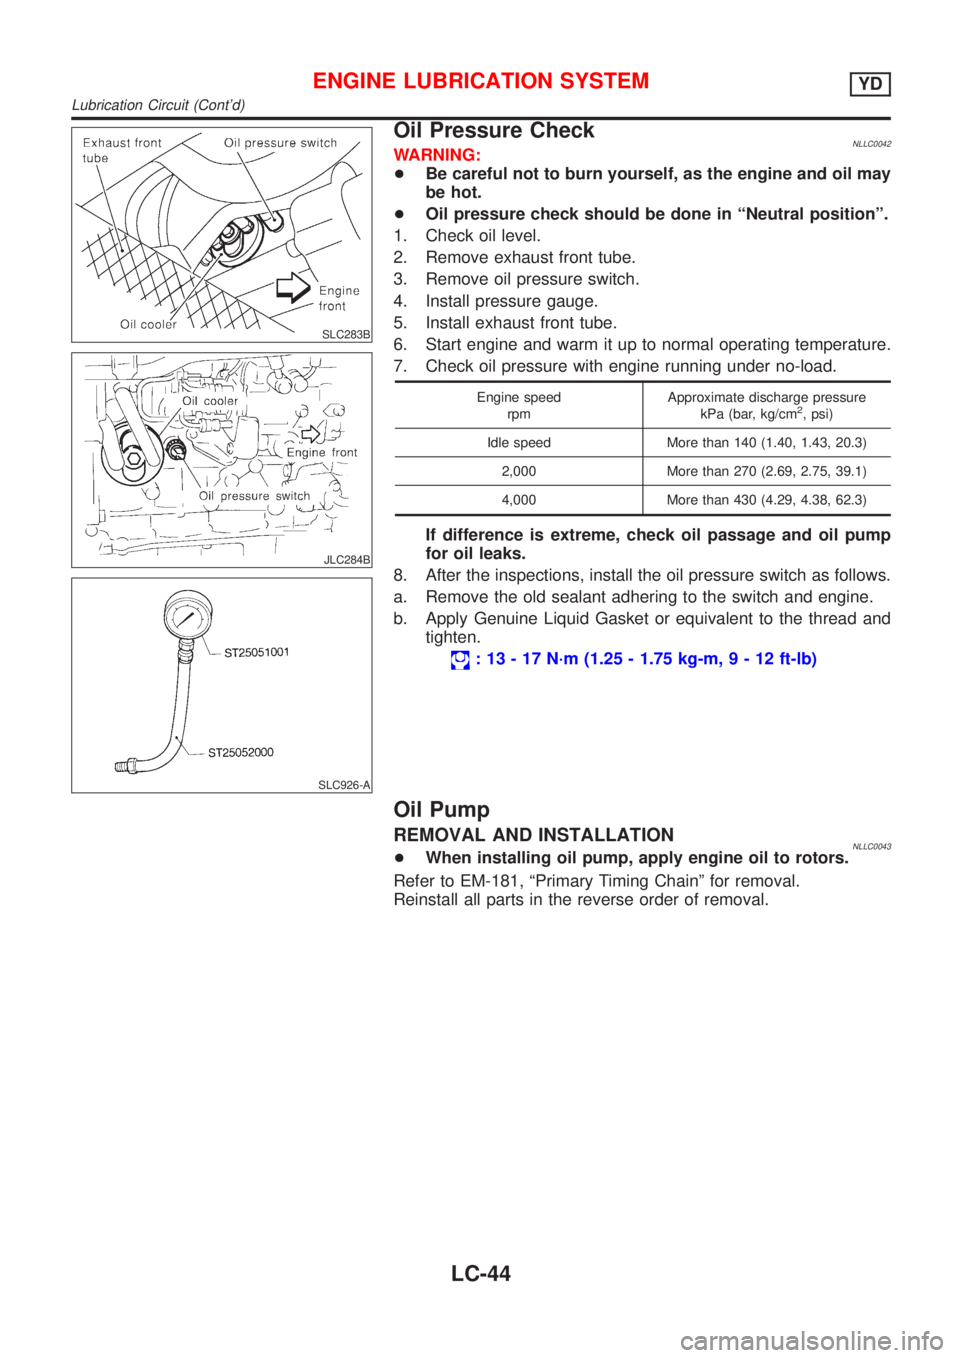
3. Remove oil pressure switch.
4. Install pressure gauge.
5. Install exhaust front tube.
6. Start engine and warm it up to normal operating temperature.
7. Check oil pressure with engine running under no-load.
Engine speed
rpmApproximate discharge pressure
kPa (bar, kg/cm2, psi)
Idle speed More than 140 (1.40, 1.43, 20.3)
2,000 More than 270 (2.69, 2.75, 39.1)
4,000 More than 430 (4.29, 4.38, 62.3)
If difference is extreme, check oil passage and oil pump
for oil leaks.
8. After the inspections, install the oil pressure switch as follows.
a. Remove the old sealant adhering to the switch and engine.
b. Apply Genuine Liquid Gasket or equivalent to the thread and
tighten.
: 13 - 17 N´m (1.25 - 1.75 kg-m,9-12ft-lb)
Oil Pump
REMOVAL AND INSTALLATIONNLLC0043+When installing oil pump, apply engine oil to rotors.
Refer to EM-181, ªPrimary Timing Chainº for removal.
Reinstall all parts in the reverse order of removal.
ENGINE LUBRICATION SYSTEMYD
Lubrication Circuit (Cont'd)
LC-44
Page 2750 of 3051
SLC287B
JLC288B
Changing Engine OilNLLC0074WARNING:
+Be careful not to burn yourself, as the engine oil is hot.
+Prolonged and repeated contact with used engine oil may
cause skin cancer; try to avoid direct skin contact with
used oil. If skin contact is made, wash thoroughly with
soap or hand cleaner as soon as possible.
1. Warm up engine, and check for oil leakage from engine com-
ponents.
2. Stop engine and wait more than 10 minutes.
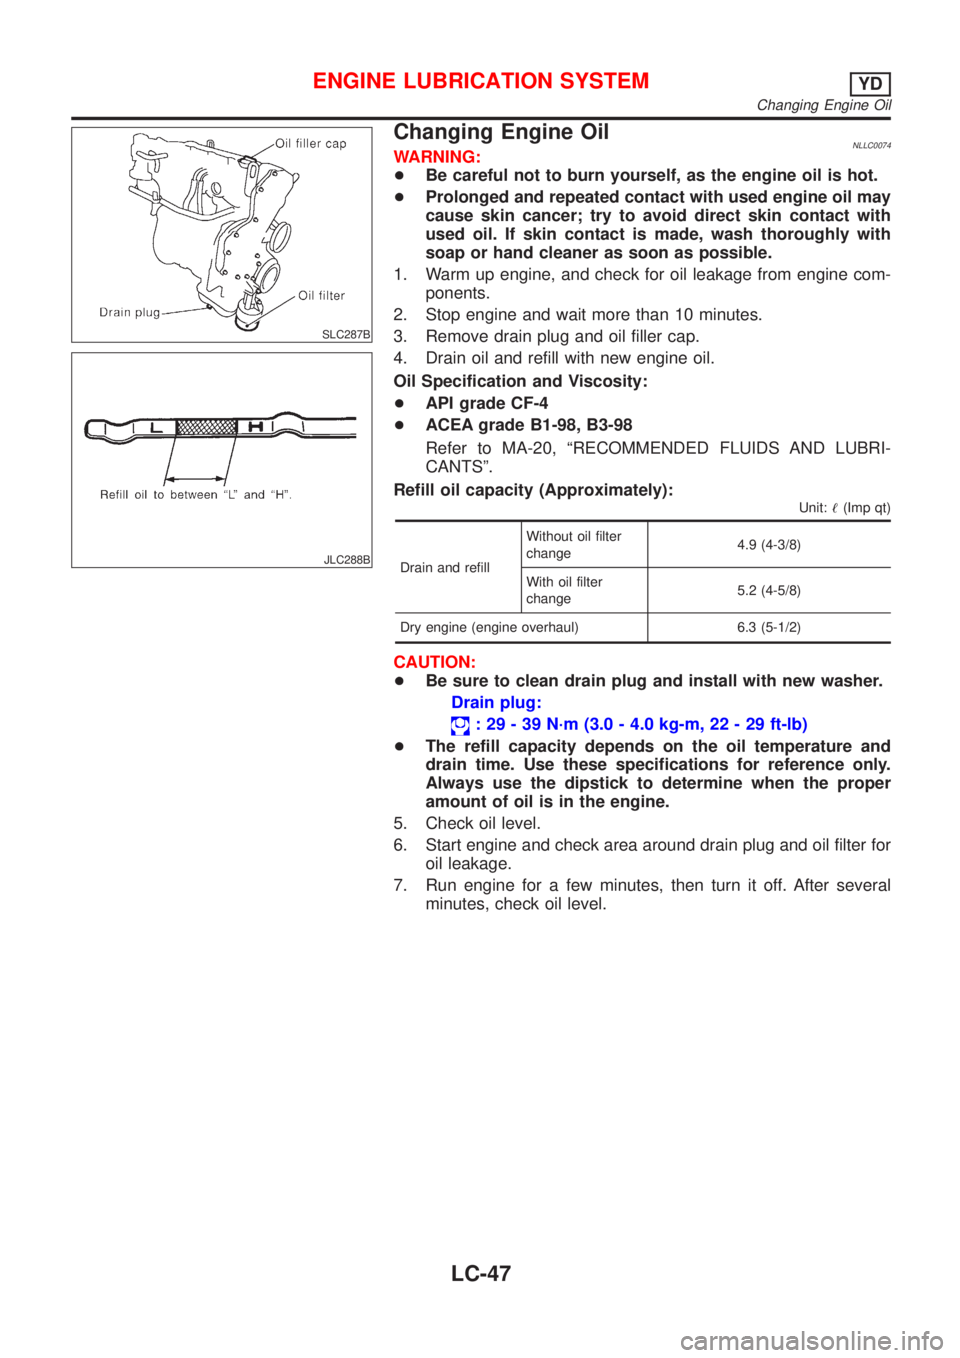
3. Remove drain plug and oil filler cap.
4. Drain oil and refill with new engine oil.
Oil Specification and Viscosity:
+API grade CF-4
+ACEA grade B1-98, B3-98
Refer to MA-20, ªRECOMMENDED FLUIDS AND LUBRI-
CANTSº.
Refill oil capacity (Approximately):
Unit:!(Imp qt)
Drain and refillWithout oil filter
change4.9 (4-3/8)
With oil filter
change5.2 (4-5/8)
Dry engine (engine overhaul) 6.3 (5-1/2)
CAUTION:
+Be sure to clean drain plug and install with new washer.
Drain plug:
: 29 - 39 N´m (3.0 - 4.0 kg-m, 22 - 29 ft-lb)
+The refill capacity depends on the oil temperature and
drain time. Use these specifications for reference only.
Always use the dipstick to determine when the proper
amount of oil is in the engine.
5. Check oil level.
6. Start engine and check area around drain plug and oil filter for
oil leakage.
7. Run engine for a few minutes, then turn it off. After several
minutes, check oil level.
ENGINE LUBRICATION SYSTEMYD
Changing Engine Oil
LC-47
Page 2757 of 3051
System CheckNLLC0054WARNING:
Never remove the radiator cap when the engine is hot; serious
burns could be caused by high pressure fluid escaping from
the radiator.
Wrap a thick cloth around the cap and carefully remove it by
turning it a quarter turn to allow built-up pressure to escape
and then turn the cap all the way off.
CHECKING COOLING SYSTEM HOSESNLLC0054S01Check hoses for improper attachment, leaks, cracks, damage,
loose connections, chafing and deterioration.
CHECKING RADIATORNLLC0054S02Check radiator for mud or clogging. If necessary, clean radiator as
follows.
+Be careful not to bend or damage the radiator fins.
+When radiator is cleaned without removal, remove all sur-
rounding parts such as cooling fan, radiator shroud and horns.
Then tape the harness and connectors to prevent water from
entering.
1. Apply water by hose to the back side of the radiator core ver-
tically downward.
2. Apply water again to all radiator core surfaces once per
minute.
3. Stop washing if any stains no longer flow out from the radia-
tor.
4. Blow air into the back side of radiator core vertically downward.
+Use compressed air lower than 490 kPa (4.9 bar, 5 kg/cm
2,71
psi) and keep distance more than 30 cm (11.8 in).
5. Blow air again into all the radiator core surfaces once per
minute until no water sprays out.
SLC755AC
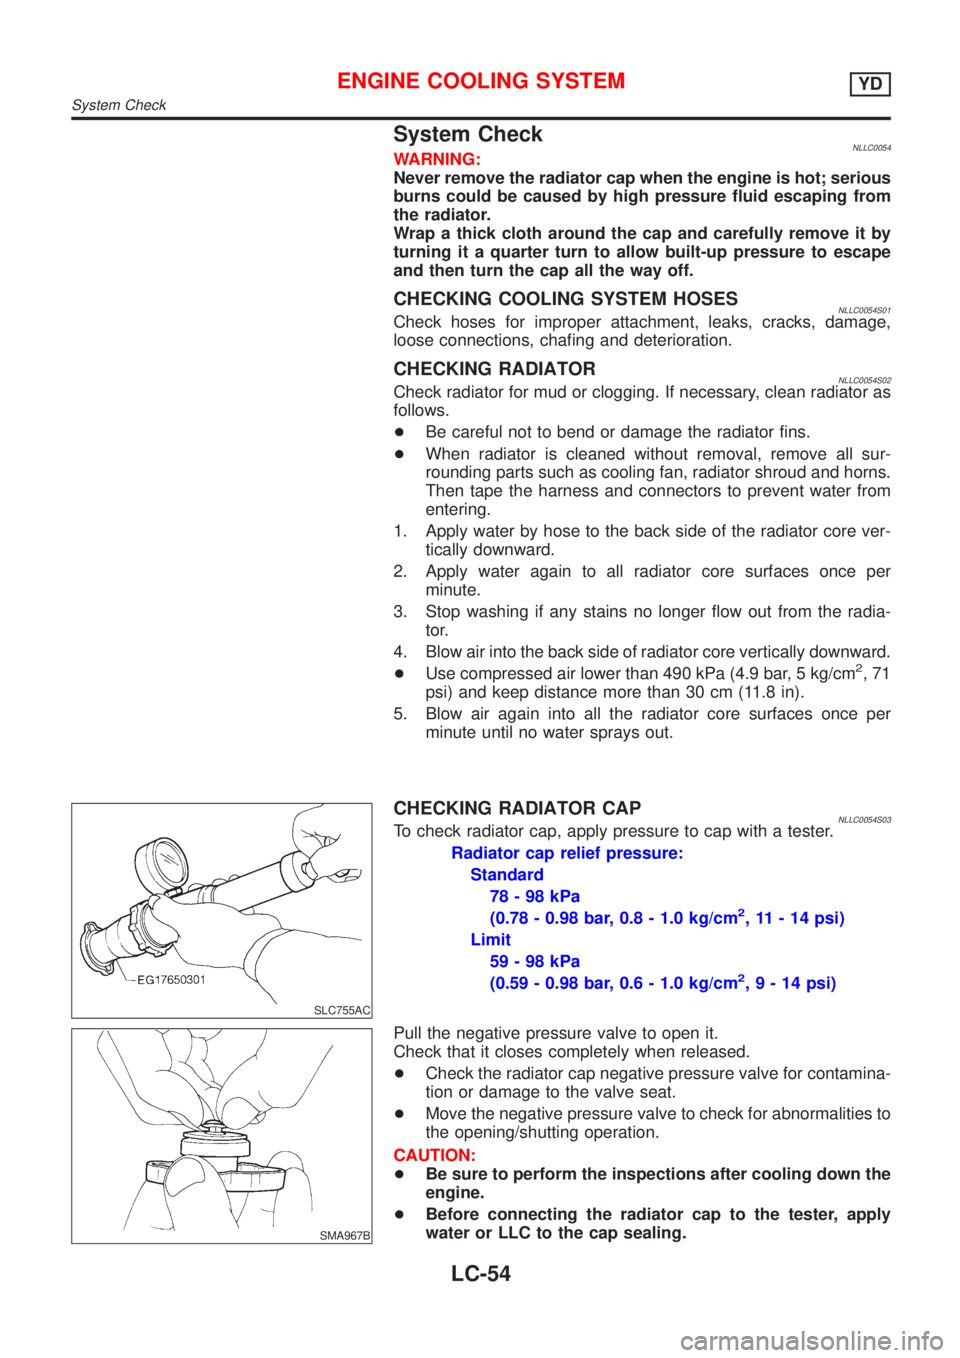
CHECKING RADIATOR CAPNLLC0054S03To check radiator cap, apply pressure to cap with a tester.
Radiator cap relief pressure:
Standard
78-98kPa
(0.78 - 0.98 bar, 0.8 - 1.0 kg/cm
2, 11 - 14 psi)
Limit
59-98kPa
(0.59 - 0.98 bar, 0.6 - 1.0 kg/cm
2,9-14psi)
SMA967B
Pull the negative pressure valve to open it.
Check that it closes completely when released.
+Check the radiator cap negative pressure valve for contamina-
tion or damage to the valve seat.
+Move the negative pressure valve to check for abnormalities to
the opening/shutting operation.
CAUTION:
+Be sure to perform the inspections after cooling down the
engine.
+Before connecting the radiator cap to the tester, apply
water or LLC to the cap sealing.
ENGINE COOLING SYSTEMYD
System Check
LC-54
Page 2762 of 3051
REMOVAL AND INSTALLATIONNLLC00631. Remove under cover.
2. Drain coolant by removing lower radiator hose.
3. Disconnect radiator upper and lower hoses.
4. Remove radiator shroud.
5. Disconnect reservoir tank hose.
6. Remove radiator mounting bracket.
7. Remove radiator.
8. After repairing or replacing radiator, install any part removed in reverse order of removal.
When filling radiator with coolant, refer to LC-59, ªChanging Engine Coolantº.
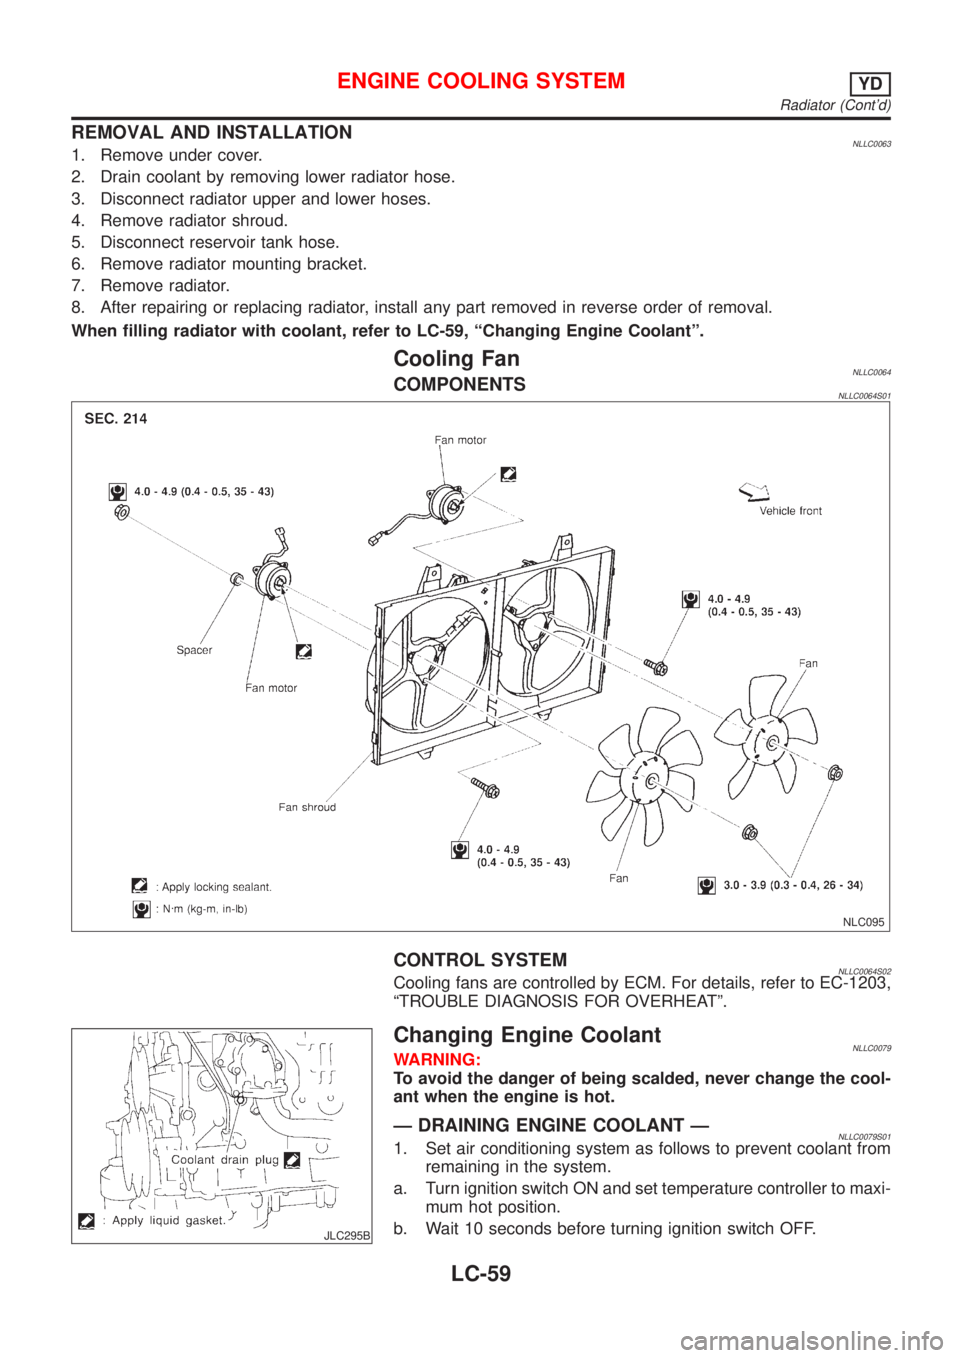
Cooling FanNLLC0064COMPONENTSNLLC0064S01
NLC095
CONTROL SYSTEMNLLC0064S02Cooling fans are controlled by ECM. For details, refer to EC-1203,
ªTROUBLE DIAGNOSIS FOR OVERHEATº.
JLC295B
Changing Engine CoolantNLLC0079WARNING:
To avoid the danger of being scalded, never change the cool-
ant when the engine is hot.
Ð DRAINING ENGINE COOLANT ÐNLLC0079S011. Set air conditioning system as follows to prevent coolant from
remaining in the system.
a. Turn ignition switch ON and set temperature controller to maxi-
mum hot position.
b. Wait 10 seconds before turning ignition switch OFF.
ENGINE COOLING SYSTEMYD
Radiator (Cont'd)
LC-59