Page 452 of 2898

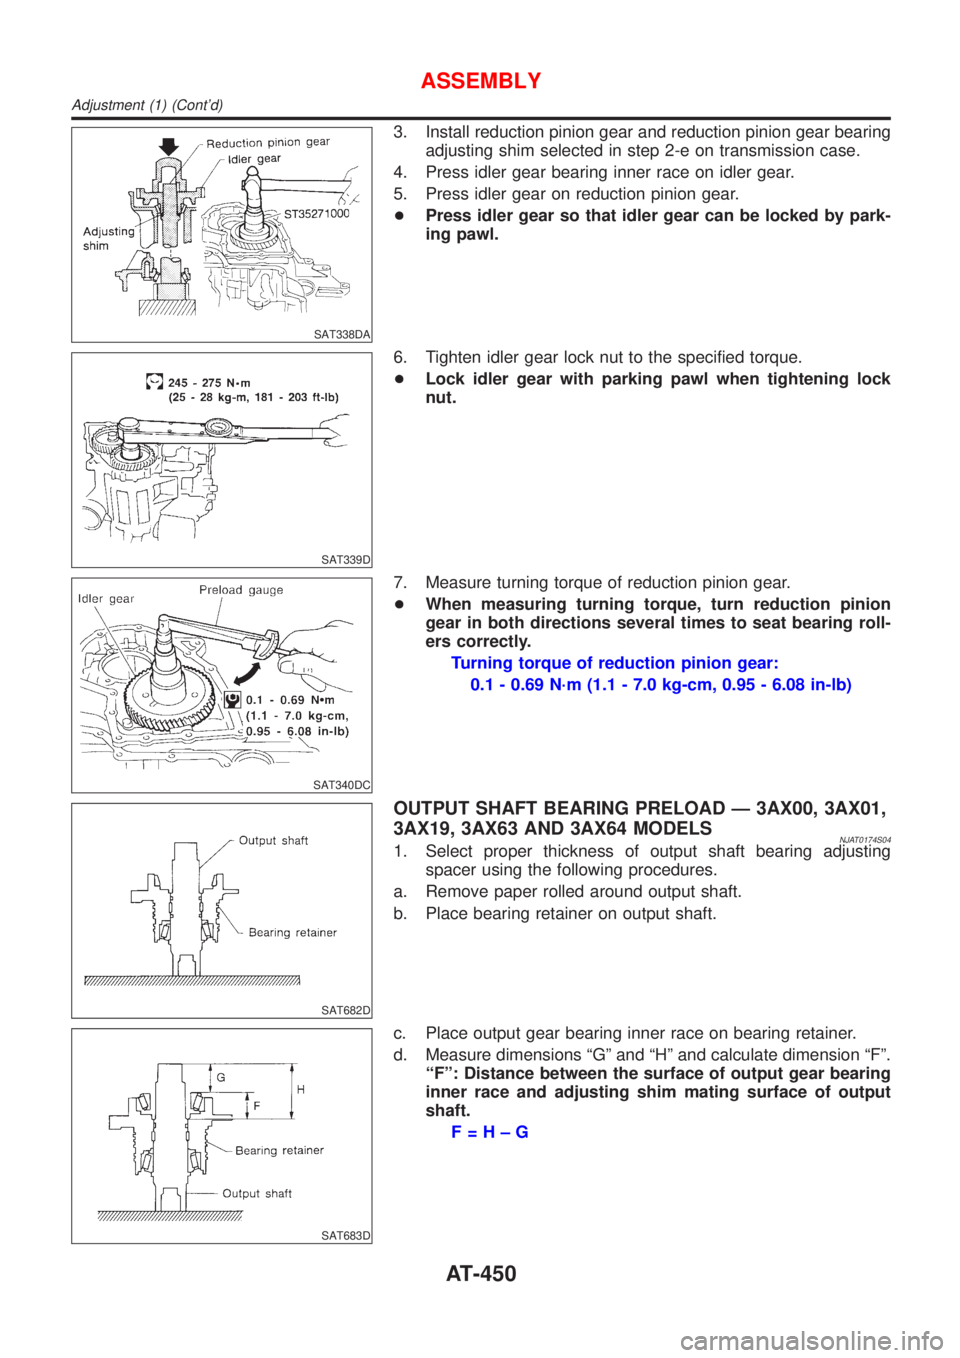
SAT338DA
3. Install reduction pinion gear and reduction pinion gear bearing
adjusting shim selected in step 2-e on transmission case.
4. Press idler gear bearing inner race on idler gear.
5. Press idler gear on reduction pinion gear.
+Press idler gear so that idler gear can be locked by park-
ing pawl.
SAT339D
6. Tighten idler gear lock nut to the specified torque.
+Lock idler gear with parking pawl when tightening lock
nut.
SAT340DC
7. Measure turning torque of reduction pinion gear.
+When measuring turning torque, turn reduction pinion
gear in both directions several times to seat bearing roll-
ers correctly.
Turning torque of reduction pinion gear:
0.1 - 0.69 N´m (1.1 - 7.0 kg-cm, 0.95 - 6.08 in-lb)
SAT682D
OUTPUT SHAFT BEARING PRELOAD Ð 3AX00, 3AX01,
3AX19, 3AX63 AND 3AX64 MODELS
NJAT0174S041. Select proper thickness of output shaft bearing adjusting
spacer using the following procedures.
a. Remove paper rolled around output shaft.
b. Place bearing retainer on output shaft.
SAT683D
c. Place output gear bearing inner race on bearing retainer.
d. Measure dimensions ªGº and ªHº and calculate dimension ªFº.
ªFº: Distance between the surface of output gear bearing
inner race and adjusting shim mating surface of output
shaft.
F=H±G
ASSEMBLY
Adjustment (1) (Cont'd)
AT-450
Page 453 of 2898
SAT684D
+Measure dimension ªGº between end of output shaft and sur-
face of output gear bearing inner race.
+Measure dimension ªGº in at least two places.
SAT685D
+Measure dimension ªHº between end of output shaft and
adjusting spacer mating surface of output shaft.
+Measure dimension ªHº in at least two places.
+Calculate dimension ªFº.
F=H±G
SAT686D
e. Measure dimension ªIº between end of output gear (adjusting
spacer mating surface) and bearing inner race fitting surface.
+Measure dimension ªIº in at least two places.
f. Calculate dimension ªT
2º.
ªT
2º: Distance between adjusting spacer mating surface
of output gear and output shaft
T
2=F±I
g. Select proper thickness of output shaft bearing adjusting
spacer using SDS table as a guide.
Output shaft bearing adjusting spacer:
Refer to SDS, AT-482.
SAT687D
2. Install bearing retainer on transmission case.
ASSEMBLY
Adjustment (1) (Cont'd)
AT-451
Page 455 of 2898
SAT224E
12. Install new gasket and side cover on transmission case.
+Always replace side cover bolts when removed.
+Refer to ªOverhaulº, AT-361.
SAT341D
OUTPUT SHAFT END PLAY Ð 3AX10 AND 3AX18
MODELS
NJAT0174S03+Measure clearance between side cover and the end of the
output shaft bearing.
+Select proper thickness of adjusting shim so that clearance is
within specifications.
SAT347D
1. Install bearing retainer for output shaft.
SAT438D
2. Install output shaft thrust needle bearing on bearing retainer.
SAT439D
3. Install output shaft on transmission case.
ASSEMBLY
Adjustment (1) (Cont'd)
AT-453
Page 456 of 2898

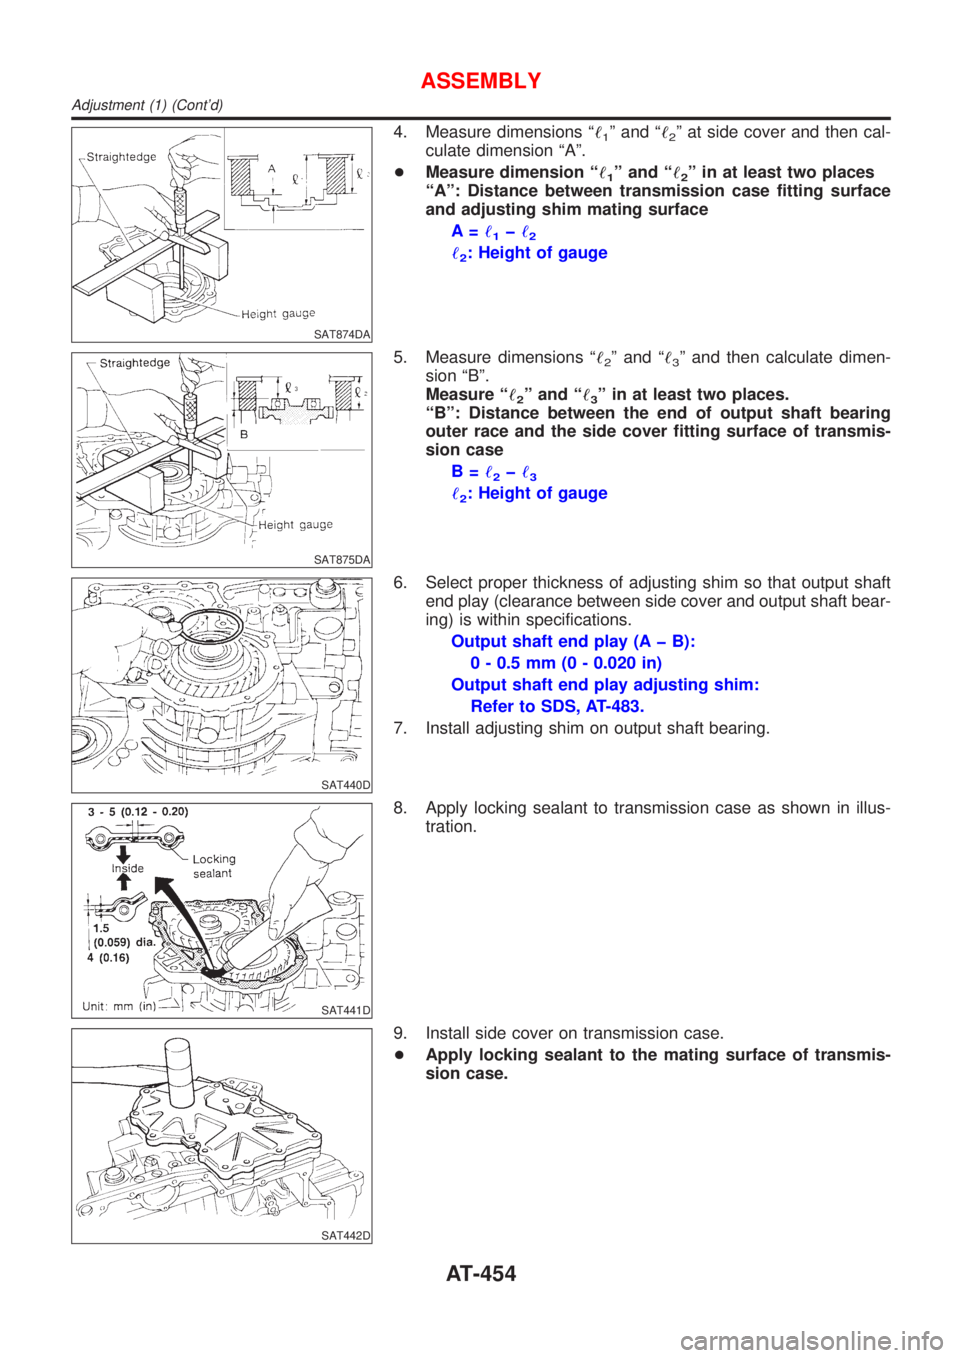
SAT874DA
4. Measure dimensions ª!1º and ª!2º at side cover and then cal-
culate dimension ªAº.
+Measure dimension ª!
1º and ª!2º in at least two places
ªAº: Distance between transmission case fitting surface
and adjusting shim mating surface
A=!
1þ!2
!2: Height of gauge
SAT875DA
5. Measure dimensions ª!2º and ª!3º and then calculate dimen-
sion ªBº.
Measure ª!
2º and ª!3º in at least two places.
ªBº: Distance between the end of output shaft bearing
outer race and the side cover fitting surface of transmis-
sion case
B=!
2þ!3
!2: Height of gauge
SAT440D
6. Select proper thickness of adjusting shim so that output shaft
end play (clearance between side cover and output shaft bear-
ing) is within specifications.
Output shaft end play (A þ B):
0 - 0.5 mm (0 - 0.020 in)
Output shaft end play adjusting shim:
Refer to SDS, AT-483.
7. Install adjusting shim on output shaft bearing.
SAT441D
8. Apply locking sealant to transmission case as shown in illus-
tration.
SAT442D
9. Install side cover on transmission case.
+Apply locking sealant to the mating surface of transmis-
sion case.
ASSEMBLY
Adjustment (1) (Cont'd)
AT-454
Page 458 of 2898
SAT358D
6. Hold forward clutch hub and turn overrun clutch hub.
Check overrun clutch hub for directions of lock and unlock.
+If not as shown in illustration, check installed direction of for-
ward one-way clutch.
SAT359D
7. Install rear internal gear assembly.
+Align teeth of forward clutch and overrun clutch drive
plate.
SAT360D
8. Install needle bearing on rear planetary carrier.
+Apply petroleum jelly to needle bearing.
+Pay attention to direction of needle bearing.
SAT052D
9. Install rear sun gear on rear planetary carrier.
+Pay attention to direction of rear sun gear.
SAT362D
10. Install rear planetary carrier on transmission case.
ASSEMBLY
Assembly (2) (Cont'd)
AT-456
Page 459 of 2898
SAT363D
11. Install thrust needle bearing on front planetary carrier.
+Apply petroleum jelly to thrust needle bearing.
+Pay attention to direction of thrust needle bearing.
SAT048D
12. Install low one-way clutch to front planetary carrier by turning
it in the direction of the arrow as shown.
13. While holding front planetary carrier, turn low one-way clutch.
Check low one-way clutch for correct directions of lock and
unlock.
SAT047D
14. Install front planetary carrier assembly on transmission case.
SAT046D
15. Install snap ring with screwdriver.
+Forward clutch and bearings must be correctly installed
for snap ring to fit groove of transmission case.
SAT367D
16. Install needle bearing on front sun gear.
+Apply petroleum jelly to needle bearing.
+Pay attention to direction of needle bearing.
ASSEMBLY
Assembly (2) (Cont'd)
AT-457
Page 461 of 2898
SAT373D
23. Install reverse clutch assembly.
+Align teeth of reverse clutch drive plates before installing.
Adjustment (2)NJAT0176When any parts listed below are replaced, adjust total end play and
reverse clutch end play.
Part name Total end playReverse clutch
end play
Transmission case++
Overrun clutch hub++
Rear internal gear++
Rear planetary carrier++
Rear sun gear++
Front planetary carrier++
Front sun gear++
High clutch hub++
High clutch drum++
Oil pump cover++
Reverse clutch drum Ð+
SAT374D
TOTAL END PLAYNJAT0176S01+Measure clearance between reverse clutch drum and needle
bearing for oil pump cover.
+Select proper thickness of bearing race so that end play is
within specifications.
SAT375D
1. Measure dimensions ªKº and ªLº and then calculate dimension
ªJº.
ASSEMBLY
Assembly (2) (Cont'd)
AT-459
Page 462 of 2898
SAT376D
a. Measure dimension ªKº.
SAT377D
b. Measure dimension ªLº.
c. Calculate dimension ªJº.
ªJº: Distance between oil pump fitting surface of trans-
mission case and needle bearing mating surface of high
clutch drum
J=KþL
SAT378D
2. Measure dimension ªMº.
a. Place bearing race and needle bearing on oil pump assembly.
SAT379D
b. Measure dimension ªMº.
ªMº: Distance between transmission case fitting surface
and needle bearing on oil pump cover
ªM
1º: Indication of gauge
SAT443D
c. Measure thickness of straightedge ªtº.
M=M
1þt
ASSEMBLY
Adjustment (2) (Cont'd)
AT-460