Page 3931 of 4284
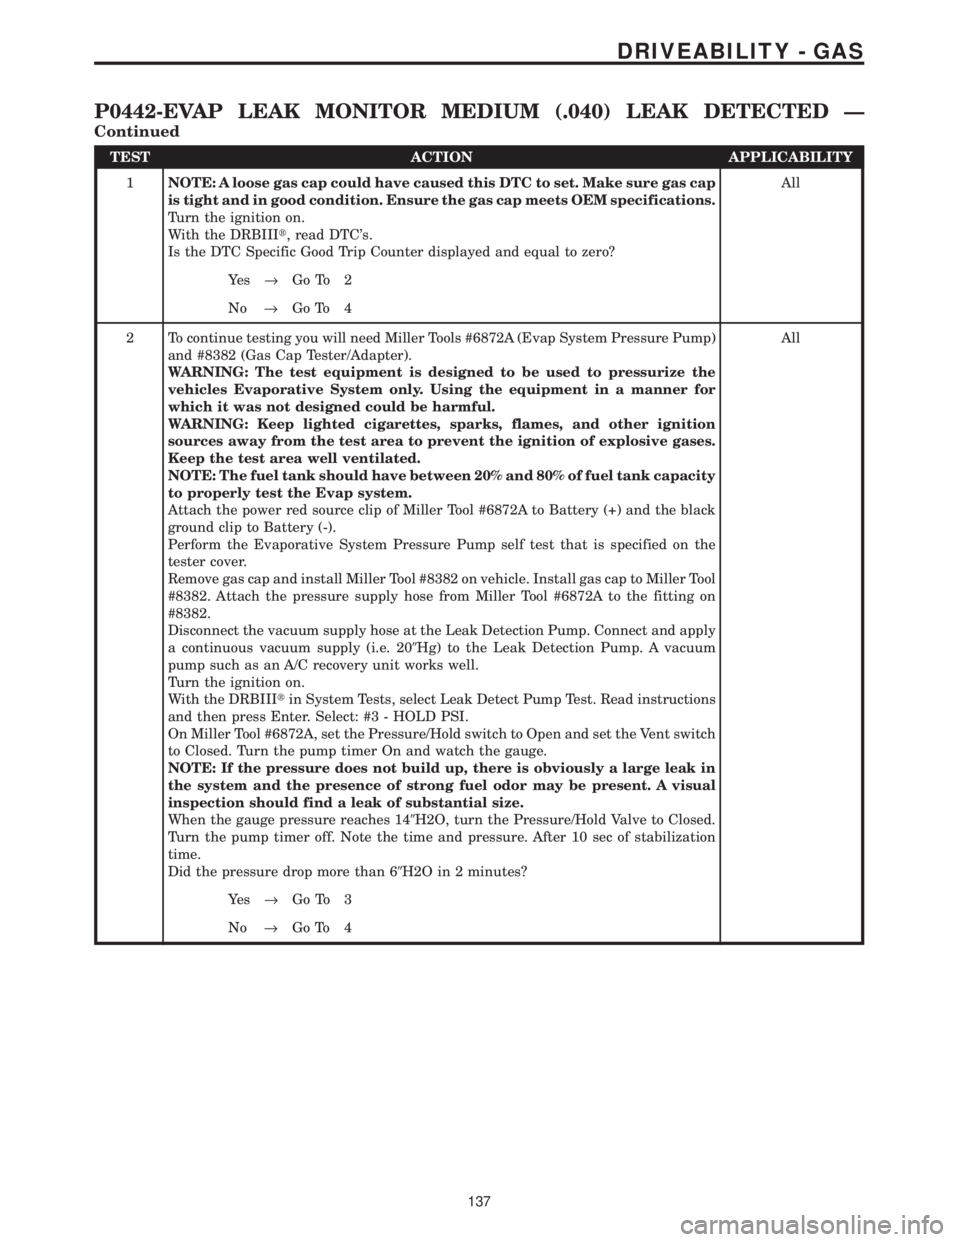
TEST ACTION APPLICABILITY
1NOTE: A loose gas cap could have caused this DTC to set. Make sure gas cap
is tight and in good condition. Ensure the gas cap meets OEM specifications.
Turn the ignition on.
With the DRBIIIt, read DTC's.
Is the DTC Specific Good Trip Counter displayed and equal to zero?All
Ye s®Go To 2
No®Go To 4
2 To continue testing you will need Miller Tools #6872A (Evap System Pressure Pump)
and #8382 (Gas Cap Tester/Adapter).
WARNING: The test equipment is designed to be used to pressurize the
vehicles Evaporative System only. Using the equipment in a manner for
which it was not designed could be harmful.
WARNING: Keep lighted cigarettes, sparks, flames, and other ignition
sources away from the test area to prevent the ignition of explosive gases.
Keep the test area well ventilated.
NOTE: The fuel tank should have between 20% and 80% of fuel tank capacity
to properly test the Evap system.
Attach the power red source clip of Miller Tool #6872A to Battery (+) and the black
ground clip to Battery (-).
Perform the Evaporative System Pressure Pump self test that is specified on the
tester cover.
Remove gas cap and install Miller Tool #8382 on vehicle. Install gas cap to Miller Tool
#8382. Attach the pressure supply hose from Miller Tool #6872A to the fitting on
#8382.
Disconnect the vacuum supply hose at the Leak Detection Pump. Connect and apply
a continuous vacuum supply (i.e. 209Hg) to the Leak Detection Pump. A vacuum
pump such as an A/C recovery unit works well.
Turn the ignition on.
With the DRBIIItin System Tests, select Leak Detect Pump Test. Read instructions
and then press Enter. Select: #3 - HOLD PSI.
On Miller Tool #6872A, set the Pressure/Hold switch to Open and set the Vent switch
to Closed. Turn the pump timer On and watch the gauge.
NOTE: If the pressure does not build up, there is obviously a large leak in
the system and the presence of strong fuel odor may be present. A visual
inspection should find a leak of substantial size.
When the gauge pressure reaches 149H2O, turn the Pressure/Hold Valve to Closed.
Turn the pump timer off. Note the time and pressure. After 10 sec of stabilization
time.
Did the pressure drop more than 69H2O in 2 minutes?All
Ye s®Go To 3
No®Go To 4
137
DRIVEABILITY - GAS
P0442-EVAP LEAK MONITOR MEDIUM (.040) LEAK DETECTED Ð
Continued
Page 3933 of 4284
Symptom:
P0443-EVAP PURGE SOLENOID CIRCUIT
When Monitored and Set Condition:
P0443-EVAP PURGE SOLENOID CIRCUIT
When Monitored: The ignition on or engine running. Battery voltage greater than 10
volts.
Set Condition: The PCM will set a trouble code if the actual state of the solenoid does not
match the intended state.
POSSIBLE CAUSES
INTERMITTENT CONDITION
EVAP PURGE SOLENOID CONTROL CIRCUIT OPEN
EVAP PURGE SOLENOID CONTROL CIRCUIT SHORTED TO GROUND
EVAP PURGE SOLENOID SENSE CIRCUIT OPEN
EVAP PURGE SOLENOID SENSE CIRCUIT SHORTED TO GROUND
EVAP PURGE SOLENOID
EVAP PURGE SOLENOID LEAKS/STUCK OPEN
EVAP PURGE SOLENOID STUCK CLOSED
POWERTRAIN CONTROL MODULE
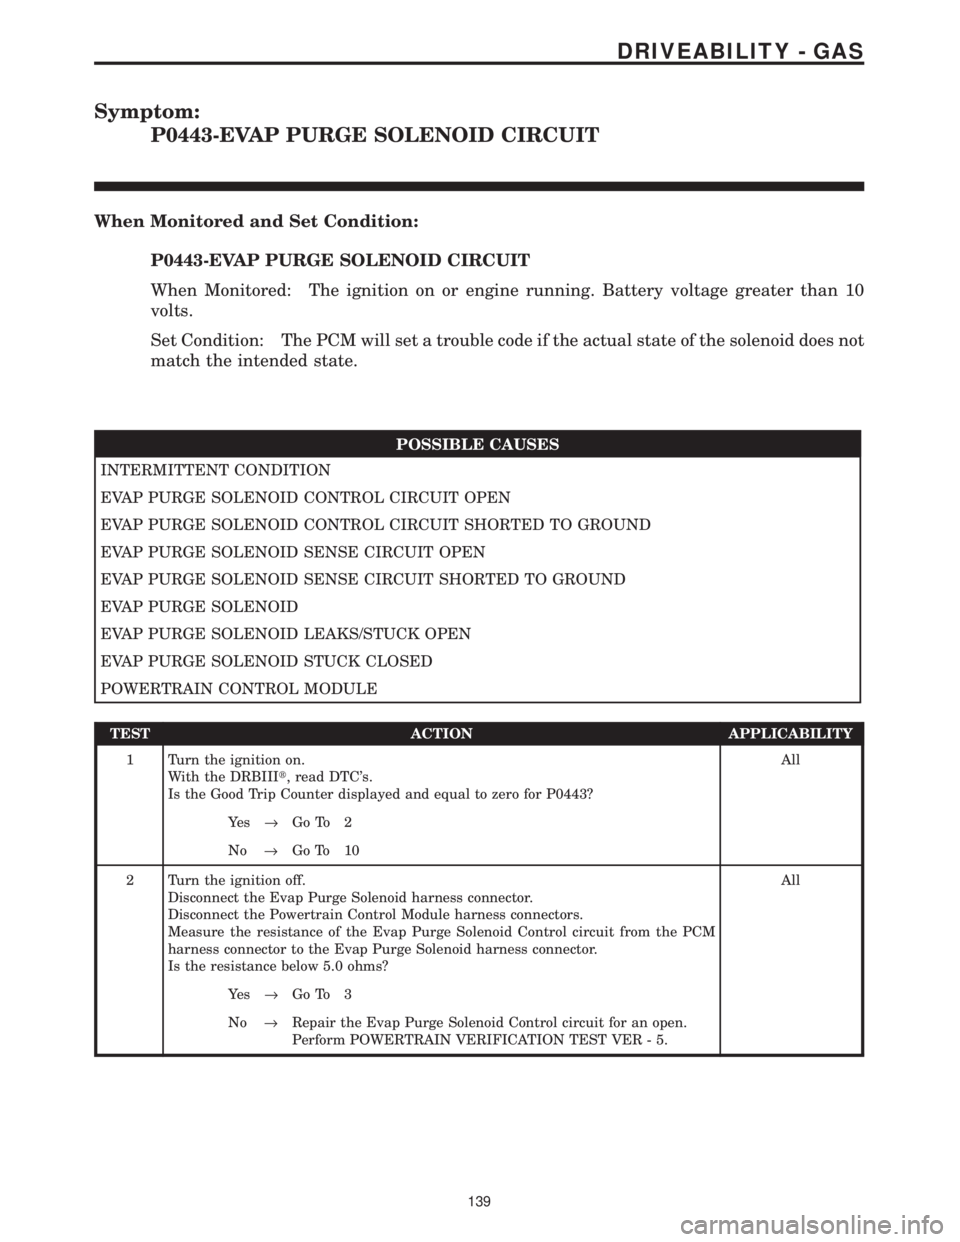
TEST ACTION APPLICABILITY
1 Turn the ignition on.
With the DRBIIIt, read DTC's.
Is the Good Trip Counter displayed and equal to zero for P0443?All
Ye s®Go To 2
No®Go To 10
2 Turn the ignition off.
Disconnect the Evap Purge Solenoid harness connector.
Disconnect the Powertrain Control Module harness connectors.
Measure the resistance of the Evap Purge Solenoid Control circuit from the PCM
harness connector to the Evap Purge Solenoid harness connector.
Is the resistance below 5.0 ohms?All
Ye s®Go To 3
No®Repair the Evap Purge Solenoid Control circuit for an open.
Perform POWERTRAIN VERIFICATION TEST VER - 5.
139
DRIVEABILITY - GAS
Page 3936 of 4284
Symptom:
P0460-FUEL LEVEL UNIT NO CHANGE OVER MILES
When Monitored and Set Condition:
P0460-FUEL LEVEL UNIT NO CHANGE OVER MILES
When Monitored: TEST #1: With the ignition on, the fuel level is compared to the
previuos key down after a 20 second delay. TEST #2: The PCM monitor the fuel level at
ignition on.
Set Condition: TEST #1: If the PCM does not see a difference in fuel level of greater than
0.1 volt the test will fail. TEST #2: If the PCM does not see a change in the fuel level of
.1765 over a set amount of miles the test will fail. See Charts and Graphs (Fuel Level
Voltage Change Over Miles Chart) for an example.
POSSIBLE CAUSES
INTERMITTENT CONDITION
VISUALLY INSPECT FUEL TANK
FUEL LEVEL SENSOR SIGNAL CIRCUIT SHORTED TO GROUND
FUEL LEVEL SENSOR SIGNAL CIRCUIT OPEN
GROUND CIRCUIT OPEN
INTERNAL INSPECTION OF THE FUEL TANK
FUEL LEVEL SENSOR
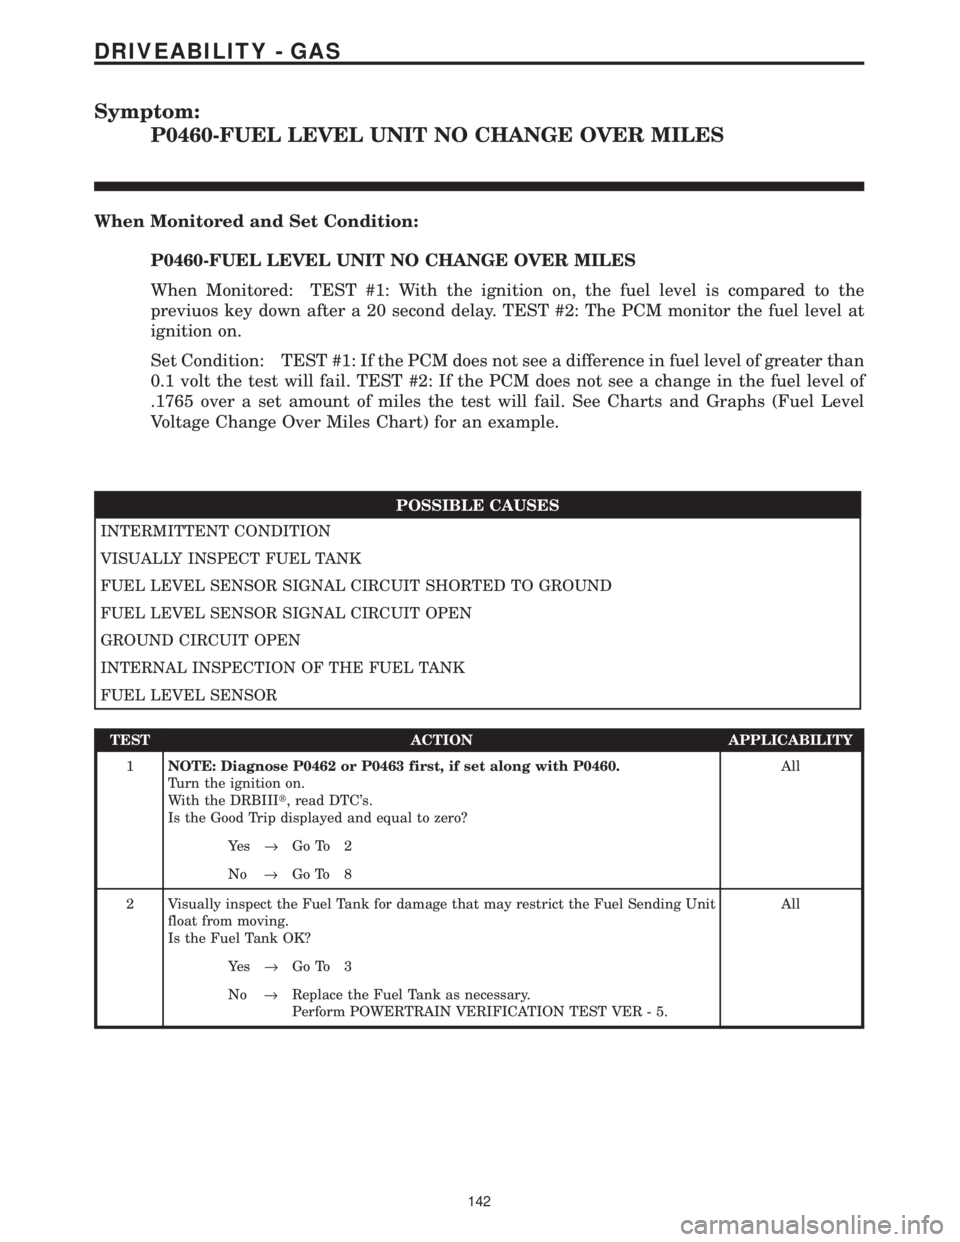
TEST ACTION APPLICABILITY
1NOTE: Diagnose P0462 or P0463 first, if set along with P0460.
Turn the ignition on.
With the DRBIIIt, read DTC's.
Is the Good Trip displayed and equal to zero?All
Ye s®Go To 2
No®Go To 8
2 Visually inspect the Fuel Tank for damage that may restrict the Fuel Sending Unit
float from moving.
Is the Fuel Tank OK?All
Ye s®Go To 3
No®Replace the Fuel Tank as necessary.
Perform POWERTRAIN VERIFICATION TEST VER - 5.
142
DRIVEABILITY - GAS
Page 3939 of 4284
Symptom List:
P0462-FUEL LEVEL SENDING UNIT VOLTS TOO LOW
P0463-FUEL LEVEL SENDING UNIT VOLTS TOO HIGH
Test Note: All symptoms listed above are diagnosed using the same tests.
The title for the tests will be P0462-FUEL LEVEL SENDING
UNIT VOLTS TOO LOW.
When Monitored and Set Condition:
P0462-FUEL LEVEL SENDING UNIT VOLTS TOO LOW
When Monitored: Ignition on and battery voltage above 10.4 volts.
Set Condition: The fuel level sensor signal voltage goes below 0.4 volts for more than 90
seconds.
P0463-FUEL LEVEL SENDING UNIT VOLTS TOO HIGH
When Monitored: Ignition on and battery voltage above 10.4 volts.
Set Condition: The fuel level sensor signal voltage at the PCM goes above 9.9 volts for
more than 90 seconds.
POSSIBLE CAUSES
GOOD TRIP EQUAL TO ZERO
INTERMITTENT CONDITION
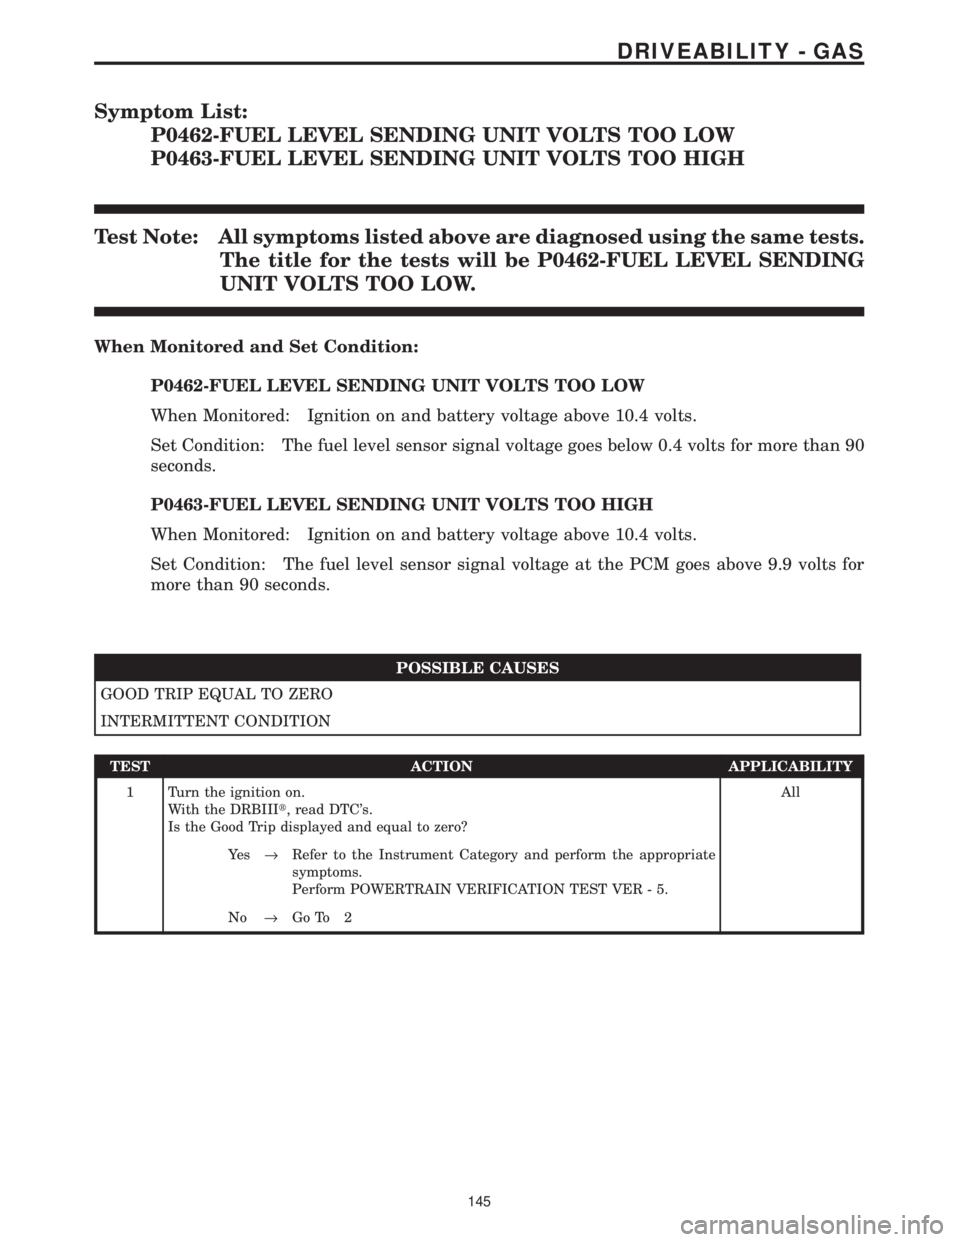
TEST ACTION APPLICABILITY
1 Turn the ignition on.
With the DRBIIIt, read DTC's.
Is the Good Trip displayed and equal to zero?All
Ye s®Refer to the Instrument Category and perform the appropriate
symptoms.
Perform POWERTRAIN VERIFICATION TEST VER - 5.
No®Go To 2
145
DRIVEABILITY - GAS
Page 3941 of 4284
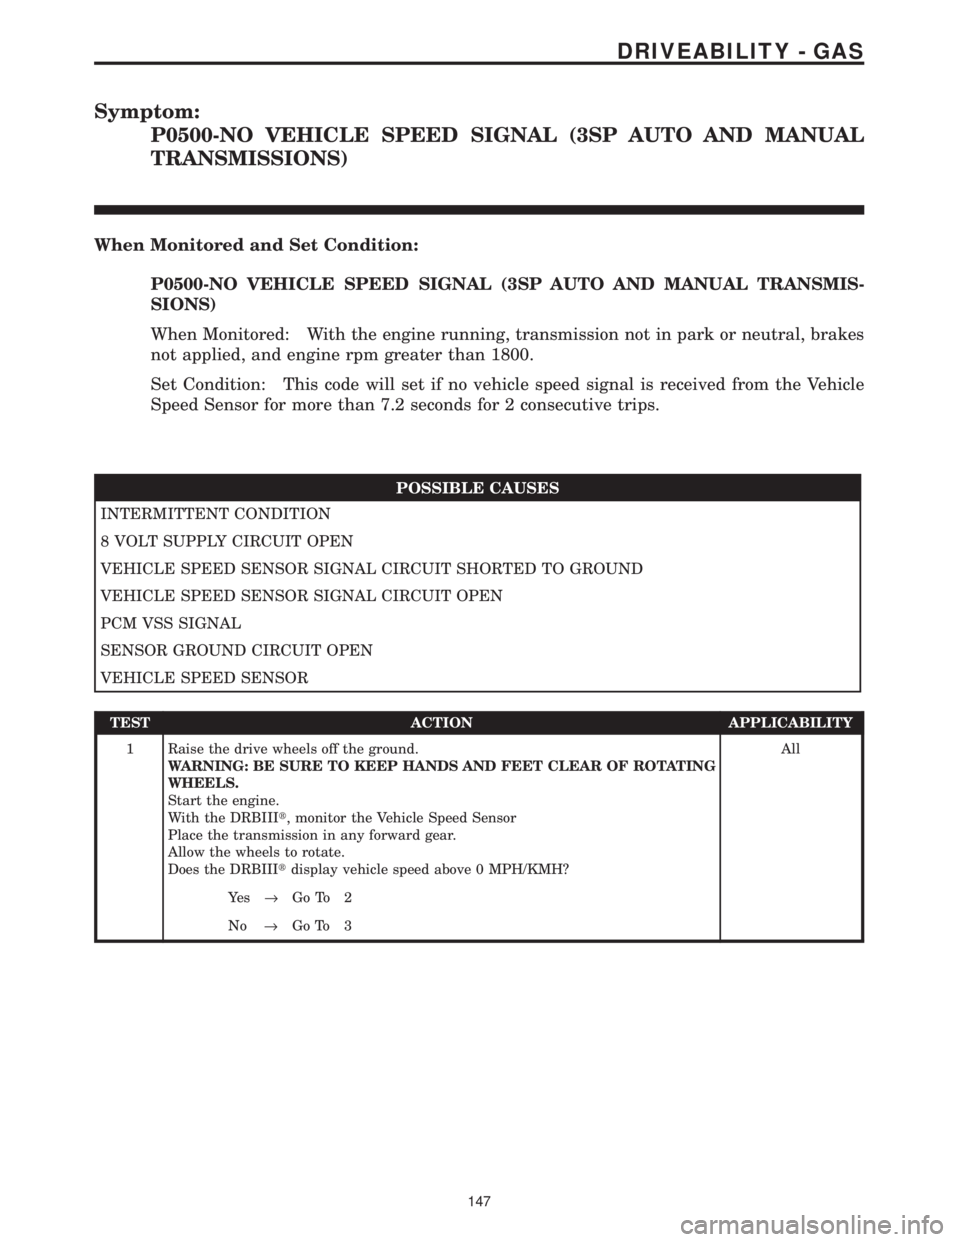
Symptom:
P0500-NO VEHICLE SPEED SIGNAL (3SP AUTO AND MANUAL
TRANSMISSIONS)
When Monitored and Set Condition:
P0500-NO VEHICLE SPEED SIGNAL (3SP AUTO AND MANUAL TRANSMIS-
SIONS)
When Monitored: With the engine running, transmission not in park or neutral, brakes
not applied, and engine rpm greater than 1800.
Set Condition: This code will set if no vehicle speed signal is received from the Vehicle
Speed Sensor for more than 7.2 seconds for 2 consecutive trips.
POSSIBLE CAUSES
INTERMITTENT CONDITION
8 VOLT SUPPLY CIRCUIT OPEN
VEHICLE SPEED SENSOR SIGNAL CIRCUIT SHORTED TO GROUND
VEHICLE SPEED SENSOR SIGNAL CIRCUIT OPEN
PCM VSS SIGNAL
SENSOR GROUND CIRCUIT OPEN
VEHICLE SPEED SENSOR
TEST ACTION APPLICABILITY
1 Raise the drive wheels off the ground.
WARNING: BE SURE TO KEEP HANDS AND FEET CLEAR OF ROTATING
WHEELS.
Start the engine.
With the DRBIIIt, monitor the Vehicle Speed Sensor
Place the transmission in any forward gear.
Allow the wheels to rotate.
Does the DRBIIItdisplay vehicle speed above 0 MPH/KMH?All
Ye s®Go To 2
No®Go To 3
147
DRIVEABILITY - GAS
Page 3944 of 4284
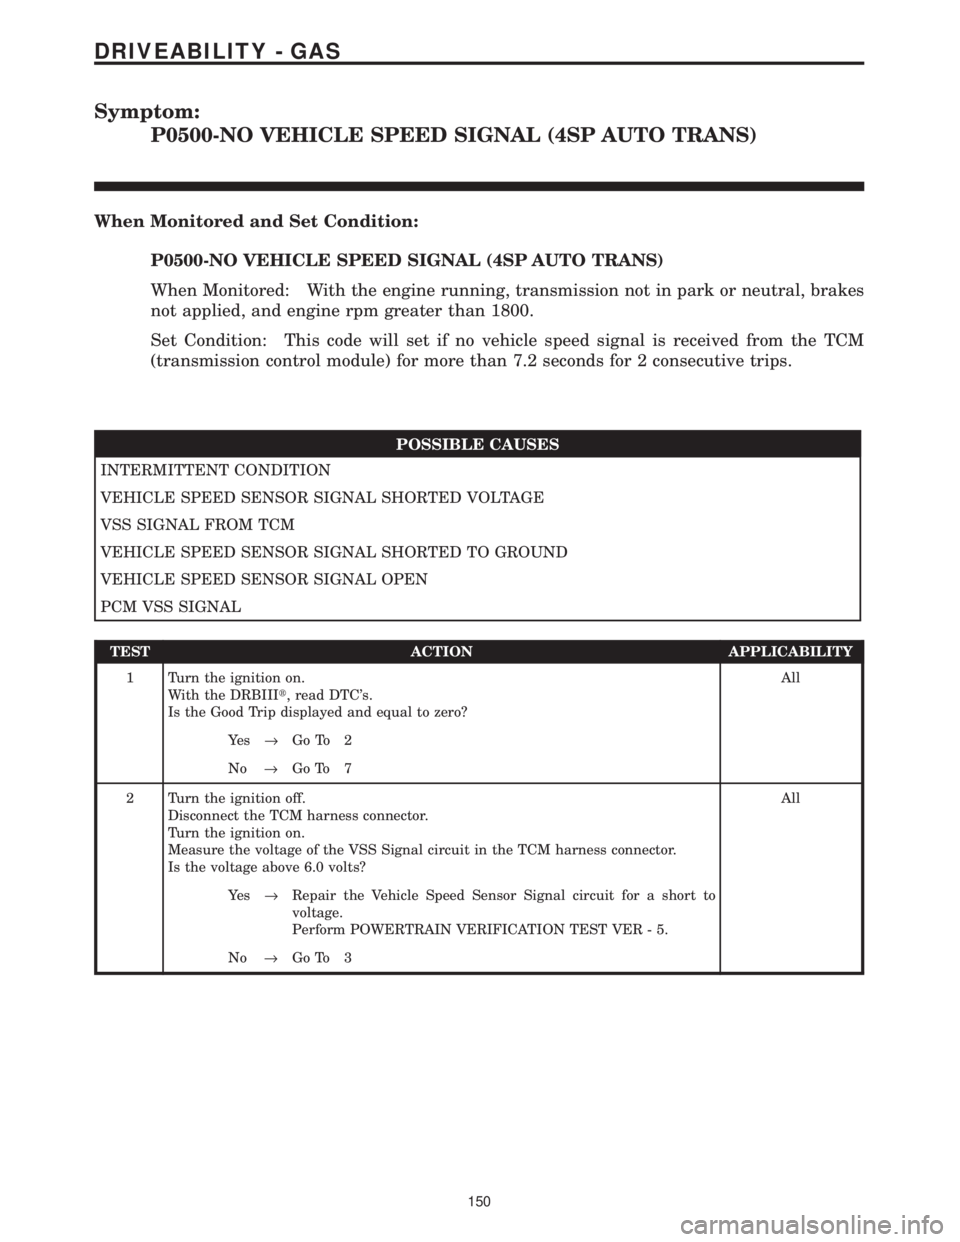
Symptom:
P0500-NO VEHICLE SPEED SIGNAL (4SP AUTO TRANS)
When Monitored and Set Condition:
P0500-NO VEHICLE SPEED SIGNAL (4SP AUTO TRANS)
When Monitored: With the engine running, transmission not in park or neutral, brakes
not applied, and engine rpm greater than 1800.
Set Condition: This code will set if no vehicle speed signal is received from the TCM
(transmission control module) for more than 7.2 seconds for 2 consecutive trips.
POSSIBLE CAUSES
INTERMITTENT CONDITION
VEHICLE SPEED SENSOR SIGNAL SHORTED VOLTAGE
VSS SIGNAL FROM TCM
VEHICLE SPEED SENSOR SIGNAL SHORTED TO GROUND
VEHICLE SPEED SENSOR SIGNAL OPEN
PCM VSS SIGNAL
TEST ACTION APPLICABILITY
1 Turn the ignition on.
With the DRBIIIt, read DTC's.
Is the Good Trip displayed and equal to zero?All
Ye s®Go To 2
No®Go To 7
2 Turn the ignition off.
Disconnect the TCM harness connector.
Turn the ignition on.
Measure the voltage of the VSS Signal circuit in the TCM harness connector.
Is the voltage above 6.0 volts?All
Ye s®Repair the Vehicle Speed Sensor Signal circuit for a short to
voltage.
Perform POWERTRAIN VERIFICATION TEST VER - 5.
No®Go To 3
150
DRIVEABILITY - GAS
Page 3945 of 4284
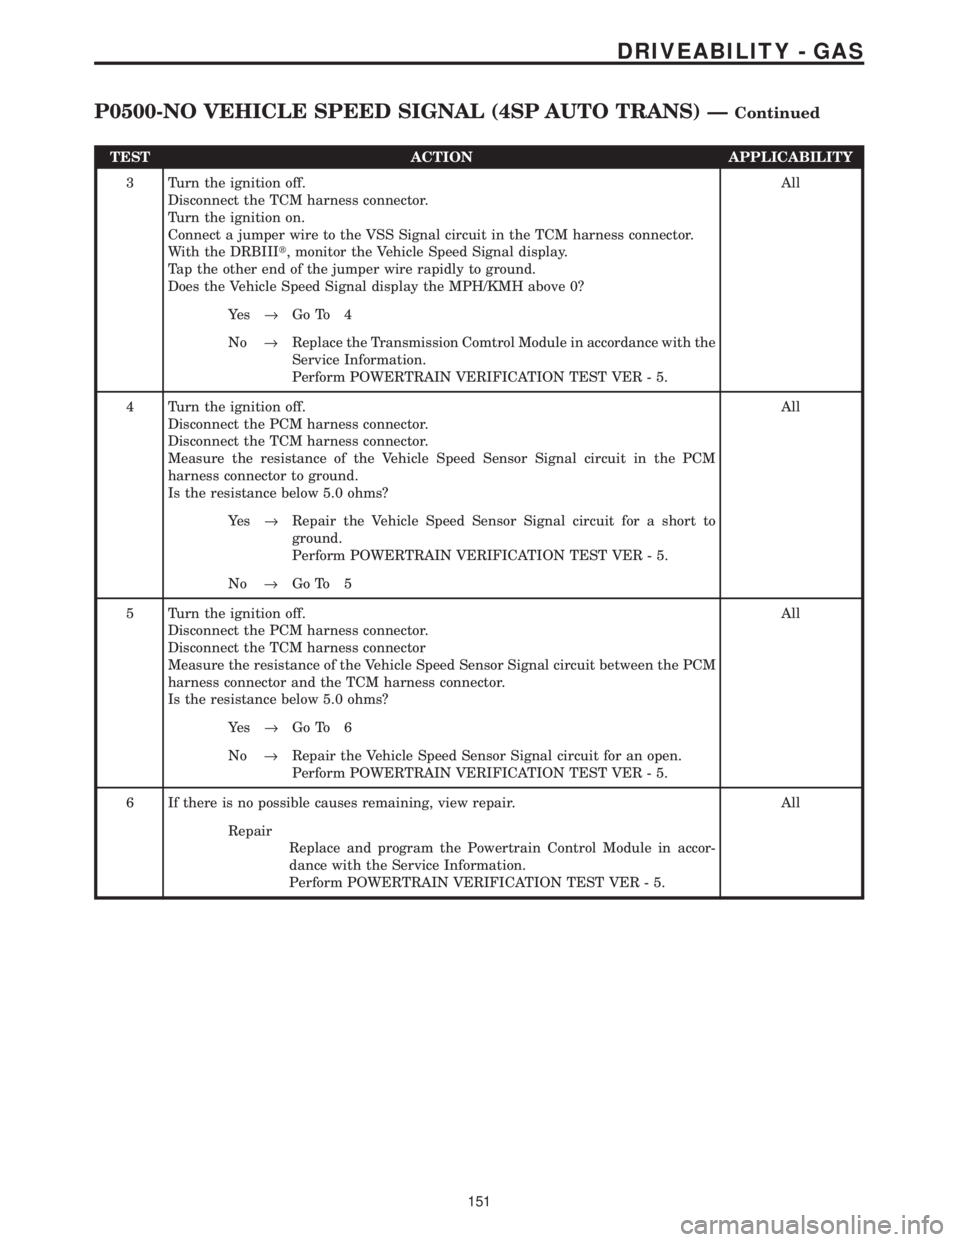
TEST ACTION APPLICABILITY
3 Turn the ignition off.
Disconnect the TCM harness connector.
Turn the ignition on.
Connect a jumper wire to the VSS Signal circuit in the TCM harness connector.
With the DRBIIIt, monitor the Vehicle Speed Signal display.
Tap the other end of the jumper wire rapidly to ground.
Does the Vehicle Speed Signal display the MPH/KMH above 0?All
Ye s®Go To 4
No®Replace the Transmission Comtrol Module in accordance with the
Service Information.
Perform POWERTRAIN VERIFICATION TEST VER - 5.
4 Turn the ignition off.
Disconnect the PCM harness connector.
Disconnect the TCM harness connector.
Measure the resistance of the Vehicle Speed Sensor Signal circuit in the PCM
harness connector to ground.
Is the resistance below 5.0 ohms?All
Ye s®Repair the Vehicle Speed Sensor Signal circuit for a short to
ground.
Perform POWERTRAIN VERIFICATION TEST VER - 5.
No®Go To 5
5 Turn the ignition off.
Disconnect the PCM harness connector.
Disconnect the TCM harness connector
Measure the resistance of the Vehicle Speed Sensor Signal circuit between the PCM
harness connector and the TCM harness connector.
Is the resistance below 5.0 ohms?All
Ye s®Go To 6
No®Repair the Vehicle Speed Sensor Signal circuit for an open.
Perform POWERTRAIN VERIFICATION TEST VER - 5.
6 If there is no possible causes remaining, view repair. All
Repair
Replace and program the Powertrain Control Module in accor-
dance with the Service Information.
Perform POWERTRAIN VERIFICATION TEST VER - 5.
151
DRIVEABILITY - GAS
P0500-NO VEHICLE SPEED SIGNAL (4SP AUTO TRANS) ÐContinued
Page 3947 of 4284
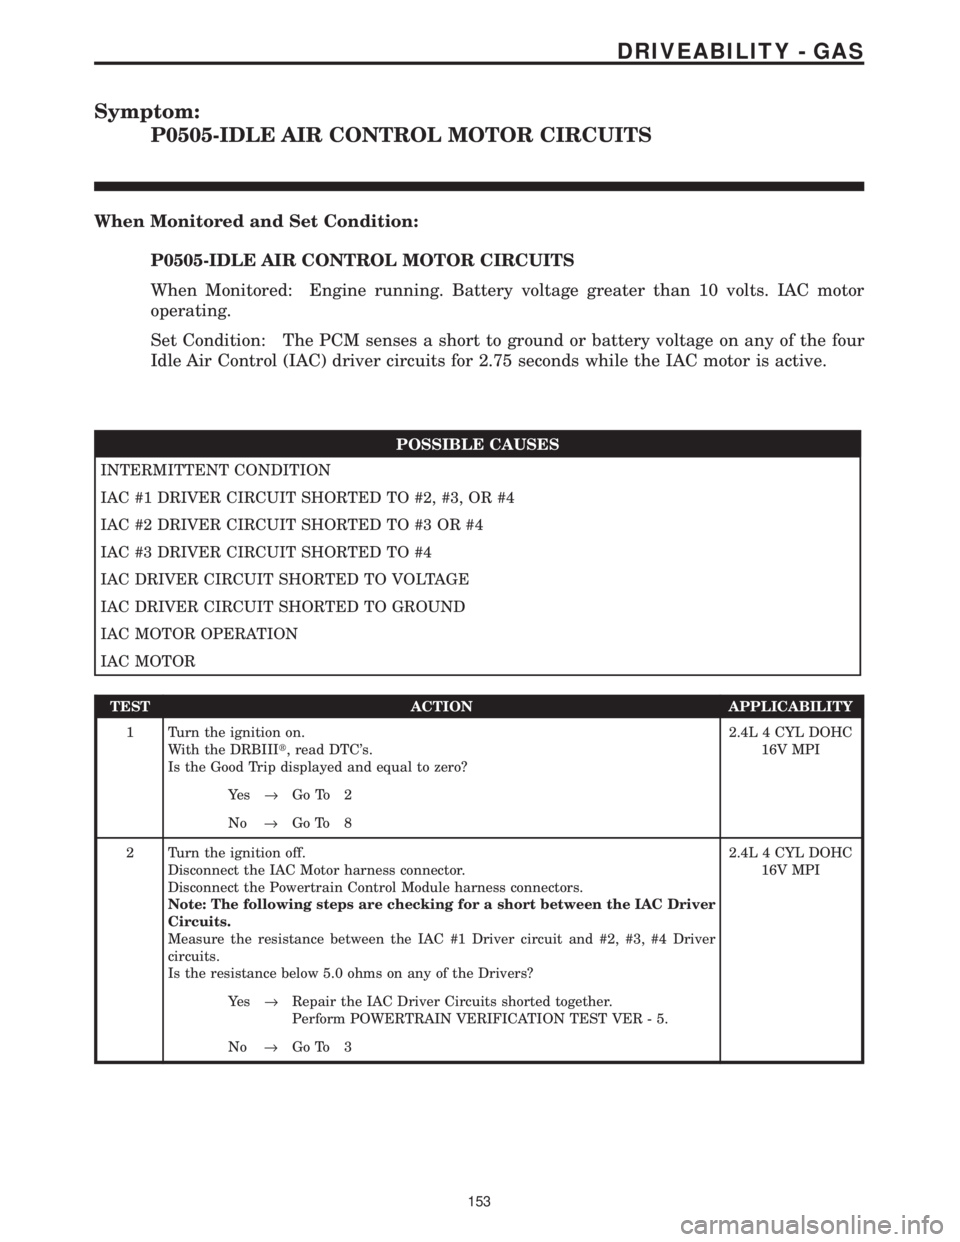
Symptom:
P0505-IDLE AIR CONTROL MOTOR CIRCUITS
When Monitored and Set Condition:
P0505-IDLE AIR CONTROL MOTOR CIRCUITS
When Monitored: Engine running. Battery voltage greater than 10 volts. IAC motor
operating.
Set Condition: The PCM senses a short to ground or battery voltage on any of the four
Idle Air Control (IAC) driver circuits for 2.75 seconds while the IAC motor is active.
POSSIBLE CAUSES
INTERMITTENT CONDITION
IAC #1 DRIVER CIRCUIT SHORTED TO #2, #3, OR #4
IAC #2 DRIVER CIRCUIT SHORTED TO #3 OR #4
IAC #3 DRIVER CIRCUIT SHORTED TO #4
IAC DRIVER CIRCUIT SHORTED TO VOLTAGE
IAC DRIVER CIRCUIT SHORTED TO GROUND
IAC MOTOR OPERATION
IAC MOTOR
TEST ACTION APPLICABILITY
1 Turn the ignition on.
With the DRBIIIt, read DTC's.
Is the Good Trip displayed and equal to zero?2.4L 4 CYL DOHC
16V MPI
Ye s®Go To 2
No®Go To 8
2 Turn the ignition off.
Disconnect the IAC Motor harness connector.
Disconnect the Powertrain Control Module harness connectors.
Note: The following steps are checking for a short between the IAC Driver
Circuits.
Measure the resistance between the IAC #1 Driver circuit and #2, #3, #4 Driver
circuits.
Is the resistance below 5.0 ohms on any of the Drivers?2.4L 4 CYL DOHC
16V MPI
Ye s®Repair the IAC Driver Circuits shorted together.
Perform POWERTRAIN VERIFICATION TEST VER - 5.
No®Go To 3
153
DRIVEABILITY - GAS