1999 TOYOTA CAMRY window
[x] Cancel search: windowPage 4260 of 4592

G
Position of Parts in Body
M 3 Moon Roof Control SW and Relay
M 4 Moon Roof Motor and Limit SW
N 2 Noise Filter (Rear Window Defogger)
P 5 Personal Light
P 6 Power Window Control SW Front RH
P 7 Power Window Control SW Rear LH
P 8 Power Window Control SW Rear RH
P 9 Power Window Master SW and Door Lock Control SW LH
P 10 Power Window Motor Front LH
P 11 Power Window Motor Front RH
P 12 Power Window Motor Rear LH
P 13 Power Window Motor Rear RH
P 24 Pretensioner LH
P 25 Pretensioner RHR 8 Rear Combination Light LH
R 9 Rear Combination Light LH
R 10 Rear Combination Light RH
R 11 Rear Combination Light RH
R 12 Rear Speaker LH
R 13 Rear Speaker RH
R 14 Rear Window Defogger
R 15 Rear Window Defogger
R 16 Remote Control Mirror LH
R 17 Remote Control Mirror RH
S 7 Side Airbag Sensor LH
S 8 Side Airbag Sensor RH
V 1 Vapor Pressure Sensor
V 7 VSV (Vapor Pressure Sensor)
V 8 Vanity Light LH
V 9 Vanity Light RH
Page 4313 of 4592

ENGINE CONTROL (5S±FE)
This system utilizes an engine control module and maintains overall control of the engine, transmission and so on. An outline
of the engine control is explained here.
1. INPUT SIGNALS
(1) Engine coolant temp. signal circuit
The engine coolant temp. sensor detects the engine coolant temp. and has a built±in thermistor with a resistance which
varies according to the engine coolant temp. thus the engine coolant temp. is input in the form of a control signal into
TERMINAL THW of the engine control module.
(2) Intake air temp. signal circuit
The intake air temp. sensor detects the intake air temp., which is input as a control signal into TERMINAL THA of the
engine control module.
(3) Oxygen sensor signal circuit
The oxygen density in the exhaust gases is detected and input as a control signal into TERMINAL OX1 (except
California) and OX2 of the engine control module.
(4) RPM signal circuit
Camshaft position and crankshaft position are detected by the camshaft position sensor and crankshaft position sensor.
Camshaft position is input as a control signal to TERMINAL G+ of the engine control module, and engine RPM is input
into TERMINAL NE+.
(5) Throttle signal circuit
The throttle position sensor detects the throttle valve opening angle, which is input as a control signal into TERMINAL
VTA of the engine control module.
(6) Vehicle speed signal circuit
The vehicle speed sensor, installed inside the transmission, detects the vehicle speed and inputs a control signal into
TERMINAL SPD of the engine control module.
(7) Park/Neutral position SW signal circuit (A/T)
The Park/Neutral position SW detects whether the shift position are in neutral, parking or not, and inputs a control signal
into TERMINAL STA of the engine control module.
(8) A/C SW signal circuit
The A/C amplifier function is built in the engine control module. The A/C SW signal inputs into the TERMINAL A/C SW of
the engine control module.
(9) Battery signal circuit
Voltage is constantly applied to TERMINAL BATT of the engine control module. When the ignition SW is turned on, the
voltage for engine control module start±up power supply is applied to TERMINAL +B of engine control module via EFI
relay.
(10) Intake air volume signal circuit
Intake air volume is detected by the manifold absolute pressure sensor (for manifold pressure) and is input as a control
signal into TERMINAL PIN of the engine control module.
(11) Starter signal circuit
To confirm whether the engine is cranking, the voltage applied to the starter motor during cranking is detected and the
signal is input into TERMINAL NSW of the engine control module as a control signal.
(12) Engine knock signal circuit
Engine knocking is detected by knock sensor 1 and the signal is input into TERMINAL KNK as a control signal.
(13) Electrical load signal circuit
The signal when systems such as the rear window defogger, headlights, etc. Which cause a high electrical burden are
on is input to TERMINAL ELS as a control signal.
(14) Air fuel ratio signal circuit (California)
The air fuel ratio is detected and input as a control signal into TERMINAL AF+ of the engine control module.
SYSTEM OUTLINE
Page 4351 of 4592
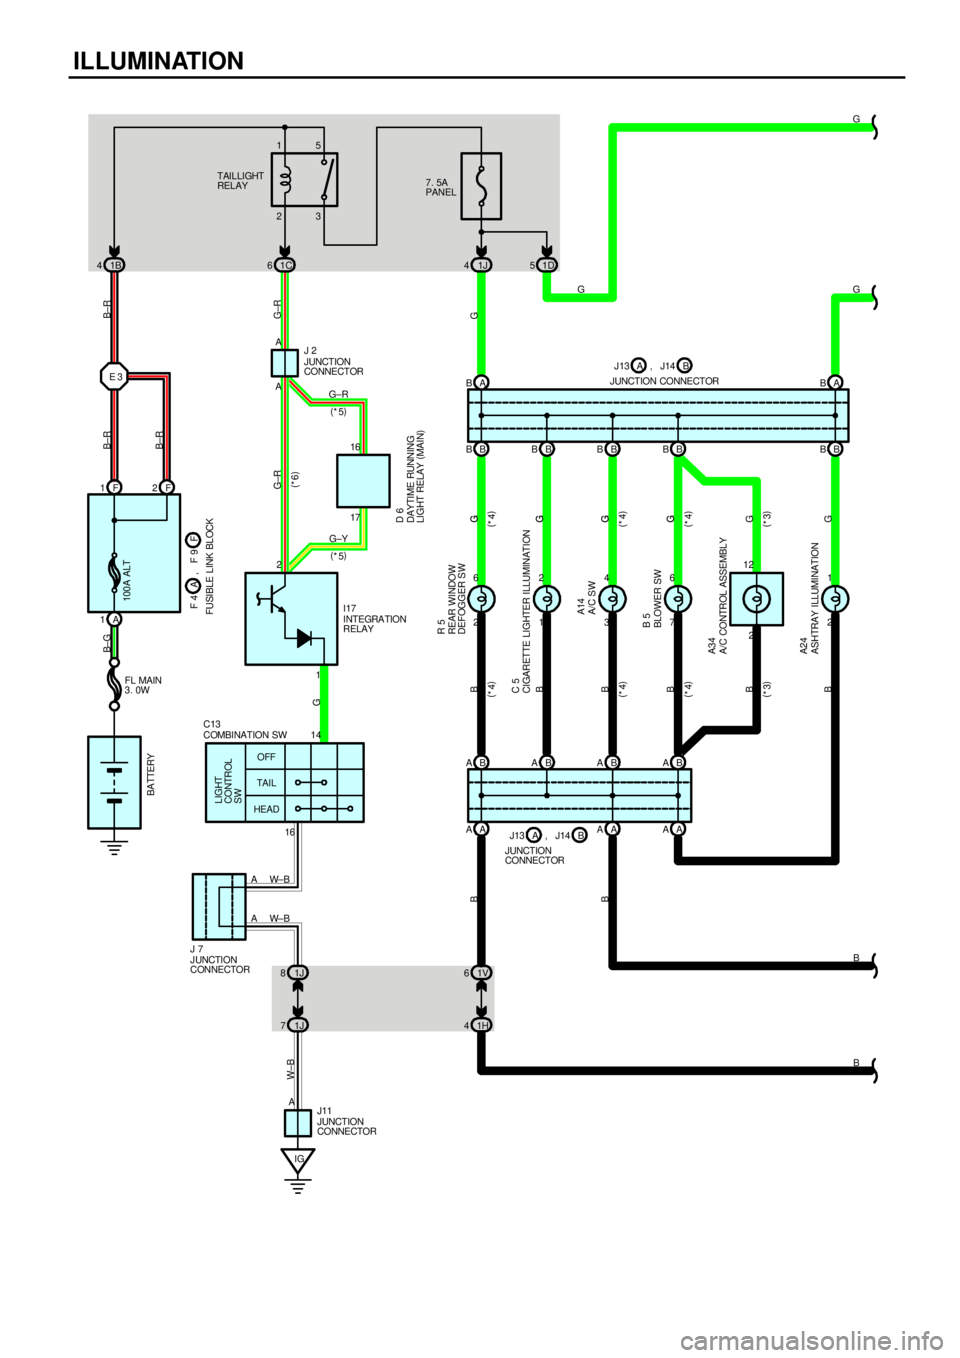
ILLUMINATION
1B 41C61J4
IG1H 41V 61 2
3 4
7 6
2 1
1614 2G
B
G±R B± G
G
B
B
B B
TAILLIGHT
RELAY7. 5A
PANEL
INTEGRATION
RELAY
FL MAIN
3. 0W
BA TTERY
OFF
TAI L
HEAD
LIGHT
CONTROL
SW
G
I17 3 2 15
F 1
A 1100A ALT
2 6A BA B
B BB B B B B B B B
B ABABABA
A AAA A A
1J 8
1J 7 A
A E 3
F 2A
1 A
B±R B±R
B±R
G±R
COMBINATION SW C13
A
W±B
W± B W± B
J UNCTION
CONNECTOR J 7
JUNCTION
CONNECTOR J11
B
B BG
G G
G G
G G
G G
JUNCTION
CONNECTOR J 2
B
ASHTRAY ILLUMINATION A24BLOWER SW B 5A/C SW A14 CIGARETTE LIGHTER ILLUMINATION C 5REAR WINDOW
DEFOGGER S W R 5
G 1D 5
G
J13
JUNCTION CONNECTORB A, J14
J13
JUNCTION
CONNECTORB A, J14 17 16 G±R
(
*5)
G±Y
(
*5)
(
*6)
DAYTIME RUNNING
LIGHT RELAY (
MAIN) D 6
(
*4) (
*4)
(
*4)
(
*4)(
*4) (
*4) F 4
FUSIBLE LINK BLOCKF A, F 9
2 12A/C CONTROL ASSEMBLY A34
G
(
*3) B
(
*3)
Page 4366 of 4592
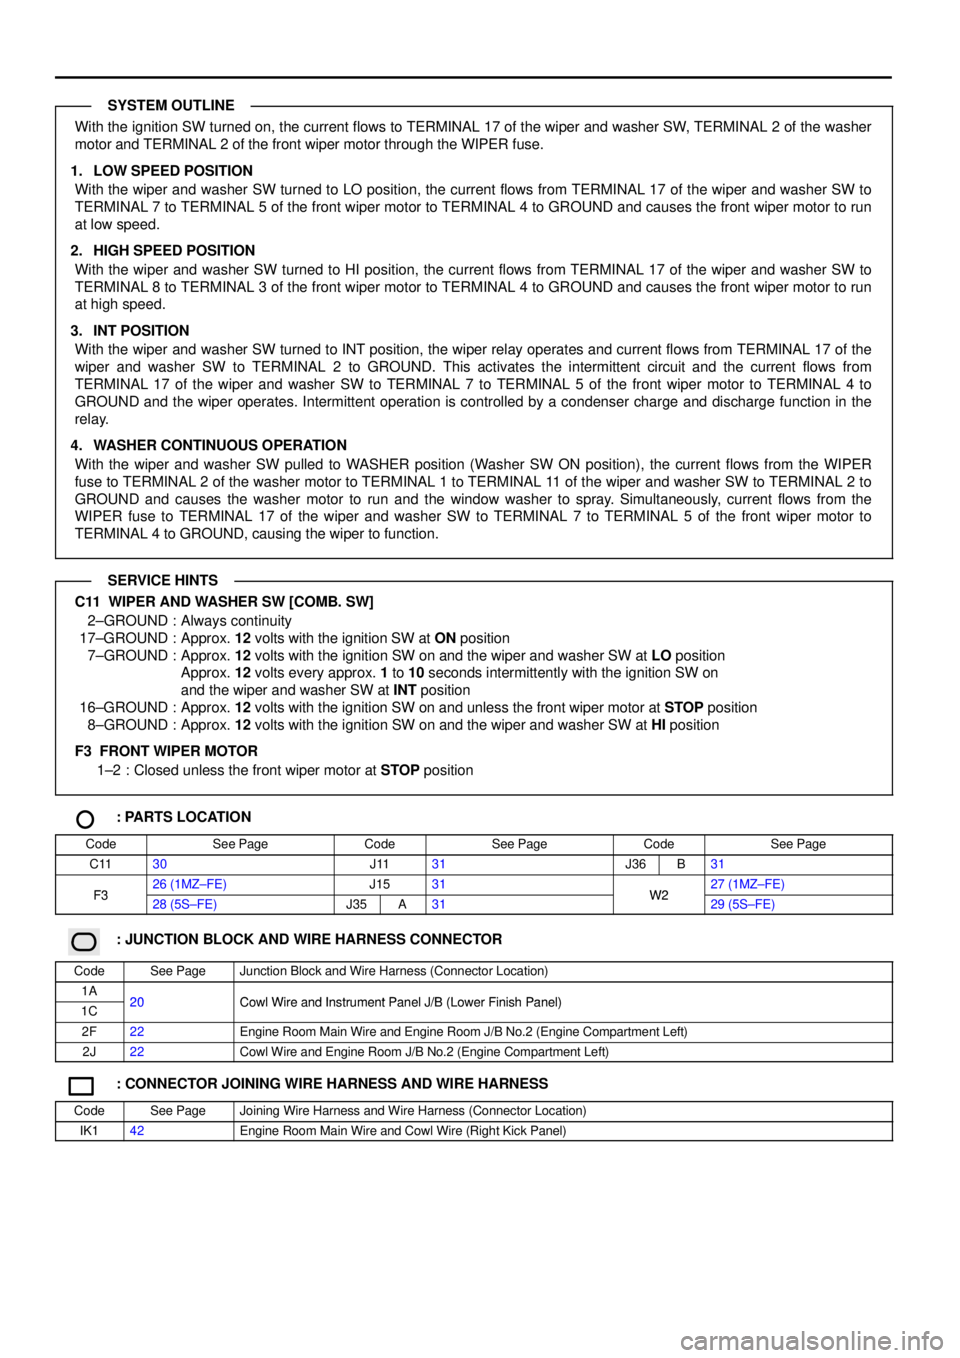
With the ignition SW turned on, the current flows to TERMINAL 17 of the wiper and washer SW, TERMINAL 2 of the washer
motor and TERMINAL 2 of the front wiper motor through the WIPER fuse.
1. LOW SPEED POSITION
With the wiper and washer SW turned to LO position, the current flows from TERMINAL 17 of the wiper and washer SW to
TERMINAL 7 to TERMINAL 5 of the front wiper motor to TERMINAL 4 to GROUND and causes the front wiper motor to run
at low speed.
2. HIGH SPEED POSITION
With the wiper and washer SW turned to HI position, the current flows from TERMINAL 17 of the wiper and washer SW to
TERMINAL 8 to TERMINAL 3 of the front wiper motor to TERMINAL 4 to GROUND and causes the front wiper motor to run
at high speed.
3. INT POSITION
With the wiper and washer SW turned to INT position, the wiper relay operates and current flows from TERMINAL 17 of the
wiper and washer SW to TERMINAL 2 to GROUND. This activates the intermittent circuit and the current flows from
TERMINAL 17 of the wiper and washer SW to TERMINAL 7 to TERMINAL 5 of the front wiper motor to TERMINAL 4 to
GROUND and the wiper operates. Intermittent operation is controlled by a condenser charge and discharge function in the
relay.
4. WASHER CONTINUOUS OPERATION
With the wiper and washer SW pulled to WASHER position (Washer SW ON position), the current flows from the WIPER
fuse to TERMINAL 2 of the washer motor to TERMINAL 1 to TERMINAL 11 of the wiper and washer SW to TERMINAL 2 to
GROUND and causes the washer motor to run and the window washer to spray. Simultaneously, current flows from the
WIPER fuse to TERMINAL 17 of the wiper and washer SW to TERMINAL 7 to TERMINAL 5 of the front wiper motor to
TERMINAL 4 to GROUND, causing the wiper to function.
C11 WIPER AND WASHER SW [COMB. SW]
2±GROUND : Always continuity
17±GROUND : Approx. 12 volts with the ignition SW at ON position
7±GROUND : Approx. 12 volts with the ignition SW on and the wiper and washer SW at LO position
Approx. 12 volts every approx. 1 to 10 seconds intermittently with the ignition SW on
and the wiper and washer SW at INT position
16±GROUND : Approx. 12 volts with the ignition SW on and unless the front wiper motor at STOP position
8±GROUND : Approx. 12 volts with the ignition SW on and the wiper and washer SW at HI position
F3 FRONT WIPER MOTOR
1±2 : Closed unless the front wiper motor at STOP position
: PARTS LOCATION
CodeSee PageCodeSee PageCodeSee Page
C1130J1131J36B31
F326 (1MZ±FE)J1531W227 (1MZ±FE)F328 (5S±FE)J35A31W229 (5S±FE)
: JUNCTION BLOCK AND WIRE HARNESS CONNECTOR
CodeSee PageJunction Block and Wire Harness (Connector Location)
1A20Cowl Wire and Instrument Panel J/B (Lower Finish Panel)1C20Cowl Wire and Instrument Panel J/B (Lower Finish Panel)
2F22Engine Room Main Wire and Engine Room J/B No.2 (Engine Compartment Left)
2J22Cowl Wire and Engine Room J/B No.2 (Engine Compartment Left)
: CONNECTOR JOINING WIRE HARNESS AND WIRE HARNESS
CodeSee PageJoining Wire Harness and Wire Harness (Connector Location)
IK142Engine Room Main Wire and Cowl Wire (Right Kick Panel)
SYSTEM OUTLINE
SERVICE HINTS
Page 4369 of 4592
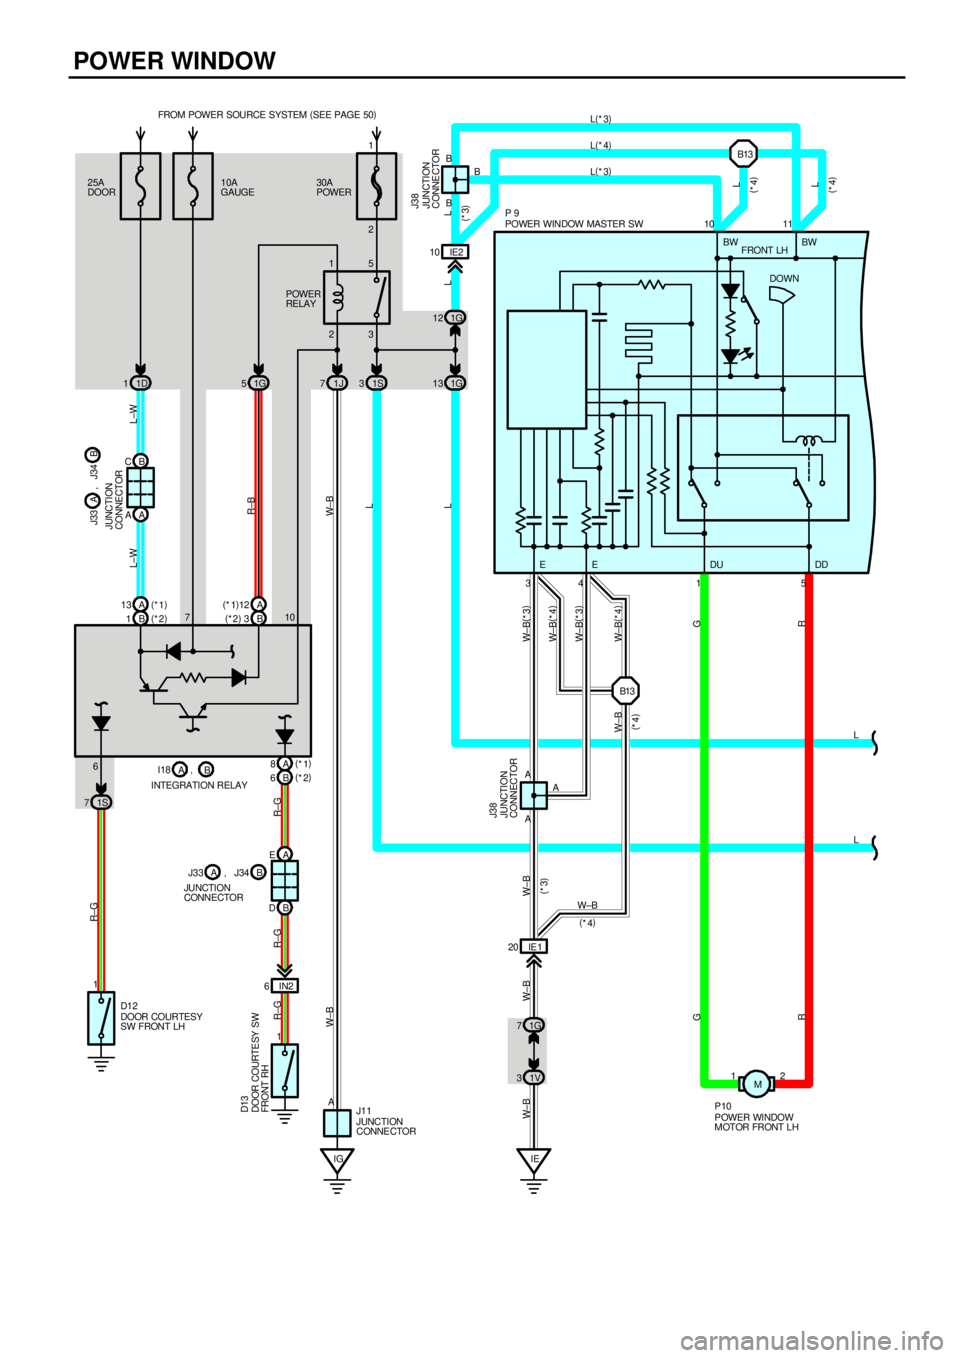
POWER WINDOW
25A
DOORFROM POWER SOURCE SYSTEM (
SEE PAGE 50)
1D 130A
POWER
23 15
1S 3 1J 7 1G 51G13IE2 10
B C
A A
B 1B(
*2)
3
IG A 10B B
B
11S 7INTEGRATION RELAY
IE 1 20
IE 1V 31G 7A
A3410 11
A
12 L(
*3) L(
*3)
L
L
L±W L±W
L L W± BR±B R±G
W± B(
*3)
W± B(
*3)
G
R R GW±B W±B W± BW± B
15 EE DDDUBW BW
DOOR COURTESY
SW FRONT LH D12
JUNCTION
CONNE CTOR J11POWER WINDOW MASTER SW P 9
JUNCTION
CONNECTOR J38JUNCTION
CONNECTOR
P OWER WINDOW
MOTOR FRONT LH P10 POWER
RELAY
L L
6
JUNCTION
CONNE CTOR J38
10A
GAUGE
A 8
B DA E
IN2 6
1 71
R±G R±G R±G DOOR COURTE SY SW
FRONT RH D13
2
JUNCTION
CONNECTOR A 13(
*1)
A (
*1)
12
B 6(
*2) (
*2)
(
*1)
B , 1G 12DOWN FRONT LH
B J33 A , J34
B J33 A , J34 I18
AB13
(
*3)
L(
*4)
L
(
*4)
L
(
*4)
B13
W± B(
*4) W± B(
*4)
W±B
(
*4)
W±B
(
*4)(
*3)
M
Page 4370 of 4592
IE2 11 IE25IE27IE29IE26IE212
DOWNUP
52
31
21
G
R
P11
POWER WINDOW MOTOR
FRONT RH4
SU SD B
UD
DOWNUP
24
15
21
G
R
P12
POWER WINDOW MOTOR
REAR LH3
SU SD B
UD
DOWNUP
24
15
21
G
R
P13
POWER WINDOW MOTOR
REAR RH3
SU SD B
UD IM2 4IM25IM26BO12BO13BO11 BP12 BP13 BP11 IF1 1IF15IN25IN27IN29 14 6 9 12 8 13
A AA PU PD RLU RLD RRU RRD
G± W
R±L
G±Y
R±Y
G±B
R±B G±B
R±B R±Y G±YR±L G± W G± W
R±L
G±B
R±BL
L
G±B
R±B
LLR±B
G± BR±Y G± YL R±L G±W
L
LJUNCTION
CONNECTOR J 4
POWER WINDOW CONTROL
SW FRONT RH P 6
POWER WINDOW CONTROL
SW REAR LH P 7
POWER WINDOW CONTROL
SW REAR RH P 8
POWER WINDOW MASTER SW P 9
L
L NORMALLOCKFRONT RH REAR LH REAR RH* 1 : W/O THEFT DETERRENT SYSTEM
* 2 : W/ THEFT DETERRENT SYSTEM
WINDOW LOCK SW* 3 : TMC MADE
* 4 : TMMK MADE
M M M
Page 4371 of 4592

POWER WINDOW
With the ignition SW turned on, current flows through the GAUGE fuse to TERMINAL 7 of the integration relay to TERMINAL
(A) 12 (w/o theft deterrent system), (B) 3 (w/ theft deterrent system) to TERMINAL 1 of the power relay to TERMINAL 2 to
GROUND, this activates the relay and the current flowing to TERMINAL 5 of the relay from the POWER fuse flows to
TERMINAL 3 of the relay to TERMINALS 10 and 11 of the power window master SW.
1. MANUAL OPERATION (DRIVER'S WINDOW)
With the ignition SW turned on and with the power window master SW (Driver's) in UP position, the current flowing from
TERMINALS 10 and 11 of the power window master SW flows to TERMINAL 1 of the master SW to TERMINAL 1 of the
power window motor to TERMINAL 2 to TERMINAL 5 of the master SW to TERMINALS 3 and 4 to GROUND and causes
the power window motor to rotate in the up direction. The window ascends only while the SW is being pushed.
In down operation, the flow of current from TERMINALS 10 and 11 of the power window master SW to TERMINAL 5 of the
master SW causes the flow of current from TERMINAL 2 of the power window motor to TERMINAL 1 to TERMINAL 1 of the
master SW to TERMINALS 3 and 4 to GROUND, flowing in the opposite detection to manual up operation and causing the
motor to rotate in reverse, lowering the window.
2. AUTO DOWN OPERATION (DRIVER'S WINDOW)
When the driver's window SW is pushed strongly to the down side, the current flowing to TERMINALS 10 and 11 of the
power window master SW flows to the down contact point and auto down contact point of the driver's SW.
This activates the relay (Down side) inside the power window master SW and the hold circuit also turns on at the same time,
so the relay (Down side) remains activated even when the SW is released.
Current flows at this time from TERMINALS 10 and 11 of the power window master SW to TERMINAL 5 to TERMINAL 2 of
the power window motor to TERMINAL 1 to TERMINAL 1 of the power window master SW to TERMINALS 3 and 4 to
GROUND, so the motor continues to operate until the driver's window is fully down.
When the driver's window finishes down operation and the hold circuit goes off, so the relay (Down side) also turns off. This
stops the current flowing from TERMINALS 10 and 11 of the power window master SW to TERMINAL 5 is cut off, so the
power window motor stops and auto down operation stops.
When the driver's SW is pulled to the up side during auto down operation, the hold circuit is turned off so the current flowing
from TERMINALS 10 and 11 of the power window master SW to TERMINAL 5 is cut off and the power window motor stops.
If the SW remains pulled up the relay (Up side) is activated, so current flows from TERMINALS 10 and 11 of the power
window master SW to TERMINAL 1 to TERMINAL 1 of the power window motor to TERMINAL 2 to TERMINAL 5 to
TERMINALS 3 and 4 to GROUND, the power window motor rotates in the up direction and manual up operation occurs
while the SW is pulled up.
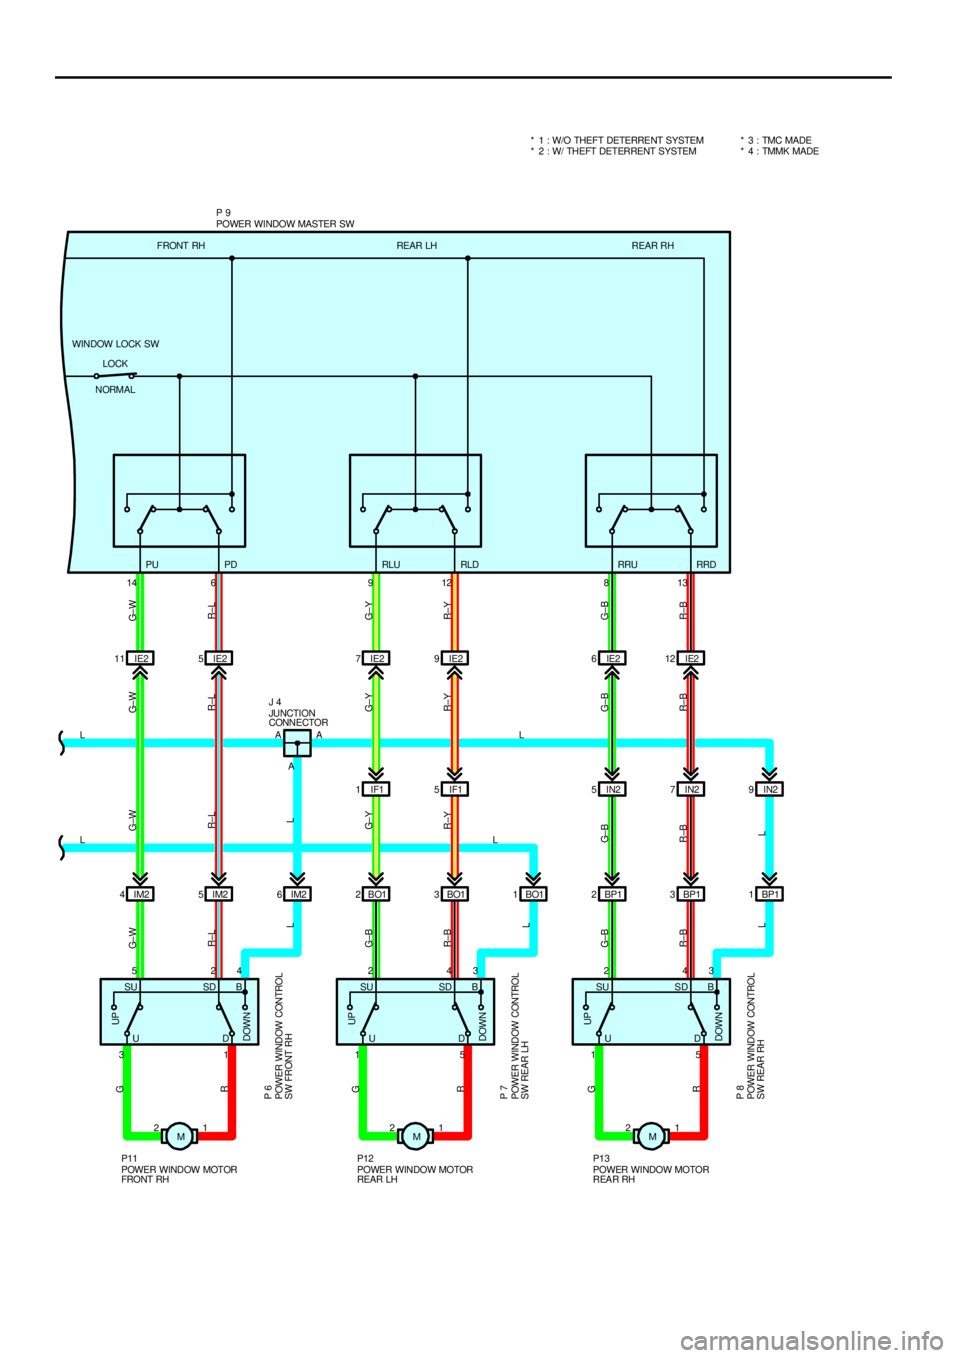
3. MANUAL OPERATION (FRONT RH WINDOW)
With the power window control SW front RH pulled to the up side, the current flowing from TERMINAL 4 of the power window
control SW flows to TERMINAL 3 of the power window control SW to TERMINAL 2 of the power window motor to TERMINAL
1 to TERMINAL 1 of the power window control SW to TERMINAL 2 to TERMINAL 6 of the master SW to TERMINALS 3 and
4 to GROUND and causes the power window motor front RH to rotate in the up direction. The up operation continues only
while the power window control SW is pulled to the up side. When the window descends, the current flowing to the motor
flows in the opposite direction, from TERMINAL 1 to TERMINAL 2, and the motor rotates in reverse. When the window lock
SW is pushed to the lock side, the ground circuit to the front RH window becomes open.
As a result, even if Open/Close operation of the front RH window is tried, the current from TERMINALS 3 and 4 of the power
window master SW is not grounded and the motor does not rotate, so the front RH window can not be operated and window
lock occurs.
4. MANUAL OPERATION (REAR LH, RH WINDOW)
With the power window control SW rear LH, RH pulled to the up side, the current flowing from TERMINAL 3 of the power
window control SW flows to TERMINAL 1 of the power control SW to TERMINAL 2 of the power window motor to TERMINAL
1 to TERMINAL 5 of the power window control SW to TERMINAL 4 to TERMINAL 12 or 13 of the master SW to TERMINALS
3 and 4 to GROUND and causes the power window motor rear LH, RH to rotate in the up direction. The up operation
continues only while the power window control SW is pulled to the up side. When the window descends, the current flowing
to the motor flows in the opposite direction, from TERMINAL 1 to TERMINAL 2, and the motor rotates in reverse. When the
window lock SW is pushed to the lock side, the ground circuit to the rear LH, RH window becomes open.
As a result, even if Open/Close operation of the rear LH, RH window is tried, the current from TERMINALS 3 and 4 of the
power window master SW is not grounded and the motor does not rotate, so the rear LH, RH window can not be operated
and window lock occurs.
SYSTEM OUTLINE
Page 4372 of 4592
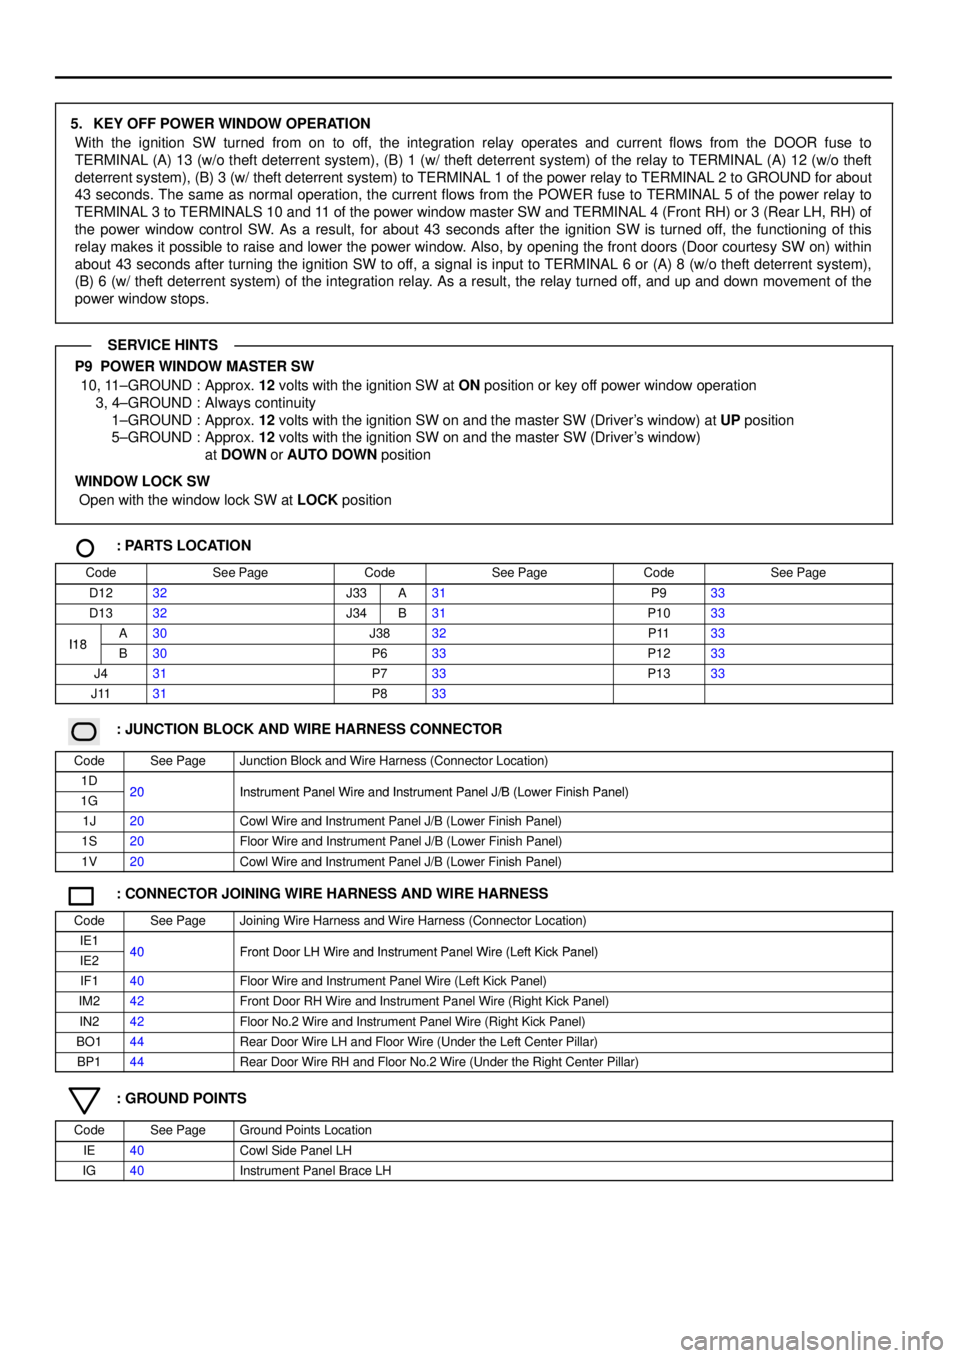
5. KEY OFF POWER WINDOW OPERATION
With the ignition SW turned from on to off, the integration relay operates and current flows from the DOOR fuse to
TERMINAL (A) 13 (w/o theft deterrent system), (B) 1 (w/ theft deterrent system) of the relay to TERMINAL (A) 12 (w/o theft
deterrent system), (B) 3 (w/ theft deterrent system) to TERMINAL 1 of the power relay to TERMINAL 2 to GROUND for about
43 seconds. The same as normal operation, the current flows from the POWER fuse to TERMINAL 5 of the power relay to
TERMINAL 3 to TERMINALS 10 and 11 of the power window master SW and TERMINAL 4 (Front RH) or 3 (Rear LH, RH) of
the power window control SW. As a result, for about 43 seconds after the ignition SW is turned off, the functioning of this
relay makes it possible to raise and lower the power window. Also, by opening the front doors (Door courtesy SW on) within
about 43 seconds after turning the ignition SW to off, a signal is input to TERMINAL 6 or (A) 8 (w/o theft deterrent system),
(B) 6 (w/ theft deterrent system) of the integration relay. As a result, the relay turned off, and up and down movement of the
power window stops.
P9 POWER WINDOW MASTER SW
10, 11±GROUND : Approx. 12 volts with the ignition SW at ON position or key off power window operation
3, 4±GROUND : Always continuity
1±GROUND : Approx. 12 volts with the ignition SW on and the master SW (Driver's window) at UP position
5±GROUND : Approx. 12 volts with the ignition SW on and the master SW (Driver's window)
at DOWN or AUTO DOWN position
WINDOW LOCK SW
Open with the window lock SW at LOCK position
: PARTS LOCATION
CodeSee PageCodeSee PageCodeSee Page
D1232J33A31P933
D1332J34B31P1033
I18A30J3832P1133I18B30P633P1233
J431P733P1333
J1131P833
: JUNCTION BLOCK AND WIRE HARNESS CONNECTOR
CodeSee PageJunction Block and Wire Harness (Connector Location)
1D20Instrument Panel Wire and Instrument Panel J/B (Lower Finish Panel)1G20Instrument Panel Wire and Instrument Panel J/B (Lower Finish Panel)
1J20Cowl Wire and Instrument Panel J/B (Lower Finish Panel)
1S20Floor Wire and Instrument Panel J/B (Lower Finish Panel)
1V20Cowl Wire and Instrument Panel J/B (Lower Finish Panel)
: CONNECTOR JOINING WIRE HARNESS AND WIRE HARNESS
CodeSee PageJoining Wire Harness and Wire Harness (Connector Location)
IE140Front Door LH Wire and Instrument Panel Wire (Left Kick Panel)IE240Front Door LH Wire and Instrument Panel Wire (Left Kick Panel)
IF140Floor Wire and Instrument Panel Wire (Left Kick Panel)
IM242Front Door RH Wire and Instrument Panel Wire (Right Kick Panel)
IN242Floor No.2 Wire and Instrument Panel Wire (Right Kick Panel)
BO144Rear Door Wire LH and Floor Wire (Under the Left Center Pillar)
BP144Rear Door Wire RH and Floor No.2 Wire (Under the Right Center Pillar)
: GROUND POINTS
CodeSee PageGround Points Location
IE40Cowl Side Panel LH
IG40Instrument Panel Brace LH
SERVICE HINTS