1999 TOYOTA CAMRY window
[x] Cancel search: windowPage 3925 of 4592
MIDTRONICS BATTERY TESTER SOFTWARE UPDATE ± SS002-02June 7, 2002
Page 8 of 10
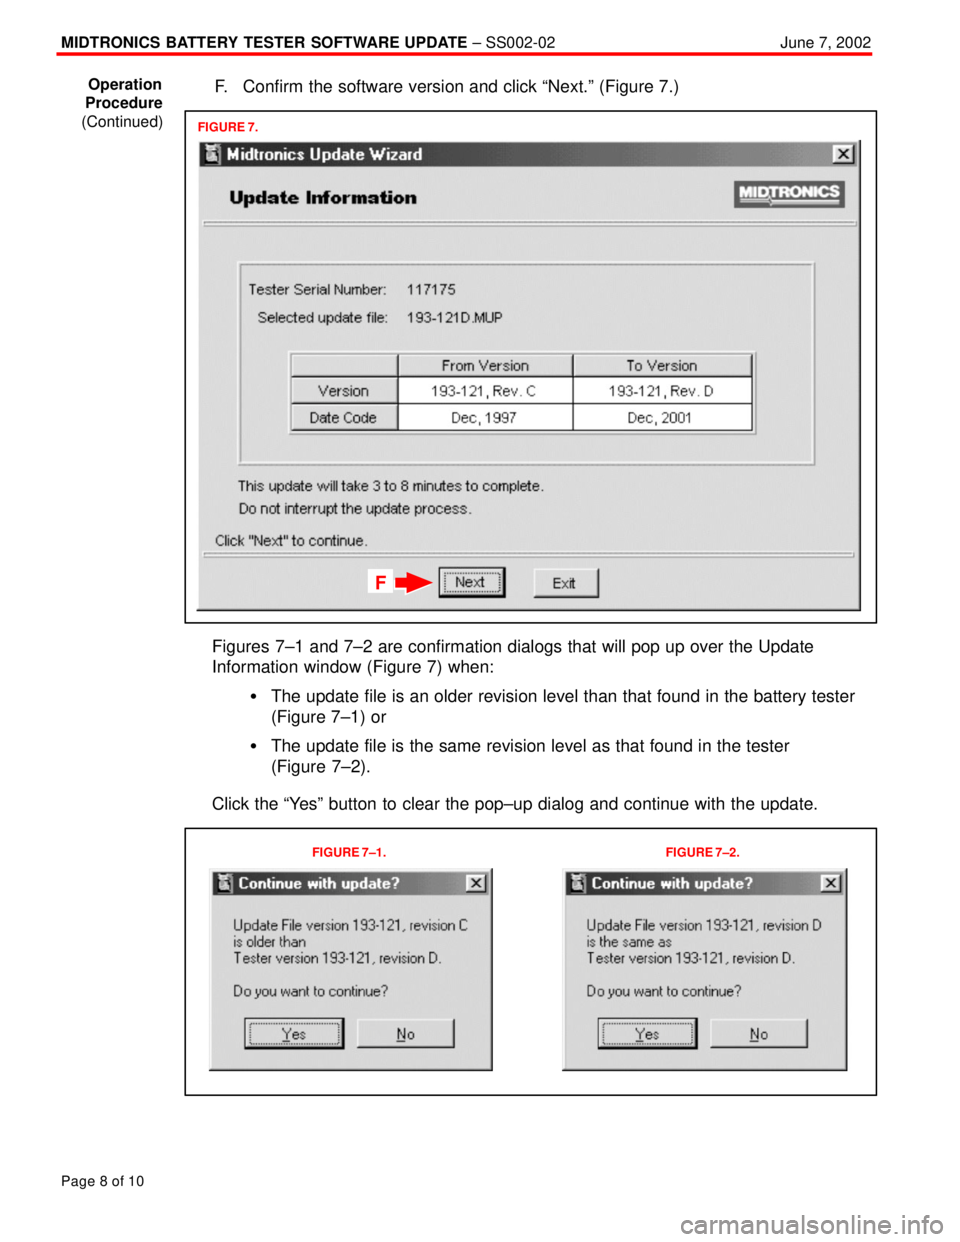
F. Confirm the software version and click ªNext.º (Figure 7.)
FIGURE 7.
F
Figures 7±1 and 7±2 are confirmation dialogs that will pop up over the Update
Information window (Figure 7) when:
�The update file is an older revision level than that found in the battery tester
(Figure 7±1) or
�The update file is the same revision level as that found in the tester
(Figure 7±2).
Click the ªYesº button to clear the pop±up dialog and continue with the update.
FIGURE 7±1. FIGURE 7±2.
Operation
Procedure
(Continued)
Page 4017 of 4592
B HOW TO USE THIS MANUAL
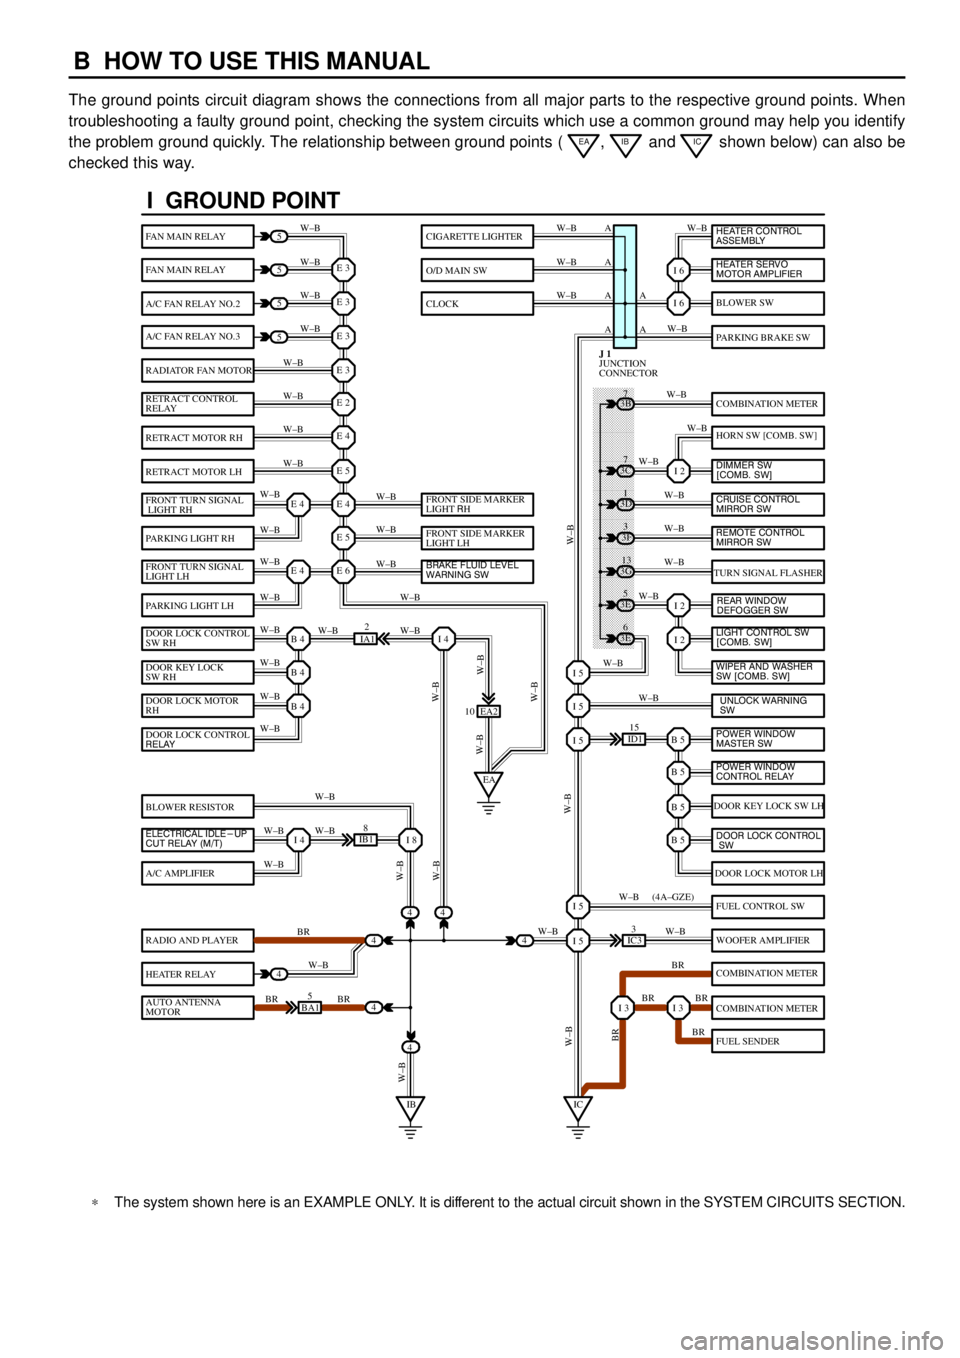
The ground points circuit diagram shows the connections from all major parts to the respective ground points. When
troubleshooting a faulty ground point, checking the system circuits which use a common ground may help you identify
the problem ground quickly. The relationship between ground points (
EA, IB and IC shown below) can also be
checked this way.
���� ���� ���� ���� ���� ���� ���� ���� ���� ���� ���� ���� ���� ���� ���� ���� ���� ���� ����
I GROUND POINT
FAN MAIN RELAY
FAN MAIN RELAY
A/C FAN RELAY NO.2
A/C FAN RELAY NO.3
RADIATOR FAN MOTOR
RETRACT CONTROL
RELAY
RETRACT MOTOR RH
RETRACT MOTOR LH
FRONT TURN SIGNAL
LIGHT RH
PARKING LIGHT RH
FRONT TURN SIGNAL
LIGHT LH
PARKING LIGHT LH
DOOR LOCK CONTROL
SW RH
DOOR KEY LOCK
SW RH
DOOR LOCK MOTOR
RH
BLOWER RESISTOR
A/C AMPLIFIER
RADIO AND PLAYER
HEATER RELAY
AUTO ANTENNA
MOTOR
BLOWER SW
PARKING BRAKE SW
COMBINATION METER
HORN SW [COMB. SW]
TURN SIGNAL FLASHER
DOOR KEY LOCK SW LH
DOOR LOCK MOTOR LH
FUEL CONTROL SW
WOOFER AMPLIFIER
COMBINATION METER
COMBINATION METER
FUEL SENDER
CIGARETTE LIGHTER
O/D MAIN SW
CLOCK
5
5
5
5
4
4
4
4
4BA15
IB18
EA2 10
3E5
3E
6 3G
13 3F
3 3D
1 3B
7
ID115
IC33
IA12
E 3
A
A AW±B
W±BW±B W±B
W±B W±B
W±B
W±B
W±B
W±B
W±B
W±B
W±B
W±B
W±B W±BW±B W±B W±B W±B
W±B W±B
W±BW±B
W±B
W±B
W±B W±B
W±B
BR
W±B
BR BRW±BW±B
W±B
W±B
W±B
W±B
W±B
W±B
W±B
W±B
W±B W±B
W±B
W±B
W±B
W±B
BR W±B
BR BR
BR W±B W±BW±B
W±BW±BBR W±B (4A±GZE)
W±B A A A
I 6
I 6
I 2
I 2
I 2
B 5I 5
I 5
I 5
B 5
B 5
B 5
I 5
I 5
I 3I 3
E 3
E 3
E 3
E 2
E 4
E 5
E 4
E 5
E 6E 4
E 4
B 4
EAI 4
B 4
B 4
I 4I 8
IBIC
3C7
4
JUNCTION
CONNECTOR J 1
4
DOOR LOCK CONTROL
RELAY
ELECTRICAL IDLE-UP
CUT RELAY (M/T)FRONT SIDE MARKER
LIGHT RH
FRONT SIDE MARKER
LIGHT LH
BRAKE FLUID LEVEL
WARNING SW
UNLOCK WARNING
SW WIPER AND WASHER
SW [COMB. SW] LIGHT CONTROL SW
[COMB. SW] HEATER CONTROL
ASSEMBLY
HEATER SERVO
MOTOR AMPLIFIER
DIMMER SW
[COMB. SW]
CRUISE CONTROL
MIRROR SW
REAR WINDOW
DEFOGGER SW
POWER WINDOW
MASTER SW
POWER WINDOW
CONTROL RELAY
DOOR LOCK CONTROL
SW
REMOTE CONTROL
MIRROR SW
*The system shown here is an EXAMPLE ONLY. It is different to the actual circuit shown in the SYSTEM CIRCUITS SECTION.
Page 4040 of 4592

G
Position of Parts in Instrument Panel
J 1 Junction Connector
J 2 Junction Connector
J 3 Junction Connector
J 4 Junction Connector
J 5 Junction Connector
J 6 Junction Connector
J 7 Junction Connector
J 8 Junction Connector
J 9 Junction Connector
J 10 Junction Connector
J 11 Junction Connector
J 12 Junction Connector
J 13 Junction Connector
J 14 Junction Connector
J 15 Junction Connector
J 16 Junction Connector
J 17 Junction Connector
J 18 Junction Connector
J 19 Junction Connector
J 20 Junction Connector
J 21 Junction Connector
J 22 Junction Connector
J 23 Junction Connector
J 24 Junction Connector
J 25 Junction Connector
J 26 Junction ConnectorJ 27 Junction Connector
J 28 Junction Connector
J 29 Junction Connector
J 30 Junction Connector
J 31 Junction Connector
J 32 Junction Connector
K 1 Key Interlock Solenoid
O 2 O/D Main SW and A/T Shift Lever Illumination
P 3 Parking Brake SW
P 4 Power Outlet
R 2 Radio and Player
R 3 Radio and Player
R 4 Rear Window Defogger SW
R 5 Remote Control Mirror SW
R 6 Rheostat
S 3 Shift Lock ECU
S 4 Stop Light SW
T 2 Turn Signal Flasher
U 1 Unlock Warning SW
Page 4042 of 4592

G
Position of Parts in Body
N 2 Noise Filter (Rear Window Defogger)
P 5 Power Window Control SW Front RH
P 6 Power Window Control SW Rear LH
P 7 Power Window Control SW Rear RH
P 8 Power Window Master SW and
Door Lock Control SW LH
P 9 Power Window Motor Front LH
P 10 Power Window Motor Front RH
P 11 Power Window Motor Rear LH
P 12 Power Window Motor Rear RH
P 13 Pretensioner LH
P 14 Pretensioner RHR 7 Rear Combination Light LH
R 8 Rear Combination Light LH
R 9 Rear Combination Light RH
R 10 Rear Combination Light RH
R 11 Rear Speaker LH
R 12 Rear Speaker RH
R 13 Remote Control Mirror LH
R 14 Remote Control Mirror RH
Page 4068 of 4592

This system utilizes an engine control module and maintains overall control of the engine, transmission and so on. An outline
of the engine control is explained here.
1. INPUT SIGNALS
(1) Engine coolant temp. signal circuit
The engine coolant temp. sensor detects the engine coolant temp. and has a built±in thermistor with a resistance which
varies according to the engine coolant temp. thus the engine coolant temp. is input in the form of a control signal into
TERMINAL THW of the engine control module.
(2) Intake air temp. signal circuit
The intake air temp. sensor detects the intake air temp. , which is input as a control signal into TERMINAL THA of the
engine control module.
(3) Oxygen sensor signal circuit
The oxygen density in the exhaust gases is detected and input as a control signal into TERMINAL OX2 of the engine
control module.
(4) RPM signal circuit
Camshaft position and crankshaft position are detected by the camshaft position sensor and crankshaft position sensor.
Camshaft position is input as a control signal to TERMINAL G of the engine control module, and engine RPM is input
into TERMINAL NE.
(5) Throttle signal circuit
The throttle position sensor detects the throttle valve opening angle, which is input as a control signal into TERMINAL
VTA of the engine control module.
(6) Vehicle speed signal circuit
The vehicle speed sensor, installed inside the transmission, detects the vehicle speed and inputs a control signal into
TERMINAL SPD of the engine control module.
(7) Park/Neutral position SW signal circuit
The Park/Neutral position SW detects whether the shift position are in neutral, parking or not, and inputs a control signal
into TERMINAL STA of the engine control module.
(8) A/C SW signal circuit
The A/C amplifier is built in the engine control module. The signal from the A/C SW is input into TERMINAL A/CS of the
engine control module.
(9) Battery signal circuit
Voltage is constantly applied to TERMINAL BATT of the engine control module. When the ignition SW is turned on, the
voltage for engine control module start±up power supply is applied to TERMINAL +B of engine control module via EFI
relay.
(10) Intake air volume signal circuit
Intake air volume is detected by the manifold absolute pressure sensor (for manifold pressure) and is input as a control
signal into TERMINAL PIM of the engine control module.
(11) Starter signal circuit
To confirm whether the engine is cranking, the voltage applied to the starter motor during cranking is detected and the
signal is input into TERMINAL NSW of the engine control module as a control signal.
(12) Electrical load signal circuit
The signal when systems such as the rear window defogger, headlights, etc. Which cause a high electrical burden are
on is input to TERMINAL ELS as a control signal.
(13) Air fuel ratio signal circuit
The air fuel ratio is detected and input as a control signal into TERMINAL AF+ of the engine control module.
SYSTEM OUTLINE
Page 4087 of 4592
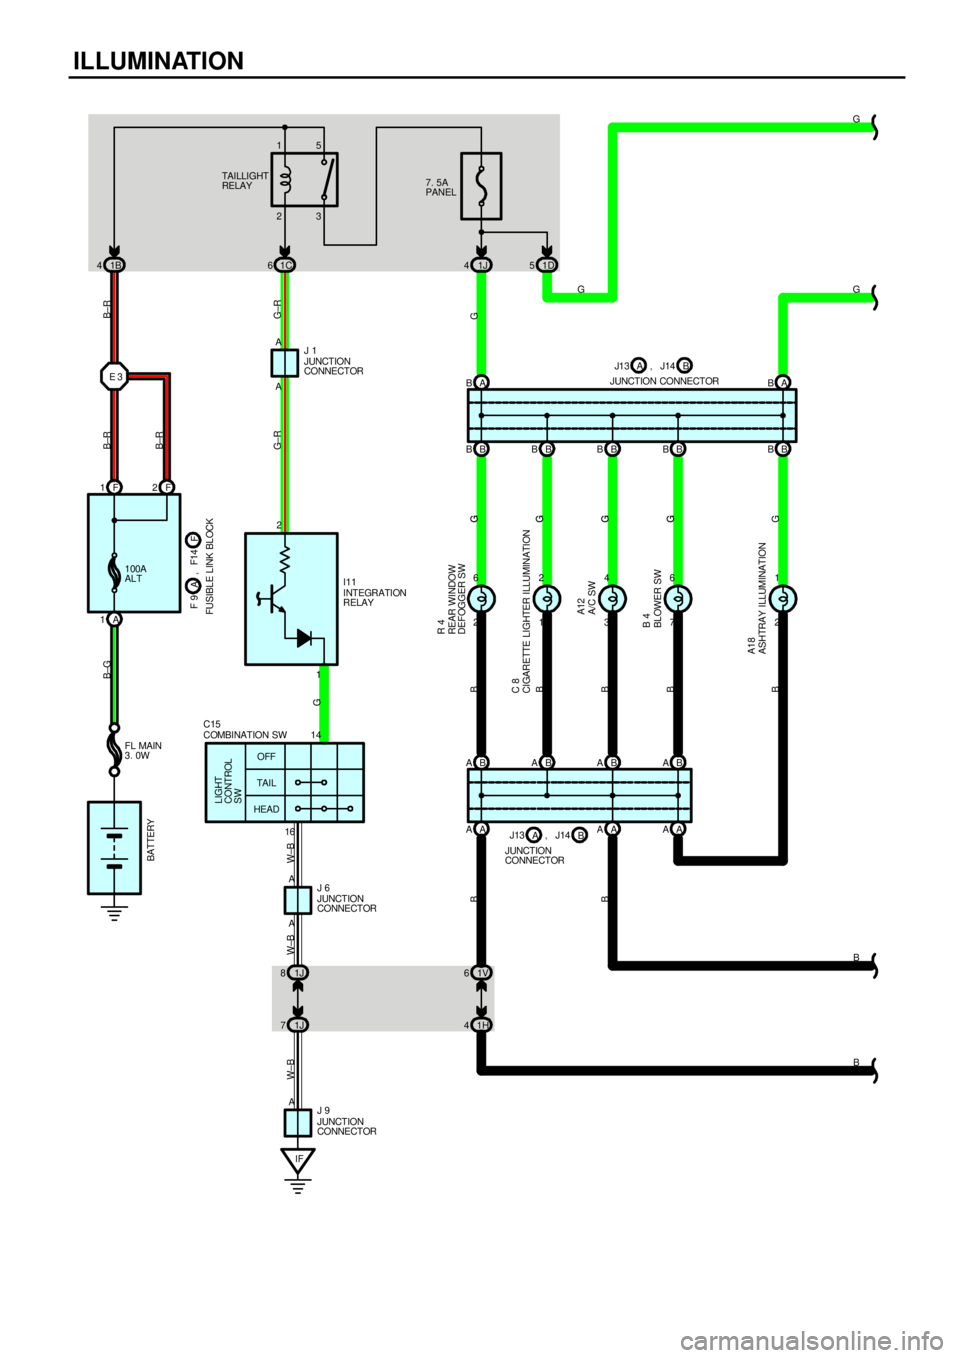
ILLUMINATION
1B 41C61J4
IF1H 41V 61 2
3 4
7 6
2 1
1614 2G
B
G±R B±G
G
B
B
B B
TAILLIGHT
RELAY7. 5A
PANEL
INTEGRATION
RELAY
FL MAIN
3. 0W
BATTERY
OFF
TAI L
HEAD
LIGHT
CONTROL
SW
G
I11 3 2 15
F 1
A 1100A
ALT
2 6A BAB
B BBB B B B B B B
B ABABABA
A AAA A A
1J 8
1J 7 E 3
F 2A
1 A
B±R B±R
B±R
G± R
COMBINATION SW C15
A
W±B
JUNCTION
CONNECTOR J 9
B
B BG
G G
G G
G G
G G
JUNCTION
CONNECTOR J 1
B
ASHTRAY ILLUMINATION A18BLOWER SW B 4A/C SW A12 CI GARETTE LI GHTER I LLUMINATI ON C 8REAR WINDOW
DEFOGGER SW R 4
G 1D 5
G
J1 3
JUNCTION CONNECTORB A, J14
J13
JUNCTION
CONNECTORB A, J14
F 9
FUSIBLE LINK BLOCKF A, F14
A A
JUNCTION
CONNECTOR J 6
W±B W±B
Page 4098 of 4592
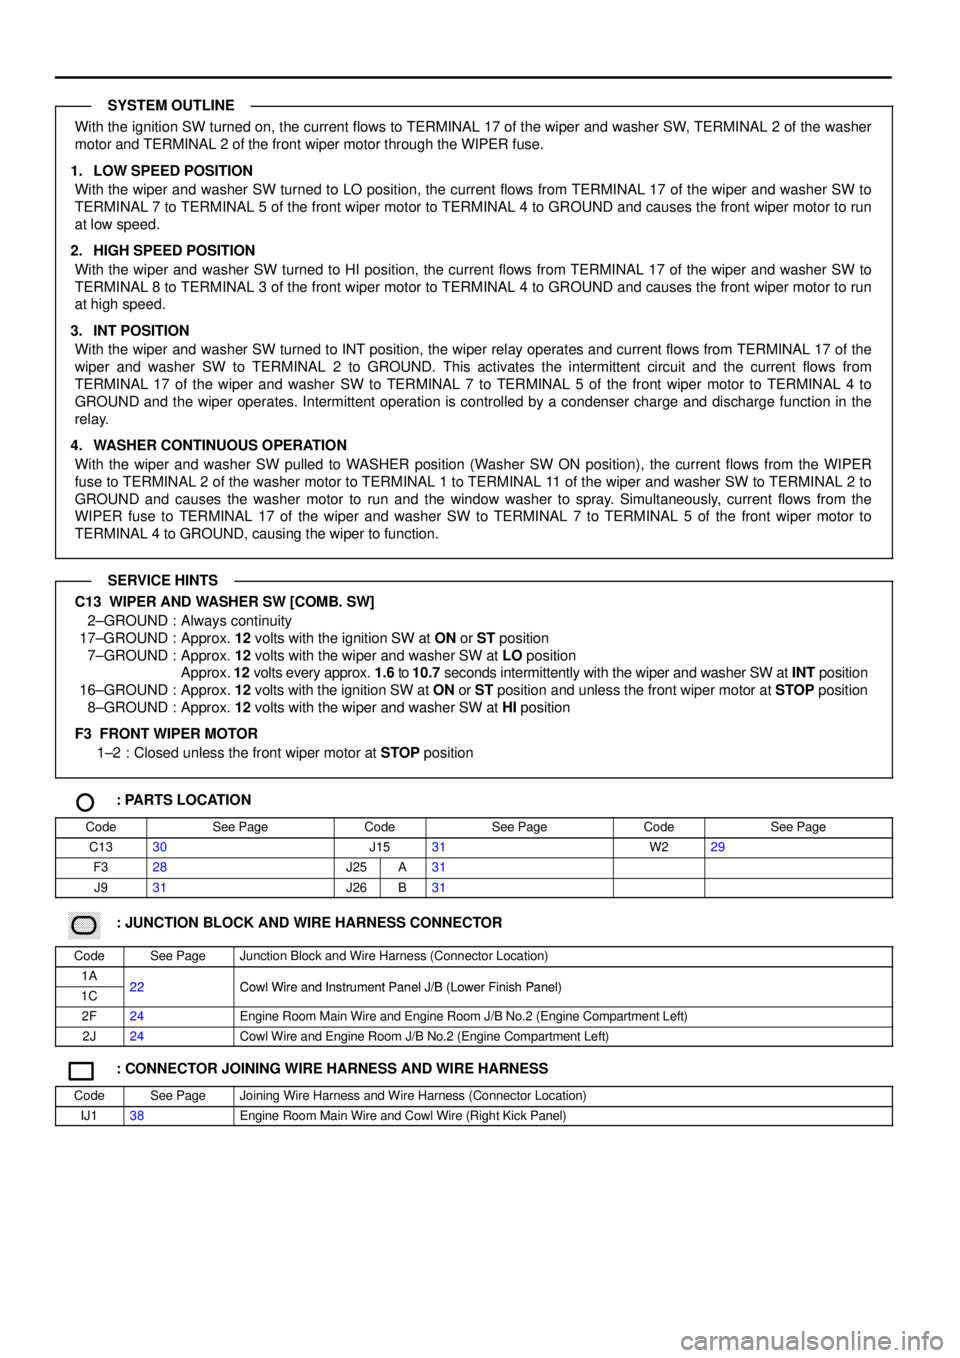
With the ignition SW turned on, the current flows to TERMINAL 17 of the wiper and washer SW, TERMINAL 2 of the washer
motor and TERMINAL 2 of the front wiper motor through the WIPER fuse.
1. LOW SPEED POSITION
With the wiper and washer SW turned to LO position, the current flows from TERMINAL 17 of the wiper and washer SW to
TERMINAL 7 to TERMINAL 5 of the front wiper motor to TERMINAL 4 to GROUND and causes the front wiper motor to run
at low speed.
2. HIGH SPEED POSITION
With the wiper and washer SW turned to HI position, the current flows from TERMINAL 17 of the wiper and washer SW to
TERMINAL 8 to TERMINAL 3 of the front wiper motor to TERMINAL 4 to GROUND and causes the front wiper motor to run
at high speed.
3. INT POSITION
With the wiper and washer SW turned to INT position, the wiper relay operates and current flows from TERMINAL 17 of the
wiper and washer SW to TERMINAL 2 to GROUND. This activates the intermittent circuit and the current flows from
TERMINAL 17 of the wiper and washer SW to TERMINAL 7 to TERMINAL 5 of the front wiper motor to TERMINAL 4 to
GROUND and the wiper operates. Intermittent operation is controlled by a condenser charge and discharge function in the
relay.
4. WASHER CONTINUOUS OPERATION
With the wiper and washer SW pulled to WASHER position (Washer SW ON position), the current flows from the WIPER
fuse to TERMINAL 2 of the washer motor to TERMINAL 1 to TERMINAL 11 of the wiper and washer SW to TERMINAL 2 to
GROUND and causes the washer motor to run and the window washer to spray. Simultaneously, current flows from the
WIPER fuse to TERMINAL 17 of the wiper and washer SW to TERMINAL 7 to TERMINAL 5 of the front wiper motor to
TERMINAL 4 to GROUND, causing the wiper to function.
C13 WIPER AND WASHER SW [COMB. SW]
2±GROUND : Always continuity
17±GROUND : Approx. 12 volts with the ignition SW at ON or ST position
7±GROUND : Approx. 12 volts with the wiper and washer SW at LO position
Approx. 12 volts every approx. 1.6 to 10.7 seconds intermittently with the wiper and washer SW at INT position
16±GROUND : Approx. 12 volts with the ignition SW at ON or ST position and unless the front wiper motor at STOP position
8±GROUND : Approx. 12 volts with the wiper and washer SW at HI position
F3 FRONT WIPER MOTOR
1±2 : Closed unless the front wiper motor at STOP position
: PARTS LOCATION
CodeSee PageCodeSee PageCodeSee Page
C1330J1531W229
F328J25A31
J931J26B31
������ ���: JUNCTION BLOCK AND WIRE HARNESS CONNECTOR
CodeSee PageJunction Block and Wire Harness (Connector Location)
1A22Cowl Wire and Instrument Panel J/B (Lower Finish Panel)1C22Cowl Wire and Instrument Panel J/B (Lower Finish Panel)
2F24Engine Room Main Wire and Engine Room J/B No.2 (Engine Compartment Left)
2J24Cowl Wire and Engine Room J/B No.2 (Engine Compartment Left)
: CONNECTOR JOINING WIRE HARNESS AND WIRE HARNESS
CodeSee PageJoining Wire Harness and Wire Harness (Connector Location)
IJ138Engine Room Main Wire and Cowl Wire (Right Kick Panel)
SYSTEM OUTLINE
SERVICE HINTS
Page 4101 of 4592
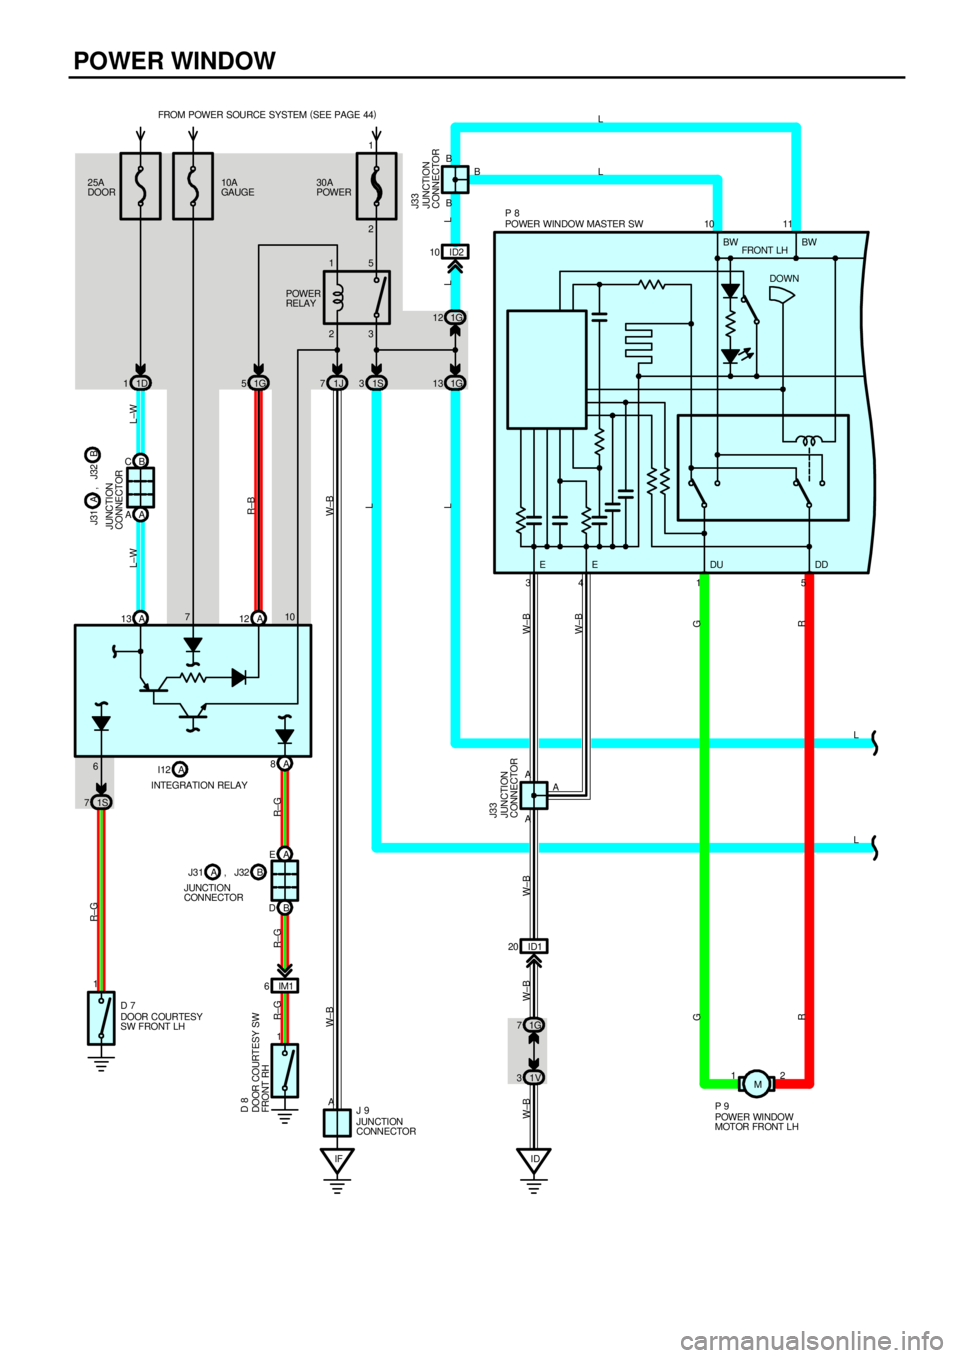
POWER WINDOW
25A
DOORFROM POWER SOURCE SYSTEM (
SEE PAGE 44)
1D 130A
POWER
23 15
1S 3 1J 7 1G 51G13ID2 10
B C
A A
A 13 A12
IF A 10BB
11S 7INTEGRATION RELAY
ID1 20
ID 1V 31G 7A
A3410 11
A
12 L L
L
L
L±W L±W
L L W±BR±B R±G
W±B
W±B
G
R R GW±B W±B W±BW± B
15 EE DDDUBW BW
DOOR COURTESY
SW FRONT LH D 7
JUNCTION
CONNECTOR J 9POWER WINDOW MASTER SW P 8
JUNCTION
CONNECTOR J33JUNCTION
CONNECTOR
POWER WINDOW
MOTOR FRONT LH P 9 POWER
RELAY
L L
6
JUNCTION
CONNECTOR J33
10A
GAUGE
A 8
B DA E
IM1 6
1 71
R±G R±G R±G DOOR COURTESY SW
FRONT RH D 8
2
JUNCTION
CONNECTOR1G 12DOWN FRONT LH
B J31 A , J32
B J31 A , J32 I12 AB
M