Page 924 of 1954
5. Remov e th e differentia l carrie r fro m th e differential
case .
DIFFERENTIA L CARRIE R
DIFFERENTIA L CAS E
6. Remov e th e oi l guid e pipe .
OIL GUID EPIPE
7. Hol d th e driv e pinio n wit h a 1 1/4 " (3 2 mm ) he x bi t
an d socke t a s shown .
DRIVE PINIO N
1 1/4 " (3 2 mm ) HE X BI T an d SOCKE T
(Commerciall y available )
8. Rais e th e locknu t ta b fro m th e groov e o f th e driv e
pinion , an d remov e th e locknut , thrus t washe r an d
pinio n hub .
NOTE : B e sur e th e ta b o f th e locknu t i s completel y
clea r o f th e groov e o r damag e t o th e thread s ca n
occur .
TABLOCKNU TReplace.
THRUST WASHE R
PINION HU B
ProCarManuals.com
Page 930 of 1954
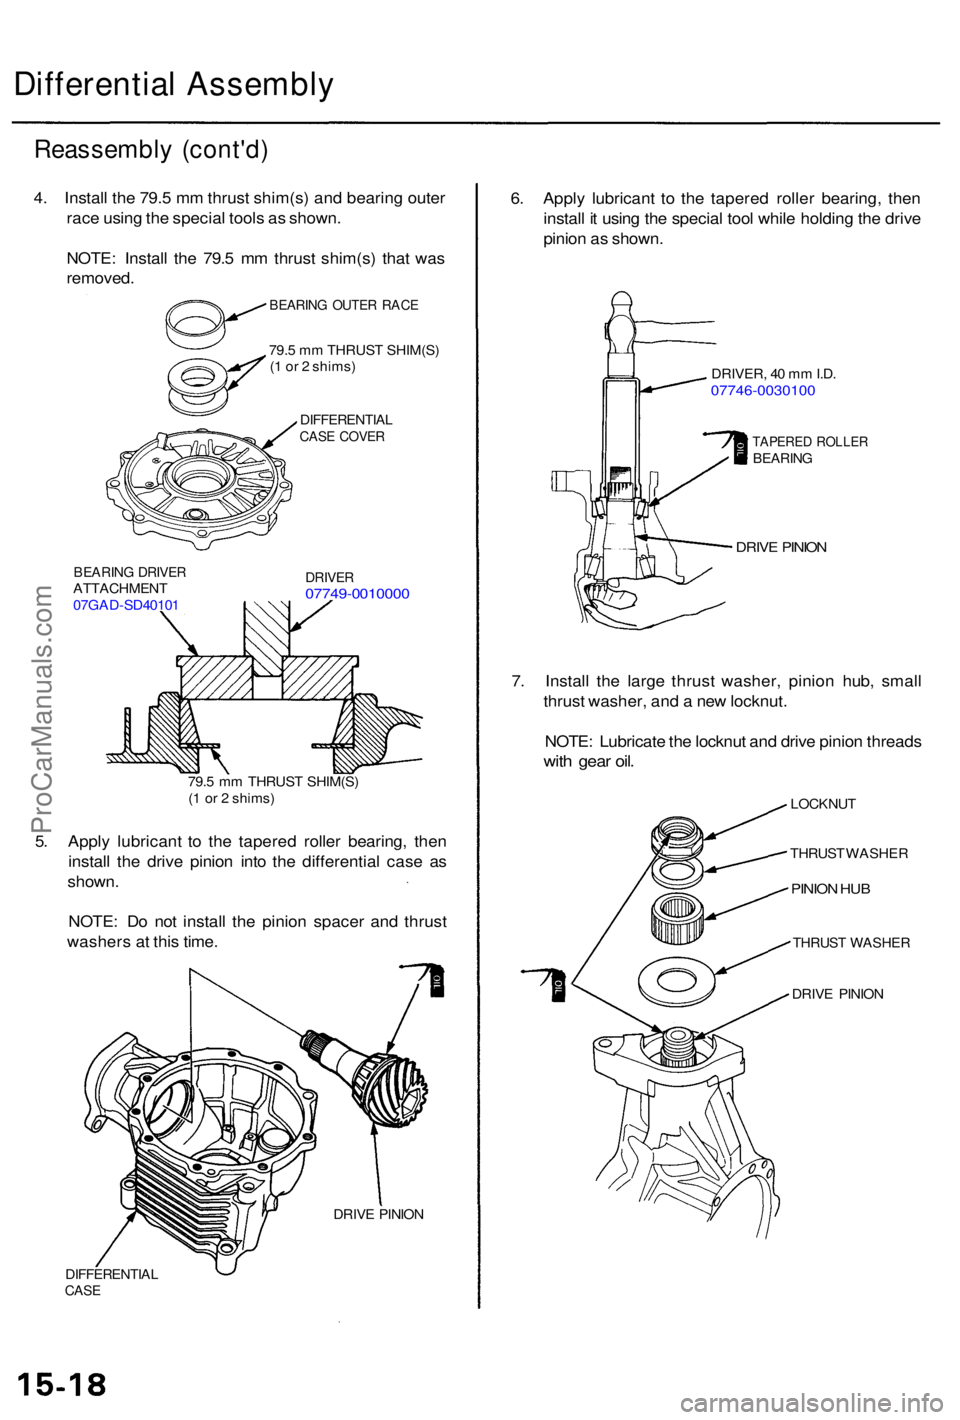
Differential Assembl y
Reassembl y (cont'd )
4. Instal l th e 79. 5 m m thrus t shim(s ) an d bearin g oute r
rac e usin g th e specia l tool s a s shown .
NOTE : Instal l th e 79. 5 m m thrus t shim(s ) tha t wa s
removed .
BEARING OUTE R RAC E
79.5 m m THRUS T SHIM(S )
( 1 o r 2 shims )
DIFFERENTIA LCASE COVE R
BEARIN G DRIVE RATTACHMEN T
07GA D-SD4010 1DRIVER07749-001000 0
79.5 m m THRUS T SHIM(S )
( 1 o r 2 shims )
5. Appl y lubrican t t o th e tapere d rolle r bearing , the n
instal l th e driv e pinio n int o th e differentia l cas e a s
shown .
NOTE : D o no t instal l th e pinio n space r an d thrus t
washer s a t thi s time .
DRIV E PINIO N
DIFFERENTIA LCASE
6. Appl y lubrican t t o th e tapere d rolle r bearing , the n
instal l i t usin g th e specia l too l whil e holdin g th e driv e
pinio n a s shown .
DRIVER , 4 0 m m I.D .07746-003010 0
TAPERED ROLLE RBEARIN G
DRIVE PINIO N
7. Instal l th e larg e thrus t washer , pinio n hub , smal l
thrus t washer , an d a ne w locknut .
NOTE : Lubricat e th e locknu t an d driv e pinio n thread s
with gea r oil .
LOCKNU T
THRUST WASHE R
PINION HU B
THRUS T WASHE R
DRIVE PINIO N
ProCarManuals.com
Page 931 of 1954
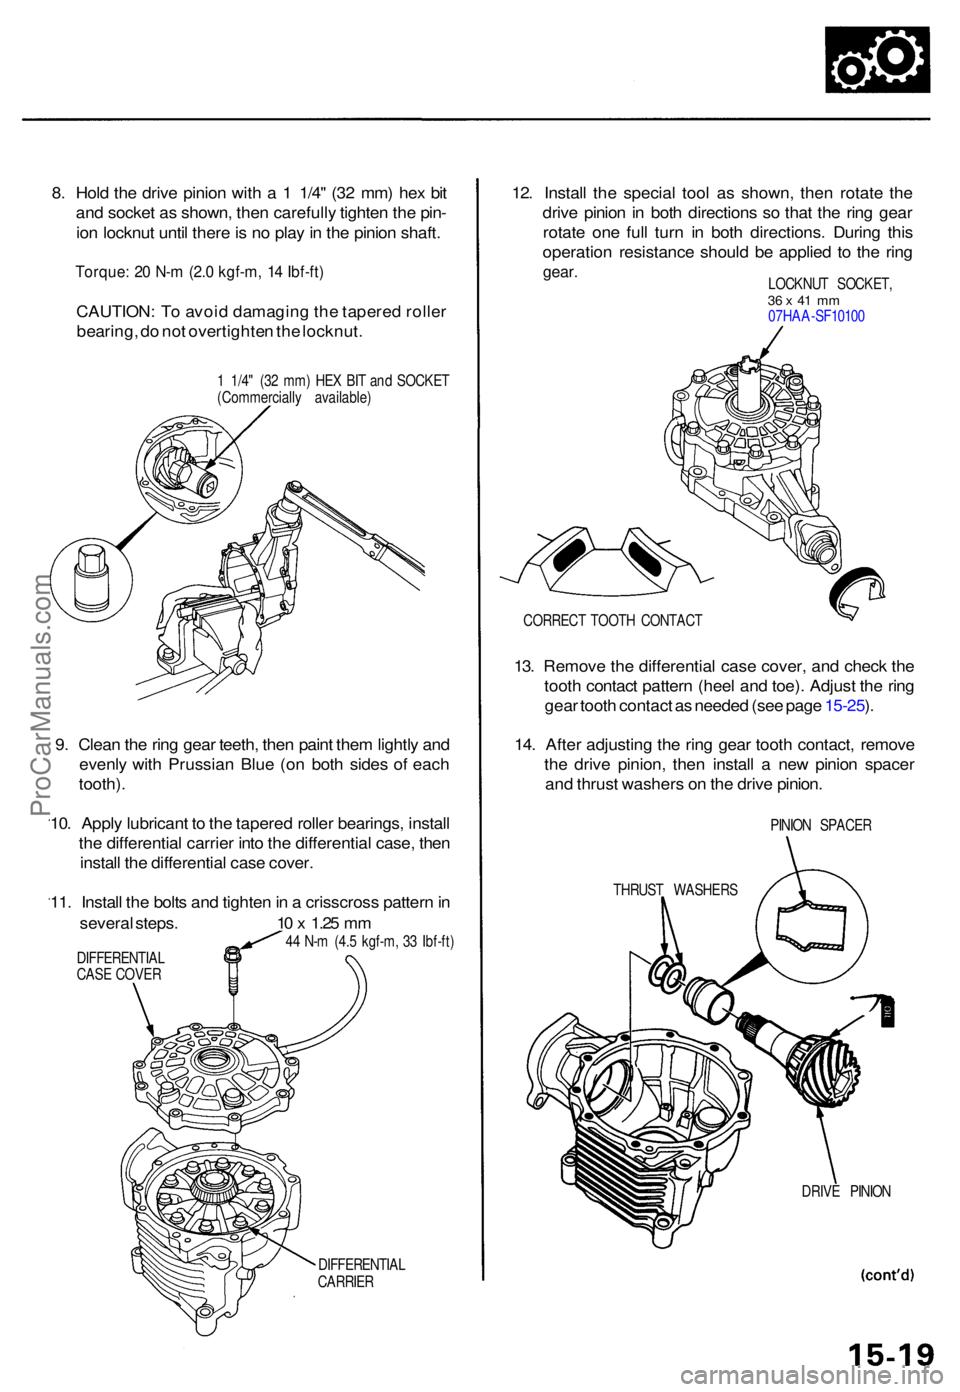
8. Hol d th e driv e pinio n wit h a 1 1/4 " (3 2 mm ) he x bi t
an d socke t a s shown , the n carefull y tighte n th e pin -
io n locknu t unti l ther e is n o pla y in th e pinio n shaft .
Torque : 2 0 N- m (2. 0 kgf-m , 1 4 Ibf-ft )
CAUTION : T o avoi d damagin g th e tapere d rolle r
bearing , d o no t overtighte n th e locknut .
1 1/4 " (3 2 mm ) HE X BI T an d SOCKE T
(Commerciall y available )
DIFFERENTIA L
CARRIE R
12. Instal l th e specia l too l a s shown , the n rotat e th e
driv e pinio n in bot h direction s s o tha t th e rin g gea r
rotat e on e ful l tur n i n bot h directions . Durin g thi s
operatio n resistanc e shoul d b e applie d t o th e rin g
gear .LOCKNU T SOCKET ,36 x 41 m m07HA A-SF1010 0
CORREC T TOOT H CONTAC T
13. Remov e th e differentia l cas e cover , an d chec k th e
toot h contac t patter n (hee l an d toe) . Adjus t th e rin g
gea r toot h contac t a s neede d (se e pag e 15-25 ).
14 . Afte r adjustin g th e rin g gea r toot h contact , remov e
th e driv e pinion , the n instal l a ne w pinio n space r
an d thrus t washer s o n th e driv e pinion .
PINION SPACE R
THRUS T WASHER S
DRIVE PINIO N
9. Clea n th e rin g gea r teeth , the n pain t the m lightl y an d
evenl y wit h Prussia n Blu e (o n bot h side s o f eac h
tooth) .
10 . Appl y lubrican t t o th e tapered roller bearings , instal l
th e differentia l carrie r int o th e differentia l case , the n
instal l th e differentia l cas e cover .
11 . Instal l th e bolt s an d tighte n in a crisscros s patter n in
severa l steps . 10 x 1.2 5 m m
44 N- m (4. 5 kgf-m , 3 3 Ibf-ft )
DIFFERENTIA L
CAS E COVE R
ProCarManuals.com
Page 932 of 1954
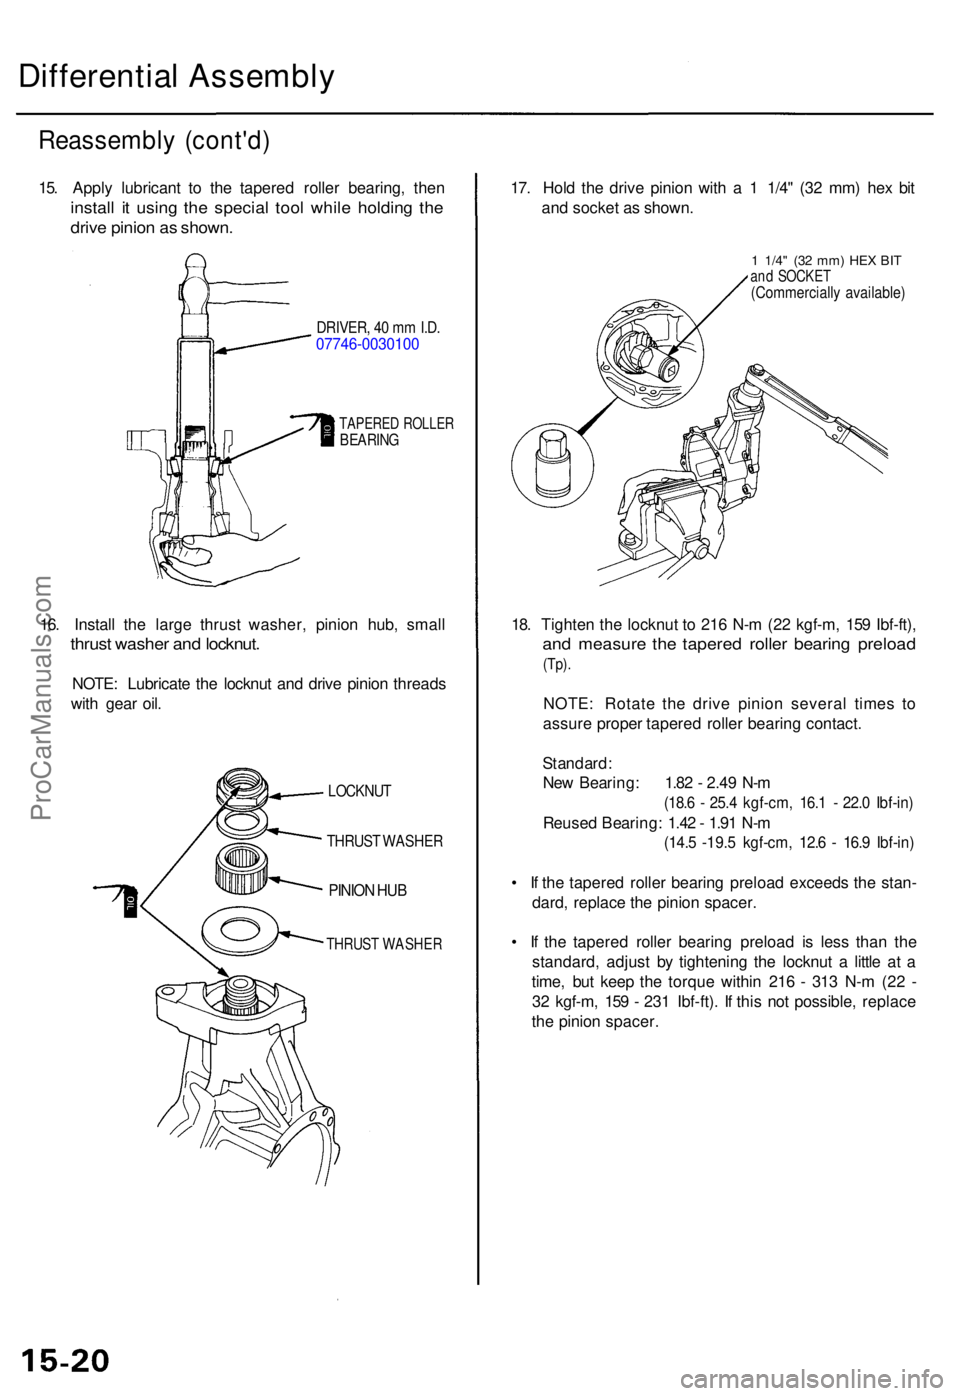
Differential Assembl y
Reassembl y (cont'd )
15. Appl y lubrican t t o th e tapere d rolle r bearing , the n
instal l i t usin g th e specia l too l whil e holdin g th e
driv e pinio n a s shown .
DRIVER , 4 0 m m I.D .07746-003010 0
TAPERED ROLLE RBEARIN G
16. Instal l th e larg e thrus t washer , pinio n hub , smal l
thrust washe r an d locknut .
NOTE: Lubricat e th e locknu t an d driv e pinio n thread s
wit h gea r oil .
LOCKNU T
THRUS T WASHE R
PINION HU B
THRUS T WASHE R
17. Hol d th e driv e pinio n wit h a 1 1/4 " (3 2 mm ) he x bi t
an d socke t a s shown .
1 1/4" (32 mm ) HE X BI Tand SOCKE T(Commerciall y available )
18. Tighte n th e locknu t t o 21 6 N- m (2 2 kgf-m , 15 9 Ibf-ft) ,
and measur e th e tapere d rolle r bearin g preloa d
(Tp).
NOTE : Rotat e th e driv e pinio n severa l time s t o
assur e prope r tapere d rolle r bearin g contact .
Standard :
Ne w Bearing : 1.8 2 - 2.4 9 N- m
(18. 6 - 25. 4 kgf-cm , 16. 1 - 22. 0 Ibf-in )
Reuse d Bearing : 1.4 2 - 1.9 1 N- m
(14. 5 -19. 5 kgf-cm , 12. 6 - 16. 9 Ibf-in )
• I f th e tapere d rolle r bearin g preloa d exceed s th e stan -
dard , replac e th e pinio n spacer .
• I f th e tapere d rolle r bearin g preloa d i s les s tha n th e
standard , adjus t b y tightenin g th e locknu t a littl e a t a
time , bu t kee p th e torqu e withi n 21 6 - 31 3 N- m (2 2 -
3 2 kgf-m , 15 9 - 23 1 Ibf-ft) . I f thi s no t possible , replac e
th e pinio n spacer .
ProCarManuals.com
Page 933 of 1954
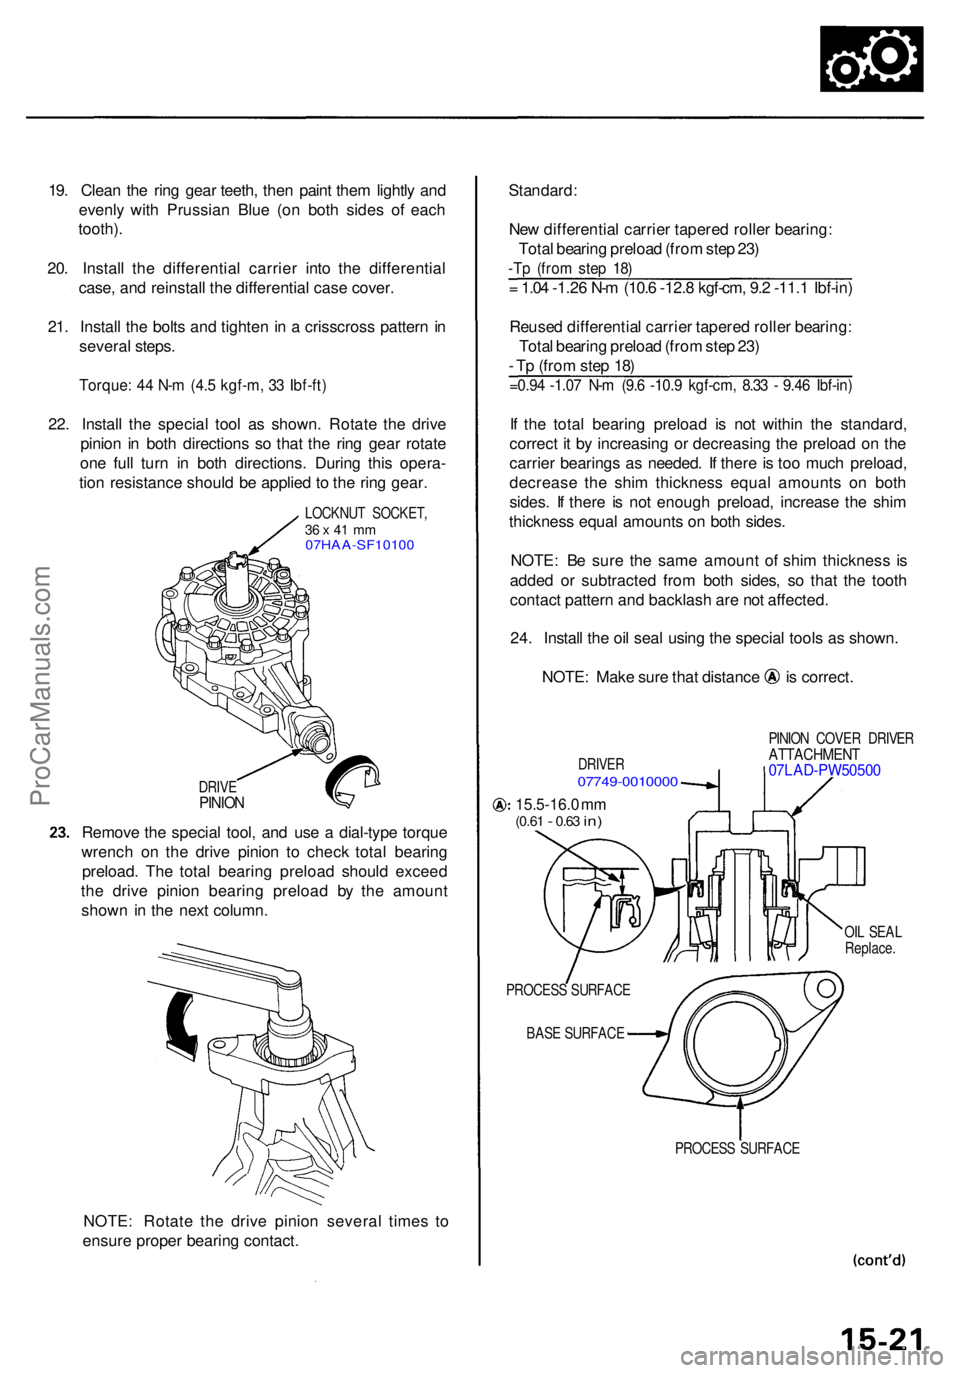
19. Clea n th e rin g gea r teeth , the n pain t the m lightl y an d
evenl y wit h Prussia n Blu e (o n bot h side s of eac h
tooth) .
20 . Instal l th e differentia l carrie r int o th e differentia l
case , an d reinstal l th e differentia l cas e cover .
21 . Instal l th e bolt s an d tighte n in a crisscros s patter n in
severa l steps .
Torque : 4 4 N- m (4. 5 kgf-m , 3 3 Ibf-ft )
22. Instal l th e specia l too l a s shown . Rotat e th e driv e
pinio n i n bot h direction s s o tha t th e rin g gea r rotat e
on e ful l tur n i n bot h directions . Durin g thi s opera -
tio n resistanc e shoul d b e applie d to th e rin g gear .
LOCKNU T SOCKET ,36 x 41 m m07HAA-SF1010 0
DRIVEPINIO N
Remov e th e specia l tool , an d us e a dial-typ e torqu e
wrenc h o n th e driv e pinio n t o chec k tota l bearin g
preload . Th e tota l bearin g preloa d shoul d excee d
th e driv e pinio n bearin g preloa d b y th e amoun t
show n i n th e nex t column .
NOTE : Rotat e th e driv e pinio n severa l time s t o
ensur e prope r bearin g contact .
=0.94 -1.0 7 N- m (9. 6 -10. 9 kgf-cm , 8.3 3 - 9.4 6 Ibf-in )
If th e tota l bearin g preloa d i s no t withi n th e standard ,
correc t i t b y increasin g o r decreasin g th e preloa d o n th e
carrie r bearing s a s needed . I f ther e is to o muc h preload ,
decreas e th e shi m thicknes s equa l amount s o n bot h
sides . I f ther e i s no t enoug h preload , increas e th e shi m
thicknes s equa l amount s o n bot h sides .
NOTE : B e sur e th e sam e amoun t o f shi m thicknes s i s
adde d o r subtracte d fro m bot h sides , s o tha t th e toot h
contac t patter n an d backlas h ar e no t affected .
24 . Instal l th e oi l sea l usin g th e specia l tool s a s shown .
NOTE: Mak e sur e tha t distanc e i s correct .
DRIVER07749-001000 0
PINION COVE R DRIVE RATTACHMEN T07LAD-PW5050 0
15.5-16.0 m m(0.6 1 - 0.63 in)
OIL SEA L
Replace .
PROCES S SURFAC E
BAS E SURFAC E
PROCESS SURFAC E
= 1.0 4 -1.2 6 N- m (10. 6 -12. 8 kgf-cm , 9. 2 -11. 1 Ibf-in )
Reuse d differentia l carrie r tapere d rolle r bearing :
Tota l bearin g preloa d (fro m ste p 23 )
- T p (fro m ste p 18 )
Standard
:
Ne w differentia l carrie r tapere d rolle r bearing :
Tota l bearin g preloa d (fro m ste p 23 )
-Tp (fro m ste p 18 )
ProCarManuals.com
Page 934 of 1954
Differential Assembl y
Reassembl y (cont'd )
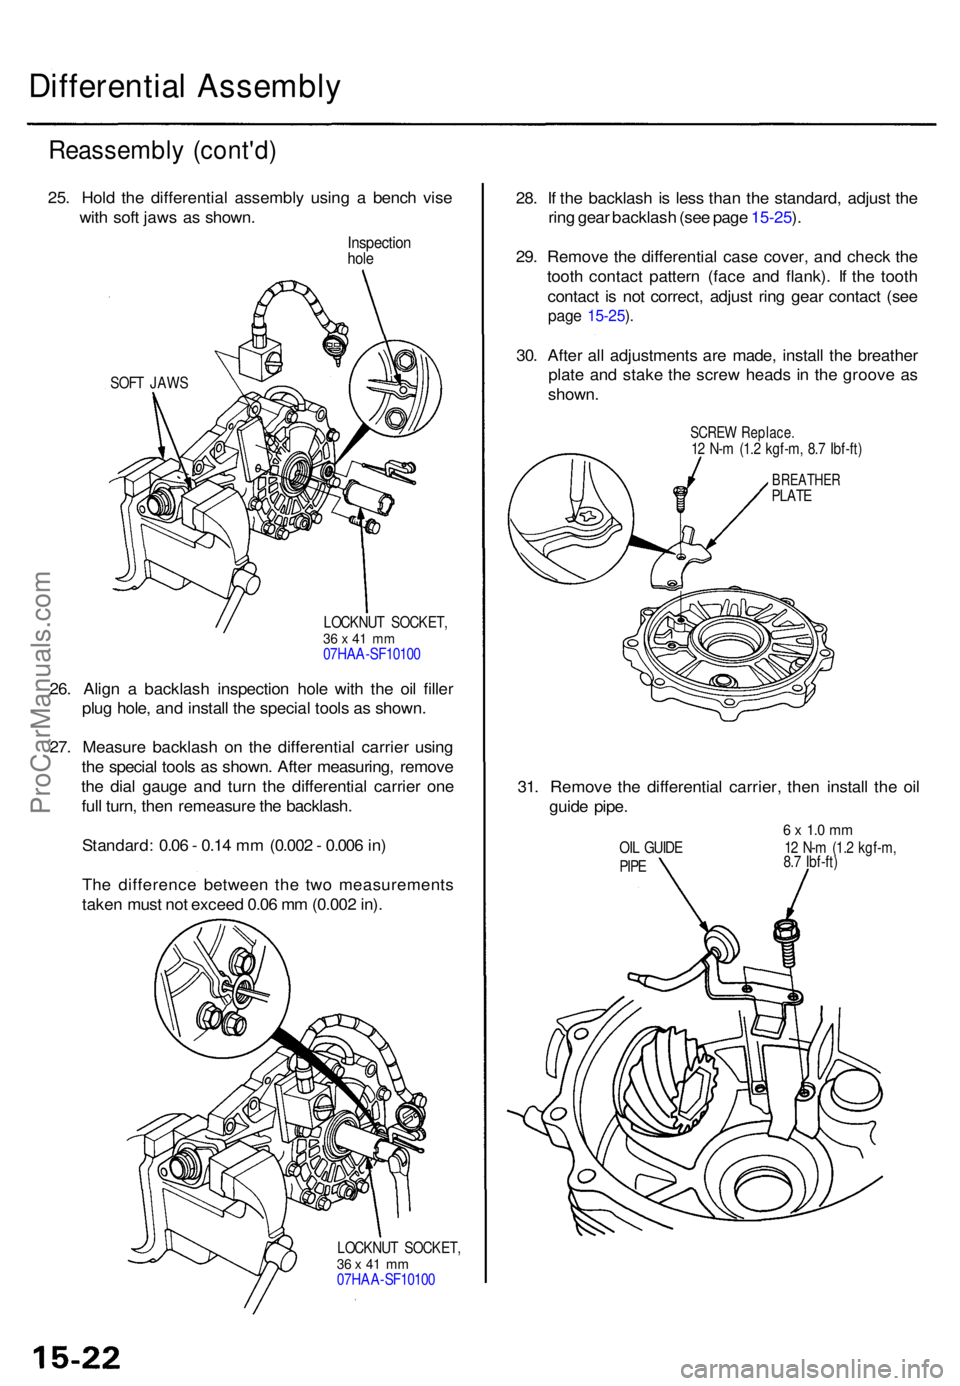
25. Hol d th e differentia l assembl y usin g a benc h vise
wit h sof t jaw s a s shown .
Inspectio nhole
SOF T JAW S
LOCKNUT SOCKET ,
36 x 41 m m07HA A-SF1010 0
26. Alig n a backlas h inspectio n hol e wit h th e oi l fille r
plu g hole , an d instal l th e specia l tool s a s shown .
27 . Measur e backlas h o n th e differentia l carrie r usin g
th e specia l tool s a s shown . Afte r measuring , remov e
th e dia l gaug e an d tur n th e differentia l carrie r on e
ful l turn , the n remeasur e th e backlash .
Standard : 0.0 6 - 0.1 4 m m (0.00 2 - 0.00 6 in )
Th e differenc e betwee n th e tw o measurement s
take n mus t no t excee d 0.0 6 m m (0.00 2 in) .
LOCKNU T SOCKET ,36 x 41 m m07HA A-SF1010 0
28. I f th e backlas h i s les s tha n th e standard , adjus t th e
rin g gea r backlas h (se e pag e 15-25 ).
29 . Remov e th e differentia l cas e cover , an d chec k th e
toot h contac t patter n (fac e an d flank) . I f th e toot h
contac t i s no t correct , adjus t rin g gea r contac t (se e
page 15-25 ).
30 . Afte r al l adjustment s ar e made , instal l th e breathe r
plat e an d stak e th e scre w head s i n th e groov e a s
shown .
SCREW Replace .12 N- m (1. 2 kgf-m , 8. 7 Ibf-ft )
BREATHE RPLATE
31. Remov e th e differentia l carrier , the n instal l th e oi l
guid e pipe .
6 x 1. 0 m m
OIL GUID E 1 2 N- m (1. 2 kgf-m ,
PIP E 8.
7 Ibf-ft )
ProCarManuals.com
Page 935 of 1954
32. Instal l th e differentia l carrie r i n th e differentia l case .
DIFFERENTIA LCARRIER
DIFFERENTIA LCASE
DIFFERENTIA LCARRIERDIFFERENTIA L CAS E
34. Instal l th e oi l sea l usin g th e specia l tool s a s shown .
DRIVER ATTACHMEN T
0796 5-SA0060 0 DRIVE
R
0774 9-001000 0
OI L SEA L
Replace .
PILOT, 3 2 x 50 m m
07MA D-PR9020 0
35. Stak e th e locknu t ta b int o th e groove .
1.0 m m (0.0 4 in)
3.5 m m (0.1 4 in)
33. Instal l th e differentia l cas e cover , an d tighte n th e
bolt s i n a crisscros s patter n i n severa l steps .
NOTE :
Us e liqui d gaske t (P/ N 0871 8 - 0001) .
Remov e an y dir t an d oi l fro m th e sealin g surface .
I f 2 0 minute s hav e passe d afte r applyin g liqui d
gasket , reappl y it , assembl e th e housings , an d
allo w it t o cur e a t leas t 2 0 minute s afte r assembl y
before fillin g differentia l wit h oil .
10 x 1.2 5 mm44 N- m (4. 5 kgf-m , 3 3 Ibf-ft )
DIFFERENTIA L
CAS E COVE R
ProCarManuals.com
Page 945 of 1954
Driveshafts
Removal
1. Loose n th e whee l nut s slightly .
2 . Rais e th e fron t o f th e vehicle , an d suppor t i t wit h
safet y stand s in th e prope r location s (se e sectio n 1 ).
3 . Remov e th e whee l nut s an d fron t wheels .
WHEEL NU T12 x 1. 5 m m
SPINDL E NU T24 x 1. 5 m mReplace . FRON
T WHEE L
4. Drai n th e differentia l oi l (se e sectio n 15 ).
NOTE : I t i s no t necessar y t o drai n th e differentia l oi l
whe n th e lef t driveshaf t i s removed .
5. Rais e th e lockin g ta b o n th e spindl e nut , the n remov e
the nut .
6. Remov e th e self-lockin g nu t an d flang e bolt s fro m
th e dampe r fork .
DAMPE R FOR K
Chec k fo r damage . FLANG
E BOL T
10 x 1.2 5 mm
7. Remov e th e dampe r fork .
SELF-LOCKIN G NU T12 x 1.2 5 mmReplace .
ProCarManuals.com