1996 ACURA RL KA9 lock
[x] Cancel search: lockPage 1022 of 1954
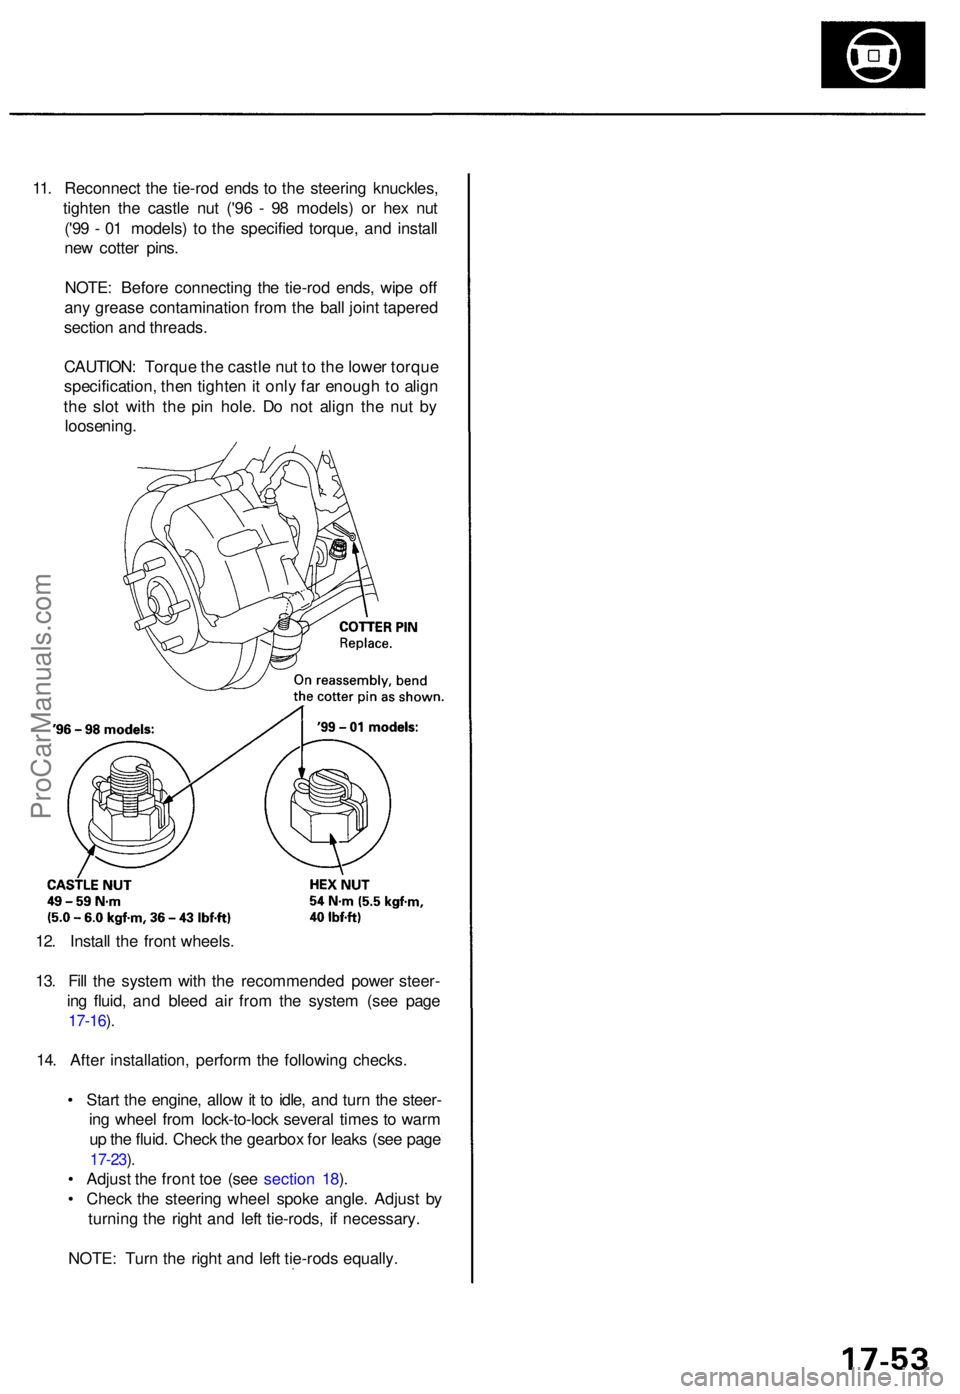
12. Instal l th e fron t wheels .
13 . Fil l th e syste m wit h th e recommende d powe r steer -
in g fluid , an d blee d ai r fro m th e syste m (se e pag e
17-16 ).
14 . Afte r installation , perfor m th e followin g checks .
• Star t th e engine , allo w it t o idle , an d tur n th e steer -
in g whee l fro m lock-to-loc k severa l time s t o war m
u p th e fluid . Chec k th e gearbo x fo r leak s (se e pag e
17-23 ).
• Adjus t th e fron t to e (se e sectio n 18 ).
• Chec k th e steerin g whee l spok e angle . Adjus t b y
turnin g th e righ t an d lef t tie-rods , i f necessary .
NOTE : Tur n th e righ t an d lef t tie-rod s equally .
11
. Reconnec t th e tie-ro d end s t o th e steerin g knuckles ,
tighte n th e castl e nu t ('9 6 - 9 8 models ) o r he x nu t
('9 9 - 0 1 models ) t o th e specifie d torque , an d instal l
ne w cotte r pins .
NOTE : Befor e connectin g th e tie-ro d ends , wip e of f
an y greas e contaminatio n fro m th e bal l join t tapere d
sectio n an d threads .
CAUTION : Torqu e th e castl e nu t t o th e lowe r torqu e
specification , the n tighte n it onl y fa r enoug h to alig n
th e slo t wit h th e pi n hole . D o no t alig n th e nu t b y
loosening .
ProCarManuals.com
Page 1027 of 1954
Front Toe Inspection/Adjustment
NOTE: Use commercially-available computerized four
wheel alignment equipment to measure wheel align-
ment (caster, camber, toe, and/or turning angle).
Follow the equipment manufacturer's instructions.
1. Check the tire pressure.
2. Center the steering wheel spokes.
3. Check the toe with the wheels pointed straight
ahead.
Front toe: 0 ± 2 mm (0±1/16 in)
— If adjustment is required, go on to step 4.
— If no adjustment is required, remove the align-
ment equipment.
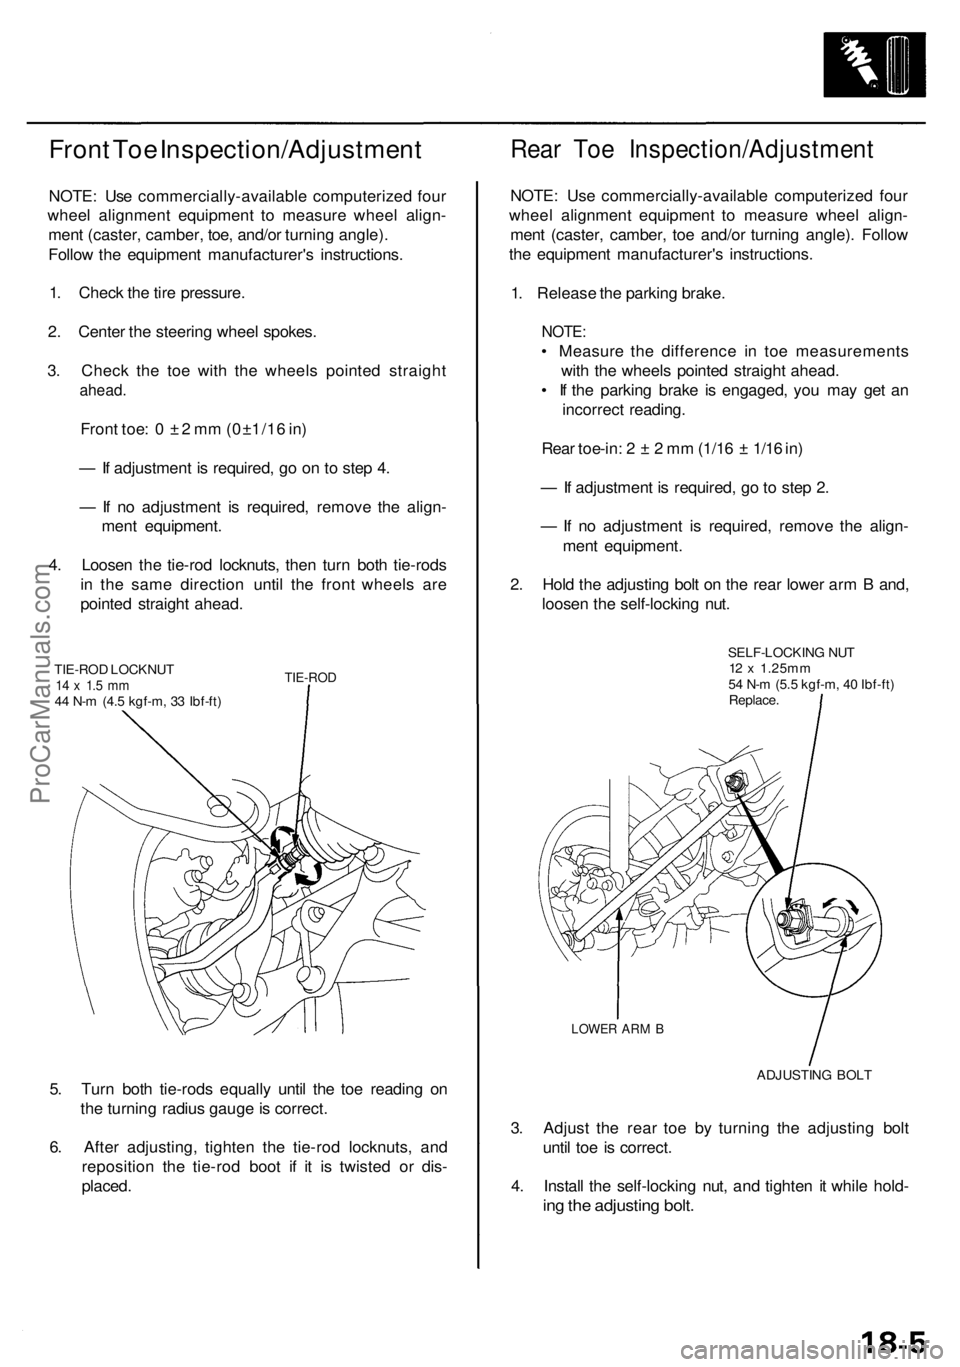
4. Loosen the tie-rod locknuts, then turn both tie-rods
in the same direction until the front wheels are
pointed straight ahead.
TIE-ROD LOCKNUT
14 x 1.5 mm
44 N-m (4.5 kgf-m, 33 Ibf-ft)
TIE-ROD
5. Turn both tie-rods equally until the toe reading on
the turning radius gauge is correct.
6. After adjusting, tighten the tie-rod locknuts, and
reposition the tie-rod boot if it is twisted or dis-
placed.
Rear Toe Inspection/Adjustment
NOTE: Use commercially-available computerized four
wheel alignment equipment to measure wheel align-
ment (caster, camber, toe and/or turning angle). Follow
the equipment manufacturer's instructions.
1. Release the parking brake.
NOTE:
• Measure the difference in toe measurements
with the wheels pointed straight ahead.
• If the parking brake is engaged, you may get an
incorrect reading.
Rear toe-in: 2 ± 2 mm (1/16 ± 1/16 in)
— If adjustment is required, go to step 2.
— If no adjustment is required, remove the align-
ment equipment.
2. Hold the adjusting bolt on the rear lower arm B and,
loosen the self-locking nut.
SELF-LOCKING NUT
12 x 1.25mm
54 N-m (5.5 kgf-m, 40 Ibf-ft)
Replace.
LOWER ARM B
ADJUSTING BOLT
3. Adjust the rear toe by turning the adjusting bolt
until toe is correct.
4. Install the self-locking nut, and tighten it while hold-
ing the adjusting bolt.ProCarManuals.com
Page 1031 of 1954
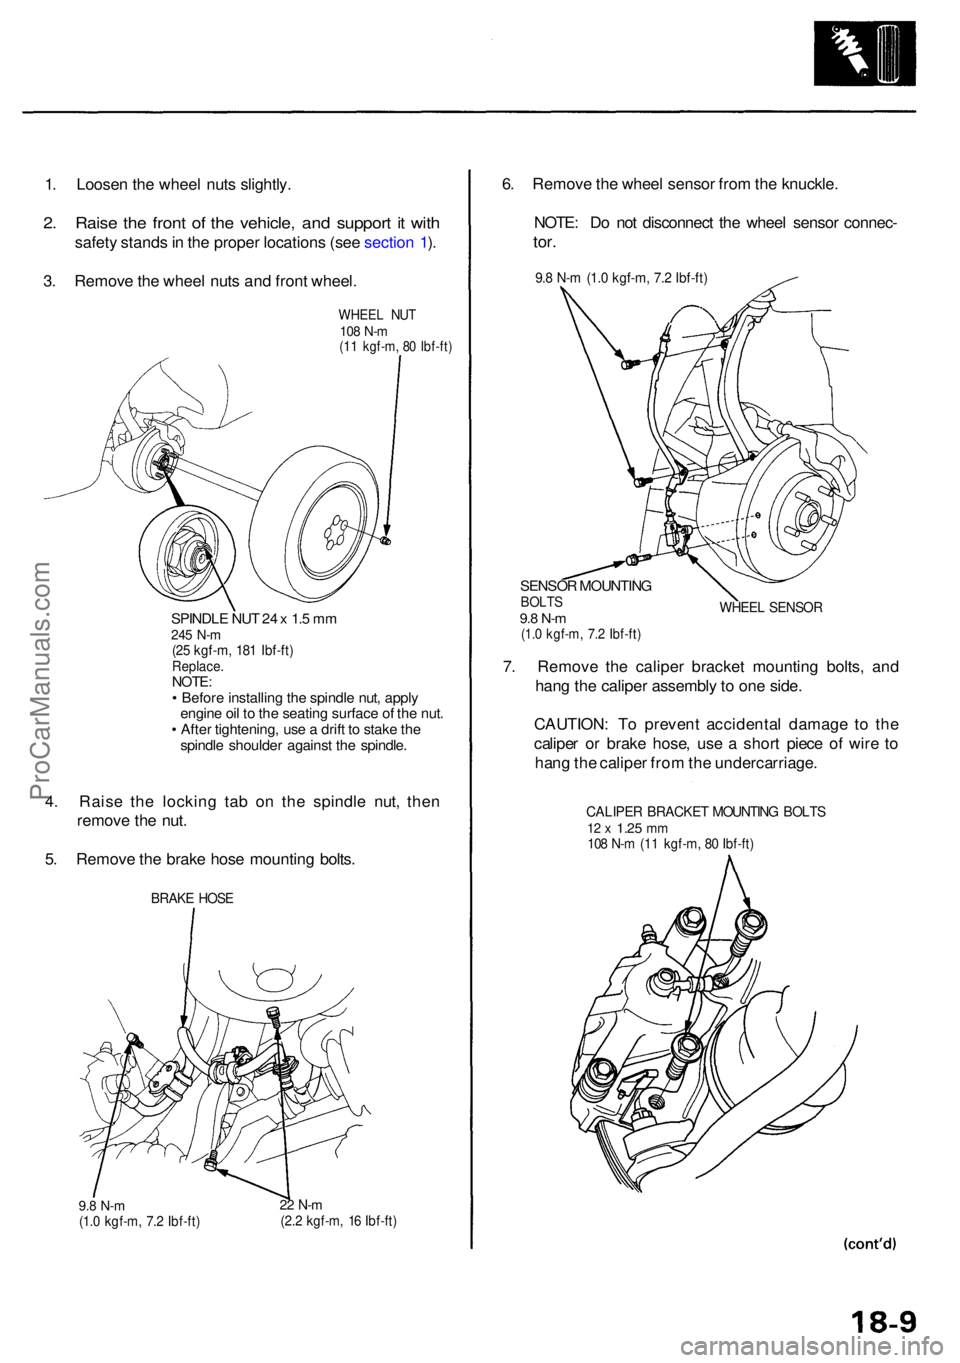
1. Loose n th e whee l nut s slightly .
2. Rais e th e fron t o f th e vehicle , an d suppor t i t wit h
safet y stand s in th e prope r location s (se e sectio n 1 ).
3 . Remov e th e whee l nut s an d fron t wheel .
WHEE L NU T108 N- m(11 kgf-m , 8 0 Ibf-ft )
SPINDL E NU T 2 4 x 1. 5 m m245 N- m(25 kgf-m , 18 1 Ibf-ft )Replace .NOTE:• Befor e installin g th e spindl e nut , appl y
engin e oi l t o th e seatin g surfac e o f th e nut .
• Afte r tightening , us e a drif t t o stak e th e
spindl e shoulde r agains t th e spindle .
4. Rais e th e lockin g ta b o n th e spindl e nut , the n
remov e th e nut .
5 . Remov e th e brak e hos e mountin g bolts .
BRAK E HOS E
9.8 N- m(1.0 kgf-m , 7. 2 Ibf-ft )22 N- m(2.2 kgf-m , 1 6 Ibf-ft )
6. Remov e th e whee l senso r fro m th e knuckle .
NOTE : D o no t disconnec t th e whee l senso r connec -
tor.
9.8 N- m (1. 0 kgf-m , 7. 2 Ibf-ft )
SENSO R MOUNTIN GBOLTS9.8 N- m(1.0 kgf-m , 7. 2 Ibf-ft )
WHEE L SENSO R
7. Remov e th e calipe r bracke t mountin g bolts , an d
han g th e calipe r assembl y t o on e side .
CAUTION : T o preven t accidenta l damag e t o th e
calipe r o r brak e hose , us e a shor t piec e o f wir e t o
han g th e calipe r fro m th e undercarriage .
CALIPER BRACKE T MOUNTIN G BOLT S12 x 1.2 5 mm108 N- m (1 1 kgf-m , 8 0 Ibf-ft )
ProCarManuals.com
Page 1037 of 1954
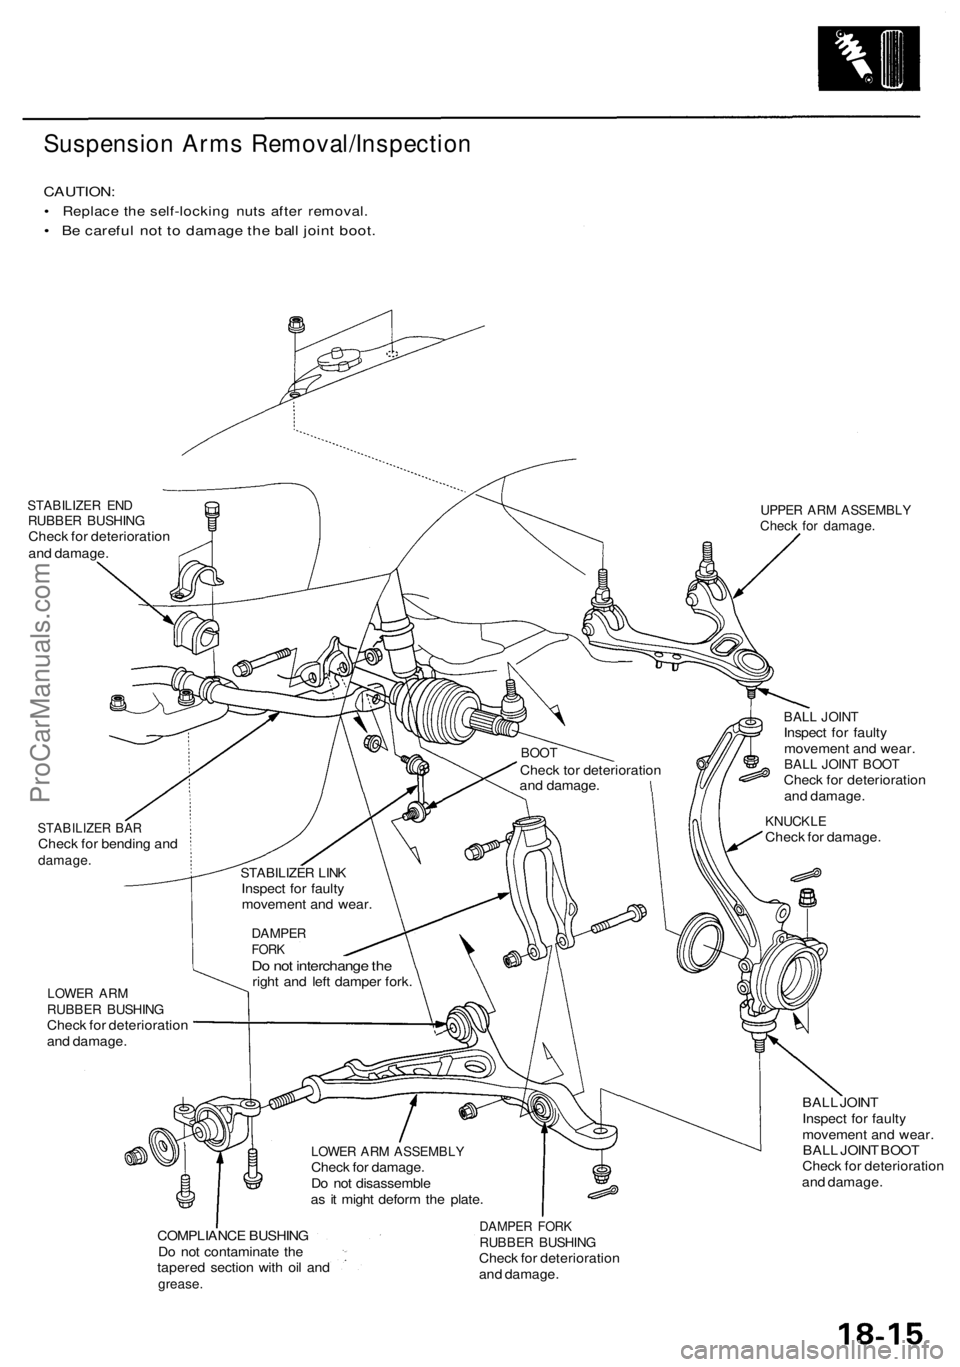
Suspension Arms Removal/Inspection
CAUTION:
• Replace the self-locking nuts after removal.
• Be careful not to damage the ball joint boot.
STABILIZER END
RUBBER BUSHING
Check for deterioration
and damage.
UPPER ARM ASSEMBLY
Check for damage.
STABILIZER BAR
Check for bending and
damage.
BALL JOINT
Inspect for faulty
movement and wear.
BALL JOINT BOOT
Check for deterioration
and damage.
KNUCKLE
Check for damage.
LOWER ARM
RUBBER BUSHING
Check for deterioration
and damage.
BALL JOINT
Inspect for faulty
movement and wear.
BALL JOINT BOOT
Check for deterioration
and damage.
COMPLIANCE BUSHING
Do not contaminate the
tapered section with oil and
grease.
DAMPER FORK
RUBBER BUSHING
Check for deterioration
and damage.
LOWER ARM ASSEMBLY
Check for damage.
Do not disassemble
as it might deform the plate.
DAMPER
FORK
Do not interchange the
right and left damper fork.
STABILIZER LINK
Inspect for faulty
movement and wear.
BOOT
Check tor deterioration
and damage.ProCarManuals.com
Page 1038 of 1954
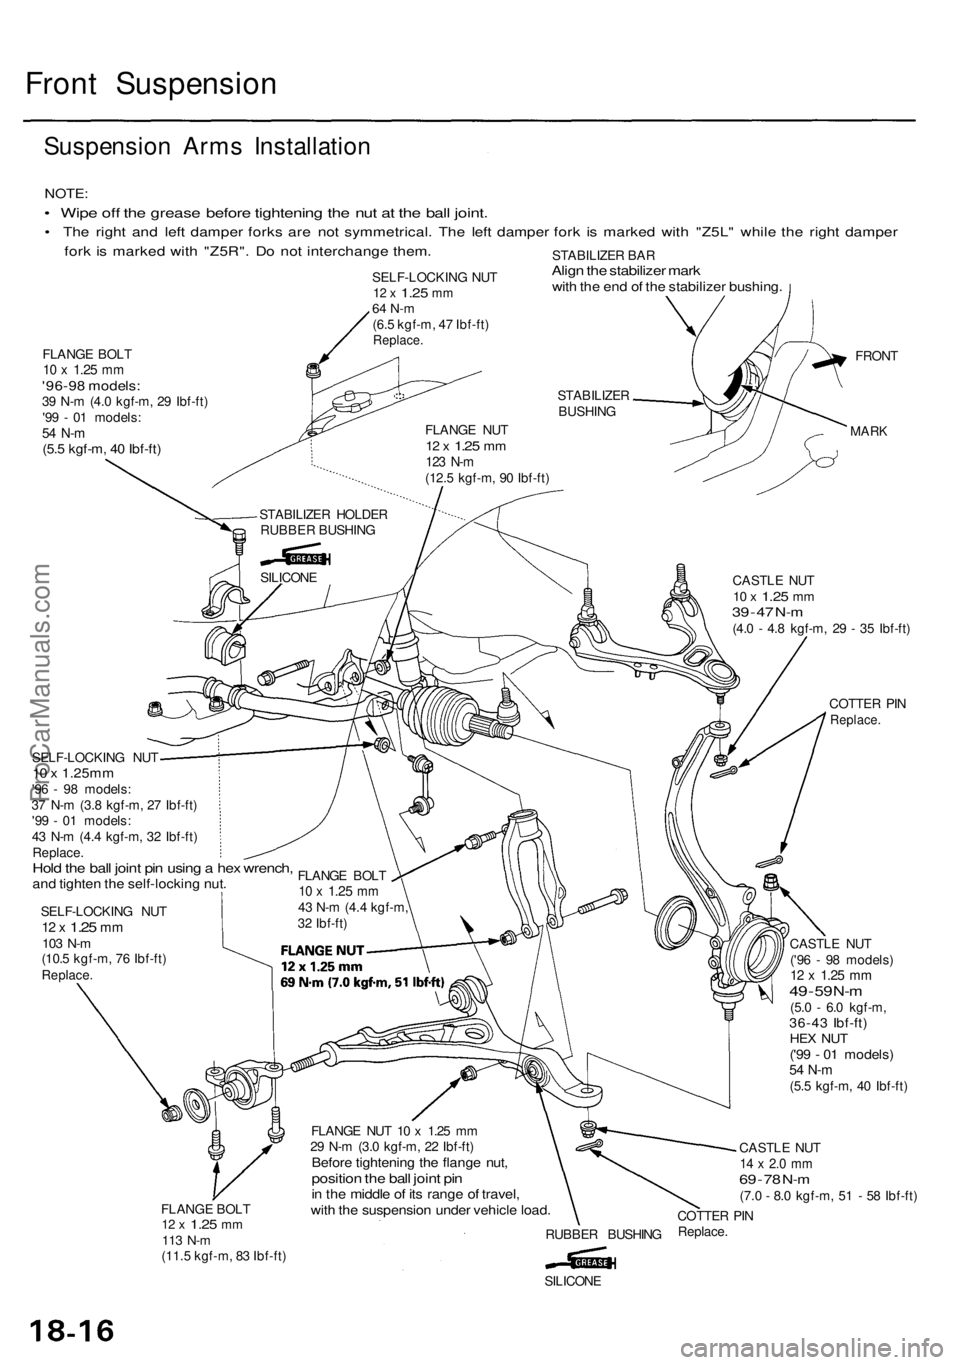
Front Suspension
Suspension Arms Installation
NOTE:
• Wipe off the grease before tightening the nut at the ball joint.
• The right and left damper forks are not symmetrical. The left damper fork is marked with "Z5L" while the right damper
fork is marked with "Z5R". Do not interchange them.
STABILIZER BAR
Align the stabilizer mark
with the end of the stabilizer bushing.
FLANGE BOLT
10 x
1.25
mm
'96-98 models:
39 N-m (4.0 kgf-m, 29 Ibf-ft)
'99 - 01 models:
54 N-m
(5.5 kgf-m, 40 Ibf-ft)
CASTLE NUT
10 x
1.25
mm
39 - 47
N-m
(4.0 - 4.8 kgf-m, 29 - 35 Ibf-ft)
COTTER PIN
Replace.
FRONT
MARK
SELF-LOCKING NUT
10 x 1.25mm
'96 - 98 models:
37 N-m (3.8 kgf-m, 27 Ibf-ft)
'99 - 01 models:
43 N-m (4.4 kgf-m, 32 Ibf-ft)
Replace.
Hold the ball joint pin using a hex wrench,
and tighten the self-locking nut.
SELF-LOCKING NUT
12 x
1.25
mm
103 N-m
(10.5 kgf-m, 76 Ibf-ft)
Replace.
FLANGE BOLT
12 x
1.25
mm
113 N-m
(11.5 kgf-m, 83 Ibf-ft)
FLANGE NUT 10 x 1.25 mm
29 N-m (3.0 kgf-m, 22 Ibf-ft)
Before tightening the flange nut,
position the ball joint pin
in the middle of its range of travel,
with the suspension under vehicle load.
RUBBER BUSHING
CASTLE NUT
('96 - 98 models)
12 x
1.25
mm
49
-
59
N-m
(5.0 - 6.0 kgf-m,
36-43 Ibf-ft)
HEX NUT
('99 - 01 models)
54 N-m
(5.5 kgf-m, 40 Ibf-ft)
CASTLE NUT
14 x 2.0 mm
69 - 78
N-m
(7.0 - 8.0 kgf-m, 51 - 58 Ibf-ft)
COTTER PIN
Replace.
SILICONE
SELF-LOCKING NUT
12 x
1.25
mm
64 N-m
(6.5 kgf-m, 47 Ibf-ft)
Replace.
STABILIZER
BUSHING
FLANGE NUT
12 x
1.25
mm
123 N-m
(12.5 kgf-m, 90 Ibf-ft)
STABILIZER HOLDER
RUBBER BUSHING
SILICONE
FLANGE BOLT
10 x
1.25
mm
43 N-m (4.4 kgf-m,
32 Ibf-ft)ProCarManuals.com
Page 1039 of 1954
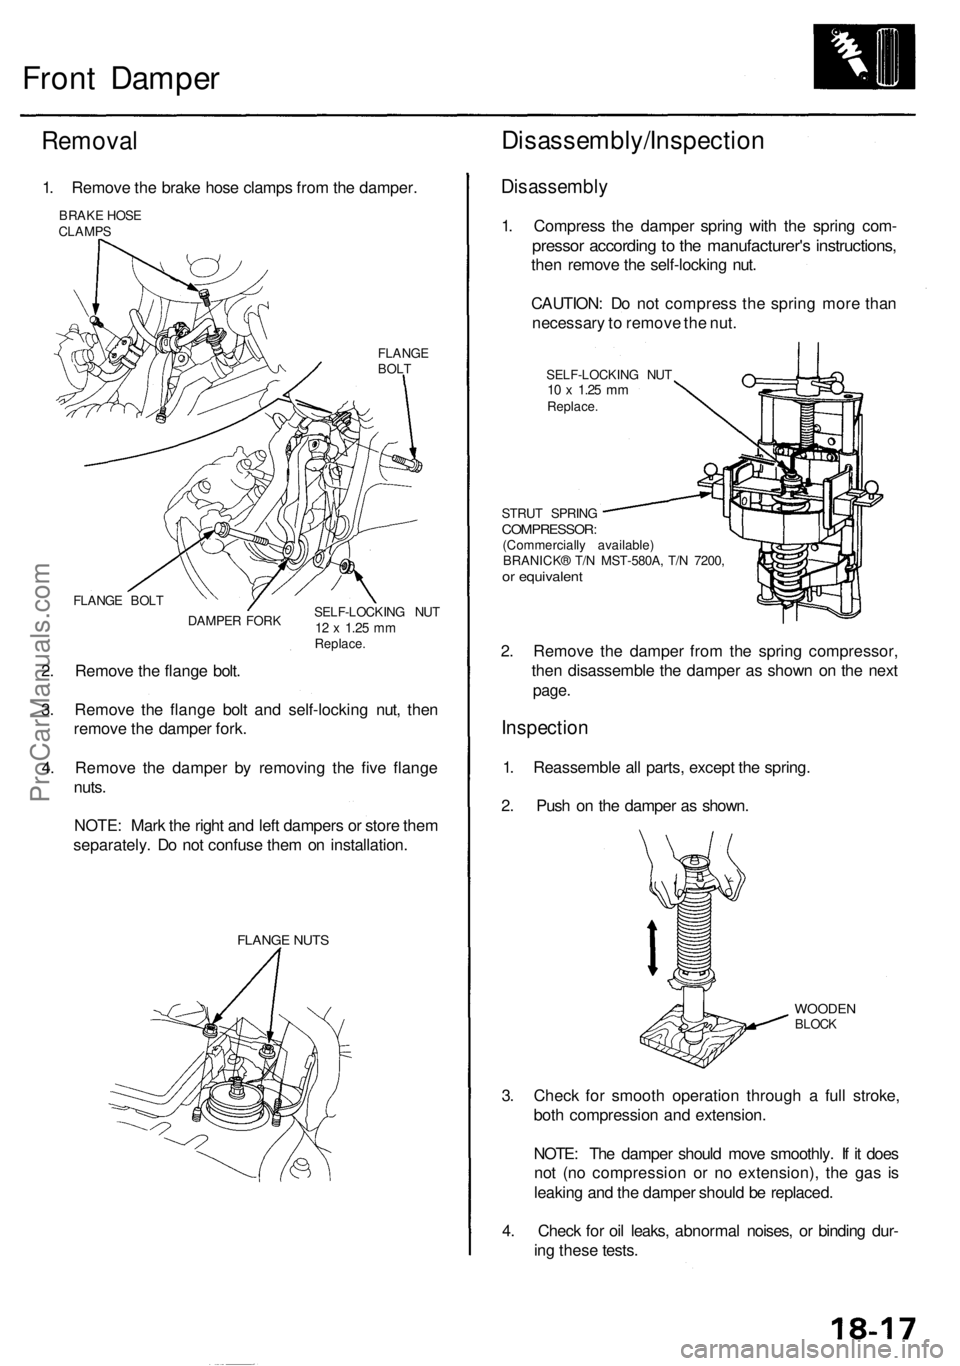
Front Damper
Removal
1. Remove the brake hose clamps from the damper.
BRAKE HOSE
CLAMPS
FLANGE
BOLT
FLANGE BOLT
DAMPER FORK
SELF-LOCKING NUT
12 x
1.25
mm
Replace.
2. Remove the flange bolt.
3. Remove the flange bolt and self-locking nut, then
remove the damper fork.
4. Remove the damper by removing the five flange
nuts.
NOTE: Mark the right and left dampers or store them
separately. Do not confuse them on installation.
FLANGE NUTS
Disassembly/Inspection
Disassembly
1. Compress the damper spring with the spring com-
pressor according to the manufacturer's instructions,
then remove the self-locking nut.
CAUTION: Do not compress the spring more than
necessary to remove the nut.
SELF-LOCKING NUT
10 x
1.25
mm
Replace.
STRUT SPRING
COMPRESSOR:
(Commercially available)
BRANICK® T/N MST-580A, T/N 7200,
or equivalent
2. Remove the damper from the spring compressor,
then disassemble the damper as shown on the next
page.
Inspection
1. Reassemble all parts, except the spring.
2. Push on the damper as shown.
WOODEN
BLOCK
3. Check for smooth operation through a full stroke,
both compression and extension.
NOTE: The damper should move smoothly. If it does
not (no compression or no extension), the gas is
leaking and the damper should be replaced.
4. Check for oil leaks, abnormal noises, or binding dur-
ing these tests.ProCarManuals.com
Page 1040 of 1954
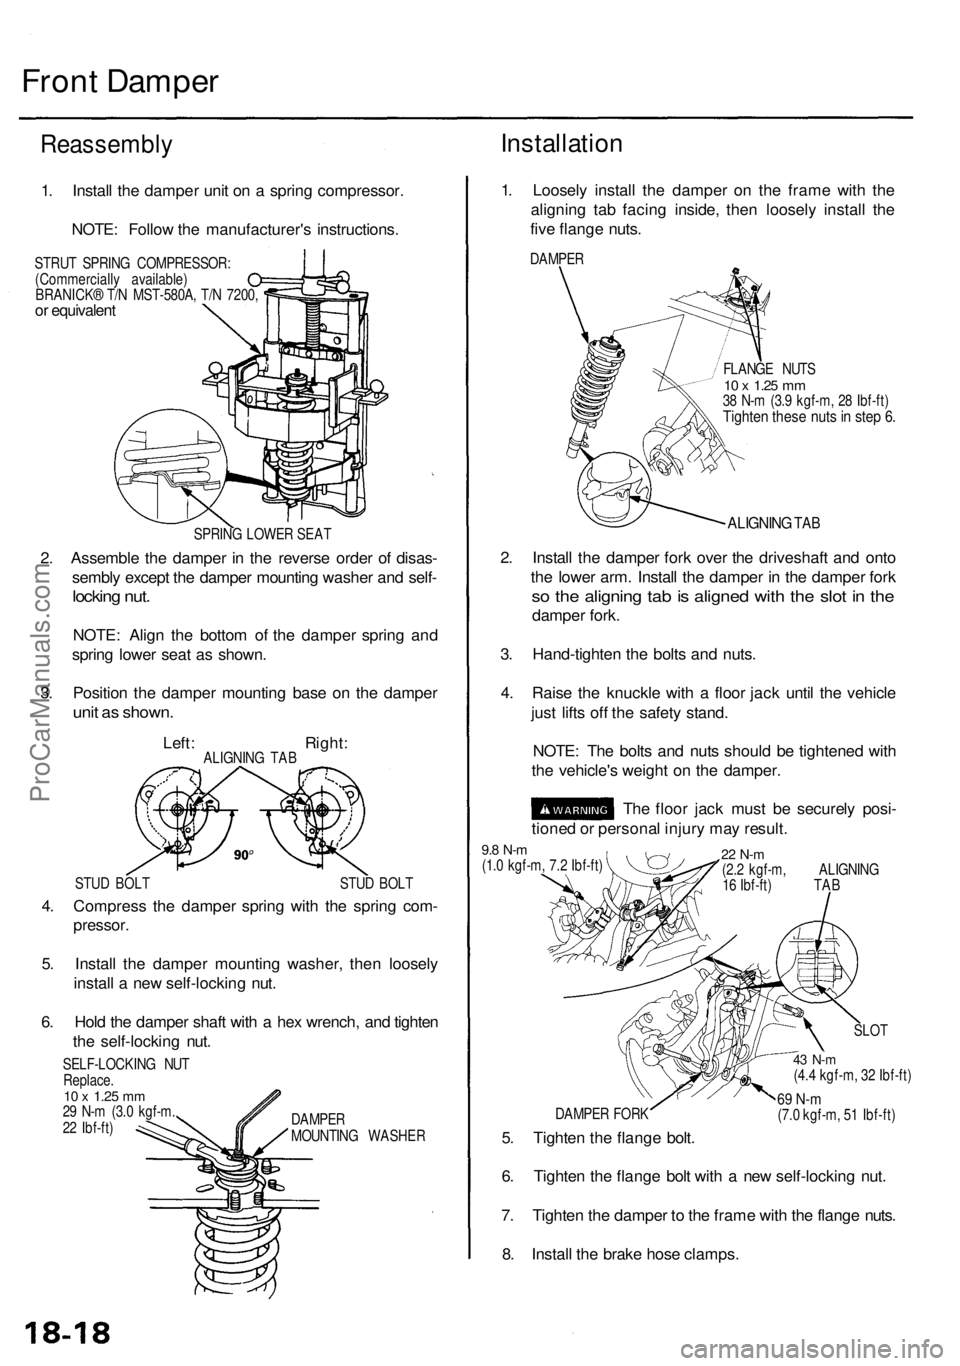
Front Dampe r
Reassembl y
1. Instal l th e dampe r uni t o n a sprin g compressor .
NOTE : Follo w th e manufacturer' s instructions .
STRUT SPRIN G COMPRESSOR :
(Commerciall y available )
BRANICK ® T/ N MST-580A , T/ N 7200 ,
or equivalen t
SPRING LOWE R SEA T
2. Assembl e th e dampe r i n th e revers e orde r o f disas -
sembl y excep t th e dampe r mountin g washe r an d self -
lockin g nut .
NOTE : Alig n th e botto m o f th e damper spring an d
sprin g lowe r sea t a s shown .
3 . Positio n th e dampe r mountin g bas e o n th e dampe r
unit a s shown .
Left: Right :ALIGNING TA B
STU D BOL T STU D BOL T
4. Compres s th e dampe r sprin g wit h th e sprin g com -
pressor .
5. Instal l th e dampe r mountin g washer , the n loosel y
instal l a ne w self-lockin g nut .
6 . Hol d th e dampe r shaf t wit h a he x wrench , an d tighte n
th e self-lockin g nut .
SELF-LOCKIN G NU T
Replace .
10 x 1.2 5 mm29 N- m (3. 0 kgf-m .
2 2 Ibf-ft ) DAMPE
R
MOUNTIN G WASHE R
Installation
1. Loosel y instal l th e dampe r o n th e fram e wit h th e
alignin g ta b facin g inside , the n loosel y instal l th e
fiv e flang e nuts .
DAMPE R
FLANGE NUT S
10 x 1.2 5 mm38 N- m (3. 9 kgf-m , 2 8 Ibf-ft )Tighte n thes e nut s in ste p 6 .
ALIGNIN G TAB
2. Instal l th e dampe r for k ove r th e driveshaf t an d ont o
th e lowe r arm . Instal l th e dampe r i n th e dampe r for k
so th e alignin g ta b is aligne d wit h th e slo t i n th e
dampe r fork .
3 . Hand-tighte n th e bolt s an d nuts .
4 . Rais e th e knuckl e wit h a floo r jac k unti l th e vehicl e
jus t lift s of f th e safet y stand .
NOTE : Th e bolt s an d nut s shoul d b e tightene d wit h
th e vehicle' s weigh t o n th e damper .
Th e floo r jac k mus t b e securel y posi -
tione d o r persona l injur y ma y result .
22 N- m(2.2 kgf-m , ALIGNIN G
1 6 Ibf-ft ) TA B
9.8 N- m(1.0 kgf-m , 7. 2 Ibf-ft )
DAMPE R FOR K
5. Tighte n th e flang e bolt .
SLO T
43 N- m(4.4 kgf-m , 3 2 Ibf-ft )
69 N- m(7.0 kgf-m , 5 1 Ibf-ft )
6. Tighte n th e flang e bol t wit h a ne w self-lockin g nut .
7 . Tighte n th e dampe r t o th e fram e wit h th e flang e nuts .
8 . Instal l th e brak e hos e clamps .
ProCarManuals.com
Page 1043 of 1954
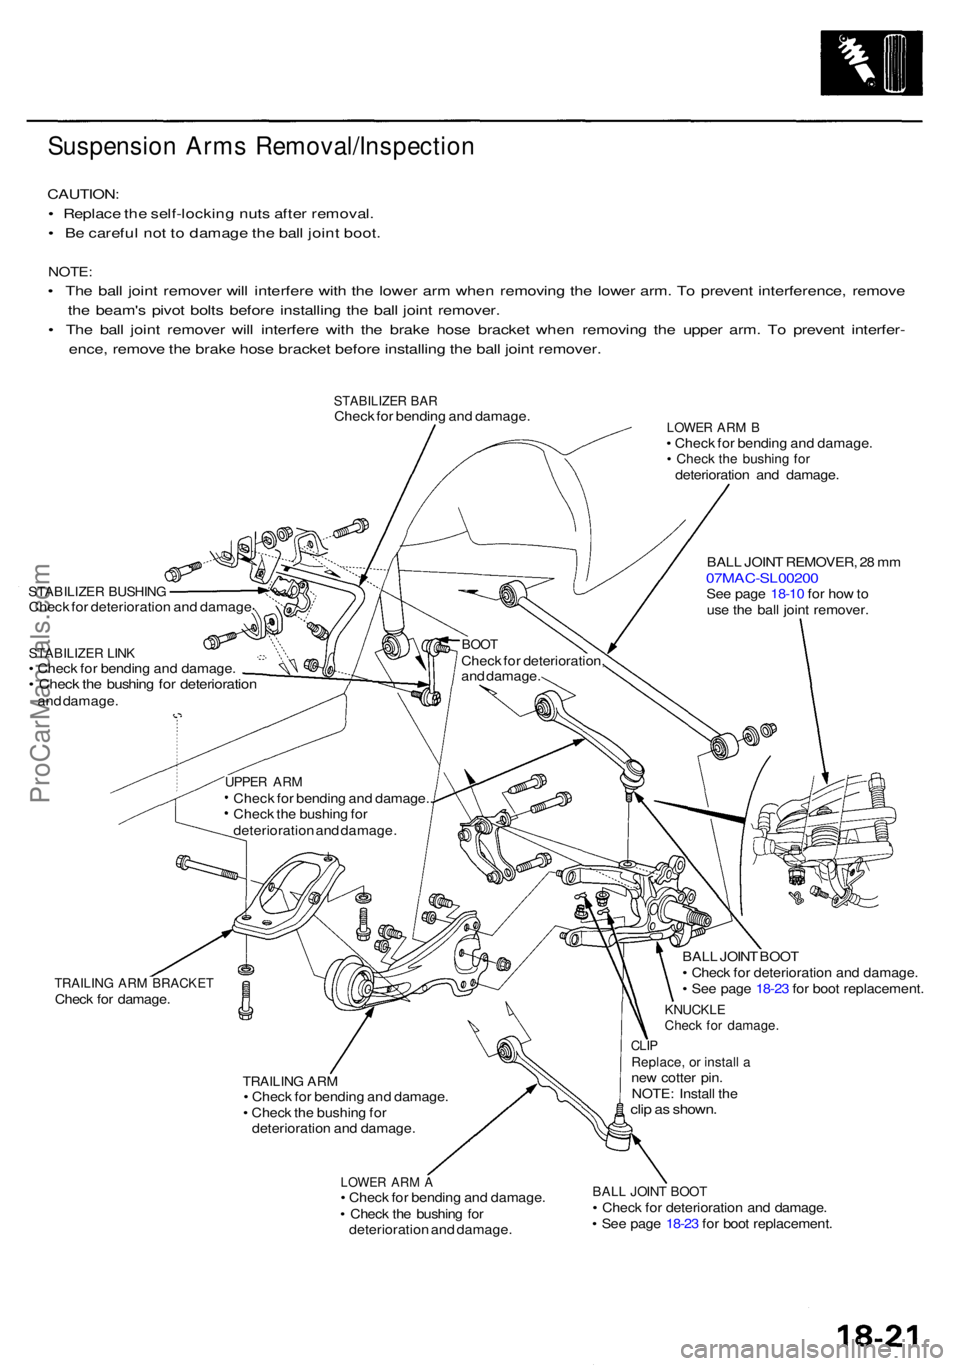
Suspension Arm s Removal/Inspectio n
CAUTION:
• Replac e th e self-lockin g nut s afte r removal .
• B e carefu l no t t o damag e th e bal l join t boot .
NOTE :
• Th e bal l join t remove r wil l interfer e wit h th e lowe r ar m whe n removin g th e lowe r arm . T o preven t interference , remov e
th e beam' s pivo t bolt s befor e installin g th e bal l join t remover .
• Th e bal l join t remove r wil l interfer e wit h th e brak e hos e bracke t whe n removin g th e uppe r arm . T o preven t interfer -
ence , remov e th e brak e hos e bracke t befor e installin g th e bal l join t remover .
STABILIZE R BA RChec k fo r bendin g an d damage .
STABILIZE R BUSHIN GCheck fo r deterioratio n an d damag e
STABILIZE R LIN K• Chec k fo r bendin g an d damage .• Chec k th e bushin g fo r deterioratio nand damage .
LOWER AR M B• Chec k fo r bendin g an d damage .• Chec k th e bushin g fo rdeterioratio n an d damage .
BAL L JOIN T REMOVER , 2 8 m m
07MAC-SL0020 0See pag e 18-1 0 fo r ho w to
us e th e bal l join t remover .
TRAILING AR M BRACKE TCheck fo r damage .
TRAILING AR M• Chec k fo r bendin g an d damage .
• Chec k th e bushin g fo r
deterioratio n an d damage .
LOWER AR M A• Chec k fo r bendin g an d damage .
• Chec k th e bushin g fo r
deterioratio n an d damage . BAL
L JOIN T BOO T
• Chec k fo r deterioratio n an d damage .
• Se e pag e 18-2 3 fo r boo t replacement .
KNUCKLECheck fo r damage .
CLIPReplace , o r instal l ane w cotte r pin .
NOTE : Instal l th e
clip a s shown .
BALL JOIN T BOO T• Chec k fo r deterioratio n an d damage .
• Se e pag e 18-2 3 fo r boo t replacement .
BOOTChec k fo r deterioration ,
an d damage .
UPPER AR MChec k fo r bendin g an d damage. .
Chec k th e bushin g fo r
deterioratio n an d damage .
ProCarManuals.com