1995 NISSAN ALMERA N15 Engine
[x] Cancel search: EnginePage 51 of 1701
SAT620EDISASSEMBL
Y
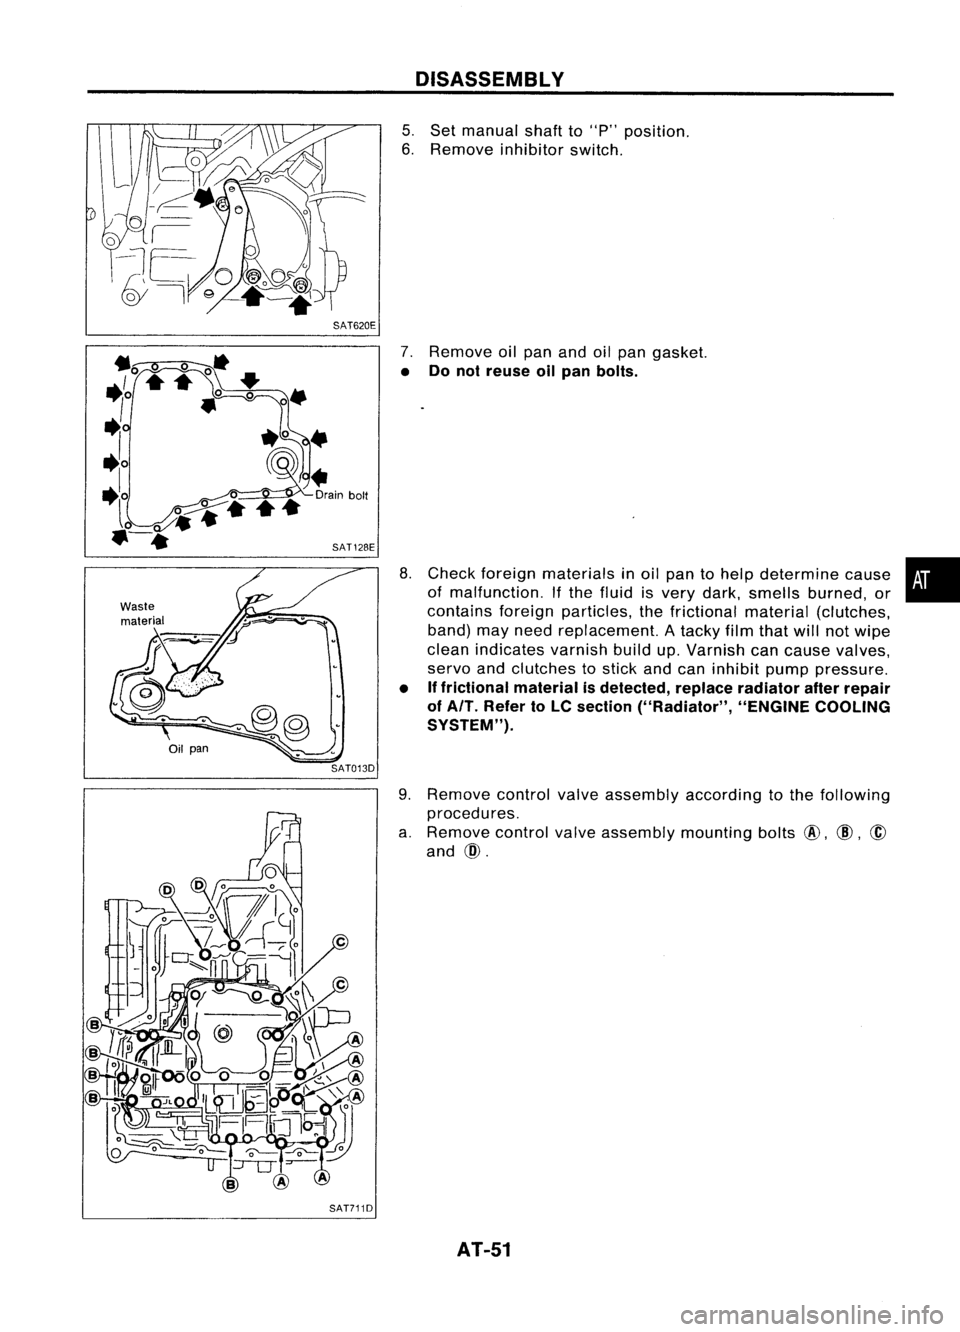
5. Set manual shaftto"P" position.
6. Remove inhibitorswitch.
Waste material
Oil
pan
SAT013D
7.
Remove oilpan andoilpan gasket.
• Donot reuse oilpan bolts.
8. Check foreign materials inoil pan tohelp determine cause•
of malfunction. Ifthe fluid isvery dark, smells burned, or
contains foreignparticles, thefrictional material(clutches,
band) mayneed replacement. Atacky filmthat willnotwipe
clean indicates varnishbuildup.Varnish cancause valves,
servo andclutches tostick andcaninhibit pumppressure.
• Iffrictional materialisdetected, replaceradiator afterrepair
of AlT. Refer toLC section ("Radiator", "ENGINECOOLING
SYSTEM").
SAT711D
9.
Remove controlvalveassembly according tothe following
procedures.
a. Remove controlvalveassembly mountingbolts@,
CID,
@
and @.
AT-51
Page 166 of 1701
Vehiclespeed
km/h (MPH)
Gear position
Throttle position
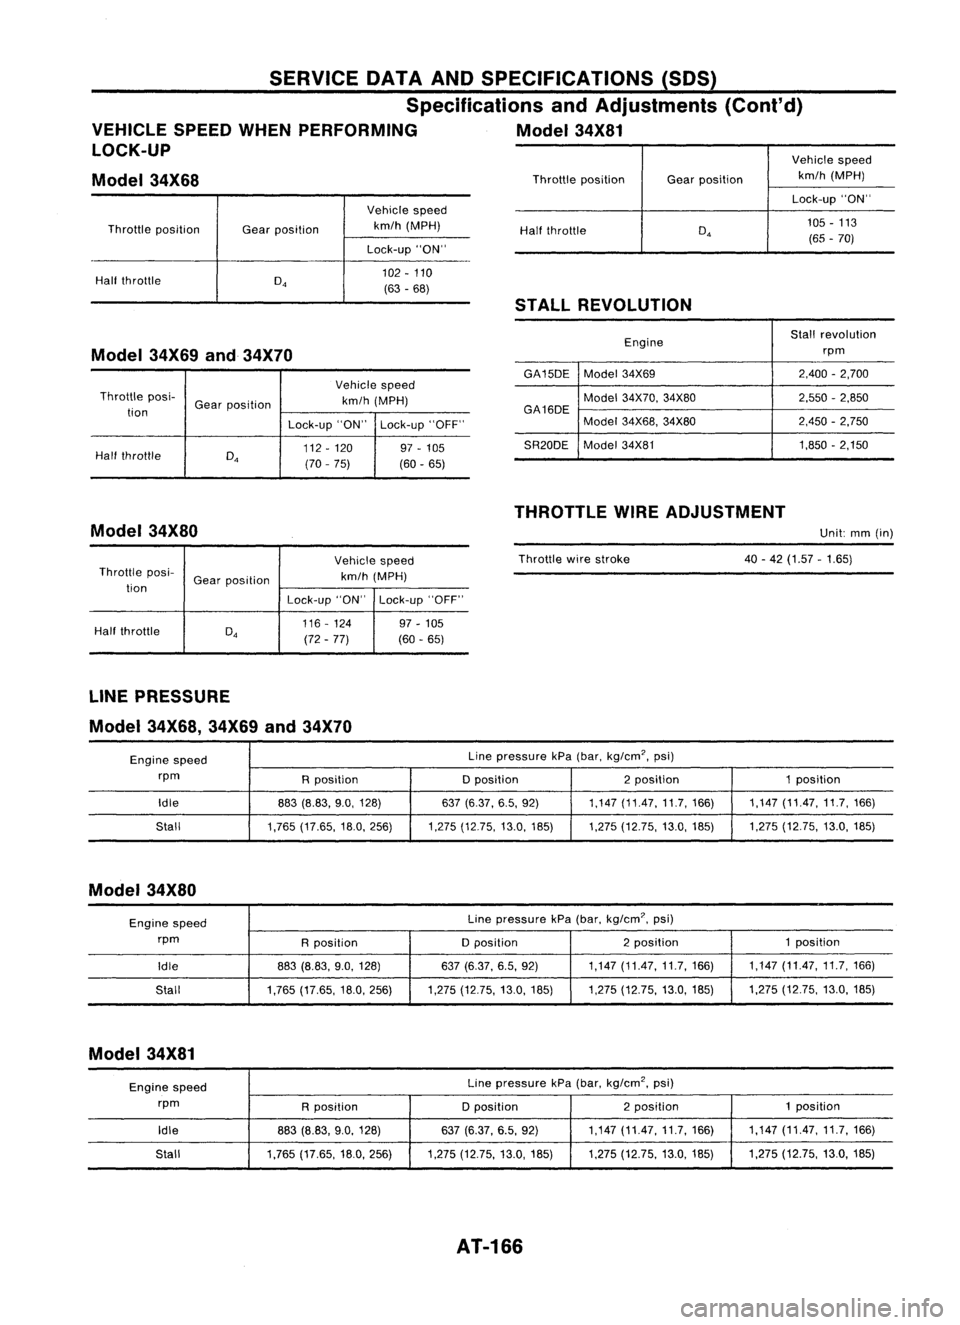
SERVICE
OATAAND SPECIFICATIONS (SOS)
Specifications andAdjustments (Cont'd)
VEHICLE SPEEDWHENPERFORMING Model34X81
LOCK-UP
Model 34X68
Throttle position
Half throttle Gear
position Vehicle
speed
km/h (MPH)
Lock-up "ON"
102 -110
(63 -68)
Half
throttle
STALL REVOLUTION
Lock-up
"ON"
105 -113
(65 -70)
Model 34X69and34X70
Vehiclespeed
Throttle posi-
Gearposition km/h
(MPH)
tion
Lock-up"ON"Lock-up "OFF"
Half throttle
D
4
112
-120 97-105
(70 -75)
(60-65) Engine
Stall
revolution
rpm
GA15DE Model34X69 2,400
-2,700
Model 34X70, 34X80 2,550-2,850
GA16DE Model34X68, 34X80 2,450
-2,750
SR20DE Model
34X81 1,850-2,150
THROTTLE WIREADJUSTMENT
Model 34X80
Unit:mm(in)
Vehicle speed
Throttle posi-
Gearposition km/h
(MPH)
tion Lock-up"ON"Lock-up "OFF"
Half throttle
D
4
116
-124 97-105
(72 -77) (60
-65) Throttle
wirestroke 40-42 (1.57 -1.65)
LINE PRESSURE
Model 34X68, 34X69and34X70
Engine speed Line
pressure kPa(bar, kg/em', psi)
rpm Rposition Dposition 2position 1position
Idle 883(8.83, 9.0,128) 637
(6.37, 6.5,92) 1,147(11.47,11.7,166) 1,147(11.47,11.7,166)
Stall 1,765(17.65, 18.0,256) 1,275(12.75,13.0,185) 1,275(12.75, 13.0,185) 1,275
(12.75,13.0,185)
Model 34X80
Engine speed Line
pressure kPa(bar, kg/em?, psi)
rpm Rposition Dposition 2
position 1position
Idle 883(8.83, 9.0,128) 637(6.37, 6.5,92) 1,147
(11.47,11.7,166) 1,147
(11.47,11.7,166)
Stall 1,765
(17.65, 18.0,256) 1,275(12.75, 13.0,185) 1,275(12.75, 13.0,185) 1,275
(12.75, 13.0,185)
Model 34X81
Engine speed Line
pressure kPa(bar, kg/em', psi)
rpm Rposition Dposition 2position 1
position
Idle 883(8.83, 9.0,128) 637(6.37, 6.5,92) 1,147
(11.47,11.7,166) 1,147
(11.47,11.7,166)
Stall 1,765
(17.65, 18.0,256) 1,275(12.75, 13.0,185) 1,275(12.75, 13.0,185) 1,275
(12.75, 13.0,185)
AT-166
Page 175 of 1701
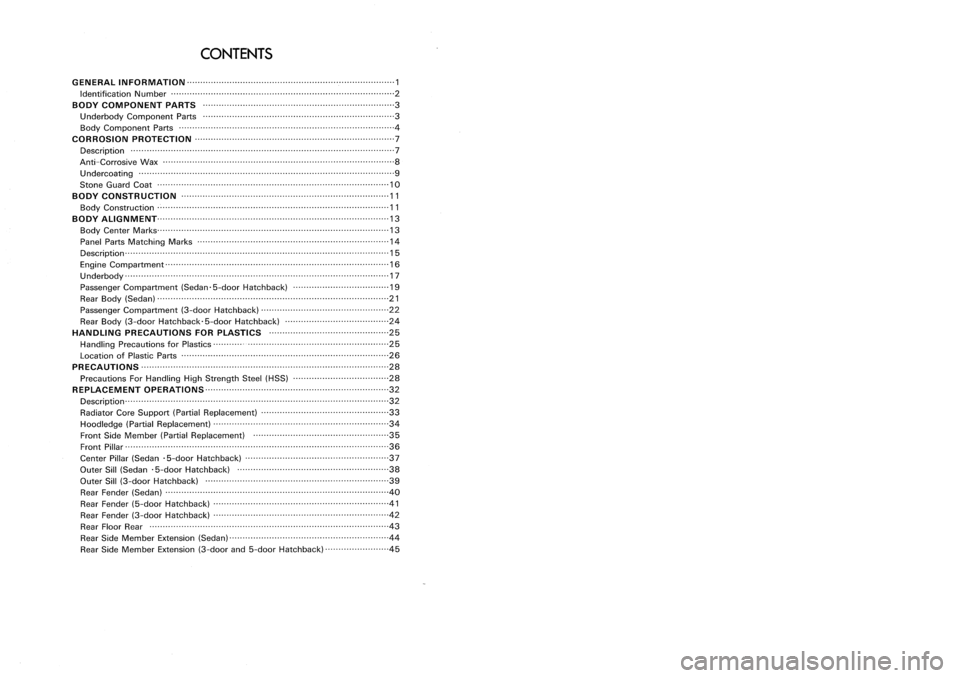
CONTENTS
G EN ERAL IN FORMATION 1
Identification Number 2
BODY COMPONENT PARTS 3
U nderbody Component Parts 3
Body Component Parts 4
CO RROSlO NPR OTECTI 0N 7
Description 7
Anti -Co rrosive Wax 8
Undercoating 9
Stone Guard Coat 10
BODY CONSTRUCTION 11
Body Construction .~ 11
BODY ALIGNM ENT 13
Body Center Marks 13
Panel PartsMatching Marks 14
Description 15
Engine Compartment 16
Underbody 17
Passenger Compartment (Sedan-5-door Hatchback) 19
Rear Body (Sedan) 21
Passenger Compartment (3-doorHatchback) 22
Rear Body (3-door Hatchback-5-door Hatchback) 24
HANDLING PRECAUTIONS FORPLASTICS 25
Handling Precautions forPlastics
>-•••••••••••••••••••••••••••••••••••••••••••••••••••••
25
Location ofPlastic Parts - 26
PR ECAUTIONS 28
Precautions ForHandling HighStrength Steel(HSS) 28
R EPLACEM ENTOPERATIONS 32
Description 32
Radiator CoreSupport (PartialReplacement) 33
Hoodledge (PartialReplacement) 34
Front SideMember (PartialReplacement) 35
Front Pillar..~ 36
Center Pillar(Sedan -5-door Hatchback) 37
Outer Sill(Sedan -5-door Hatchback) 38
Outer Sill(3-door Hatchback) 39
Rear Fender (Sedan) 40
Rear Fender (5-door Hatchback) 41
Rear Fender (3-door Hatchback) 42
Rear Floor Rear 43
Rear SideMember Extension (Sedan) 44
Rear SideMember Extension (3-doorand5-door Hatchback) 45
Page 176 of 1701
~~~~~~~~_GENERALJNFORM~ION~~~~~~~~_
IdentificationNumber _
REPLACEMENTOPERATIONS
Rear SideMember Extension
Sedan
-------
/
/\
---
/ \ -
'------- /~ ,,\I
c-
~ ~>~
111
114
Service
Joint
SGI908
Vehicle
identification plate
A
A
Vehicle
identification number
N15 U
0
xxxxxx.
T
T
---c::
serialnumber
0:
Stopgap (nomeaning)
Destination
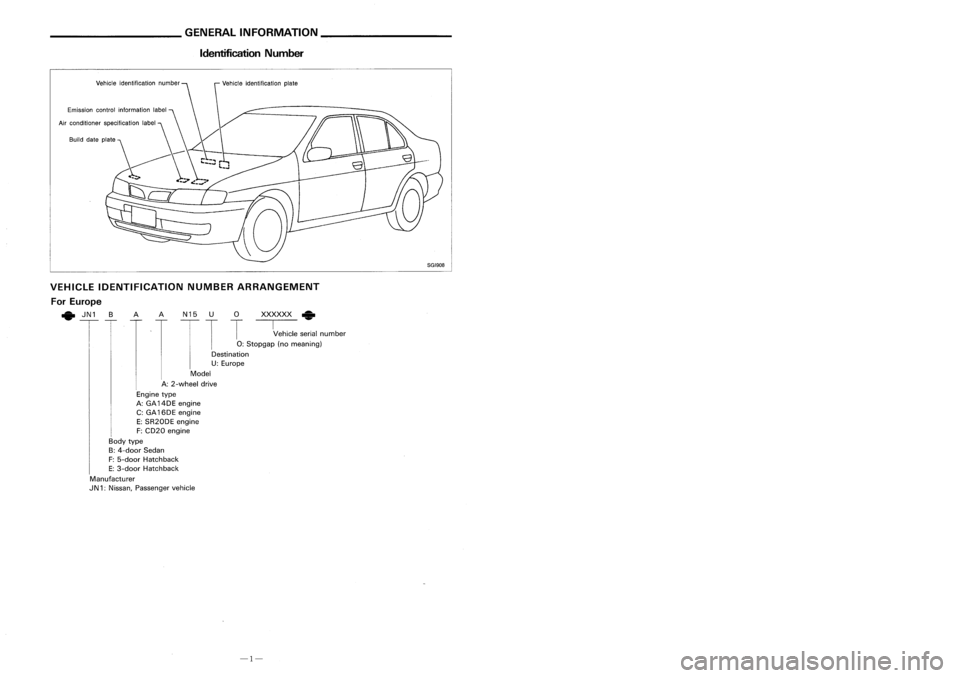
U: Europe
Model
A: 2-wheel drive
Engine type
A: GA 14DE engine
C: GA 16DE engine
E: SR20DE engine
F: CD20 engine
Body type
B: 4-door Sedan
F: 5-door Hatchback
E: 3-door Hatchback
Manufacturer
J
N 1: Nissan, Passenger vehicle
Emission
controlinformation label
VEHICLE IDENTIFICATION NUMBERARRANGEMENT
For Europe
• JN1 B
2-spotwelds 3-spotwelds M.I.G plug weld
(For 3panels plugweld method )
d
r;==
dA~ dB~
GTJ ~
M.
I.G seam weld/
Point weld
-1-
-44-
Page 177 of 1701
REPLACEMENTOPERATIONS
Rear Floor Rear ________
GENERALINFORMATION _
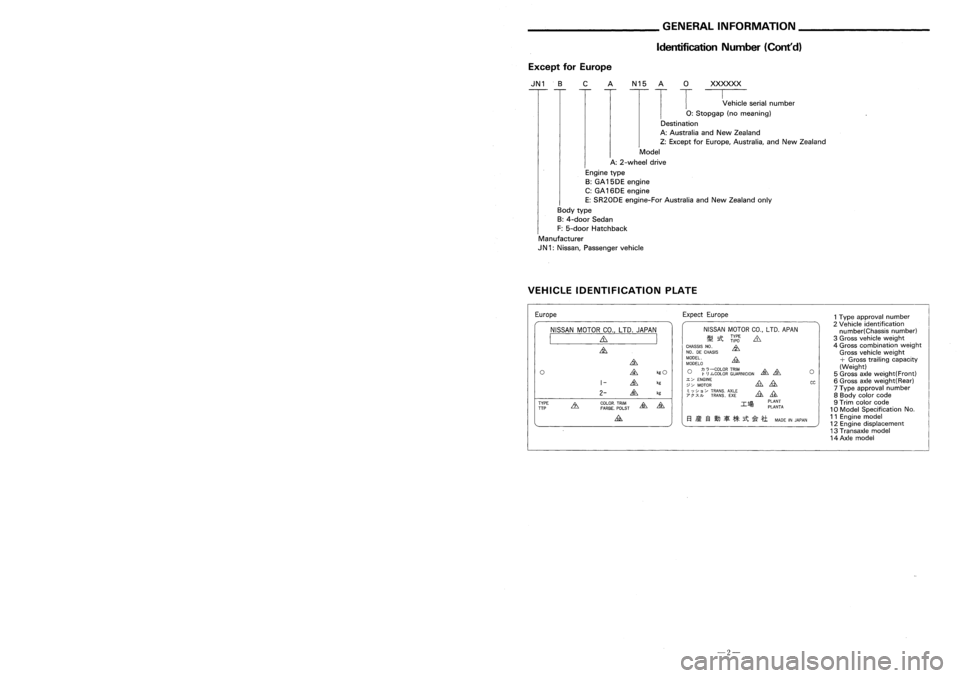
Identification Number(Cont'd)
(Work afterrearpanel havebeen removed.)
ExceptforEurope
IN 1 .B CAN 15A
0
XXXXXX
T
T
--c:::
serialnumber
0:
Stopgap (nomeaning)
Destination
A: Australia andNew Zealand
Z: Except forEurope, Australia, andNew Zealand
Model
A: 2-wheel drive
Engine type
B: GA 15DE engine
C: GA 16DE engine
E: SR20DE engine-For AustraliaandNew Zealand only
Body type
B: 4-door Sedan
F: 5-door Hatchback
Manufacturer
IN 1:Nissan, Passenger vehicle
VEHICLE IDENTIFICATION PLATE
1Type approval number
2 Vehicle identification
number(Chassis number)
3 Gross vehicle weight
4 Gross combination weight
Gross vehicle weight
+
Gross trailing capacity
(Weight)
5 Gross axleweight(Front)
6 Gross axleweight(Rear)
7 Type approval number
8 Body colorcode
9 Trim color code
10 Model Specification No.
11 Engine model
12 Engine displacement
13 Transaxle model
14 Axle model
cc
o
PLANT
PlANTA
El
ii:
13IJJ
if[
**
it~
*1
MADEINJAPAN
NISSAN
MOTORCO.,LTD. APAN
~ tt
~(:l
&
~~~sg~
CNHOA"SIS ~
~~~~~o
&
o ~
0
:ggtg~
~~~RNICION ~
&.
~~ ~~~~~ &
£
; ;~)~ /~~~~~'. AE~~
A1L11
Expect
Europe
~
&
kgO
1-
&
kg
2-
&
kg
COlOR. TRIM
~
&
FARBE. POlST
&
NISSAN
MOTORCO.,LTD. JAPAN
I ~ I
~
o
TYPE
TTP
Europe
FR
_2
3D
HI
B:3door hatchback
5D
HI
B:5door hatchback
Service
Joint
111
~
2-spot welds 3-spotwelds M.
I.
G plug weld .MIG seam weld/
(For 3panels plugweld method )P:
F
weld
• rr=- •
A
===-=
.'S~
.L.LLL
GTJ --- ~
-43-
-2-
Page 190 of 1701
__________ BODYALIGNMENT _
_ PRECAUTIONS _
Description PrecautionsForHandling HighStrength Steel
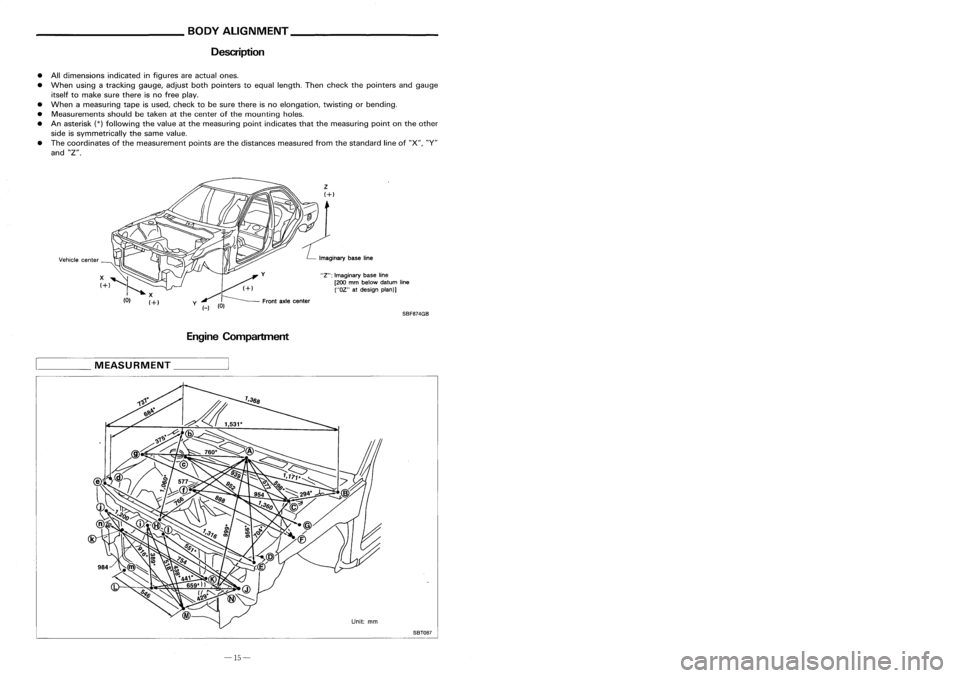
• Alldimensions indicatedinfigures areactual ones.
• When usingatracking gauge,adjustbothpointers toequal length. Thencheck thepointers andgauge
itself tomake surethere isno free play.
• When ameasuring tapeisused, check tobe sure there isno elongation, twistingorbending.
• Measurements shouldbetaken atthe center ofthe mounting holes.
• Anasterisk
(*)
following thevalue atthe measuring pointindicates thatthemeasuring pointonthe other
side issymmetrically thesame value.
• The coordinates ofthe measurement pointsarethe distances measured fromthestandard lineof"X", "V"
and "Z".
EngineCompartment
D=2T+3(mm)
D=2T+O.12 (in)
•
The electrode tipdiameter mustbereformed
properly according tothe panels thickness.
•
The spot ungget onHSS panel isharder than
that ofan ordinary steelpanel.
Therefore, forspot cutting HSSpanel, ahigh
torque drillofalow speed (1,000 to1,200
rpm) maybeused tomaintain itsdurability
and facilitate theoperation.
• HSS panels withatensile strength of785 to981 N/mm
2
(80to100 kg/mm
2,
114to142 klb/sq in),
used asreinforcement inthe door guard barand inthe bumper, istoo high intensile strength touse
for general repairs.Whenthesepanels aredamaged, theouter panels alsosustain consequential
damage; therefore, thesepanels arenever remedied withoutreplacing thedoor assembly orbumper
assembly.
2. Precautions inspot welding
This work should beperformed understandard workconditions. However,workcontrol mustbeexercised
as folloows:
SBF8?4GB
"Z":
Imaginary baseline
[200 mmbelow datum line
("OZ" atdesign plan)]
Front axlecenter
/
y (_)
(0)
Incorrect
Incorrect
Correct
D==Tip+diameter
T
,::=T====p=la::t_e=-=-_t_h=i_C=k=_n=_e_s=s= __,-- ~
• The panel surfaces mustbefitted toeach
other, leaving nogaps.
____
MEASURMENT _
SBT08?
-15- -30-
Page 191 of 1701
__________ PRECAUTIONS ___________
BODYALIGNMENT _
Precautions ForHandling HighStregth Steel Engine
Compartment
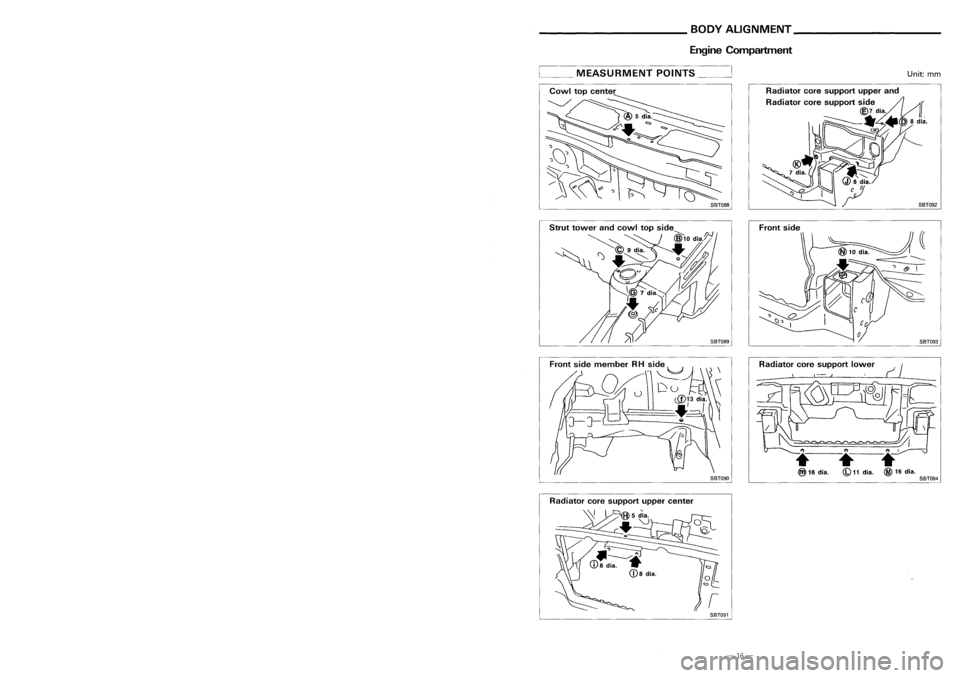
__ MEASURMENT POINTS__
Unit:mm
Front side
SBT088
Traction direction: ...
Not
recommended
• The repair ofreinforcements (suchasside
members) byheating isnot recommended
since itinvolves theriskoflowering strength.
When heating isunavoidable, donot heat
such parts attemperatures above550°C (1,
022°F)
Heating temperature shouldbeverified with
a thermometer. (Acrayon-type andother
thermometer areavailable.)
• When straightening bodypanels, usecaution
in pulling anyHSS panel. Because itis very
strong, thismay cause deformation inadja-
cent portions ofthe body. Inthis case,
increase thenumber ofmeasuring points,
and carefully pulltheHSS panel.
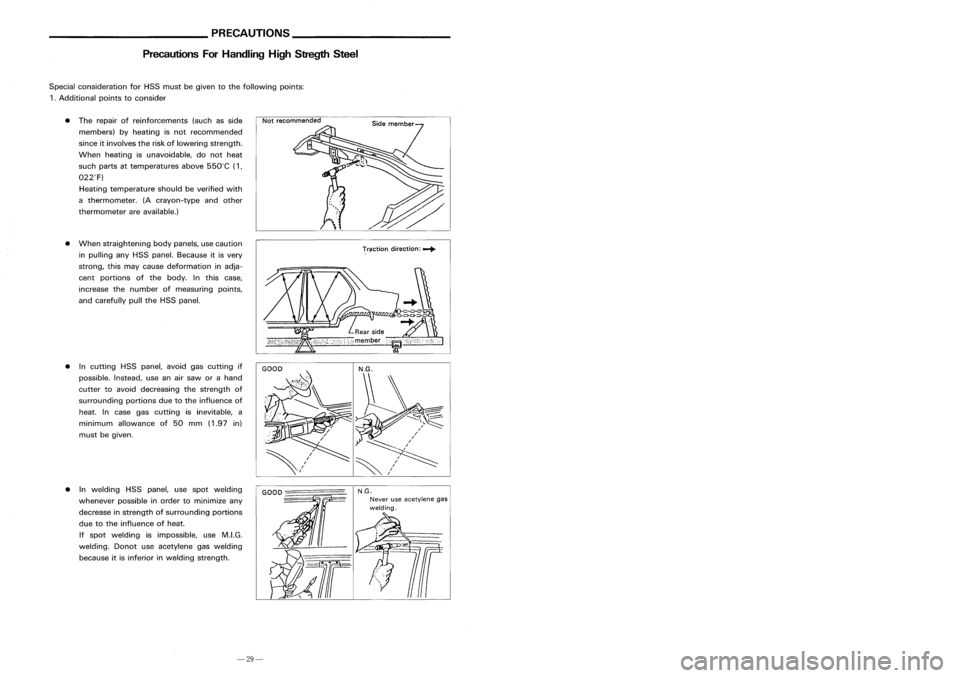
Special
consideration forHSS must begiven tothe following points:
1 .Additional pointstoconsider
• Incutting HSSpanel, avoidgascutting if
possible. Instead,useanairsaw orahand
cutter toavoid decreasing thestrength of
surrounding portionsduetothe influence of
heat. Incase gascutting isinevitable, a
minimum allowance of50 mm (1.97 in)
must begiven.
SBT090
Radiator
coresupport lower
•
(b)
11
dia.
SBT094
• Inwelding HSSpanel, usespot welding
whenever possibleinorder tominimize any
decrease instrength ofsurrounding portions
due tothe influence ofheat.
If spot welding isimpossible, useM.LG.
welding. Donotuseacetylene gaswelding
because itis inferior inwelding strength.
GOOD
-================
N.G.
Never useacetylene .gas
welding.
Radiator
coresupport uppercenter
SBT091
-29-
-16-
Page 204 of 1701
__________ PRECAUTIONS ___________
BODYALIGNMENT _
Precautions ForHandling HighStregth Steel Engine
Compartment
__ MEASURMENT POINTS__
Unit:mm
Front side
SBT088
Traction direction: ...
Not
recommended
• The repair ofreinforcements (suchasside
members) byheating isnot recommended
since itinvolves theriskoflowering strength.
When heating isunavoidable, donot heat
such parts attemperatures above550°C (1,
022°F)
Heating temperature shouldbeverified with
a thermometer. (Acrayon-type andother
thermometer areavailable.)
• When straightening bodypanels, usecaution
in pulling anyHSS panel. Because itis very
strong, thismay cause deformation inadja-
cent portions ofthe body. Inthis case,
increase thenumber ofmeasuring points,
and carefully pulltheHSS panel.
Special
consideration forHSS must begiven tothe following points:
1 .Additional pointstoconsider
• Incutting HSSpanel, avoidgascutting if
possible. Instead,useanairsaw orahand
cutter toavoid decreasing thestrength of
surrounding portionsduetothe influence of
heat. Incase gascutting isinevitable, a
minimum allowance of50 mm (1.97 in)
must begiven.
SBT090
Radiator
coresupport lower
•
(b)
11
dia.
SBT094
• Inwelding HSSpanel, usespot welding
whenever possibleinorder tominimize any
decrease instrength ofsurrounding portions
due tothe influence ofheat.
If spot welding isimpossible, useM.LG.
welding. Donotuseacetylene gaswelding
because itis inferior inwelding strength.
GOOD
-================
N.G.
Never useacetylene .gas
welding.
Radiator
coresupport uppercenter
SBT091
-29-
-16-