Page 651 of 1771
Precautions/Procedures
Steering-related Precaution s
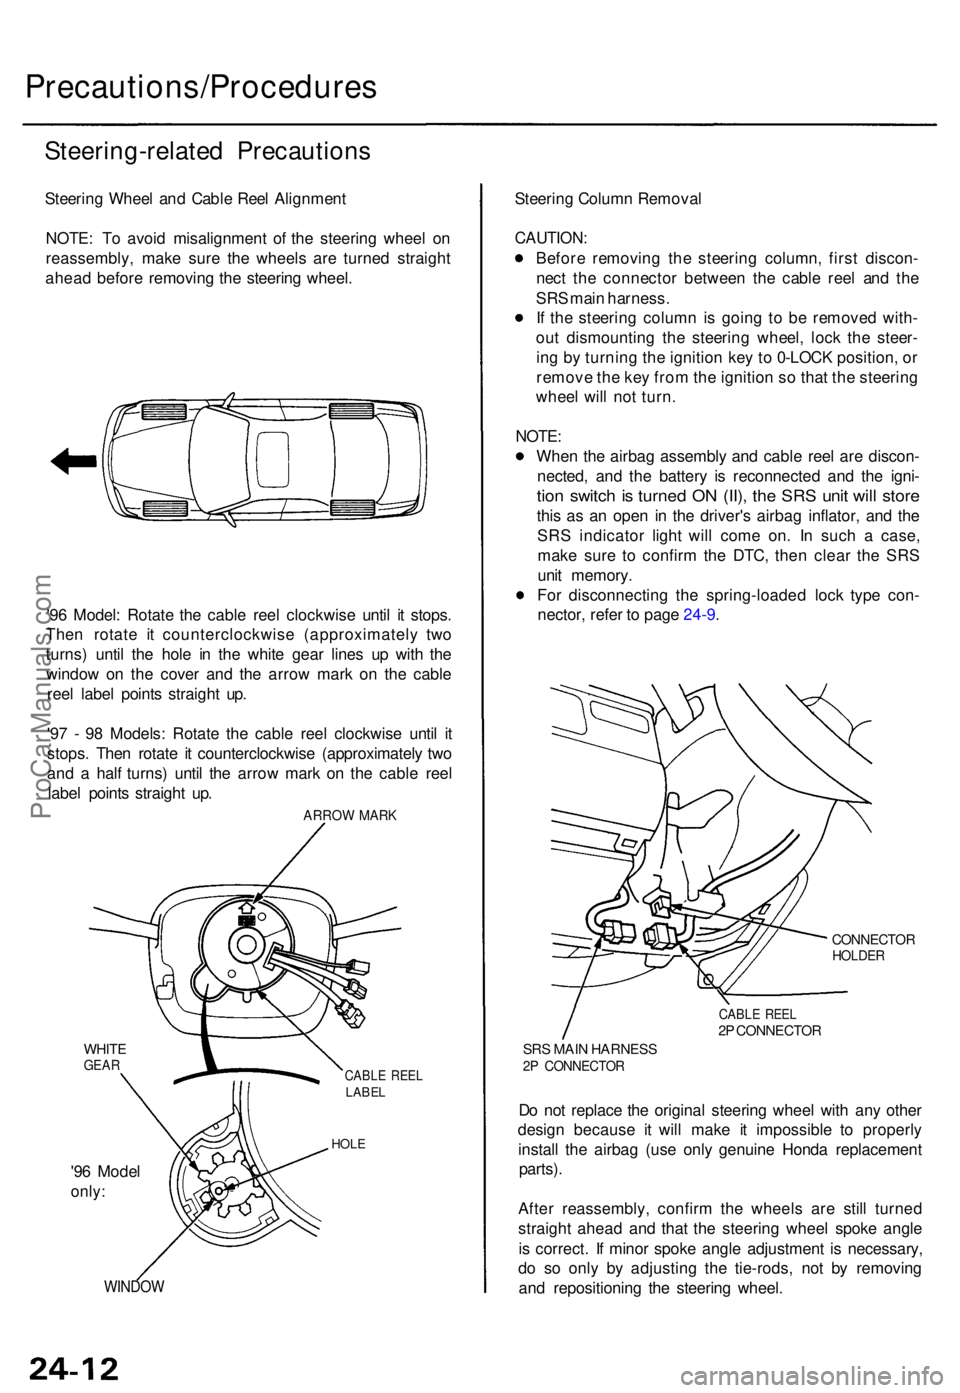
Steering Whee l an d Cabl e Ree l Alignmen t
NOTE : T o avoi d misalignmen t o f th e steerin g whee l o n
reassembly , mak e sur e th e wheel s ar e turne d straigh t
ahea d befor e removin g th e steerin g wheel .
'9 6 Model : Rotat e th e cabl e ree l clockwis e unti l i t stops .
The n rotat e i t counterclockwis e (approximatel y tw o
turns ) unti l th e hol e i n th e whit e gea r line s u p wit h th e
windo w o n th e cove r an d th e arro w mar k o n th e cabl e
ree l labe l point s straigh t up .
'9 7 - 9 8 Models : Rotat e th e cabl e ree l clockwis e unti l i t
stops . The n rotat e i t counterclockwis e (approximatel y tw o
an d a hal f turns ) unti l th e arro w mar k o n th e cabl e ree l
labe l point s straigh t up .
ARRO W MAR K
WHITEGEARCABL E REE LLABE L
HOLE
'96 Mode l
only:
WINDO W
Steering Colum n Remova l
CAUTION :
Before removin g th e steerin g column , firs t discon -
nec t th e connecto r betwee n th e cabl e ree l an d th e
SR S mai n harness .
I f th e steerin g colum n is goin g t o b e remove d with -
ou t dismountin g th e steerin g wheel , loc k th e steer -
in g b y turnin g th e ignitio n ke y t o 0-LOC K position , o r
remov e th e ke y fro m th e ignitio n s o tha t th e steerin g
whee l wil l no t turn .
NOTE :
Whe n th e airba g assembl y an d cabl e ree l ar e discon -
nected , an d th e batter y i s reconnecte d an d th e igni -
tion switc h is turne d O N (II) , th e SR S uni t wil l stor e
this a s a n ope n i n th e driver' s airba g inflator , an d th e
SR S indicato r ligh t wil l com e on . I n suc h a case ,
mak e sur e t o confir m th e DTC , the n clea r th e SR S
uni t memory .
Fo r disconnectin g th e spring-loade d loc k typ e con -
nector , refe r t o pag e 24-9 .
CONNECTO RHOLDER
CABLE REE L2P CONNECTO R
SRS MAI N HARNES S2P CONNECTO R
Do no t replac e th e origina l steerin g whee l wit h an y othe r
desig n becaus e i t will mak e i t impossibl e t o properl y
instal l th e airba g (us e onl y genuin e Hond a replacemen t
parts).
After reassembly , confir m th e wheel s ar e stil l turne d
straigh t ahea d an d tha t th e steerin g whee l spok e angl e
i s correct . I f mino r spok e angl e adjustmen t i s necessary ,
d o s o onl y b y adjustin g th e tie-rods , no t b y removin g
an d repositionin g th e steerin g wheel .
ProCarManuals.com
Page 652 of 1771
Troubleshooting
Self-diagnostic Procedure s
The self-diagnosti c functio n o f th e SR S syste m allow s i t t o locat e th e cause s o f syste m problem s an d t o stor e thi s informa -
tio n i n memory . Fo r easie r troubleshooting, this dat a ca n b e retrieve d vi a a dat a lin k circuit .
Whe n yo u tur n th e ignitio n switc h O N (II) , th e SR S indicato r wil l com e on . I f i t goe s of f afte r si x seconds , th e syste m is
normal .
I f ther e i s a n abnormality , th e syste m locate s an d define s th e problem , store s thi s informatio n i n memory , an d turn s
the SR S indicato r ligh t on .
NOTE : Th e dat a wil l remai n i n th e memor y eve n whe n th e ignitio n switc h i s turne d of f o r i f th e batter y i s disconnected .
Whe n yo u connec t th e SC S servic e connecto r t o th e servic e chec k connecto r (2P) , an d tur n th e ignitio n switc h O N (II) ,
th e SR S indicato r ligh t wil l indicat e th e diagnosti c troubl e cod e (DTC ) b y th e numbe r o f blinks .
Afte r readin g an d recordin g th e DTC , procee d wit h th e troubleshootin g fo r thi s code .
Precaution s
Use onl y a digita l multimete r t o chec k th e system . I f it' s no t a Hond a multimeter , mak e sur e it s outpu t i s 1 0 m A (0.0 1 A )
o r les s whe n switche d t o th e smalles t valu e i n th e ohmmete r range . A teste r wit h a highe r outpu t coul d damag e th e
airba g circui t o r caus e accidenta l airba g deploymen t an d possibl e injury -
Wheneve r th e ignitio n switc h i s O N (II) , o r ha s bee n turne d OF F fo r les s tha n thre e minutes , b e carefu l no t t o bum p th e
SR S unit ; th e airbag s coul d accidentall y deplo y an d caus e damag e o r injuries .
Befor e yo u remov e th e SR S mai n harness , disconnec t th e driver' s airba g connecto r an d th e fron t passenger' s airba g
connector . (Connec t th e Shor t connecto r (RED ) t o th e fron t passenger' s airba g connecto r o n a '9 6 model. )
Mak e sur e th e batter y i s sufficientl y charge d (se e sectio n 23 ). I f th e batter y i s dea d o r low , measurin g value s won' t b e
correct .
D o no t touc h a teste r prob e t o th e terminal s i n th e SR S uni t o r harnes s connectors , an d d o no t connec t th e terminal s
wit h a jumpe r wire . Us e onl y th e tes t harnes s an d th e SC S servic e connectors .
For backprobin g spring-loade d loc k typ e connectors , refe r t o pag e 24-11 .
ProCarManuals.com
Page 661 of 1771
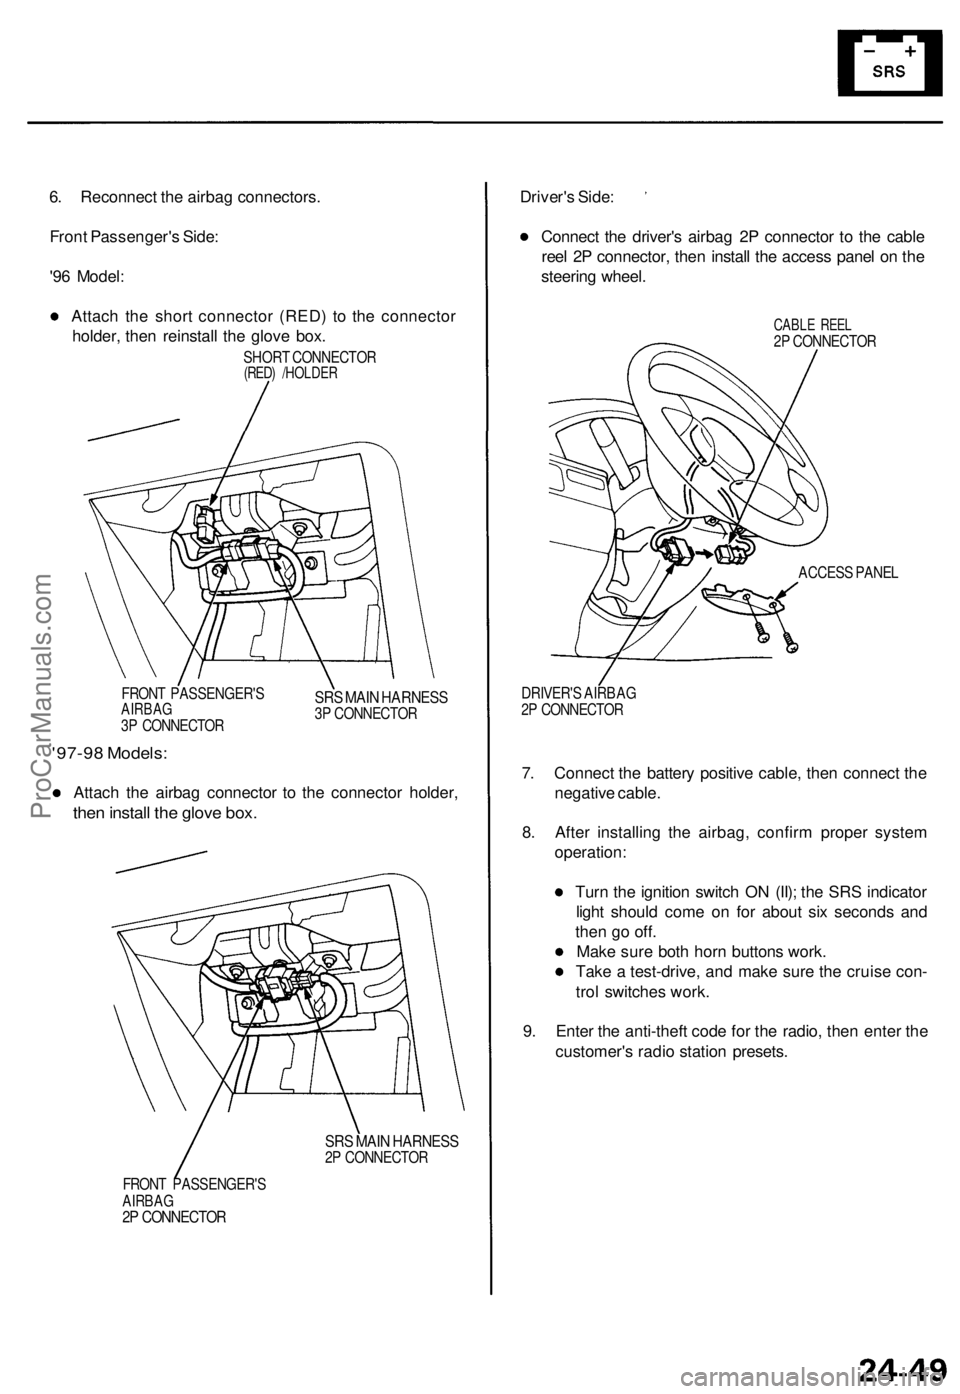
6. Reconnect the airbag connectors.
Front Passenger's Side:
'96 Model:
Attach the short connector (RED) to the connector
holder, then reinstall the glove box.
SHORT CONNECTOR
(RED) /HOLDER
FRONT PASSENGER'S
AIRBAG
3P CONNECTOR
SRS MAIN HARNESS
3P CONNECTOR
'97-98 Models:
Attach the airbag connector to the connector holder,
then install the glove box.
SRS MAIN HARNESS
2P CONNECTOR
FRONT PASSENGER'S
AIRBAG
2P CONNECTOR
Driver's Side:
Connect the driver's airbag 2P connector to the cable
reel 2P connector, then install the access panel on the
steering wheel.
CABLE REEL
2P CONNECTOR
ACCESS PANEL
DRIVER'S AIRBAG
2P CONNECTOR
7. Connect the battery positive cable, then connect the
negative cable.
8. After installing the airbag, confirm proper system
operation:
Turn the ignition switch ON (II); the SRS indicator
light should come on for about six seconds and
then go off.
Make sure both horn buttons work.
Take a test-drive, and make sure the cruise con-
trol switches work.
9. Enter the anti-theft code for the radio, then enter the
customer's radio station presets.ProCarManuals.com
Page 707 of 1771
According to stat e an d federa l regulations , failur e t o perfor m maintenanc e o n th e item s marke d wit h a n asteris k (* ) wil l no t voi d customer' s emissio n
warranties . However , Acur a recommend s tha t al l maintenance services b e performe d a t th e recommende d tim e o r mileag e perio d t o ensur e long-ter m
reliability .
For 199 6 Canad a Model :
Thi s Maintenanc e Schedul e outline s th e minimu m require d maintenanc e tha t yo u shoul d perfor m to ensur e th e trouble-fre e operatio n o f Canadia n
model . Du e to regiona l an d climacti c differences , som e additiona l servicin g ma y b e required .
Thi s schedul e shoul d b e use d fo r 199 5 an d 199 6 2.5T L models ; i t supersede s th e schedul e show n in th e 199 5 2.5T L owner' s manuals .
19-30
10-5, 14-105 ,15-4, 19- 7
17-2 2
16-3
10- 3
9-5
11-11 8
ProCarManuals.com
Page 709 of 1771
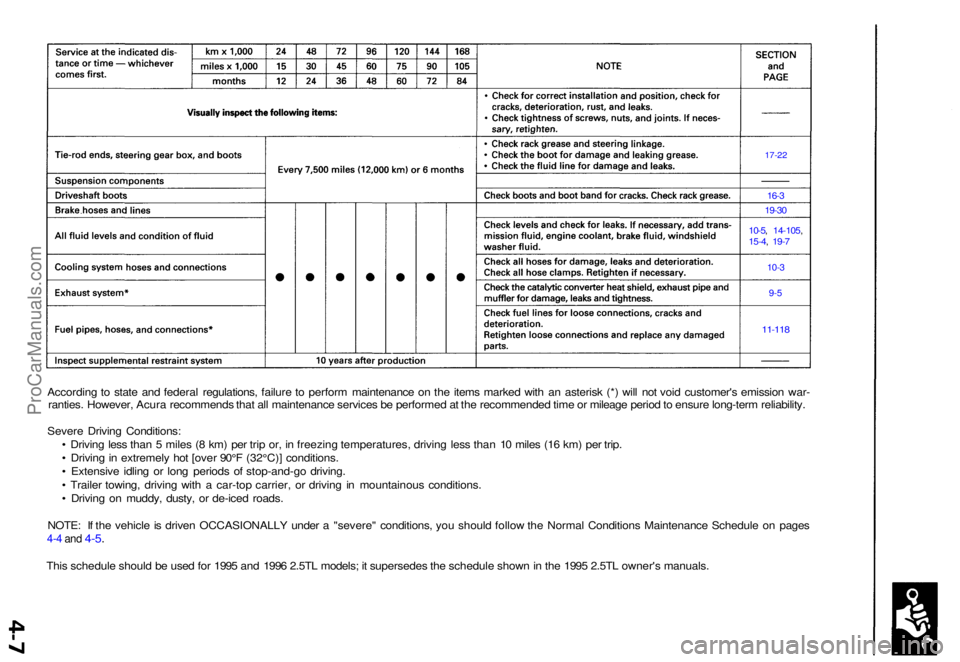
According to stat e an d federa l regulations , failur e to perfor m maintenanc e o n th e item s marke d wit h a n asteris k (* ) wil l no t voi d customer' s emissio n war -
ranties . However , Acur a recommend s tha t al l maintenanc e service s b e performe d a t th e recommende d tim e o r mileag e perio d to ensur e long-ter m reliability .
Sever e Drivin g Conditions :
• Drivin g les s tha n 5 mile s ( 8 km ) pe r tri p or , i n freezin g temperatures , drivin g les s tha n 1 0 mile s (1 6 km ) pe r trip .
• Drivin g in extremel y ho t [ove r 90° F (32°C) ] conditions .
• Extensiv e idlin g o r lon g period s o f stop-and-g o driving .
• Traile r towing , drivin g wit h a car-to p carrier , o r drivin g i n mountainou s conditions .
• Drivin g o n muddy , dusty , o r de-ice d roads .
NOTE : I f th e vehicl e is drive n OCCASIONALL Y unde r a "severe " conditions , yo u shoul d follo w th e Norma l Condition s Maintenanc e Schedul e o n page s
4-4 an d 4-5 .
This schedul e shoul d b e use d fo r 199 5 an d 199 6 2.5T L models ; i t supersede s th e schedul e show n in th e 199 5 2.5T L owner' s manuals .
17-22
16-3
19-3 0
10-5, 14-105 ,15-4, 19- 7
10- 3
9-5
11-11 8
ProCarManuals.com
Page 711 of 1771
According t o stat e an d federa l regulations , failur e t o perfor m maintenance on th e item s marke d wit h a n asteris k (* ) wil l no t voi d customer' s emissio n war -
ranties . However , Acur a recommend s tha t al l maintenanc e services be performe d a t th e recommende d tim e o r mileag e perio d t o ensur e long-ter m reliability .
For 199 7 Canad a Model : Follow the Sever e Condition s Maintenanc e Schedul e fo r 199 7 Mode l o n page s 4-1 0 an d 4-11 .
17-22
16-3
19-30
10-5, 14-105 ,15-4, 19- 7
11-11 8
10-3
9-5
ProCarManuals.com
Page 713 of 1771
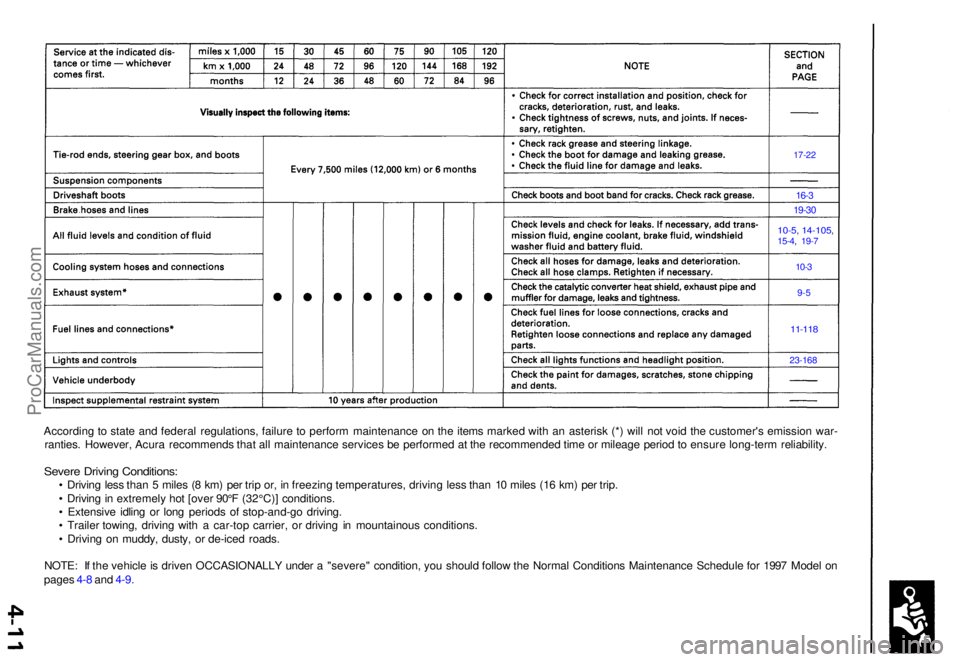
According t o stat e an d federa l regulations , failur e t o perfor m maintenanc e o n th e item s marke d wit h a n asteris k (* ) wil l no t voi d th e customer' s emissio n war -
ranties . However , Acur a recommend s tha t al l maintenanc e service s b e performe d a t th e recommende d tim e o r mileag e perio d to ensur e long-ter m reliability .
Severe Drivin g Conditions :
• Drivin g les s tha n 5 mile s ( 8 km ) pe r tri p or , i n freezin g temperatures , drivin g les s tha n 1 0 mile s (1 6 km ) pe r trip .
• Drivin g in extremel y ho t [ove r 90° F (32°C) ] conditions .
• Extensiv e idlin g o r lon g period s o f stop-and-g o driving .
• Traile r towing , drivin g wit h a car-to p carrier , o r drivin g i n mountainou s conditions .
• Drivin g o n muddy , dusty , o r de-ice d roads .
NOTE : I f th e vehicl e is drive n OCCASIONALL Y unde r a "severe " condition , yo u shoul d follo w th e Norma l Condition s Maintenanc e Schedul e fo r 199 7 Mode l o n
page s 4- 8 an d 4-9 .
17-2 2
16-3
19-3 0
10-5 , 14-105 ,15-4, 19- 7
10- 3
9-5
11-11 8
23-16 8
ProCarManuals.com
Page 715 of 1771
According t o stat e an d federa l regulations , failur e t o perfor m maintenanc e o n th e item s marke d wit h a n asteris k (* ) wil l no t voi d customer' s emissio n war -
ranties . However , Acur a recommend s tha t al l maintenanc e service s b e performe d a t th e recommende d tim e o r mileag e perio d t o ensur e long-ter m reliability .
Fo r 199 8 Canad a Model : Follo w th e Sever e Condition s Maintenanc e Schedul e fo r 199 8 Mode l o n page s 4-1 4 an d 4-15 .
17-22
16-3
19-3 0
10-5, 14-105 ,15-4, 19- 7
10- 3
9-5
11-11 8
ProCarManuals.com