Page 1630 of 1771
Lighting Syste m
Componen t Locatio n Inde x
UNDER-HOO D
FUSE/RELA Y BO XHEADLIGH T RELA YTest, pag e 23-6 3
FO G LIGHT S
Bul b Replacement , pag e 23-17 0
Adjustment , pag e 23-16 8
HEADLIGHT S
Replacement , pag e 23-16 7
Adjustment , pag e 23-16 8
Bul b Replacement , pag e 23-16 7
FRONT PARKIN G LIGHT S
Bul b Replacement ,
pag e 23-16 6
FRON T SID E MARKE R LIGH T
Replacement , pag e 23-17 1
HIGH MOUN T BRAK E LIGH T
Replacement , pag e 23-18 4
LICENS E PLAT E LIGHT S
Replacement , pag e 23-17 3
TAILLIGH TBulb Replacement , pag e 23-17 2
Replacement , pag e 23-17 2
DIMME
R RELA Y
Test , pag e 23-6 3
FRON T TUR N SIGNA L LIGH T
Replacement , pag e 23-17 1
NOTE : Refe r t o page 23-100 a of th e '96-9 8 Acura
3.2TL Servic e Manual supplement for the differences
on this page for the 3.2TL.
ProCarManuals.com
Page 1637 of 1771

Headlights
Replacemen t
CAUTION: Haloge n headlight s becom e ver y ho t i n use ;
d o no t touc h the m o r th e attachin g hardwar e immedi -
atel y afte r the y hav e bee n turne d off .
1 . Remov e th e fron t bumpe r (se e sectio n 20 ).
2 . Remov e th e headligh t maintenanc e cove r (lef t
headlight) , the n disconnec t th e 2 P an d 3 P connec -
tors .
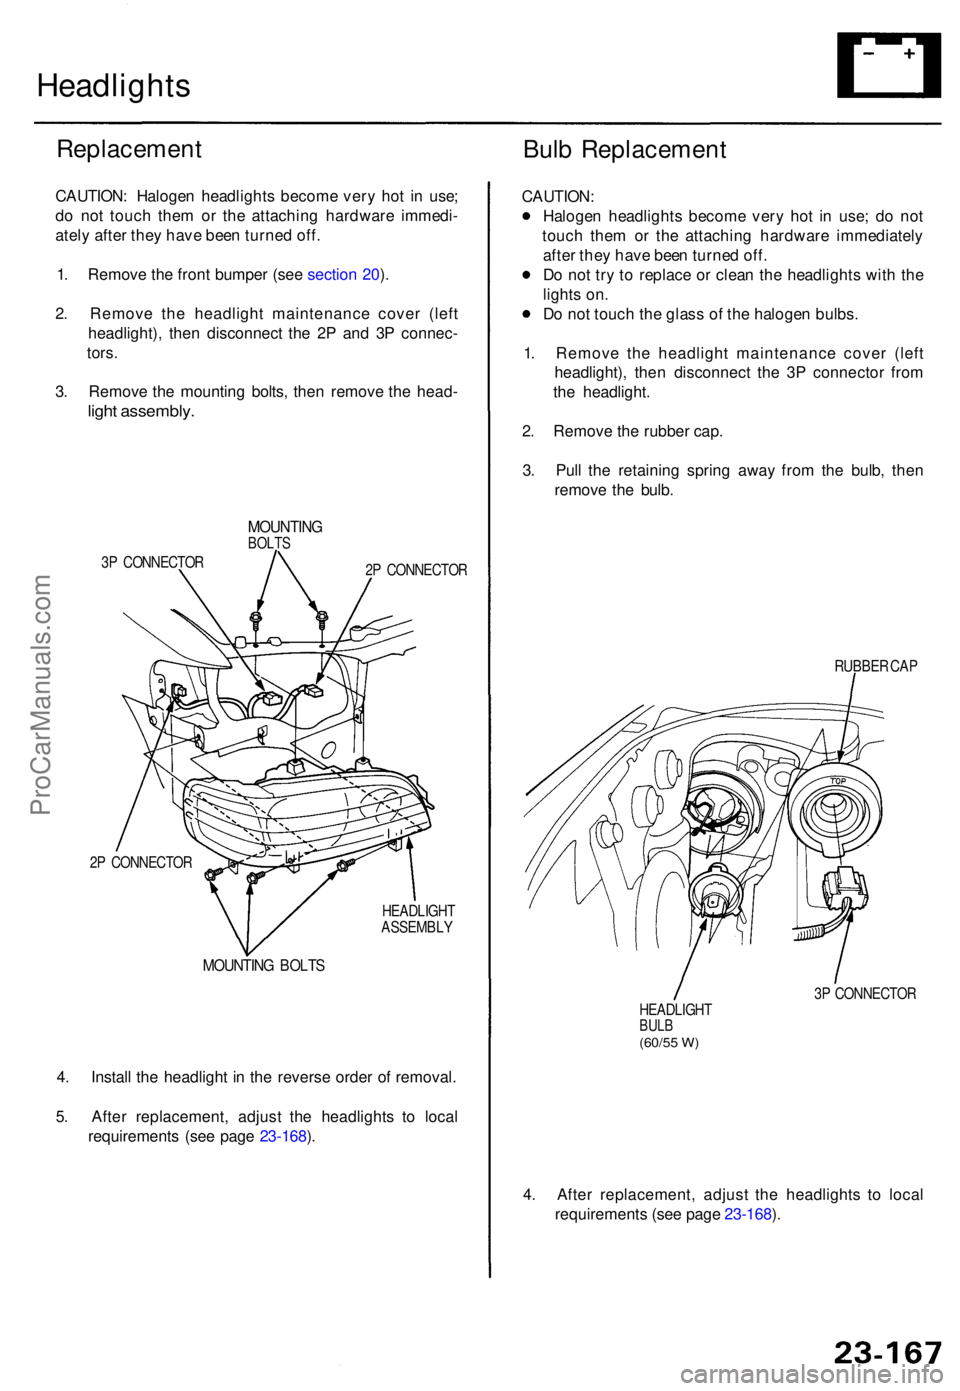
3 . Remov e th e mountin g bolts , the n remov e th e head -
light assembly .
MOUNTIN GBOLTS
3P CONNECTO R
2P CONNECTO R
2 P CONNECTO R
HEADLIGHT
ASSEMBL Y
MOUNTING BOLT S
4. Instal l th e headligh t i n th e revers e orde r o f removal .
5 . Afte r replacement , adjus t th e headlight s t o loca l
requirement s (se e pag e 23-168 ).
Bul b Replacemen t
CAUTION:
Haloge n headlight s becom e ver y ho t i n use ; d o no t
touc h the m o r th e attachin g hardwar e immediatel y
afte r the y hav e bee n turne d off .
D o no t tr y t o replac e o r clea n th e headlight s wit h th e
light s on .
D o no t touc h th e glas s o f th e haloge n bulbs .
1 . Remov e th e headligh t maintenanc e cove r (lef t
headlight) , the n disconnec t th e 3 P connecto r fro m
th e headlight .
2 . Remov e th e rubbe r cap .
3 . Pul l th e retainin g sprin g awa y fro m th e bulb , the n
remov e th e bulb .
RUBBE R CA P
3 P CONNECTO R
HEADLIGH T
BULB(60/5 5 W )
4. Afte r replacement , adjus t th e headlight s t o loca l
requirement s (se e pag e 23-168 ).
ProCarManuals.com
Page 1640 of 1771

Fog Ligh t
Switc h Tes t
SRS component s ar e locate d i n thi s area . Revie w th e
SR S componen t locations , precautions , an d procedure s
i n th e SR S (sectio n 24 ) befor e performin g repair s o r ser -
vice .
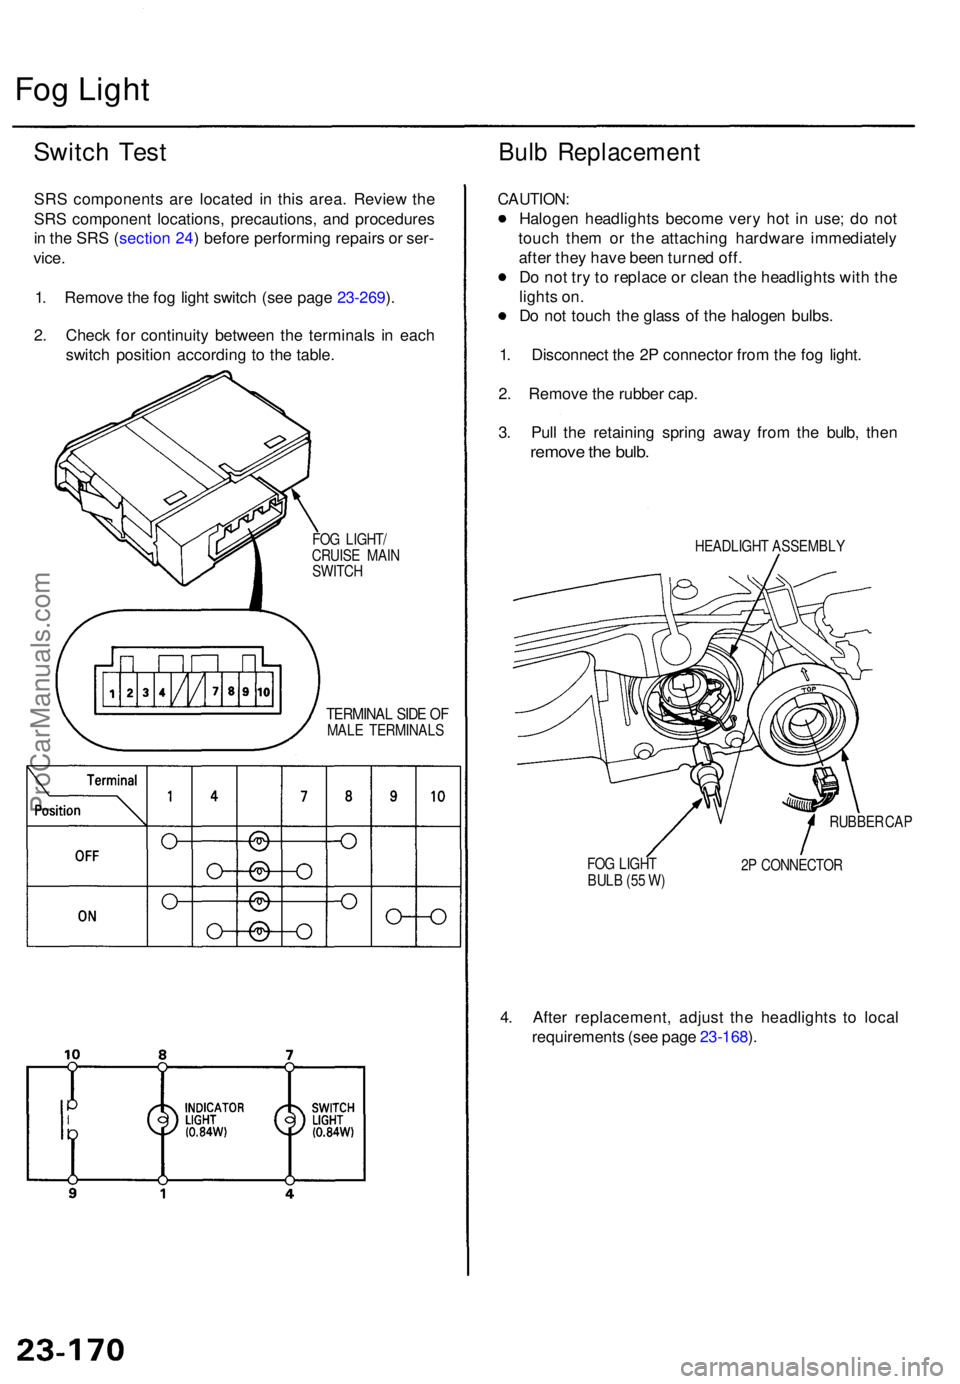
1 . Remov e th e fo g ligh t switc h (se e pag e 23-269 ).
2 . Chec k fo r continuit y betwee n th e terminal s i n eac h
switc h positio n accordin g t o th e table .
Bulb Replacemen t
FOG LIGHT /
CRUIS E MAI N
SWITC H
TERMINA L SID E O FMAL E TERMINAL S
CAUTION:
Halogen headlight s becom e ver y ho t i n use ; d o no t
touc h the m o r th e attachin g hardwar e immediatel y
afte r the y hav e bee n turne d off .
D o no t tr y to replac e o r clea n th e headlight s wit h th e
light s on .
D o no t touc h th e glas s o f th e haloge n bulbs .
1 . Disconnec t th e 2 P connecto r fro m th e fo g light .
2 . Remov e th e rubbe r cap .
3 . Pul l th e retainin g sprin g awa y fro m th e bulb , the n
remov e th e bulb .
HEADLIGH T ASSEMBL Y
FO G LIGH T
BUL B (5 5 W ) RUBBE
R CA P
2 P CONNECTO R
4. Afte r replacement , adjus t th e headlight s t o loca l
requirement s (se e pag e 23-168 ).
ProCarManuals.com