1993 DODGE TRUCK ignition
[x] Cancel search: ignitionPage 377 of 1502
8D
- 28
IGNITION
SYSTEMS
SMALL
SCREWDRIVER
KEY
CYLINDER
RETAINING
PIN
KEY
CYLINDER
RETAINING
PIN
IGNITION SWITCH
908D-15
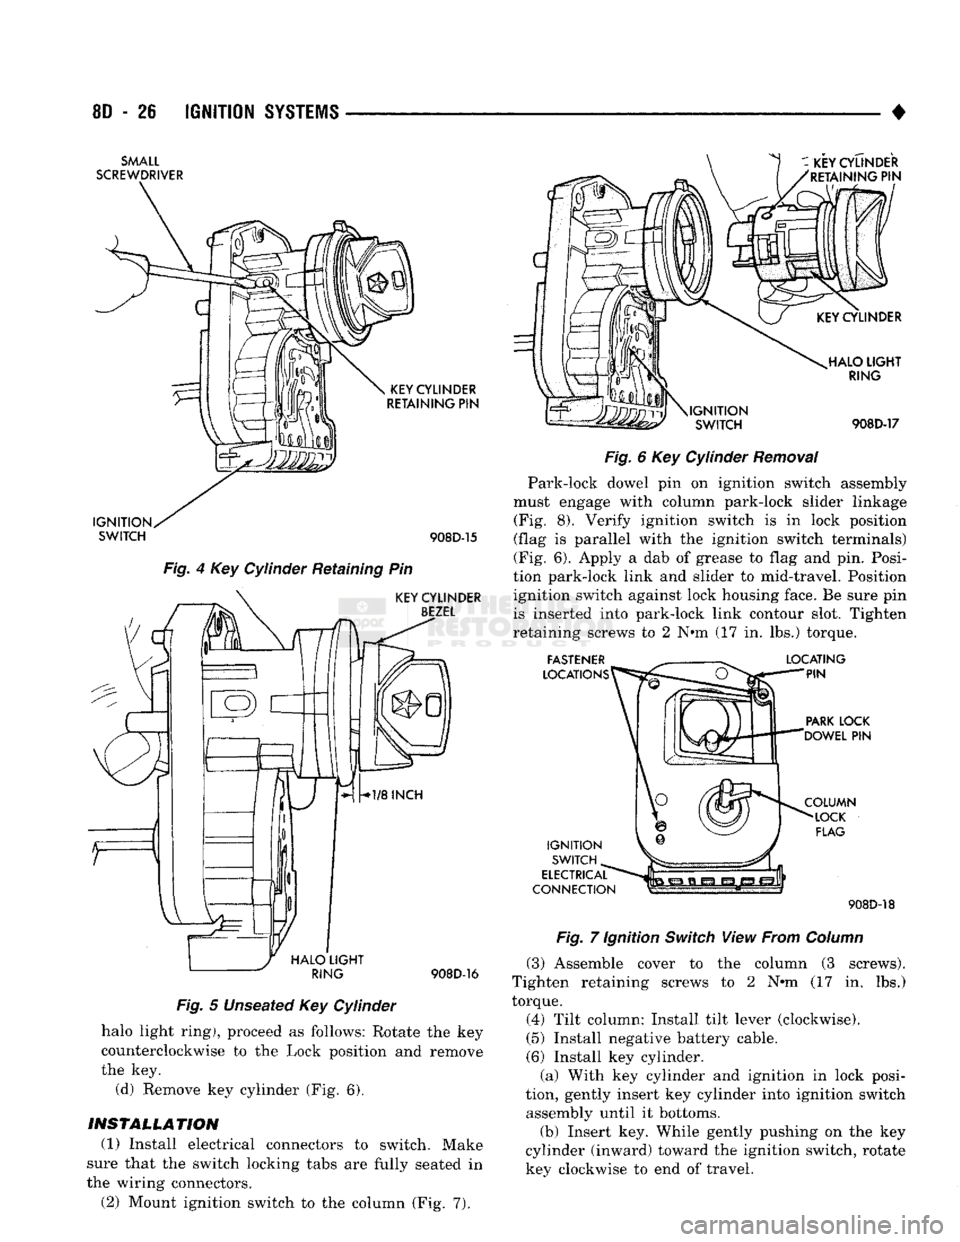
Fig.
4 Key Cylinder Retaining Pin
KEY
CYLINDER
BEZEL
j
HALO
LIGHT
^
RING
908D-16
Fig.
5 Unseated Key Cylinder
halo light ring), proceed as follows: Rotate the key
counterclockwise to the Lock position and remove
the key. (d) Remove key cylinder (Fig. 6).
INSTALLATION
(1) Install electrical connectors to switch. Make
sure that the switch locking tabs are fully seated in
the wiring connectors. (2) Mount ignition switch to the column (Fig. 7).
i-i-ii
\IGNITION
SWITCH HALO
LIGHT
RING
908D-17
Fig.
6 Key Cylinder
Removal
Park-lock dowel pin on ignition switch assembly
must engage with column park-lock slider linkage (Fig. 8). Verify ignition switch is in lock position
(flag is parallel with the ignition switch terminals)
(Fig. 6). Apply a dab of grease to flag and pin. Posi
tion park-lock link and slider to mid-travel. Position ignition switch against lock housing face. Be sure pin
is inserted into park-lock link contour slot. Tighten
retaining screws to 2 N#m (17 in. lbs.) torque.
FASTENER
LOCATIONS LOCATING
PIN
PARK
LOCK
'DOWEL
PIN
IGNITION SWITCH
ELECTRICAL
CONNECTION COLUMN
LOCK
FLAG 908D-18
Fig.
7 Ignition
Switch
View From
Column
(3) Assemble cover to the column (3 screws).
Tighten retaining screws to 2 N»m (17 in. lbs.)
torque.
(4) Tilt column: Install tilt lever (clockwise).
(5) Install negative battery cable.
(6) Install key cylinder. (a) With key cylinder and ignition in lock posi
tion, gently insert key cylinder into ignition switch assembly until it bottoms.
(b) Insert key. While gently pushing on the key
cylinder (inward) toward the ignition switch, rotate key clockwise to end of travel.
Page 378 of 1502
•
IGNITION
SYSTEMS
80 - 27
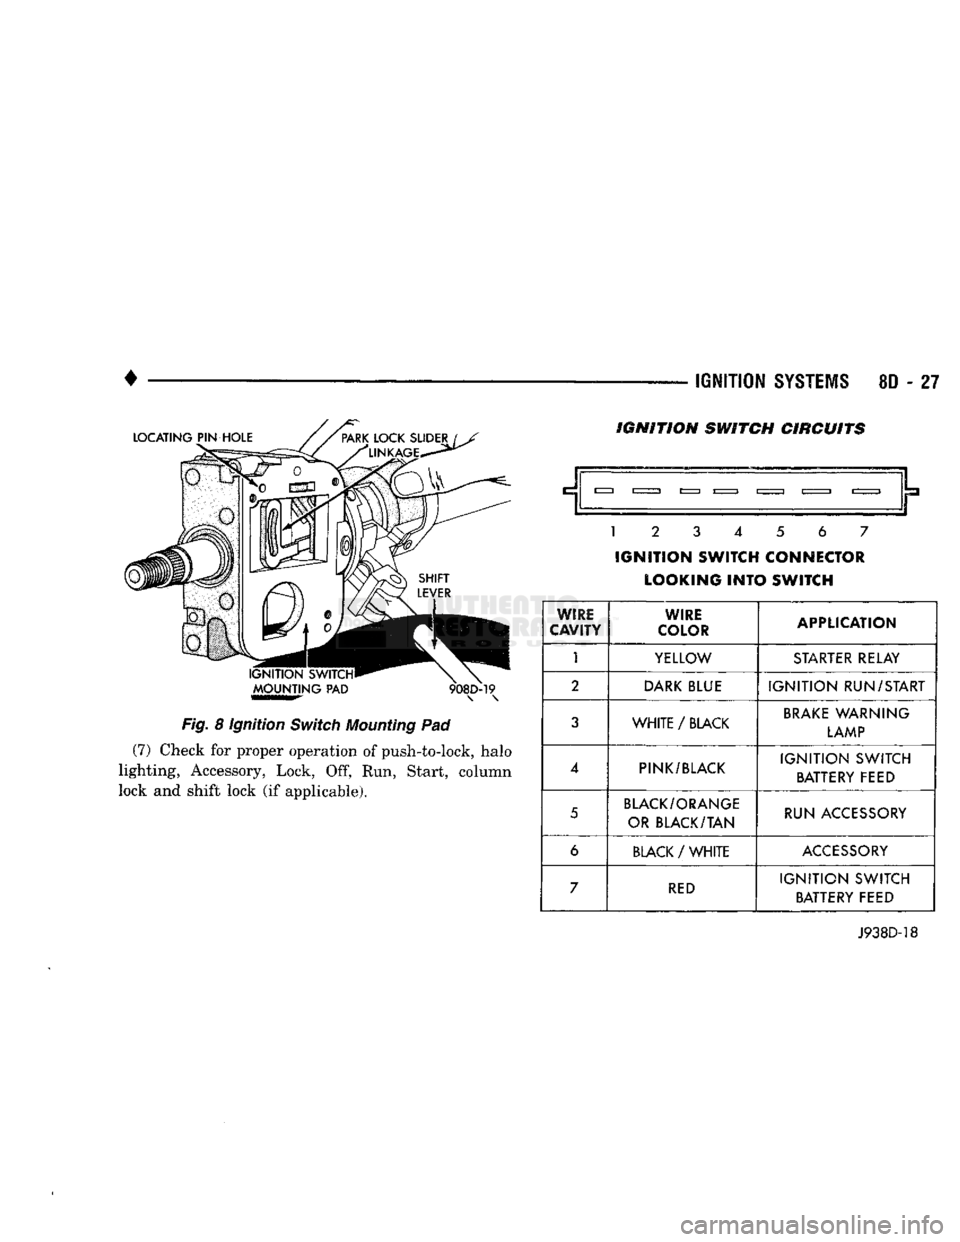
Fig.
8 Ignition
Switch
Mounting
Pad (7) Check for proper operation of push-to-lock, halo
lighting, Accessory, Lock, Off, Run, Start, column
lock and shift lock (if applicable). IGNITION SWITCH CIRCUITS
.__|.
1
2 3 4 5 6 7
IGNITION
SWITCH CONNECTOR LOOKING
INTO
SWITCH
WIRE
CAVITY WIRE
COLOR APPLICATION
1
YELLOW
STARTER
RELAY
2
DARK
BLUE
IGNITION
RUN/START
3
WHITE
/
BLACK
BRAKE
WARNING
LAMP
4
PINK/BLACK
IGNITION
SWITCH
BATTERY FEED
5
BLACK/ORANGE
OR BLACK/TAN RUN ACCESSORY
6
BLACK
/
WHITE
ACCESSORY
7
RED
IGNITION
SWITCH
BATTERY FEED
J938D-18
Page 379 of 1502

8D
- 28
IGNITION
SYSTEMS
•
GENERAL
INFORMATION
The following specifications
are
published from
the
latest information available
at the
time
of
publica
tion.
If
anything differs between
the
specifica
tions found
on the
Vehicle Emission Control Information (VECI) label
and the
following spec
ifications,
use
specifications
on
VECI label.
The
SPECIFICATIONS
VECI label
is
located
in the
engine compartment.
IGNITION
TIMING
Ignition timing
is not
adjustable
on any
engine.
Refer
to
Ignition Timing
in the
Diagnostics/Service
Procedures section
of
this group
for
more informa
tion.
IGNITION
COIL
COii
TOYODSNSO
Primary Resistance .95-
1.20
Ohms .96-
1.18
Ohms
Secondary
Resistance
at
70°
-
80
°F
11,300-
13,300
Ohms
11,300
-
15,300
Ohms
SPARK PLUGS J918D-25
Engine
Spark
Plug
Application
Gap
Tightening
Torque Size
Engine
Original
Equipment Replacement Application
Gap
Tightening
Torque Size
3.9L/5.2L/5.9L
RC12YC RC12YC
All
.035°
(0.9mm)
41
Nm
(30
ft.
lbs.)
14mm
%"
Reach
J928D-23
SPARK PLUG CABLE RESISTANCE
ENGINE FIRING ORDER-3.9L
V-6
ENGINE
MINIMUM
MAXIMUM
250 Ohms
Per
Inch 1000 Ohms
Per
Inch
3000
Ohms
Per
Foot
12,000
Ohms
Per
Foot
J908D-43
a
FRONT
OF
ENGINE CLOCKWISE
ROTATION
1
-6-5-4-3-2
,
©
V©
^ ©y
©
J9314-80
Page 380 of 1502
IGNITION
SYSTEMS
8D - 29
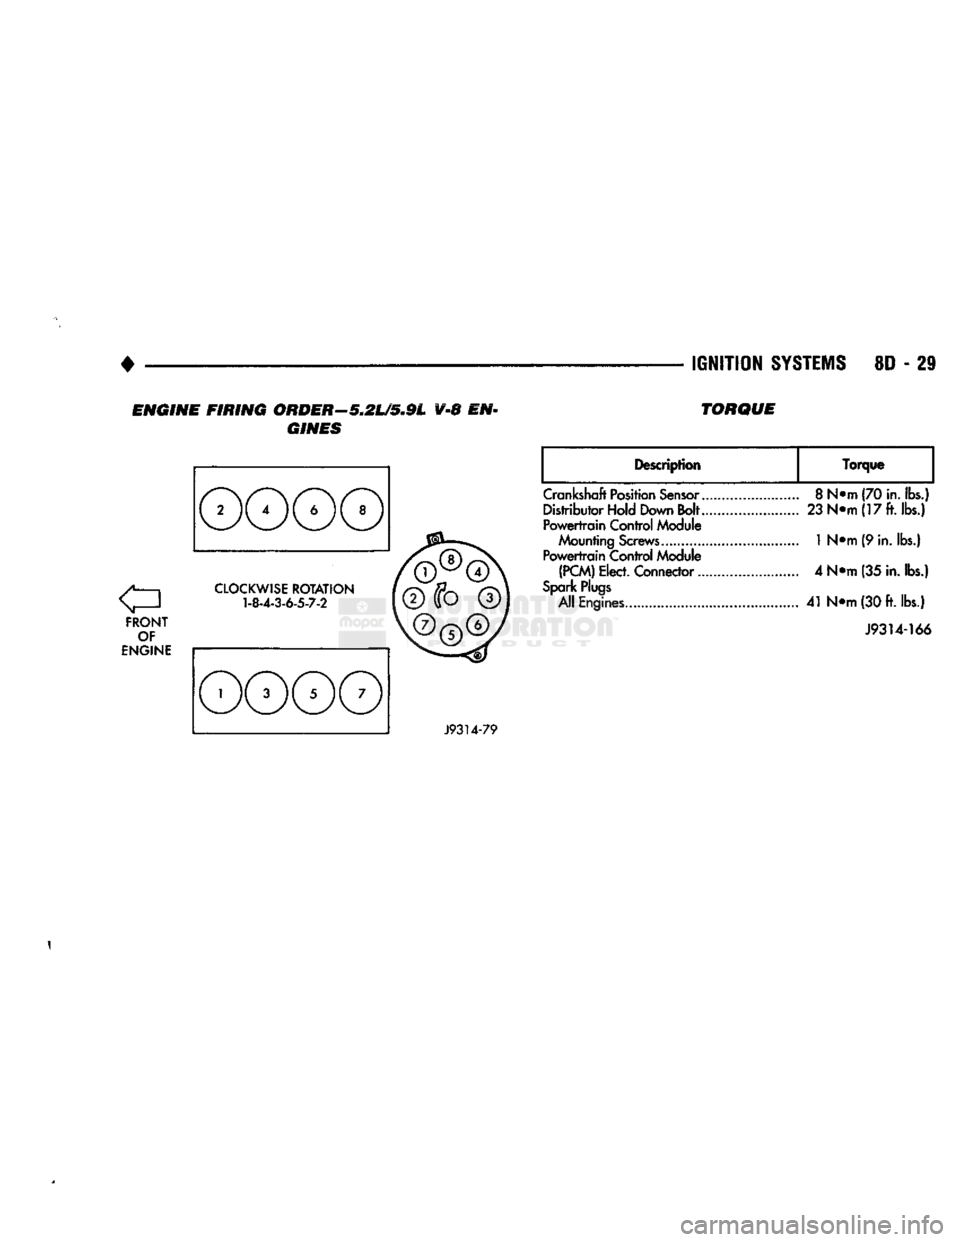
ENGINE FIRING ORDER—5.2L/5.9L V-8 EN
GINES TORQUE
FRONT
OF
ENGINE
CLOCKWISE
ROTATION
1-8-4-3-6-5-7-2
Description
Torque
Crankshaft
Position
Sensor..
Distributor Hold Down Bolt..
Powertrain
Control Module
Mounting
Screws............
Powertrain
Control Module
(PCM)
Elect. Connector...
Spark
Plugs
All Engines
8
N*m (70
in.
lbs.)
23
N«m(17ft.ibs.)
1
N«m (9 in. lbs.)
4 N*m (35
in.
lbs.)
41
N<>m
(30
ft.
lbs.)
J9314-166
J9314-79
1
Page 382 of 1502
• • ^ ^ ^ INSTRUMENT PANEL AND GAUGES 8E - 1
CONTENTS
page
CLUSTER AND GAUGE SERVICE PROCEDURES . 12
CLUSTER AND GAUGE TEST PROCEDURES .. i
GENERAL INFORMATION . 1
page
MESSAGE CENTER-DIESEL ENGINE ........ 4
MESSAGE CENTER-GAS ENGINE .......... 3
SWITCH
AND PANEL COMPONENT SERVICE . 16
GENERAL
INFORMATION
INDEX
page
Generator
Indicating
System
2
Distance
Sensor
2
Electronic
Digital
Clock
3
Fuel
Level
Indicating
System
1
page
Malfunction
Indicator
(Check
Engine)
3
Oil
Pressure
Warning
Lamp
................. 2
Speedometer/Odometer
System
2
Temperature
and Oil
Indicating
System
......... 2
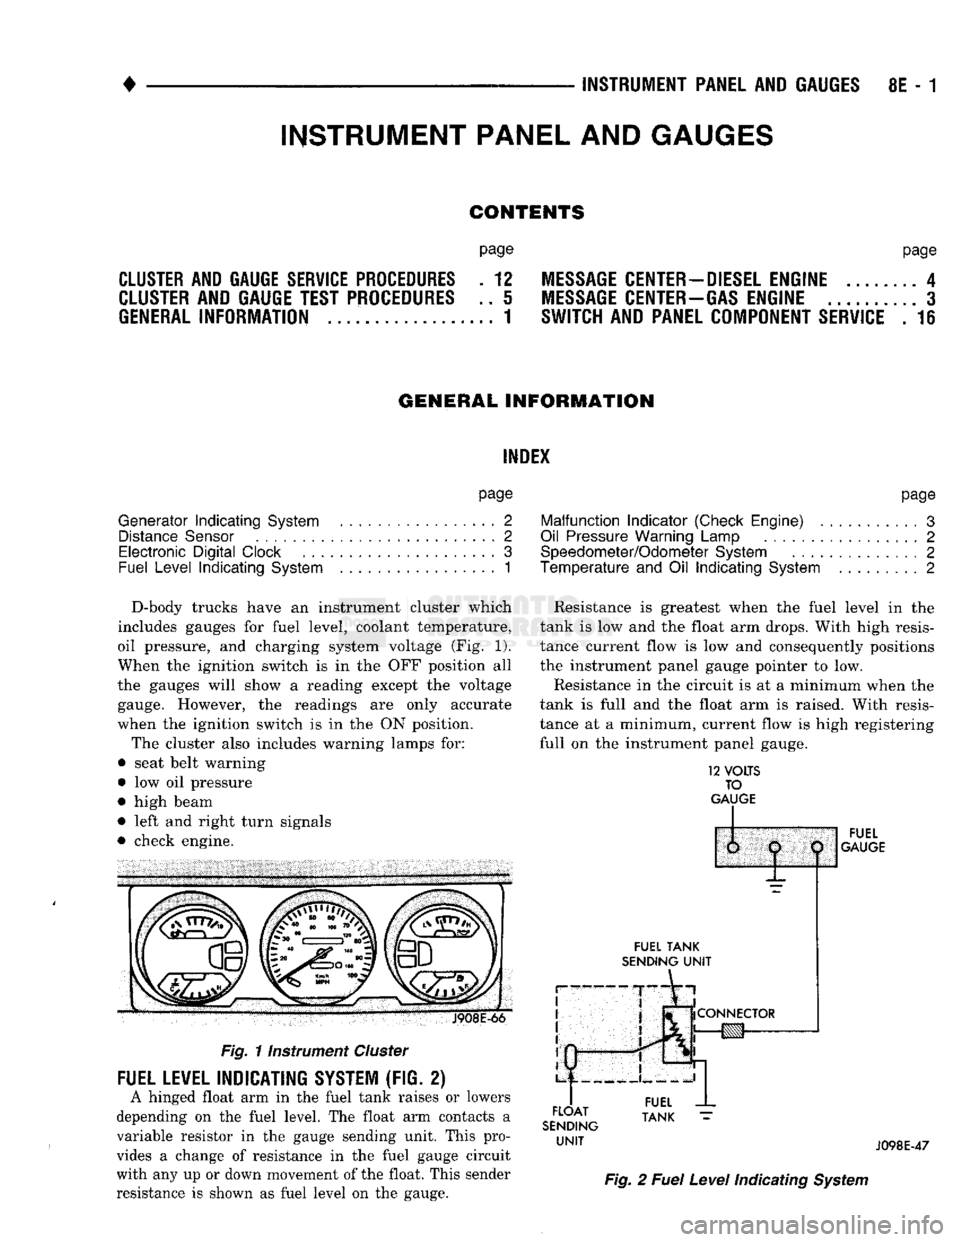
D-body trucks have an instrument cluster which
includes gauges for fuel level, coolant temperature,
oil pressure, and charging system voltage (Fig. 1).
When the ignition switch is in the OFF position all
the gauges will show a reading except the voltage gauge. However, the readings are only accurate
when the ignition switch is in the ON position.
The cluster also includes warning lamps for:
• seat belt warning
• low oil pressure
• high beam
• left and right turn signals
• check engine. J908E-66
Fig.
11nstrument
Cluster
FUEL LEVEL INDICATING SYSTEM (FIG. 2)
A hinged float arm in the fuel tank raises or lowers
depending on the fuel level. The float arm contacts a
variable resistor in the gauge sending unit. This pro
vides a change of resistance in the fuel gauge circuit
with any up or down movement of the float. This sender
resistance is shown as fuel level on the gauge. Resistance is greatest when the fuel level in the
tank is low and the float arm drops. With high resis
tance current flow is low and consequently positions
the instrument panel gauge pointer to low.
Resistance in the circuit is at a minimum when the
tank is full and the float arm is raised. With resis
tance at a minimum, current flow is high registering
full on the instrument panel gauge.
12
VOLTS
TO
GAUGE
IP
FUEL
TANK
SENDING
UNIT
FLOAT
SENDING
UNIT
1:
1
j
^
fCONNECTOR
!g|yj-»—
FUEL
GAUGE
FUEL
TANK
J098E-47
Fig.
2
Fuel
Level
Indicating
System
INSTRUMENT PANEL AND GAUGES
Page 384 of 1502
•
INSTRUMENT PANEL
AND
GAUGES
8E - 3
MALFUNCTION INDICATOR (CHECK ENGINE)
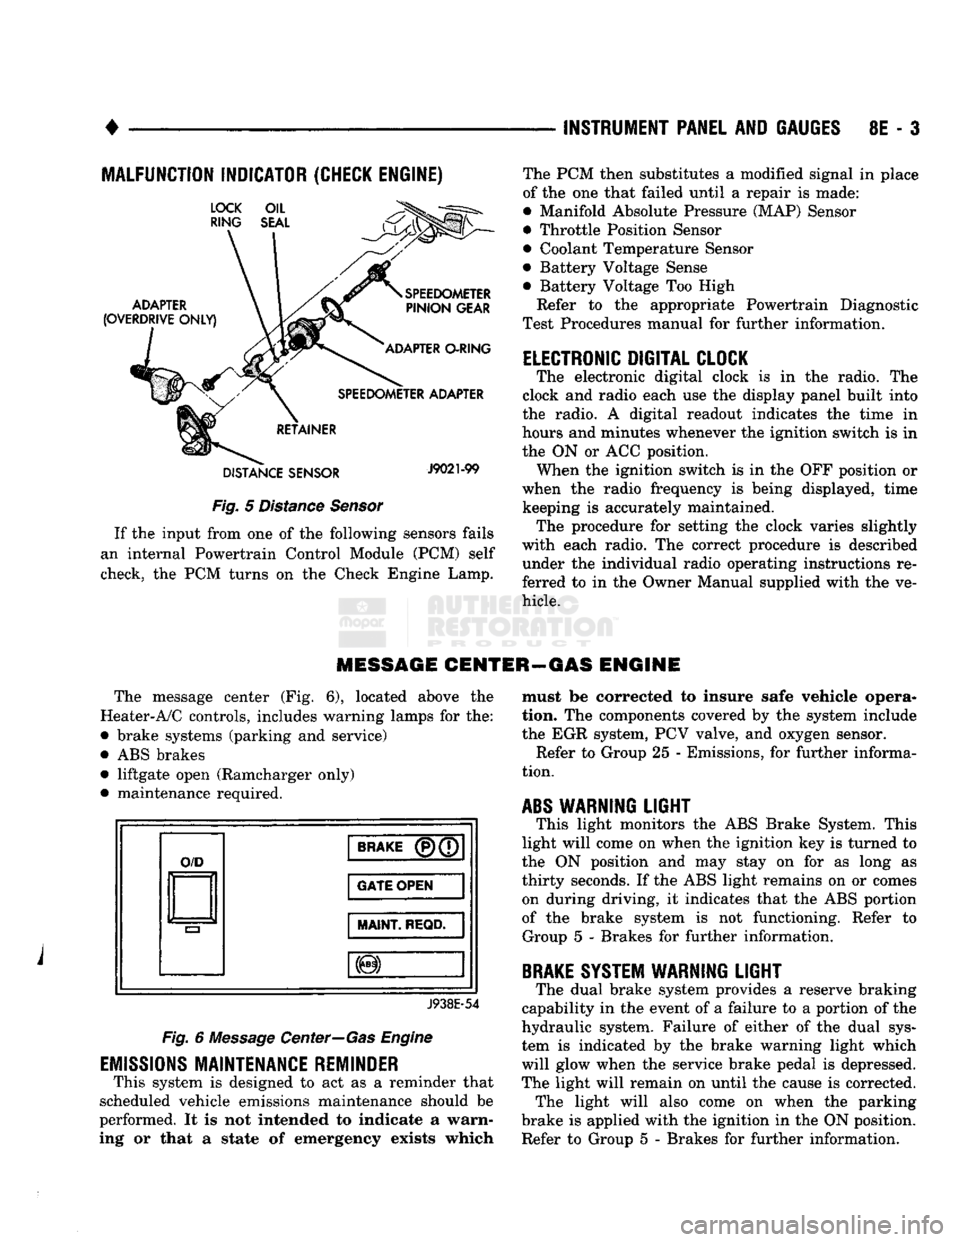
Fig.
5
Distance Sensor
If
the
input from
one of the
following sensors fails
an internal Powertrain Control Module
(PCM)
self
check,
the PCM
turns
on the
Check Engine Lamp. The
PCM
then substitutes
a
modified signal
in
place
of
the one
that failed until
a
repair
is
made:
• Manifold Absolute Pressure (MAP) Sensor
• Throttle Position Sensor
• Coolant Temperature Sensor
• Battery Voltage Sense
• Battery Voltage
Too
High
Refer
to the
appropriate Powertrain Diagnostic
Test Procedures manual
for
further information.
ELECTRONIC DIGITAL CLOCK
The electronic digital clock
is in the
radio.
The
clock
and
radio each
use the
display panel built into
the radio.
A
digital readout indicates
the
time
in
hours
and
minutes whenever
the
ignition switch
is in
the
ON or ACC
position. When
the
ignition switch
is in the OFF
position
or
when
the
radio frequency
is
being displayed, time keeping
is
accurately maintained. The procedure
for
setting
the
clock varies slightly
with each radio.
The
correct procedure
is
described under
the
individual radio operating instructions
re
ferred
to in the
Owner Manual supplied with
the ve
hicle.
MESSAGE CENTER—GAS ENGINE
The message center
(Fig. 6),
located above
the
Heater-A/C controls, includes warning lamps
for the:
• brake systems (parking
and
service)
•
ABS
brakes • liftgate open (Ramcharger only)
• maintenance required.
O/D
BRAKE
(P)(7
GATE OPEN
MAINT
REQD.
J938E-54
Fig.
6
Message Center—Gas Engine
EMISSIONS
MAINTENANCE REMINDER
This system
is
designed
to act as a
reminder that
scheduled vehicle emissions maintenance should
be
performed.
It is not
intended
to
indicate
a
warn
ing
or
that
a
state
of
emergency exists which must
be
corrected
to
insure safe vehicle opera
tion.
The
components covered
by the
system include
the
EGR
system,
PCV
valve,
and
oxygen sensor. Refer
to
Group
25 -
Emissions,
for
further informa
tion.
ABS
WARNING
LIGHT
This light monitors
the ABS
Brake System. This
light will come
on
when
the
ignition
key is
turned
to
the
ON
position
and may
stay
on for as
long
as
thirty seconds.
If the ABS
light remains
on or
comes on during driving,
it
indicates that
the ABS
portion
of
the
brake system
is not
functioning. Refer
to
Group
5 -
Brakes
for
further information.
BRAKE
SYSTEM WARNING
LIGHT
The dual brake system provides
a
reserve braking
capability
in the
event
of a
failure
to a
portion
of the
hydraulic system. Failure
of
either
of the
dual sys
tem
is
indicated
by the
brake warning light which
will glow when
the
service brake pedal
is
depressed.
The light will remain
on
until
the
cause
is
corrected. The light will also come
on
when
the
parking
brake
is
applied with
the
ignition
in the ON
position.
Refer
to
Group
5 -
Brakes
for
further information.
Page 385 of 1502
8E
- 4
INSTRUMENT PANEL
AND
GAUGES
•
MESSAGE CENTER—DIESEL
ENGINE
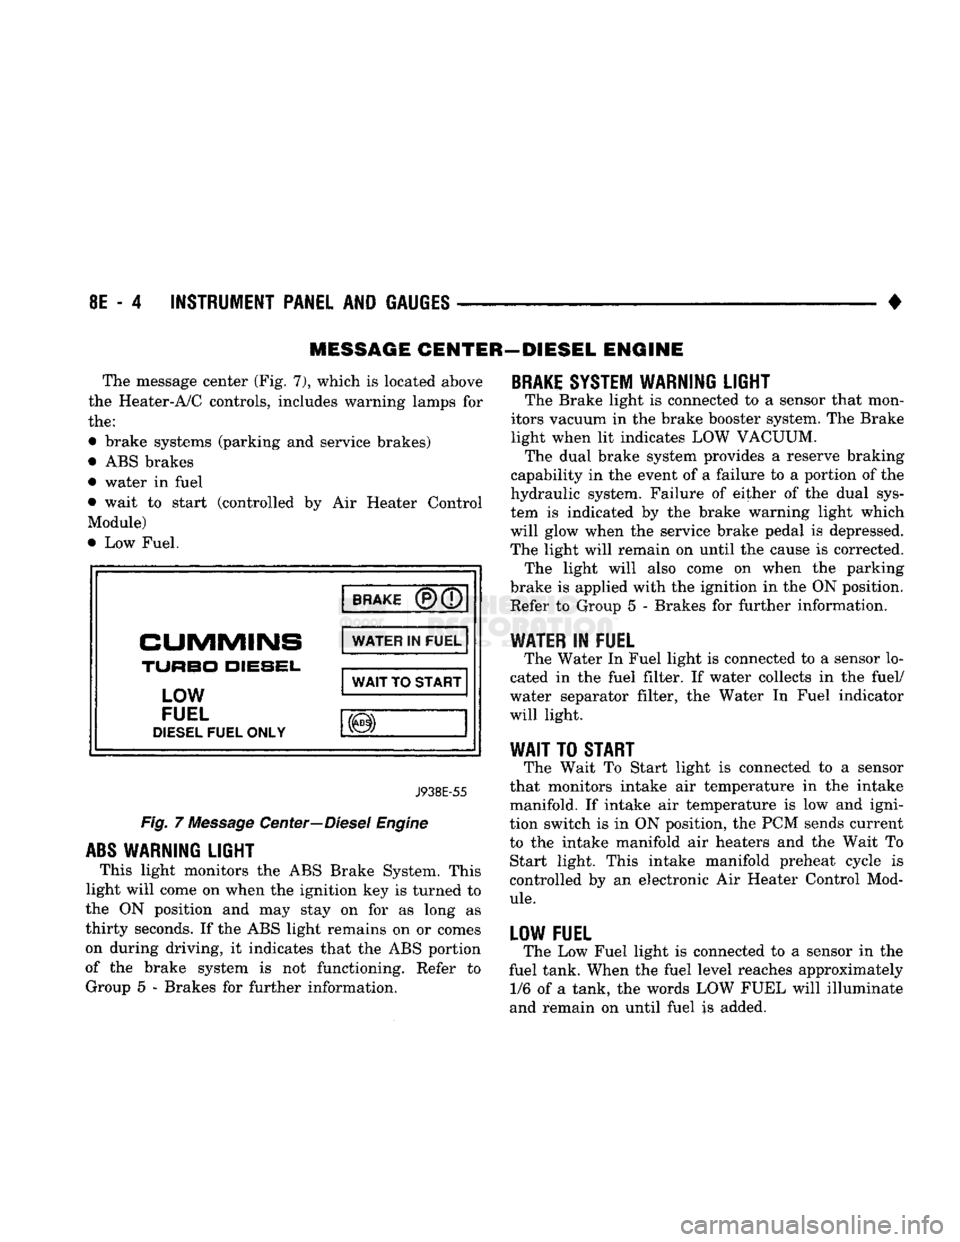
The message center (Fig. 7), which
is
located above
the Heater-A/C controls, includes warning lamps
for
the:
• brake systems (parking
and
service brakes)
• ABS brakes
• water
in
fuel
• wait
to
start (controlled
by Air
Heater Control
Module)
• Low Fuel.
BRAKE
CUMMINS
TURBO
DIESEL,
LOW
FUEL
DIESEL
FUEL ONLY WATER
IN
FUEL
WAIT
TO
START
J938E-55
Fig.
7
Message Center—Diesel Engine
ABS
WARNING LIGHT
This light monitors
the
ABS Brake System. This
light will come
on
when the ignition key
is
turned
to
the
ON
position
and may
stay
on for as
long
as
thirty seconds.
If
the ABS light remains
on or
comes
on during driving,
it
indicates that
the
ABS portion
of
the
brake system
is not
functioning. Refer
to
Group
5 -
Brakes
for
further information.
BRAKE
SYSTEM WARNING LIGHT
The Brake light
is
connected
to a
sensor that mon
itors vacuum
in
the brake booster system. The Brake
light when
lit
indicates LOW VACUUM. The dual brake system provides
a
reserve braking
capability
in
the event
of a
failure
to a
portion
of
the
hydraulic system. Failure
of
either
of the
dual sys
tem
is
indicated
by the
brake warning light which
will glow when
the
service brake pedal
is
depressed.
The light will remain
on
until
the
cause
is
corrected. The light will also come
on
when
the
parking
brake
is
applied with the ignition
in
the ON position. Refer
to
Group
5 -
Brakes
for
further information.
WATER
IN
FUEL
The Water
In
Fuel light
is
connected
to a
sensor lo
cated
in the
fuel filter.
If
water collects
in the
fuel/
water separator filter,
the
Water
In
Fuel indicator
will light.
WAIT
TO
START
The Wait
To
Start light
is
connected
to a
sensor
that monitors intake
air
temperature
in the
intake
manifold.
If
intake
air
temperature
is low and
igni
tion switch
is in
ON position,
the
PCM sends current
to
the
intake manifold
air
heaters
and the
Wait
To
Start light. This intake manifold preheat cycle
is
controlled
by an
electronic
Air
Heater Control Mod
ule.
LOW FUEL
The Low Fuel light
is
connected
to a
sensor
in the
fuel tank. When the fuel level reaches approximately 1/6
of a
tank,
the
words LOW FUEL will illuminate
and remain
on
until fuel
is
added.
Page 386 of 1502
•
INSTRUMENT PANEL
AND
GAUGES
8E - 5
CLUSTER
AND
GAUGE TEST
PROCEDURES
INDEX
page
Fuel Gauge
Circuit
Test
9
Fuel Tank Sending
Unit
Test
5
Oil Pressure Gauge
Circuit
Test
..............
9
Sending
Unit
(Sensor) Test
5
page
Speedometer
10
Temperature
Gauge
Circuit
Test
8
Voltage Gauge
Circuit
Test
10
Warning Lamp System Tests
6
CAUTION:
Disconnect
battery
negative cable,
in
en
gine compartment, before servicing instrument panel. When power
is
required
for
test purposes,
connect
battery
cable
(for
test only).
Disconnect battery negative cable after test
and before continuing service procedures.
SENDING
UNIT
(SENSOR) TEST
When
a
problem occurs with
a
cluster gauge,
be
fore disassembling
the
cluster
to
check
the
gauge, check
for a
defective sending unit (sensor)
or
wiring.
(1) Sending units
and
wiring
can be
checked
by
grounding
the
connector leads,
at the
sending unit,
in
the
vehicle.
CAUTION:
When connecting
an
input
terminal
to
ground,
Do Not
leave
the
connection grounded
for
more than
a
few
seconds.
(2) With
the
ignition
in the ON
position;
a
grounded input will cause
the oil,
fuel
or
tempera
ture gauge
to
read
at or
above maximum.
FUEL TANK SENDING
UNIT
TEST
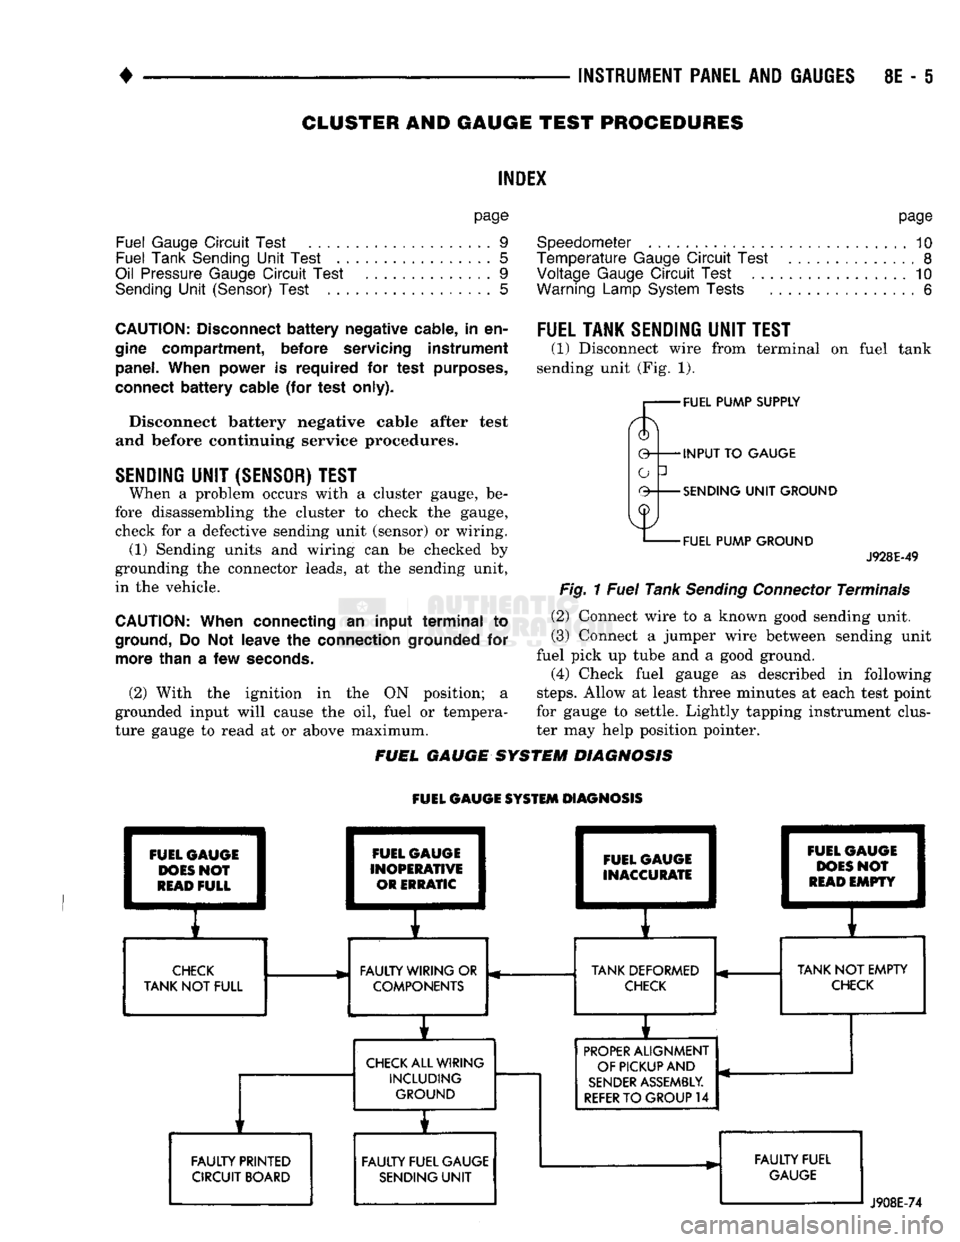
(1) Disconnect wire from terminal
on
fuel tank
sending unit (Fig.
1).
FUEL PUMP SUPPLY
INPUT
TO
GAUGE
SENDING
UNIT
GROUND
FUEL PUMP GROUND
J928E-49
Fig.
1
Fuel
Tank
Sending
Connector
Terminals
(2) Connect wire
to a
known good sending unit.
(3) Connect
a
jumper wire between sending unit
fuel pick
up
tube
and a
good ground.
(4) Check fuel gauge
as
described
in
following
steps.
Allow
at
least three minutes
at
each test point
for gauge
to
settle. Lightly tapping instrument clus
ter
may
help position pointer.
FUEL GAUGE SYSTEM DIAGNOSIS
FUEL GAUGE SYSTEM DIAGNOSIS FUEL GAUGE
DOES
NOT
READ
FULL FAULTY PRINTED
CIRCUIT BOARD FUEL GAUGE
INOPERATIVE OR ERRATIC FUEL GAUGE
INACCURATE
E
1
I
CHECK
FAULTY WIRING
OR
TANK DEFORMED
TANK
NOT
FULL COMPONENTS
CHECK
CHECK
ALL WIRING INCLUDING GROUND
i
FAULTY FUEL GAUGE SENDING
UNIT
i 1
FUEL
C
1
DOES
1
READ
1
pAUGE
I
>N0?
1
EMPTY
1
r
TANK
NOT
EMPTY
CHECK
PROPER
ALIGNMENT
OF PICKUP AND
SENDER
ASSEMBLY.
REFER
TO
GROUP
14
FAULTY FUEL
GAUGE
J908E-74